Difference between revisions of "ProDon:Transaction Logging (version 4)"
| Line 252: | Line 252: | ||
==== Different Types of Transactions:<br> ==== | ==== Different Types of Transactions:<br> ==== | ||
| − | *[[ProDon: | + | *[[ProDon:Transaction Logging#Standard_Transaction|Standard Transaction]]<br> |
| − | *[[ProDon: | + | *[[ProDon:Transaction Logging#Transaction_with_a_Sale_Price|Transaction with a Sale Price]]<br> |
| − | *[[ProDon: | + | *[[ProDon:Transaction Logging#Transaction_with_a_Third-party_Client|Transaction with a Third-party Client]]<br> |
| − | *[[ProDon: | + | *[[ProDon:Transaction Logging#Transaction_Paid_by_Cheque|Transaction Paid by Cheque]]<br> |
| − | *[[ProDon: | + | *[[ProDon:Transaction Logging#Transaction_Paid_by_Cheque|In-kind Payments]]<br> |
<br> | <br> | ||
| Line 262: | Line 262: | ||
===== Standard Transaction<br> ===== | ===== Standard Transaction<br> ===== | ||
| − | + | A standard is a transaction made for an activity for which no sale price has been defined in advance. | |
| − | + | This type of transaction is mainly used pour simple cash donations. | |
{| width="200" cellspacing="1" cellpadding="1" border="1" class="wikitable" | {| width="200" cellspacing="1" cellpadding="1" border="1" class="wikitable" | ||
Revision as of 17:45, 17 February 2015
Contents
Introduction
ProDon allows you to enter transactions of revenues associated with activities that have previously been defined in the "Donation Occasion Management".
Once the transactions are entered, you must transfer them, in order to be able to generate documents such as thank-you letters and receipts.
To learn how to transfer a transaction batch, see this document.
CAUTION: To enter transactions with instant payment methods (credit card or bank transfer), the Electronic Transactions Module must be active in ProDon.
For more details on this module or to learn how to enter transactions with Optimal, click here.
Transaction Management
The transaction logging is done in the "Transaction Management".
|
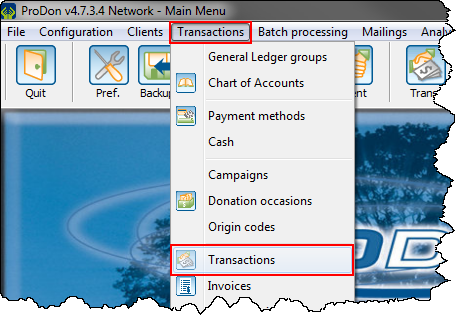
To go to the "Transaction Management", click on the "Transactions" menu, then select " | |
 |
|
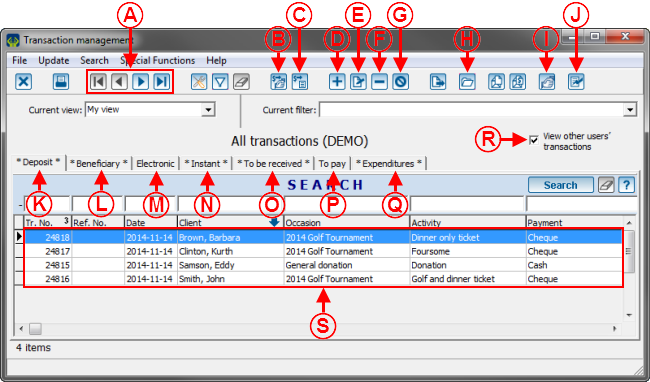
The Transaction Management allows you to enter and transfer the transactions in ProDon. To add a new transaction, click on the To learn how to transfer transactions, see this document. | |
 | |
|
A: Allows you to move from one transaction to the other in the grid at S. |
B: Allows you to generate transactions for the donation commitments. The Commitment Module must be active in ProDon for this button to become available. |
|
C: Allows you to import transactions from an Excel file. The transaction Importation Module must be active in ProDon for this button to become available. |
D: Allows you to add a new transaction. |
|
E: Allows you to modify the transaction selected at S. To modify a transaction, select the transaction to modify, then click on the |
F: Allows you to delete a transaction at S. To delete a transaction, select the transaction to delete, then click on the |
|
G : Allows you to cancel the transaction selected at S. To cancel a transaction, select the transaction to cancel, then click on the |
H: Allows you to open the folder of the transaction in order to insert documents (pdf, jpg, etc) related to the transaction. |
|
I: Allows you to open the file of the client of the transaction. |
J: Allows you to transfer transactions. For more information on transaction transfer, click here. |
|
K: The "Deposit" tab contains the transactions received in cheque or cash, as well as the transactions in goods and services (in-kind). |
L: The "Beneficiary" tab contains the issued transactions, either in bursaries, loans, etc. The Beneficiary Module must be active in ProDon for this tab to be visible. |
|
M: The "Electronic" tab contains the transactions paid by the IBAN payment method (France). The Electronic Transaction Module must be active in ProDon for this tab to be visible. |
N: The "Instant" tab contains the transactions processed by Optimal. The Electronic Transaction Module must be active in ProDon for this tab to be visible. |
|
O: The "To be received" tab contains the transactions awaiting for a payment, either in donation promises, in ticket sale promises, etc. |
P: The "To pay" tab contains the transactions awaiting to be paid, such as bursaries for which the file is being evaluated. The Beneficiary Module must be active in ProDon for this tab to be visible. |
|
Q: The "Expenditures" tab contains the expenditure transactions made for activities such as a catering service, venue rental, food purchasing, etc. For more information on expenditure transactions, click here. |
R: Allows you to see the transactions that all the users have entered. If this option is unchecked, only the transactions entered by the current user are displayed. |
Adding a Transaction
In the "Transaction Management", click on the ![]() button to add a new transaction.
button to add a new transaction.
Selecting a Client for the Addition of a Transaction
|
After clicking on the | |
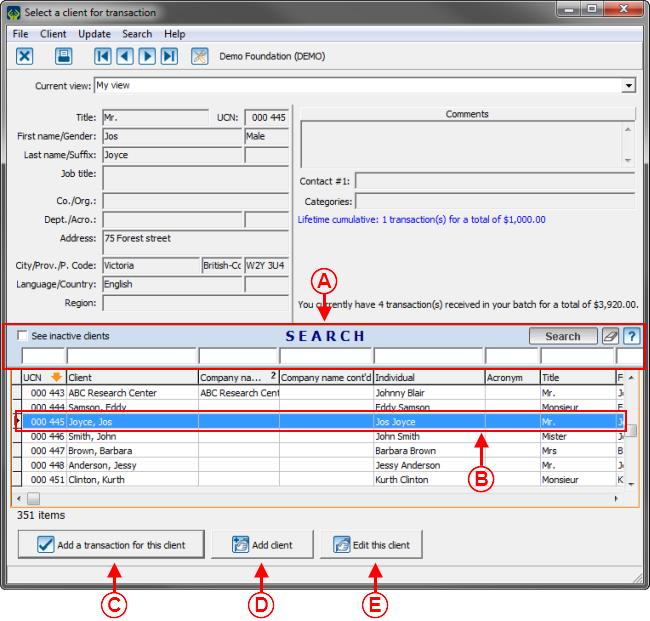 | |
|
First check, using the search bar at A, if the client already exists in ProDon. If he or she already exists, select him or her at B, then click on the " If he or she does not exist in the database, click on the " To view the file of the client selected at B, click on the " |
Transaction Logging
NOTE: If the client has commitments in progress or pending transactions, see this section.
|
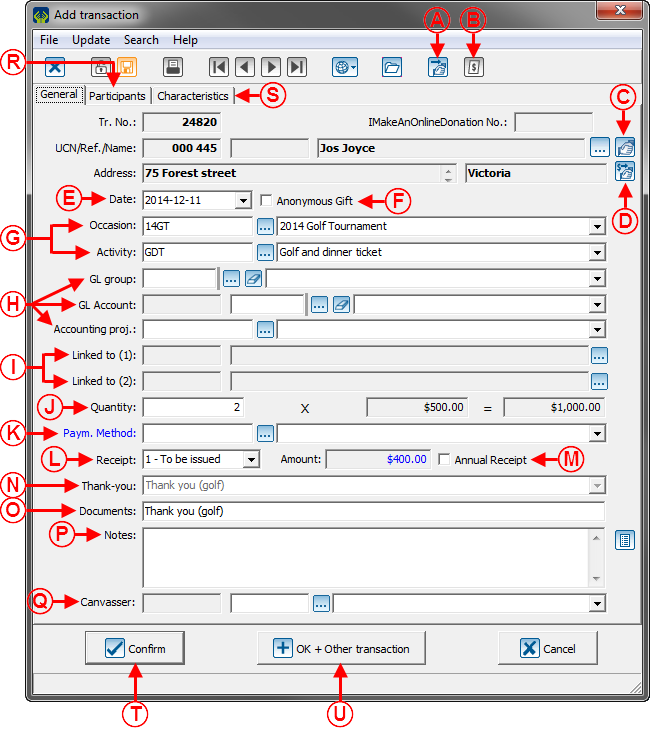
After adding a new client, clicking on the "Add a transaction for this client" button or selecting a pending transaction or a commitment, this window opens. | |
 | |
|
CAUTION: The fields of this window vary according to the type of transaction (standard or with a sale price), depending whether a third-party donor is assigned to the transaction and also depending on the payment method (cash, cheque, in goods and services donation, etc) used. Moreover, once the transaction is confirmed, depending on the payment method used, the transaction will be in different tabs of the transaction management. | |
|
A: Allows you to assign a third-party client to the transaction. |
B: Allows you to print the receipt of the transaction in progress. In order for this button to be available, the transaction must have previously been saved. |
|
C: Allows you to open the client file of the transaction. |
D: Allows you to assign the transaction to a commitment of the client (the Prospecting and Commitments module must be active for this button to be available). |
|
E: Allows you to indicate the date on which the transaction was made. Caution, this date determines teh taxation year of the tax receipt. |
F: Allows you to specify the transaction must remain anonymous. |
|
G: Allows you to select the donation occasion and the activity for which the transaction was made. |
H: Allows you to select the General Ledger group, the General Ledger account or the accounting project to assign to the transaction. |
|
I: Allows you to add a linked client to the transaction. To link clients of a transaction, you must first activate the linked clients in the donation occasion. |
J: This field allows you to indicate the quantity or the amount of the transaction (depending on the configuration of the activity selected at G). |
|
K: Allows you to select the payment method used by the donor. Based on the selected payment method (e.g. cheque, goods and services, etc), some fields may be added. |
L: In order for a receipt to be generated, select the "To be issued" option; otherwise, do not select any. If the status of the receipt is "To be calculated", it means the value of the benefit was not specified in the configuration of the activity selected at G. The amount of the receipt generated is indicated at the right of the "Receipt" field. |
|
M: In order for the receipt to be generated only at the end of the year, check the "Annual receipt" checkbox. |
N: Allows you to select the thank-you for a receipt with integrated thank-you. |
|
O: Allows you to select the documents to be issued in the transaction transfer. |
P: Allows you to add notes related to the transaction. |
|
Q: Allows you to select a canvasser for the transaction. |
R: This tab allows you to identify the participants for the transaction. |
|
S: Allows you to add the characteristics applicable to this transaction. |
T: By clicking on the " |
|
U: By clicking on the " |
NOTE: It is possible to activate default values in the transaction logging window, in order for the information to always be documented automatically when adding a new transaction. |
Different Types of Transactions:
- Standard Transaction
- Transaction with a Sale Price
- Transaction with a Third-party Client
- Transaction Paid by Cheque
- In-kind Payments
Standard Transaction
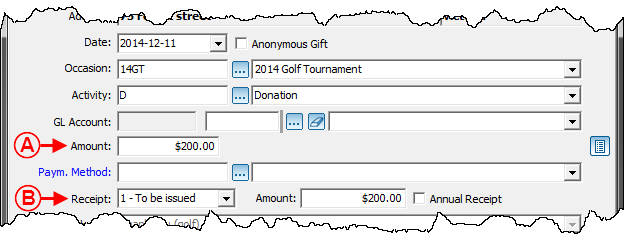
A standard is a transaction made for an activity for which no sale price has been defined in advance.
This type of transaction is mainly used pour simple cash donations.
 | |
|
A : Le montant de la transaction doit être inscrit ici. |
B : Le montant du reçu est le même que celui de la transaction. |
Transaction with a Sale Price
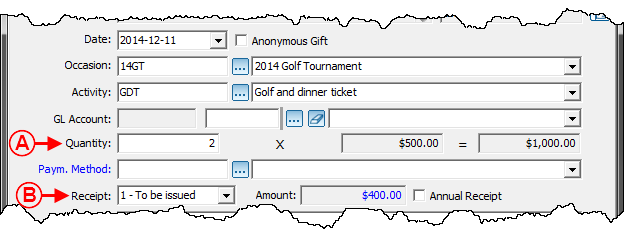
Une transaction avec un prix de vente est une transaction effectuée pour une activité pour laquelle un prix de vente avait été défini à l'avance.
Ce type de transaction est utilisé par exemple pour la vente de billets lors d'une activité bénéfice.
 | |
|
A : Au lieu d'inscrire un montant pour la transaction, il faut inscrire le nombre de billets vendus. Le montant de chaque billet est inscrit au milieu (500,00 $) et le montant total de la transaction est inscrit à droite (1000,00 $). Le montant du billet a été déterminé lors de la création de l'activité. |
B : Le montant du reçu est différent de celui de la transaction. Dans une transaction avec un prix de vente, la personne qui achète le billet bénéficie d'un avantage, par exemple, une partie de golf ou un souper, alors le montant du reçu est calculé automatiquement selon le montant de l'avantage inscrit lors de la création de l'activité. |
|
NOTE : Pour plus de détails concernant la gestion des occasions et des activités, cliquer ici. | |
Transaction with a Third-party Client
 | |
|
A : Ce client est le donateur. |
B : Ce client est le donateur tiers. |
|
NOTE : Pour savoir ce qu'est un client tiers, consulter la procédure « Différents clients d'une transaction ». | |
Transaction Paid by Cheque
 | |
|
A : Lorsque le mode de paiement « Chèque » est choisi, le champ « Réf. » s'insère. Ce champ permet d'inscrire le numéro du chèque. |
Une fois qu'une transaction payée par chèque est enregistrée, elle se retrouve dans l'onglet « Dépôt » de la « Gestion des transactions ».
Transaction in Goods and Services (In-kind)
Une fois qu'une transaction de don de biens est enregistrée, elle se retrouve dans l'onglet « Dépôt » de la « Gestion des transactions ».
If the Client has a Commitment in Progress or a Pending Payment
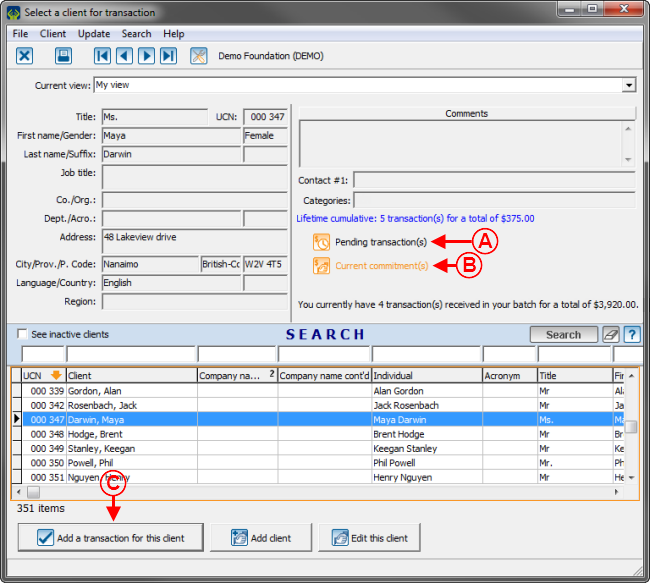
NOTE : Si le client n'a pas d'engagements en cours ou de transactions en attente, voir cette section.
 | |
|
A : Si le client sélectionné a une transaction en attente, le bouton « File:Bouton transaction en attente.png Transaction(s) en attente » sera disponible. En cliquant sur ce bouton, les transactions en attente du client s'afficheront. |
B : Si le client sélectionné a un engagement en cours, le bouton « NOTE : Le « Module engagement » doit être activé dans la base de données pour que les clients puissent avoir des engagements en cours. |
|
C : Pour affecter une transaction à un engagement en cours ou à une transaction en attente du client sélectionné, ou pour ajouter une transaction reliée à aucun engagement en cours ou à aucune transaction en attente du client sélectionné, cliquer sur le bouton « |
|
|
Après avoir cliqué sur le bouton « | |
 | |
|
A : Pour affecter la transaction à un engagement en cours, cliquer sur le bouton « Engagement(s) ». Après avoir cliqué sur ce bouton, cette fenêtre s'ouvre. |
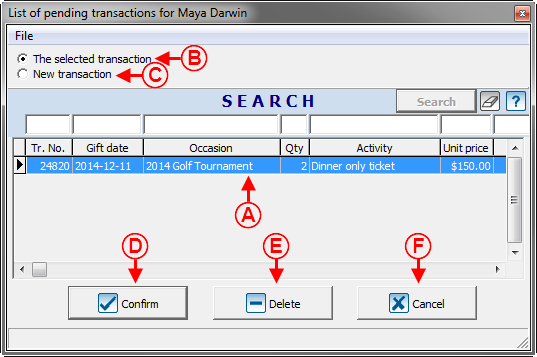
B : Pour affecter la transaction à une transaction en attente, cliquer sur le bouton « Transactions ». Après avoir cliqué sur ce bouton, cette fenêtre s'ouvre. |
|
C : Pour créer une nouvelle transaction sans l'affecter aux engagements en cours ni aux transactions en attente du client, cliquer sur le bouton « Nouvelle transaction ». Après avoir cliqué sur ce bouton, cette fenêtre s'ouvre. |
D : Pour retourner à l'écran de sélection du client, cliquer sur le bouton « Annuler ». |
|
NOTE : Si, par exemple, le client a seulement un ou des engagements en cours et pas de transaction en attente, le bouton « Transactions » ne sera pas visible. Si, au contraire, le client a seulement une ou des transactions en attente et pas d'engagement en cours, le bouton « Engagements » ne sera pas visible. | |
Commitment(s) in Progress
|
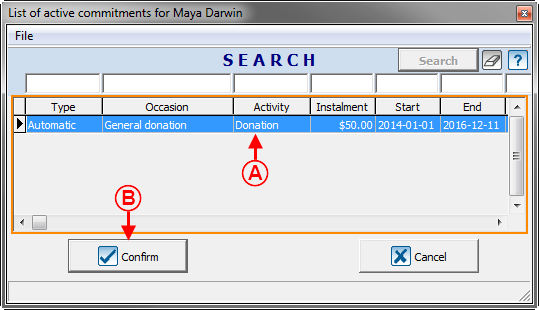
Après avoir cliqué sur le bouton « Engagement(s) », la fenêtre suivante s'ouvre. | |
 | |
|
A : Si le client a plusieurs engagements en cours, sélectionner l'engagement auquel la transaction doit être affectée. |
B : Après avoir sélectionné le bon engagement, cliquer sur le bouton « |
Pending Transaction(s)
Document name: ProDon:Transaction Logging (version 4)
