Difference between revisions of "ProDon:General Configuration of the Receipt"
(→"Receipt" Tab) |
(Tag: Visual edit) |
||
| (40 intermediate revisions by 4 users not shown) | |||
| Line 1: | Line 1: | ||
| − | {{ | + | {{Header_TOC}}<br> |
| − | + | '''<u>CAUTION</u>''': This document is for '''VERSION''' '''5''' of '''''Prodon'''''. To go to the version 4 document, [[ProDon:General_Configuration_of_the_Receipt_(Version_4)|click here]]. | |
| − | |||
| − | + | == Introduction == | |
| + | There are two types of receipts in '''''ProDon''''', the standard receipts and the '''''Word''''' receipts. | ||
| + | The standard receipt is available in many formats, but its customizability is limited. This receipt is constantly updated by '''''Logilys''''' and is complying with the CRA (Canada Revenue Agency) and the Canadian standards. Therefore, if the software version is updated regularly, the receipt is updated at the same time. | ||
| − | + | <br> | |
| + | The '''''Word''''' receipt is complying with the Canadian standards at the time of the delivery of the software. This receipt is a '''''Word''''' document customized by the trainer in accordance with the organization's requests. Since it is a '''''Word''''' document, the customizability options are infinite. However, this type of receipt is not updated by '''''Logilys''''', so it is important to update it in accordance with the Canadian standards. Also, take into consideration that this type of document is generally more complex than a standard '''''Word''''' document and that there is a need to have a certain mastery of '''''Word''''' to update it. Finally, since this receipt uses '''''Word''''', it is slower to produce than the standard receipt. | ||
| − | |||
| − | + | == General Configuration of the Receipt == | |
| − | + | Usually, only the "Supervisor" user has access to the "System preferences", other users have a read-only access to them. So, to be able to make the following modifications, enter '''''ProDon''''' with the user name "Supervisor". | |
| − | |||
| − | Usually, only the | ||
<br> | <br> | ||
| − | === Organization Management | + | === Organization Management === |
| − | Before performing the configuration of the receipt, | + | Before performing the configuration of the receipt, the organization has to be correctly configured.<br> |
{| cellspacing="1" cellpadding="1" border="1" style="width: 410px; height: 249px;" class="wikitable" | {| cellspacing="1" cellpadding="1" border="1" style="width: 410px; height: 249px;" class="wikitable" | ||
|- | |- | ||
| | | | ||
| − | To do so, from the software | + | To do so, from the software homepage, click on the "Configuration" menu, then select "Organizations". |
|- | |- | ||
| − | | style="text-align: center;" | [[ | + | | style="text-align: center;" | [[File:ProDon5_General_Configuration_of_the_Receipt_001.png]]<br> |
|} | |} | ||
<br> | <br> | ||
| − | {| cellspacing="1" cellpadding="1" border="1" | + | {| cellspacing="1" cellpadding="1" border="1" class="wikitable" style="width: 557px; height: 347px;" |
|- | |- | ||
| colspan="2" | | | colspan="2" | | ||
| − | After clicking on "Organizations", the Organization management" window opens. | + | After clicking on "Organizations", the "Organization management" window opens. |
|- | |- | ||
| − | | style="text-align: center;" colspan="2" | [[ | + | | style="text-align: center;" colspan="2" | [[File:ProDon5_General_Configuration_of_the_Receipt_002.png]] |
|- | |- | ||
| width="50%" | | | width="50%" | | ||
| − | '''<span style="color: rgb(255, 0, 0);">A: </span>'''If there are | + | '''<span style="color: rgb(255, 0, 0);">A: </span>'''If there are many organizations, select the one for which the receipt must be configured. |
| width="50%" | | | width="50%" | | ||
| Line 56: | Line 55: | ||
<br> | <br> | ||
| − | {| cellspacing="1" cellpadding="1" border="1" | + | {| cellspacing="1" cellpadding="1" border="1" class="wikitable" style="width: 632px; height: 661px;" |
|- | |- | ||
| colspan="2" | | | colspan="2" | | ||
| Line 62: | Line 61: | ||
|- | |- | ||
| − | | colspan="2" | [[ | + | | colspan="2" | [[File:ProDon5_General_Configuration_of_the_Receipt_003.png]] |
|- | |- | ||
| width="50%" | | | width="50%" | | ||
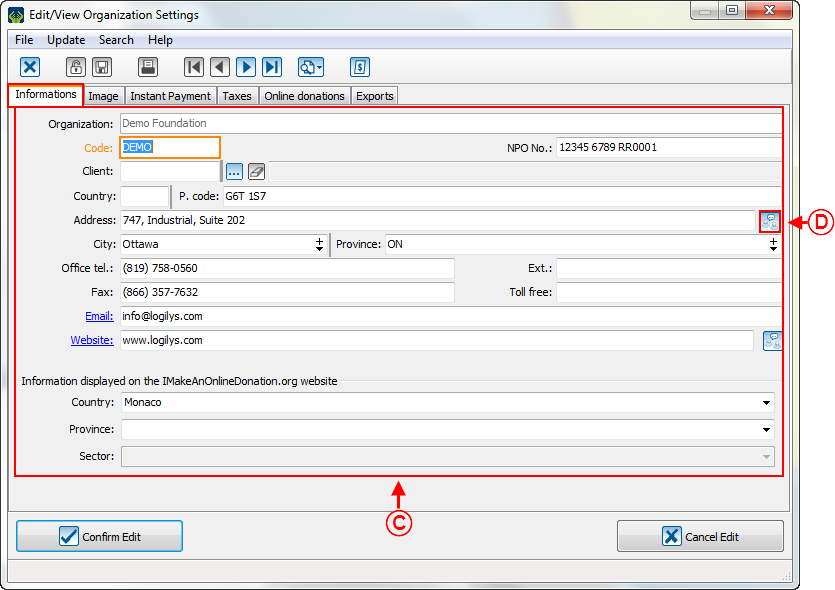
| − | '''<span style="color: rgb(255, 0, 0);">C: </span>'''If not already done so, it is possible to enter | + | '''<span style="color: rgb(255, 0, 0);">C: </span>'''If not already done so, it is possible here to enter the information related to the organization. Some information will appear on the receipt. |
| width="50%" | | | width="50%" | | ||
| − | '''<span style="color: rgb(255, 0, 0);">D: </span>'''The [[Image:Button translate.png]] button, which is at the end of the line of the "Address" field allows | + | '''<span style="color: rgb(255, 0, 0);">D: </span>'''The [[Image:Button translate.png]] button, which is at the end of the line of the "Address" field allows the translation of the address main line in all the active languages of '''''ProDon'''''. |
|} | |} | ||
| Line 80: | Line 79: | ||
|- | |- | ||
| − | | style="text-align: center;" | [[ | + | | style="text-align: center;" | [[File:ProDon5_General_Configuration_of_the_Receipt_006.png]] |
|- | |- | ||
| | | | ||
| − | Enter the | + | Enter the correct address in the corresponding languages. |
| + | |||
| + | |} | ||
| + | |||
| + | <br> | ||
| + | <br> | ||
| + | === Receipt configuration === | ||
| + | |||
| + | To configure the receipt, select the "Configuration" tab and "Configure Receipts". <br> | ||
| + | {| class="wikitable" | ||
| + | ![[File:ProDon5_General_Configuration_of_the_Receipt_004.png]] | ||
|} | |} | ||
| + | <br> | ||
| − | + | {| class="wikitable" width="200" cellspacing="1" cellpadding="1" border="1" | |
| + | |- | ||
| + | | colspan="2" | | ||
| + | After clicking on "Configure Receipts", the "Configure Receipts" window opens. | ||
| − | <br> | + | |- |
| + | | colspan="2" | [[File:ProDon5_General_Configuration_of_the_Receipt_005.png]]<br> | ||
| − | |||
| − | + | |- | |
| + | | width="50%" | | ||
| + | <span style="color: rgb(255, 0, 0);">'''A:'''</span> If there are many organizations, select the one that must be configured. | ||
| + | | width="50%" | | ||
| + | <span style="color: rgb(255, 0, 0);">'''B:'''</span> Click on the button [[Image:Button Edit.png]]. | ||
| + | |} | ||
| − | ==== " | + | ==== "Miscellaneous" tab ==== |
| − | The " | + | The "Miscellaneous" tab allows the general configuration of the receipt to be configured. <br> |
| − | {| width=" | + | {| width="200" cellspacing="1" cellpadding="1" border="1" class="wikitable" |
| + | | colspan="2" |After clicking the button [[Image:Button Edit.png]], the "Edit/View receipt configuration" window opens. | ||
|- | |- | ||
| − | | colspan="2" | [[ | + | | colspan="2" | [[File:ProDon5_General_Configuration_of_the_Receipt_007.png]]<br> |
|- | |- | ||
| width="50%" | | | width="50%" | | ||
| − | + | <span style="color: rgb(255, 0, 0);">'''A:'''</span> Allows the receipt to be generate when transferring transactions. | |
| width="50%" | | | width="50%" | | ||
| − | + | <span style="color: rgb(255, 0, 0);">'''B: '''</span> Allows the display of the current cumulative of receipts to be issued by clients. The displayed result will depend of the applied filter. | |
|- | |- | ||
| − | + | | | |
| − | + | <span style="color: rgb(255, 0, 0);">'''C:'''</span> Determines if the selling price is high enough to issue a receipt. For example, the buying price must exceed 80% of the selling price to issue a receipt (an article bought at $100 must be sold for at least $125). | |
| + | |||
| − | + | | | |
| − | + | <span style="color: rgb(255, 0, 0);">'''D: '''</span> Enables split receipts for contacts who are different. <br> | |
|- | |- | ||
| − | + | | | |
| − | + | <span style="color: rgb(255, 0, 0);">'''E:'''</span> Enables the receipt to show the contact. | |
| − | + | | | |
| − | + | <span style="color: rgb(255, 0, 0);">'''F:'''</span> Determines the receipt type of receipt that will be used. For more information about the receipt types, [[ProDon:Processing_Receipts_to_be_Issued#Receipt_Types|click here]]. | |
|- | |- | ||
| − | | | + | | |
| − | '''<span style="color: rgb(255, 0, 0);"> | + | <span style="color: rgb(255, 0, 0);">'''G:'''</span> Allows a choice of standard type or ''''Word'''' type receipt. |
| + | | | ||
| + | <span style="color: rgb(255, 0, 0);">'''H:'''</span> Gives a choice of the paper format and of how many receipt copies will be generated. | ||
| + | |- | ||
| + | |<span style="color: rgb(255, 0, 0);">'''I:'''</span> The [[Image:Button Edit.png]] button allows the edit of the "Type" and "Document" fields of the selected type of receipt. | ||
| − | | | + | |<span style="color: rgb(255, 0, 0);">'''J:'''</span> Allows the edit the nomenclature that is over the receipt. The only ones included with the software are French and English. If a translation another languages is needed, it will have to be entered manually. |
| − | |||
|} | |} | ||
| Line 136: | Line 159: | ||
<br> | <br> | ||
| − | For the configuration of the standard receipt, click here. | + | For the configuration of the standard receipt, [[ProDon:Configuration of a Standard Type Receipt|click here]]. |
| − | For the configuration of the '''''Word''''' receipt, click here. | + | For the configuration of the '''''Word''''' receipt, [[ProDon:Configuration of a Word Type Receipt|click here]]. |
| − | + | <br> | |
| − | |||
| − | |||
| − | |||
| − | <br> | ||
| − | {{ | + | {{Footer_ProDon_Version|5.0.3}}<br> |
Latest revision as of 13:00, 17 May 2019
| General Configuration of the Receipt |
CAUTION: This document is for VERSION 5 of Prodon. To go to the version 4 document, click here.
Introduction
There are two types of receipts in ProDon, the standard receipts and the Word receipts.
The standard receipt is available in many formats, but its customizability is limited. This receipt is constantly updated by Logilys and is complying with the CRA (Canada Revenue Agency) and the Canadian standards. Therefore, if the software version is updated regularly, the receipt is updated at the same time.
The Word receipt is complying with the Canadian standards at the time of the delivery of the software. This receipt is a Word document customized by the trainer in accordance with the organization's requests. Since it is a Word document, the customizability options are infinite. However, this type of receipt is not updated by Logilys, so it is important to update it in accordance with the Canadian standards. Also, take into consideration that this type of document is generally more complex than a standard Word document and that there is a need to have a certain mastery of Word to update it. Finally, since this receipt uses Word, it is slower to produce than the standard receipt.
General Configuration of the Receipt
Usually, only the "Supervisor" user has access to the "System preferences", other users have a read-only access to them. So, to be able to make the following modifications, enter ProDon with the user name "Supervisor".
Organization Management
Before performing the configuration of the receipt, the organization has to be correctly configured.
|
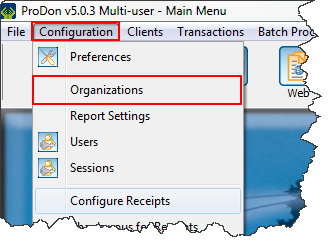
To do so, from the software homepage, click on the "Configuration" menu, then select "Organizations". |
 |
|
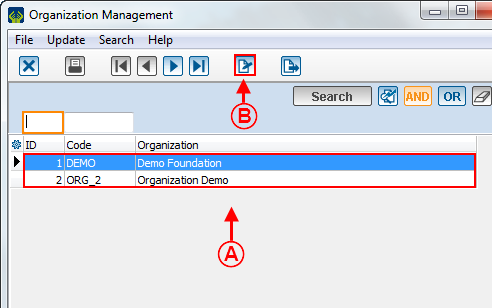
After clicking on "Organizations", the "Organization management" window opens. | |
| |
|
A: If there are many organizations, select the one for which the receipt must be configured. |
|
|
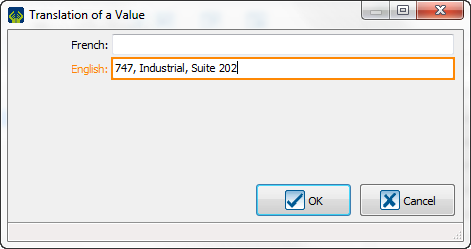
After clicking on the |
|
|
Enter the correct address in the corresponding languages. |
Receipt configuration
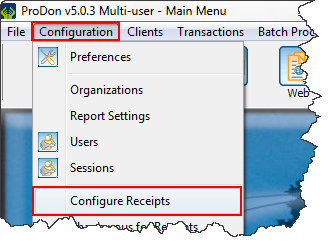
To configure the receipt, select the "Configuration" tab and "Configure Receipts".
|
|---|
|
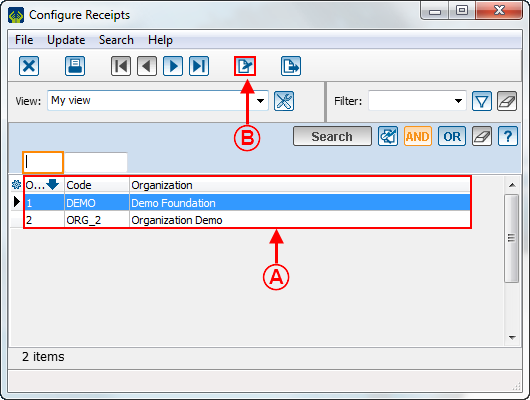
After clicking on "Configure Receipts", the "Configure Receipts" window opens. | |
| |
|
A: If there are many organizations, select the one that must be configured. |
|
"Miscellaneous" tab
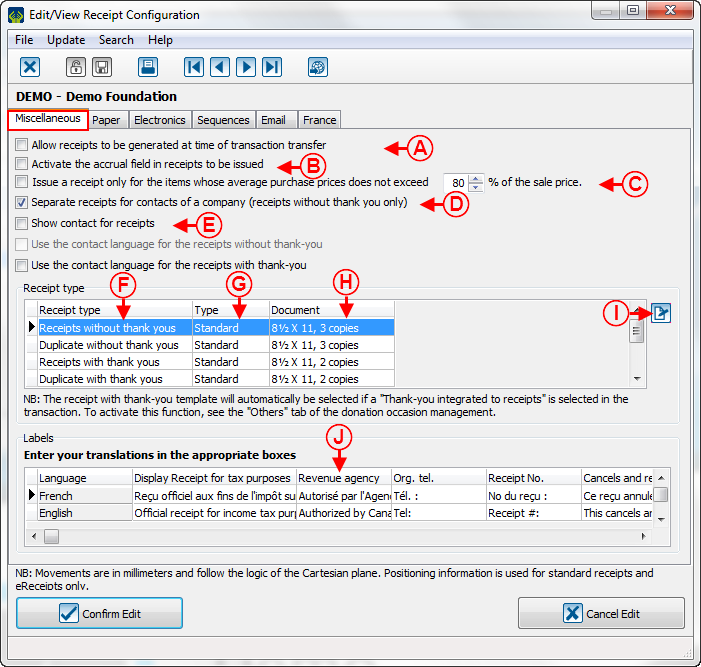
The "Miscellaneous" tab allows the general configuration of the receipt to be configured.
| After clicking the button | |
 | |
|
A: Allows the receipt to be generate when transferring transactions. |
B: Allows the display of the current cumulative of receipts to be issued by clients. The displayed result will depend of the applied filter. |
|
C: Determines if the selling price is high enough to issue a receipt. For example, the buying price must exceed 80% of the selling price to issue a receipt (an article bought at $100 must be sold for at least $125).
|
D: Enables split receipts for contacts who are different. |
|
E: Enables the receipt to show the contact. |
F: Determines the receipt type of receipt that will be used. For more information about the receipt types, click here. |
|
G: Allows a choice of standard type or 'Word' type receipt. |
H: Gives a choice of the paper format and of how many receipt copies will be generated. |
| I: The |
J: Allows the edit the nomenclature that is over the receipt. The only ones included with the software are French and English. If a translation another languages is needed, it will have to be entered manually. |
For the configuration of the standard receipt, click here.
For the configuration of the Word receipt, click here.
Document name: ProDon:General Configuration of the Receipt
Version : 5.0.3
