Difference between revisions of "ProDon:Configuration of a Thank-you Letter Integrated to a Receipt"
Jguillemette (talk | contribs) (→Configuration of the Thank-you Letter Integrated to the Receipt) |
(→Creating the Thank-you Letter) (Tag: Visual edit) |
||
| (17 intermediate revisions by 2 users not shown) | |||
| Line 1: | Line 1: | ||
{{Header_TOC}}<br> | {{Header_TOC}}<br> | ||
| − | '''<u>CAUTION</u>''' : This document is for '''VERSION''' '''5''' of | + | '''<u>CAUTION</u>''' : This document is for '''VERSION''' '''5''' of '''''Prodon'''''. To go to the version 4 document, [[ProDon:Configuration_of_a_Thank-you_Letter_Integrated_to_a_Receipt_(Version_4)|click here]]. |
| − | |||
| − | |||
== Introduction == | == Introduction == | ||
| − | + | A receipt with an integrated thank-you letter is usually generated in two copies. The thank-you letter is placed at the top of the page and followed by both copies of the receipt. | |
| − | |||
| − | |||
| − | |||
| − | |||
| − | |||
| − | |||
| − | |||
| − | |||
| − | |||
| − | |||
| − | |||
| − | |||
| − | |||
| − | |||
| − | |||
| − | |||
| − | + | The main advantage of the receipt with an integrated thank-you is that it saves paper since a single page is sent to the donor (rather than a receipt and a letter on two separate sheets of paper). | |
| − | + | In a [[ProDon:Configuration of a Standard Type Receipt|" Standard Type Receipt "]], the space intended for the thank-you letter will always remain the same from one thank-you letter to the other. If the thank-you letter is shorter than the space available, the remaining space will remain blank. Therefore, the receipts are always at the same place on the sheet. | |
| − | |||
| − | |||
| − | |||
| − | + | In a [[ProDon:Configuration of a Word Type Receipt|" '''''Word''''' Type Receipt "]], the integrated thank-you letter is inserted like a merge field predefined in the master document. There is no specific space allotted for the letter in the master document. If the letter is too short, the user will need to manually insert spaces with the " Enter " of the keyboard in the writing of the letter to make sure that the receipts are always in the same place on the sheet.<br> | |
| − | |||
| − | |||
| − | |||
| − | |||
| − | |||
| − | |||
| − | |||
| − | |||
| − | |||
| − | |||
| − | |||
| − | |||
| − | |||
| − | |||
| − | |||
| − | |||
| − | |||
| − | |||
| − | |||
| − | |||
| − | |||
| − | |||
| − | |||
| − | |||
| − | |||
| − | |||
| − | |||
| − | |||
| − | |||
| − | |||
| − | |||
| − | |||
| − | |||
| − | |||
| − | |||
| − | |||
| − | |||
| − | |||
| − | |||
| − | |||
| − | |||
| − | |||
| − | |||
| − | |||
| − | |||
| − | |||
| − | |||
| − | |||
| − | |||
| − | |||
| − | |||
| − | |||
| − | |||
| − | |||
| − | |||
| − | |||
| − | |||
| − | |||
| − | |||
| − | |||
| − | |||
| − | |||
| − | |||
| − | |||
| − | |||
| − | |||
| − | |||
| − | |||
| − | |||
| − | |||
| − | |||
| − | |||
| − | |||
| − | |||
| − | |||
| − | |||
| − | |||
| − | |||
| − | |||
| − | |||
| − | |||
| − | |||
| − | |||
| − | |||
| − | |||
| − | |||
| − | |||
| − | |||
| − | |||
| − | |||
| − | |||
| − | |||
| − | |||
| − | |||
| − | |||
| − | |||
| − | |||
| − | |||
| − | |||
| − | |||
| − | |||
| − | |||
| − | |||
| − | |||
| − | |||
| − | |||
| − | |||
| − | |||
| − | |||
| − | |||
| − | |||
| − | |||
| − | |||
| − | |||
| − | |||
| − | |||
| − | |||
| − | |||
| − | |||
| − | |||
| − | |||
| − | |||
| − | |||
| − | |||
| − | |||
| − | |||
| − | |||
| − | |||
| − | |||
| − | |||
| − | |||
== Configuration of the Receipt == | == Configuration of the Receipt == | ||
| − | Before proceeding with the configuration of the thank-you letter, perform the [[ProDon:General Configuration of the Receipt| | + | Before proceeding with the configuration of the thank-you letter, perform the [[ProDon:General Configuration of the Receipt|" General Configuration of the Receipt]], as the case may be, the [[ProDon:Configuration of a Standard Type Receipt|" Configuration of the Standard Type Receipt "]] or the [[ProDon:Configuration of a Word Type Receipt|" Configuration of the '''''Word''''' Type Receipt "]]. |
== Configuration of the Thank-you Letter Integrated to the Receipt == | == Configuration of the Thank-you Letter Integrated to the Receipt == | ||
| Line 177: | Line 25: | ||
|- | |- | ||
| | | | ||
| − | To modify or create a thank-you letter, from the software home page, click on the "Configuration" menu, then select "Receipts | + | To modify or create a thank-you letter, from the software home page, click on the " Configuration " menu, then select " Thank-you for Receipts ". |
|- | |- | ||
| − | | [[File: | + | | [[File:Prodon5 Configuration of a Thank-you Letter Integrated to a Receipt 001.png|563x563px]] |
|} | |} | ||
| Line 188: | Line 36: | ||
|- | |- | ||
| colspan="2" | | | colspan="2" | | ||
| − | After clicking on "Receipts | + | After clicking on " Thank-you for Receipts ", the " Thank-you Management for Receipts " window opens up. |
|- | |- | ||
| − | | colspan="2" | [[File: | + | | colspan="2" | [[File:Prodon5 Configuration of a Thank-you Letter Integrated to a Receipt 002.png]] |
|- | |- | ||
| width="50%" | | | width="50%" | | ||
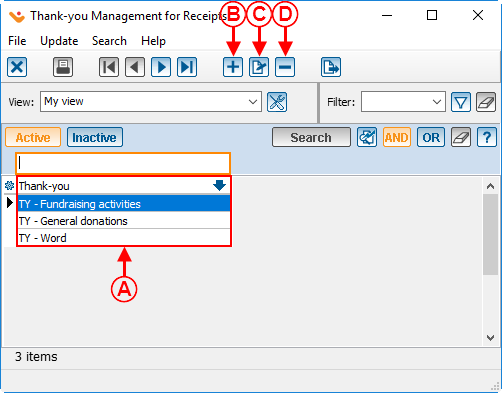
| − | '''<span style="color: rgb(255, 0, 0);">A: </span>''' | + | '''<span style="color: rgb(255, 0, 0);">A: </span>'''List of existing "Thank-you for Receipts" |
| width="50%" | | | width="50%" | | ||
'''<span style="color: rgb(255, 0, 0);">B: </span>'''To create a new integrated thank-you, click on the [[Image:Button add plus.png]] button. | '''<span style="color: rgb(255, 0, 0);">B: </span>'''To create a new integrated thank-you, click on the [[Image:Button add plus.png]] button. | ||
| − | + | |- | |
| + | |'''<span style="color: rgb(255, 0, 0);">C: </span>'''To modify an intergrated thank-you, click on the [[File:Button Edit.png]] button. | ||
| + | |'''<span style="color: rgb(255, 0, 0);">D: </span>'''To delete an intergrated thank-you, click on the [[File:Button Minus remove delete.png]] button. | ||
|} | |} | ||
| Line 206: | Line 56: | ||
|- | |- | ||
| colspan="2" | | | colspan="2" | | ||
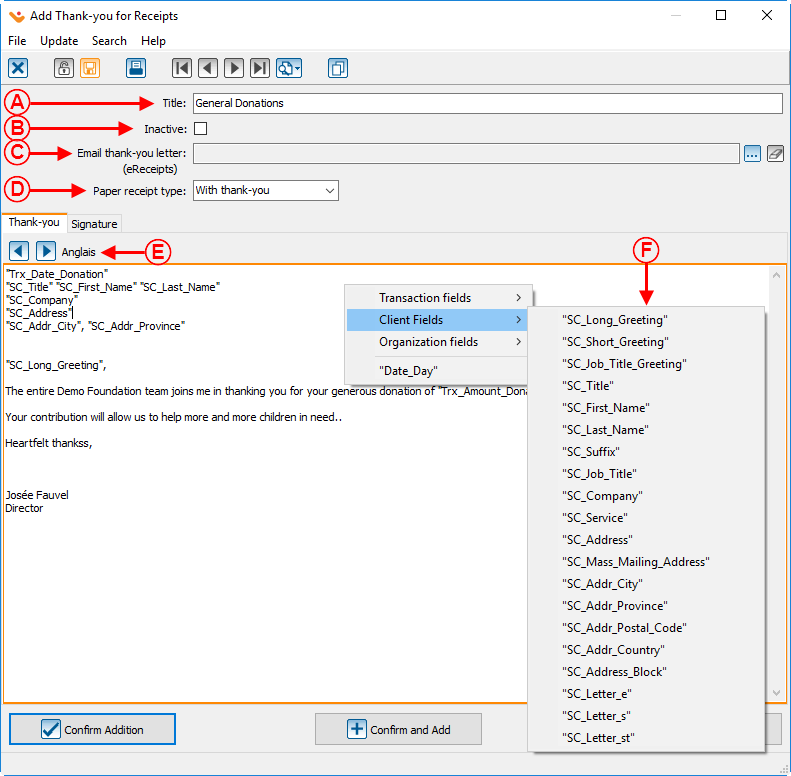
| − | After clicking on the [[Image:Button add plus.png]] button, the "Add | + | After clicking on the [[Image:Button add plus.png]] button, the " Add Thank-you for Receipts " window opens up. |
|- | |- | ||
| − | | colspan="2" | [[ | + | | colspan="2" | [[File:Prodon5 Configuration of a Thank-you Letter Integrated to a Receipt 003.png]] |
|- | |- | ||
| width="50%" | | | width="50%" | | ||
| − | + | <span style="color: rgb(255, 0, 0);">'''A:'''</span> Name of the thank-you for the receipt. | |
| width="50%" | | | width="50%" | | ||
| − | '''<span style="color: rgb(255, 0, 0);"> | + | <span style="color: rgb(255, 0, 0);">'''B:'''</span> Allows you to deactivate the thank-you. |
| + | |- | ||
| + | | | ||
| + | <span style="color: rgb(255, 0, 0);">'''C:'''</span> To add a thank-you letter linked to eReceipts, the [[ProDon:Table of Contents#eReceipt Module|" eReceipts Module "]] must be activated. | ||
| + | | | ||
| + | <span style="color: rgb(255, 0, 0);">'''D:'''</span> Allows the receipt type to be selected. | ||
|- | |- | ||
| − | | | + | |<span style="color: rgb(255, 0, 0);">'''E:'''</span> The [[Image:Button left arrow.png]] and [[Image:Button right arrow.png]] buttons allow the user to browse between languages to write the appropriate letters. |
| − | + | |<span style="color: rgb(255, 0, 0);">'''F:'''</span> While writing the Thank-you letter you can add merge fields to personalize the letter. To do so, right click anywhere in the blank area of the window and choose the merge fields you want to insert. The merge fields are inserted where the mouse cursor is. | |
| − | |||
| − | |||
| − | ''' | ||
| − | |||
|} | |} | ||
| Line 231: | Line 82: | ||
|- | |- | ||
| colspan="2" | | | colspan="2" | | ||
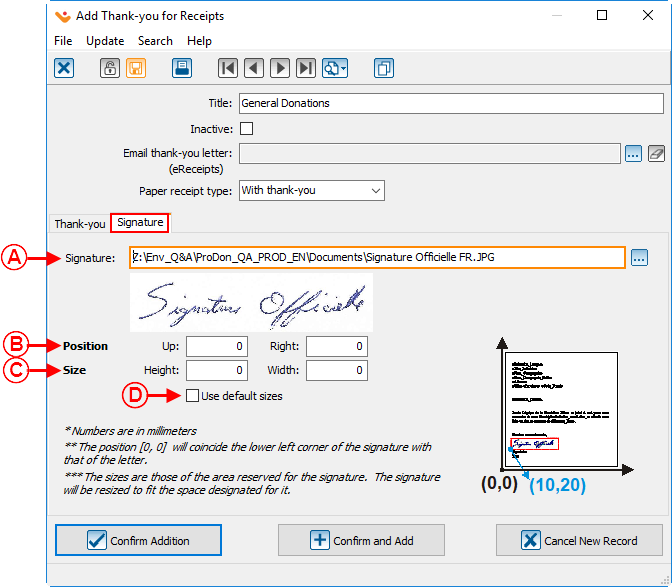
| − | After filling out the "Thank-you" tab, go to the "Signature" tab. | + | After filling out the " Thank-you " tab, go to the " Signature " tab. |
|- | |- | ||
| − | | colspan="2" | [[ | + | | colspan="2" | [[File:Prodon5 Configuration of a Thank-you Letter Integrated to a Receipt 004.png]] |
|- | |- | ||
| colspan="2" | | | colspan="2" | | ||
| − | '''NOTE: '''If the receipt with integrated thank-you is of '''''Word''''' type, the signature does not integrate | + | '''NOTE: '''If the receipt with an integrated thank-you is of '''''Word''''' type, the signature does not integrate itself into the thank-you letter. You will need to manually add into in the master document. |
|- | |- | ||
| width="50%" | | | width="50%" | | ||
| − | + | <span style="color: rgb(255, 0, 0);">'''A:'''</span> Allows you to insert a signature on the thank-you letter (may be different from the one on the receipts). | |
| width="50%" | | | width="50%" | | ||
| − | + | <span style="color: rgb(255, 0, 0);">'''B:'''</span> Allows the user to specify the positioning of the signature on the thank-you letter. | |
|- | |- | ||
| − | + | | | |
| − | + | <span style="color: rgb(255, 0, 0);">'''C:'''</span> Allows the user to specify the size of the signature. | |
| − | |||
| − | |||
| − | ''' | ||
| + | | | ||
| + | <span style="color: rgb(255, 0, 0);">'''D:'''</span> Allows the size on the thank-you letter's signature and the one on the receipts to be identical. This option is useful if the same signature is used for the letters and the receipts. | ||
|} | |} | ||
=== Choice of Thank-you Letter to Integrate to the Receipt === | === Choice of Thank-you Letter to Integrate to the Receipt === | ||
| − | To integrate a thank-you letter to a receipt, in a donation occasion, | + | To integrate a thank-you letter to a receipt, in a donation occasion, the user will need to indicate which thank-you letter to use. |
| − | {| | + | {| class="wikitable" |
| − | + | | colspan="2" |To activate an integrated thank-you letter in a donation occasion, from the software home page, click on the | |
| − | | colspan="2" | | + | " Transactions" menu, then select "[[Image:Bouton Occasion de dons.png]] Donation occasion". The "Donation occasion management" window opens. Then |
| − | To activate an integrated thank-you letter in a donation occasion, from the software home page, click on the "Transactions" menu, then select "[[Image:Bouton Occasion de dons.png]] Donation occasion". The "Donation occasion management" window opens. Then double-click on the donation occasion for which there must be a thank-you letter integrated to the receipt, then the "Edit donation | + | |
| + | double-click on the donation occasion for which there must be a thank-you letter integrated to the receipt, then the "Edit donation | ||
| + | occasion" window opens. | ||
|- | |- | ||
| − | | colspan="2" | [[ | + | | colspan="2" |[[File:Prodon5 Configuration of a Thank-you Letter Integrated to a Receipt 005.png|786x786px]] |
|- | |- | ||
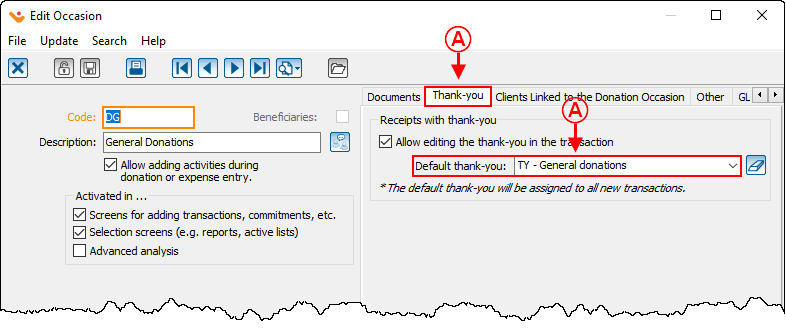
| − | | | + | |'''<span style="color: rgb(255, 0, 0);">A: </span>'''Select the "Thank-you" tab on the right. |
| − | '''<span style="color: rgb(255, 0, 0);">A: </span>'''Select the " | + | |'''<span style="color: rgb(255, 0, 0);">B: </span>'''Select the thank-you that will be used by default to |
| − | + | activate the thank-you integrated to the letter. | |
| − | | | + | |} |
| − | '''<span style="color: rgb(255, 0, 0);">B: </span>'''Select the thank-you that will be used by default to activate the thank-you integrated to the letter. | ||
| − | |||
| − | |} | ||
| − | It is possible to specify a single default thank-you per donation occasion, so | + | It is possible to specify a single default thank-you letter per donation occasion, to do so the user will need to choose the type of thank-you that will be the most frequently used. However, it can be necessary to use more than one type of thank-you in the same donation occasion. In this case, the thank-you to be used can be selected during the transaction entry. It is thereby possible to select manually a different thank-you letter in the same donation occasion. <br> |
=== Integrating the Thank-you Letter to the Receipt === | === Integrating the Thank-you Letter to the Receipt === | ||
| Line 281: | Line 130: | ||
==== Standard Type Receipt ==== | ==== Standard Type Receipt ==== | ||
| − | For a standard type receipt with thank-you | + | For a standard type receipt with an intergrated thank-you, '''''Prodon''''' automatically performs the integration of the thank-you on the receipt. |
==== '''''Word''''' Type Receipt ==== | ==== '''''Word''''' Type Receipt ==== | ||
| − | '''NOTE: '''This type of receipt is generally more complex than a standard '''''Word''''' document, | + | '''NOTE: '''This type of receipt is generally more complex than a standard '''''Word''''' document, the user will need a certain understanding of Word to be able to configure it properly. |
| − | To create a | + | To create a WOrd type receipt with an intergrated thank-you, you will need to create a receipt type master document. In this master document, simply add the merge fields named " Thank-you ". By adding these merge fields to the master document, the thank-you letter chosen in the donation occasion will automatically integrate in the master document (for more details, see [[ProDon:Configuration of a Thank-you Letter Integrated to a Receipt#Choice_of_Thank-you_Letter_to_Integrate_to_the_Receipt|" Choice of Thank-you Letter to Integrate to the Receipt "]]). |
| − | For more details concerning | + | For more details concerning merge fields and master documents, consult the [[ProDon:Master Document Management|" Master document management "]] document. |
<br> | <br> | ||
| Line 295: | Line 144: | ||
<br> | <br> | ||
| − | {{Footer_ProDon_Version| | + | {{Footer_ProDon_Version|5.0.5}}<br> |
Latest revision as of 13:55, 15 October 2018
| Configuration of a Thank-you Letter Integrated to a Receipt |
CAUTION : This document is for VERSION 5 of Prodon. To go to the version 4 document, click here.
Introduction
A receipt with an integrated thank-you letter is usually generated in two copies. The thank-you letter is placed at the top of the page and followed by both copies of the receipt.
The main advantage of the receipt with an integrated thank-you is that it saves paper since a single page is sent to the donor (rather than a receipt and a letter on two separate sheets of paper).
In a " Standard Type Receipt ", the space intended for the thank-you letter will always remain the same from one thank-you letter to the other. If the thank-you letter is shorter than the space available, the remaining space will remain blank. Therefore, the receipts are always at the same place on the sheet.
In a " Word Type Receipt ", the integrated thank-you letter is inserted like a merge field predefined in the master document. There is no specific space allotted for the letter in the master document. If the letter is too short, the user will need to manually insert spaces with the " Enter " of the keyboard in the writing of the letter to make sure that the receipts are always in the same place on the sheet.
Configuration of the Receipt
Before proceeding with the configuration of the thank-you letter, perform the " General Configuration of the Receipt, as the case may be, the " Configuration of the Standard Type Receipt " or the " Configuration of the Word Type Receipt ".
Configuration of the Thank-you Letter Integrated to the Receipt
Creating the Thank-you Letter
|
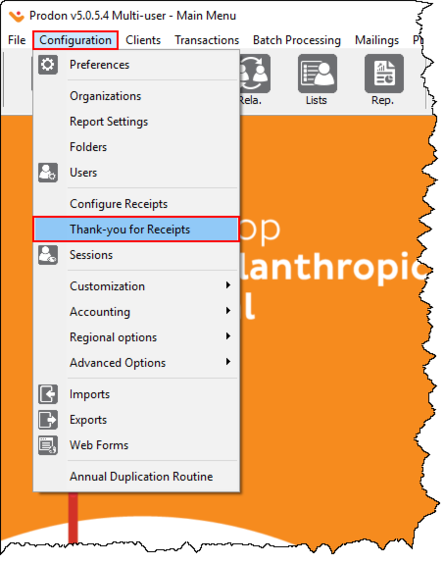
To modify or create a thank-you letter, from the software home page, click on the " Configuration " menu, then select " Thank-you for Receipts ". |
|
|
After clicking on the | |
| |
|
A: Name of the thank-you for the receipt. |
B: Allows you to deactivate the thank-you. |
|
C: To add a thank-you letter linked to eReceipts, the " eReceipts Module " must be activated. |
D: Allows the receipt type to be selected. |
| E: The |
F: While writing the Thank-you letter you can add merge fields to personalize the letter. To do so, right click anywhere in the blank area of the window and choose the merge fields you want to insert. The merge fields are inserted where the mouse cursor is. |
Choice of Thank-you Letter to Integrate to the Receipt
To integrate a thank-you letter to a receipt, in a donation occasion, the user will need to indicate which thank-you letter to use.
It is possible to specify a single default thank-you letter per donation occasion, to do so the user will need to choose the type of thank-you that will be the most frequently used. However, it can be necessary to use more than one type of thank-you in the same donation occasion. In this case, the thank-you to be used can be selected during the transaction entry. It is thereby possible to select manually a different thank-you letter in the same donation occasion.
Integrating the Thank-you Letter to the Receipt
Standard Type Receipt
For a standard type receipt with an intergrated thank-you, Prodon automatically performs the integration of the thank-you on the receipt.
Word Type Receipt
NOTE: This type of receipt is generally more complex than a standard Word document, the user will need a certain understanding of Word to be able to configure it properly.
To create a WOrd type receipt with an intergrated thank-you, you will need to create a receipt type master document. In this master document, simply add the merge fields named " Thank-you ". By adding these merge fields to the master document, the thank-you letter chosen in the donation occasion will automatically integrate in the master document (for more details, see " Choice of Thank-you Letter to Integrate to the Receipt ").
For more details concerning merge fields and master documents, consult the " Master document management " document.
Document name: ProDon:Configuration of a Thank-you Letter Integrated to a Receipt
Version : 5.0.5
