Difference between revisions of "ProDon:General Configuration of the Receipt"
Jguillemette (talk | contribs) |
Jguillemette (talk | contribs) |
||
| Line 16: | Line 16: | ||
<br><br> | <br><br> | ||
| + | == Introduction<br> == | ||
| + | |||
| + | There are two types of receipts in '''''ProDon''''', the standard receipts and the '''''Word''''' receipts. | ||
| + | |||
| + | The standard receipt is available in many formats, but its customizability is limited. This receipt is constantly updated by '''''Logilys''''' and it is complying with the CRA (Canada Revenue Agency) and with the Canadian standards. Therefore, if the software version is updated regularly, the receipt is updated as well. | ||
| + | |||
| + | <br> | ||
| + | |||
| + | The '''''Word''''' receipt is complying with the Canadian standards at the time of the delivery of the software. This receipt is a '''''Word''''' document customized with the trainer in accordance with requests. Since it is a '''''Word''''' document, the customizability options are infinite. On the other hand, this type of receipt is not updated by '''''Logilys''''', so it is important to update it in accordance with the Canadian standards. You also have to take into consideration that this type of document is generally more complex than a standard '''''Word''''' document and that you need to have a certain mastery of '''''Word''''' to update it. Finally, since this receipt uses '''''Word''''', it is slower to produce than the standard receipt. | ||
| + | |||
| + | |||
== Configuration générale du reçu == | == Configuration générale du reçu == | ||
| Line 82: | Line 93: | ||
|} | |} | ||
| + | |||
| + | == General Configuration of the Receipt<br> == | ||
| + | |||
| + | Usually, only the user "Supervisor" has access to the "System preferences", the other users have a read-only access to them. So, to be able to make the following modifications, enter '''''ProDon''''' with the user name "Supervisor". | ||
<br> | <br> | ||
| − | === | + | === Organization Management<br> === |
| + | |||
| + | Before performing the configuration of the receipt, you have to correctly configure the organization.<br> | ||
| + | |||
| + | {| cellspacing="1" cellpadding="1" border="1" style="width: 410px; height: 249px;" class="wikitable" | ||
| + | |- | ||
| + | | | ||
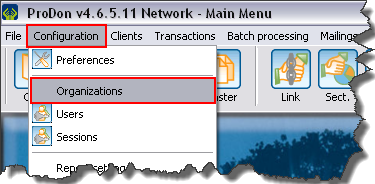
| + | To do so, from the software home page, click on the "Configuration" menu, then select "Organizations". | ||
| − | + | |- | |
| − | + | | style="text-align: center;" | [[Image:General Configuration of the Receipt 001.png]]<br> | |
| − | |||
|} | |} | ||
| + | |||
<br> | <br> | ||
| − | {| | + | {| cellspacing="1" cellpadding="1" border="1" class="wikitable" style="width: 557px; height: 347px;" |
|- | |- | ||
| colspan="2" | | | colspan="2" | | ||
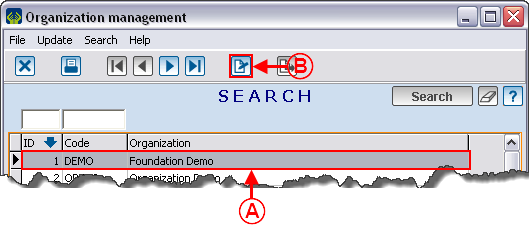
| − | + | After clicking on "Organizations", the "Organization management" window opens. | |
|- | |- | ||
| − | | colspan="2" | [[ | + | | style="text-align: center;" colspan="2" | [[Image:General Configuration of the Receipt 002.png]] |
| − | |||
| − | |||
|- | |- | ||
| width="50%" | | | width="50%" | | ||
| − | <span style="color: rgb(255, 0, 0);"> | + | '''<span style="color: rgb(255, 0, 0);">A: </span>'''If there are more than one organization, select the one for which the receipt must be configured. |
| width="50%" | | | width="50%" | | ||
| − | <span style="color: rgb(255, 0, 0);"> | + | '''<span style="color: rgb(255, 0, 0);">B: </span>'''Click on the [[Image:Button Edit.png]] button. |
|} | |} | ||
| + | <br> | ||
| + | {| cellspacing="1" cellpadding="1" border="1" class="wikitable" style="width: 632px; height: 661px;" | ||
| + | |- | ||
| + | | colspan="2" | | ||
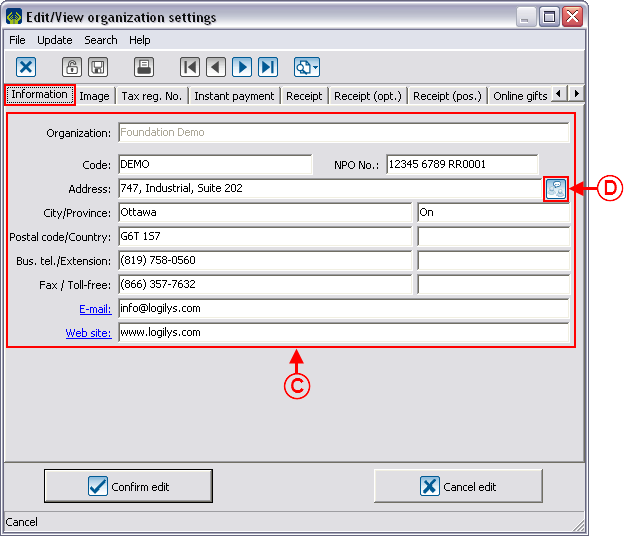
| + | After clicking on the [[Image:Button Edit.png]] button, the "Edit/View organization settings" window opens. | ||
| − | |||
| − | |||
| − | |||
| − | |||
| − | |||
| − | |||
|- | |- | ||
| − | | colspan="2" | [[ | + | | colspan="2" | [[Image:General Configuration of the Receipt 003.png]] |
|- | |- | ||
| width="50%" | | | width="50%" | | ||
| − | <span style="color: rgb(255, 0, 0);"> | + | '''<span style="color: rgb(255, 0, 0);">C: </span>'''If not already done so, it is possible to enter here the information related to the foundation. Some of the information will appear on the receipt. |
| width="50%" | | | width="50%" | | ||
| − | <span style="color: rgb(255, 0, 0);">''' | + | '''<span style="color: rgb(255, 0, 0);">D: </span>'''The [[Image:Button translate.png]] button, which is at the end of the line of the "Address" field allows you to translate the address main line for all the active languages in '''''ProDon'''''. |
| − | | | + | |} |
| − | |||
| − | |||
| − | + | <br> | |
| − | |||
| + | {| cellspacing="1" cellpadding="1" border="1" style="width: 510px; height: 227px;" class="wikitable" | ||
|- | |- | ||
| | | | ||
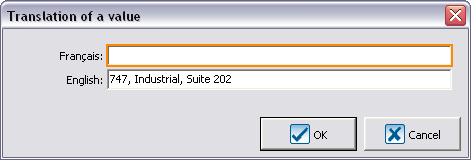
| − | + | After clicking on the [[Image:Button translate.png]] button, the "Translation of a value" window opens. | |
| − | |||
| − | |||
| − | |||
| + | |- | ||
| + | | style="text-align: center;" | [[Image:General Configuration of the Receipt 004.png]] | ||
|- | |- | ||
| | | | ||
| − | + | Enter the right address in the corresponding languages. | |
| − | |||
| − | |||
| − | |||
| − | |||
| − | |||
|} | |} | ||
| − | |||
| − | |||
| − | |||
| − | |||
| − | |||
| − | |||
| − | |||
| − | |||
| − | |||
| − | |||
| − | |||
| − | |||
| − | |||
| − | |||
| − | |||
<br> | <br> | ||
| − | |||
| − | |||
<br> | <br> | ||
| − | |||
| − | |||
| − | |||
<br> | <br> | ||
| − | == | + | === Configuration du reçu === |
| − | |||
| − | |||
| + | Pour faire la configuration du reçu, il faut sélectionner le menu «Configuration» et «Configuration des reçus».<br> | ||
| + | {| class="wikitable" | ||
| + | ![[Fichier:ProDon5 Configuration générale d'un reçu 005.png|thumb|389x389px]] | ||
| + | |} | ||
<br> | <br> | ||
| − | + | {| class="wikitable" width="200" cellspacing="1" cellpadding="1" border="1" | |
| − | |||
| − | |||
| − | |||
| − | {| | ||
|- | |- | ||
| − | | | + | | colspan="2" | |
| − | + | Après avoir cliqué sur « Configuration des reçus », la fenêtre « Configuration des reçus » s'ouvre. | |
|- | |- | ||
| − | | | + | | colspan="2" | [[Fichier:ProDon5 Configuration générale d'un reçu 006.png|574x574px]]<br> |
| − | |||
| − | |||
| − | |||
| − | |||
| − | |||
| − | |||
| − | |||
| − | |||
| − | |||
|- | |- | ||
| width="50%" | | | width="50%" | | ||
| − | + | <span style="color: rgb(255, 0, 0);">'''A :'''</span> S'il y a plus d'un organisme, sélectionner celui pour lequel le reçu doit être configuré. | |
| width="50%" | | | width="50%" | | ||
| − | + | <span style="color: rgb(255, 0, 0);">'''B :'''</span> Cliquer sur le bouton [[Image:Bouton Modifier.png]]. | |
|} | |} | ||
| − | |||
| − | |||
| − | |||
| − | |||
| − | |||
| + | ==== Onglet « Divers » ==== | ||
| + | |||
| + | L'onglet « Divers » permet d'effectuer la configuration générale du reçu.<br> | ||
| + | |||
| + | {| width="200" cellspacing="1" cellpadding="1" border="1" class="wikitable" | ||
| + | | colspan="2" |Après avoir cliquer sur le bouton [[Image:Bouton Modifier.png]], la fenêtre « Modification/Consultation de la configuration des reçus » s'ouvre. | ||
|- | |- | ||
| − | | colspan="2" | [[ | + | | colspan="2" | [[Fichier:ProDon5 Configuration générale d'un reçu 007.png]]<br> |
|- | |- | ||
| width="50%" | | | width="50%" | | ||
| − | + | <span style="color: rgb(255, 0, 0);">'''A :'''</span> Permet de produire les reçus au moment du report des transactions. | |
| width="50%" | | | width="50%" | | ||
| − | + | <span style="color: rgb(255, 0, 0);">'''B : '''</span>Permet de cumuler le total des reçus à émettre. | |
| − | | | + | |- |
| + | | | ||
| + | <span style="color: rgb(255, 0, 0);">'''C :'''</span> Permet de déterminer si le prix de vente est assez élevé pour émettre un reçu. Dans cet exemple, le prix d'achat doit excéder 80% du prix de vente pour pouvoir émettre un reçu (un article acheté à 100$, doit être vendu à au moins 125$). | ||
| − | <br> | + | | |
| + | <span style="color: rgb(255, 0, 0);">'''D : '''</span>Permet de séparer les reçus pour les contacts qui sont différents.☃☃<br> | ||
| − | |||
|- | |- | ||
| | | | ||
| − | + | <span style="color: rgb(255, 0, 0);">'''E :'''</span> Permet de voir le contact sur le reçu. | |
| + | |||
| + | | | ||
| + | <span style="color: rgb(255, 0, 0);">'''F :'''</span> Permet de déterminer le type de reçu qui sera utilisé. Pour plus d'informations concernant les types de reçus, [[ProDon:Traitement des reçus à émettre#Types_de_re.C3.A7us|cliquer ici]]. | ||
| − | |||
| − | |||
|- | |- | ||
| | | | ||
| − | + | <span style="color: rgb(255, 0, 0);">'''G :'''</span> Permet de déterminer s'il s'agit d'un reçu de type standard ou '''''Word'''''. | |
| + | | | ||
| + | <span style="color: rgb(255, 0, 0);">'''H :'''</span> Permet de déterminer le format de papier et le nombre de copies du reçu qui seront générés. | ||
| + | |- | ||
| + | |<span style="color: rgb(255, 0, 0);">'''I :'''</span> Le bouton [[Image:Bouton Modifier.png|link=http://wikifr.logilys.com/index.php/Fichier:Bouton_Modifier.png]] permet de modifier les champs « Type » et « Document » du type de reçu sélectionné. | ||
| + | |<span style="color: rgb(255, 0, 0);">'''J :'''</span> Permet de modifier les nomenclatures qui sont réparties sur l’ensemble du reçu. Seules les mentions française et anglaise sont fournies avec le logiciel, si des traductions vers d'autres langues sont nécessaires, il faudra les effectuer. | ||
|} | |} | ||
| − | |||
| − | |||
| − | |||
=== Configuration of the Receipt === | === Configuration of the Receipt === | ||
| Line 303: | Line 289: | ||
<br> | <br> | ||
| − | {{Footer_ProDon_Version| | + | {{Footer_ProDon_Version|5.0.3}}<br> |
Revision as of 14:21, 9 December 2016
| General Configuration of the Receipt |
CAUTION: This document is for VERSION 5 of ProDon. To get to the version 4 document, click here.
CAUTION: This document is currently being revised, it may be possible that some parts are missing or outdated.
Introduction
Il existe 2 types de reçus dans ProDon, les reçus standards et les reçus Word.
Le reçu standard est disponible en plusieurs formats, mais sa personnalisation est limitée. Ce reçu est maintenu à jour par Logilys et il est conforme avec l’ARC (Agence du Revenu du Canada) et avec les normes canadiennes. Donc, si la version du logiciel est mise à jour régulièrement, le reçu sera à jour également.
Le reçu Word est conforme aux normes canadiennes au moment de la livraison du logiciel. Ce reçu est un document Word personnalisé avec le formateur selon la demande. Puisqu'il s'agit d'un document Word, les options de personnalisation sont infinies. Par contre, ce type de reçu n'est pas maintenu à jour par Logilys, il sera donc important de le maintenir à jour selon les normes canadiennes. Il faut également prendre en considération que ce type de document est généralement plus complexe qu'un document Word standard et qu'il faudra une certaine maîtrise de Word pour le maintenir à jour. Finalement, puisque ce reçu utilise Word, il est plus lent à produire que le reçu standard.
Introduction
There are two types of receipts in ProDon, the standard receipts and the Word receipts.
The standard receipt is available in many formats, but its customizability is limited. This receipt is constantly updated by Logilys and it is complying with the CRA (Canada Revenue Agency) and with the Canadian standards. Therefore, if the software version is updated regularly, the receipt is updated as well.
The Word receipt is complying with the Canadian standards at the time of the delivery of the software. This receipt is a Word document customized with the trainer in accordance with requests. Since it is a Word document, the customizability options are infinite. On the other hand, this type of receipt is not updated by Logilys, so it is important to update it in accordance with the Canadian standards. You also have to take into consideration that this type of document is generally more complex than a standard Word document and that you need to have a certain mastery of Word to update it. Finally, since this receipt uses Word, it is slower to produce than the standard receipt.
Configuration générale du reçu
Gestion de l'organisme
Avant d'effectuer la configuration du reçu, il faut configurer correctement l'organisme.
|
Pour ce faire, à partir de la page d'accueil du logiciel, cliquer sur le menu « Configuration », puis choisir « Organismes ». | |
| 402x402px |
|
Après avoir cliqué sur « Organismes », la fenêtre « Gestion des organismes » s'ouvre. | |
| 574x574px | |
|
A : S'il y a plus d'un organisme, sélectionner celui pour lequel le reçu doit être configuré. |
B : Cliquer sur le bouton File:Bouton Modifier.png. |
|
Après avoir cliquer sur le bouton File:Bouton Modifier.png, la fenêtre « Consulter / modifier les paramètres d'un organisme » s'ouvre. | |
| 786x786px | |
|
C : Si ce n’est pas déjà fait, il est possible de saisir ici les informations relatives à la fondation. Certaines de ces informations apparaîtront sur le reçu. |
D : Le bouton File:Bouton adresses plusieurs langues.png qui se trouve au bout de la ligne du champ « Adresse » permet de traduire la ligne principale d'adresse pour chacune des langues actives dans ProDon. |
|
Après avoir cliqué sur le bouton File:Bouton adresses plusieurs langues.png, la fenêtre « Traduction d'une valeur » s'ouvre. | |
| 457x457px | |
|
Inscrire la bonne adresse dans les langues correspondantes. |
General Configuration of the Receipt
Usually, only the user "Supervisor" has access to the "System preferences", the other users have a read-only access to them. So, to be able to make the following modifications, enter ProDon with the user name "Supervisor".
Organization Management
Before performing the configuration of the receipt, you have to correctly configure the organization.
|
To do so, from the software home page, click on the "Configuration" menu, then select "Organizations". |
 |
|
After clicking on "Organizations", the "Organization management" window opens. | |
| |
|
A: If there are more than one organization, select the one for which the receipt must be configured. |
|
|
After clicking on the |
|
|
Enter the right address in the corresponding languages. |
Configuration du reçu
Pour faire la configuration du reçu, il faut sélectionner le menu «Configuration» et «Configuration des reçus».
| thumb|389x389px |
|---|
|
Après avoir cliqué sur « Configuration des reçus », la fenêtre « Configuration des reçus » s'ouvre. | |
| 574x574px
| |
|
A : S'il y a plus d'un organisme, sélectionner celui pour lequel le reçu doit être configuré. |
B : Cliquer sur le bouton File:Bouton Modifier.png. |
Onglet « Divers »
L'onglet « Divers » permet d'effectuer la configuration générale du reçu.
| Après avoir cliquer sur le bouton File:Bouton Modifier.png, la fenêtre « Modification/Consultation de la configuration des reçus » s'ouvre. | |
| Fichier:ProDon5 Configuration générale d'un reçu 007.png | |
|
A : Permet de produire les reçus au moment du report des transactions. |
B : Permet de cumuler le total des reçus à émettre. |
|
C : Permet de déterminer si le prix de vente est assez élevé pour émettre un reçu. Dans cet exemple, le prix d'achat doit excéder 80% du prix de vente pour pouvoir émettre un reçu (un article acheté à 100$, doit être vendu à au moins 125$). |
D : Permet de séparer les reçus pour les contacts qui sont différents.☃☃ |
|
E : Permet de voir le contact sur le reçu. |
F : Permet de déterminer le type de reçu qui sera utilisé. Pour plus d'informations concernant les types de reçus, cliquer ici. |
|
G : Permet de déterminer s'il s'agit d'un reçu de type standard ou Word. |
H : Permet de déterminer le format de papier et le nombre de copies du reçu qui seront générés. |
| I : Le bouton File:Bouton Modifier.png permet de modifier les champs « Type » et « Document » du type de reçu sélectionné. | J : Permet de modifier les nomenclatures qui sont réparties sur l’ensemble du reçu. Seules les mentions française et anglaise sont fournies avec le logiciel, si des traductions vers d'autres langues sont nécessaires, il faudra les effectuer. |
Configuration of the Receipt
In the "Edit/View organization settings" window, the tabs "Receipt", "Receipt (opt.)" and "Receipt" (pos.)" are available to configure the receipt. The first tab allows you to perform the general configuration of the receipt and the two other ones allow you to configure the standard type receipt.
"Receipt" Tab
The "Receipt" tab allows you to perform the general configuration of the receipt.
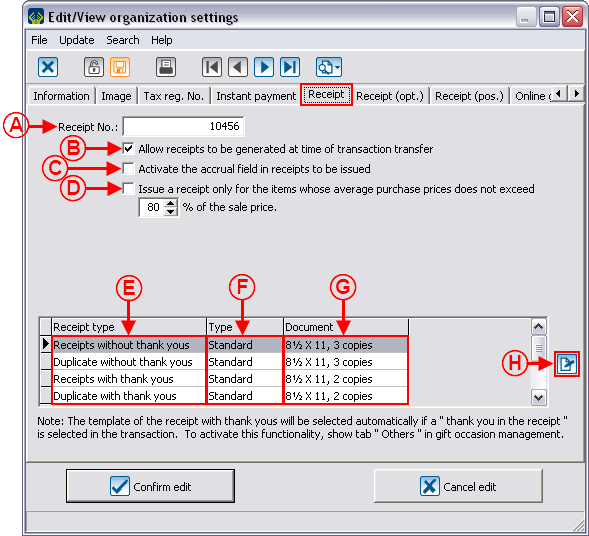
| |
|
A: Allows you to specify the next receipt number to be used. It is strongly recommended to leave the default number, the software always takes the number following the last issued receipt. |
B: Allows you to issue the receipts at the time of the transaction transfer. |
|
C: Displays a column containing the total of the receipts to be issued for a client in the processing of receipts to be issued. |
D: Allows you to determine if the sale price is high enough to issue a receipt. In this example, the purchase price must exceed 80% of the sale price to issue a receipt (an item bought for $100 must be sold for at least $125). |
|
E: Allows you to determine the receipt type that will be used. For more information concerning the receipt types, click here. |
F: Allows you to determine whether it is a standard type receipt or a Word type receipt. |
|
G: Allows you to determine the paper format and the number of copies of the receipt that will be generated. |
H: The |
For the configuration of the standard receipt, click here.
For the configuration of the Word receipt, click here.
Document name: ProDon:General Configuration of the Receipt
Version : 5.0.3
