CAUTION: This document is currently being revised, it may be possible that some parts are missing or outdated
Introduction
The relations are the contact network within ProDon. From this function, it is possible to link contacts to their organization, their family, their friends and their acquaintances. Furthermore, ProDon keeps a memory because it is important to be able to redraw the contact network of clients and organizations. The relations are also important because they are linked to the mass mailing and E-mail blast.
The Relation concept
A relation is the link between 2 entities. These entities can be individuals or companies. These links are depicted by Client 1 (C1) is linked to Client 2 (C2).
| Possible type of relations
|
|
C1
|
C2
|
| Individual
|
Individual
|
| Individual
|
Company
|
| Company
|
Individual
|
| Company
|
Company
|
From a theoretical perspective, a relation should be shown as followed:

Here are the results with examples:
1) If C1 is an individual and C2 is also an individual:

2) If C1 is an individual and C2 is a company:

3) If C1 is a company and C2 is an individual:

4) If C1 is a company and C2 is also a company:

Please note that even if a relation is MUTUAL, it must always be read from C1 to C2:
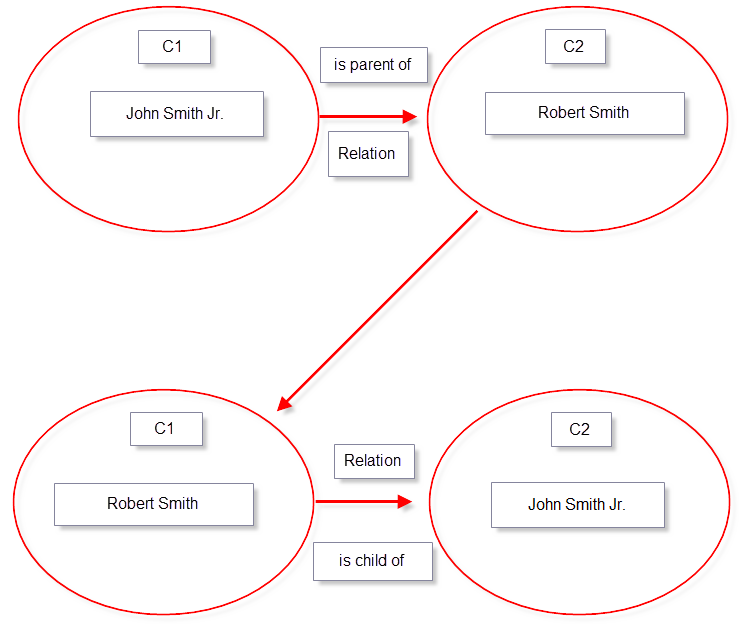
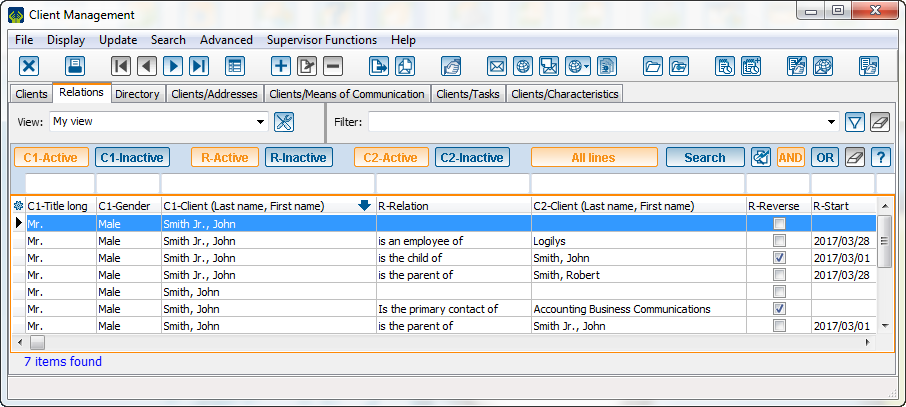
So, with a example from the relation tab of the client management of ProDon:
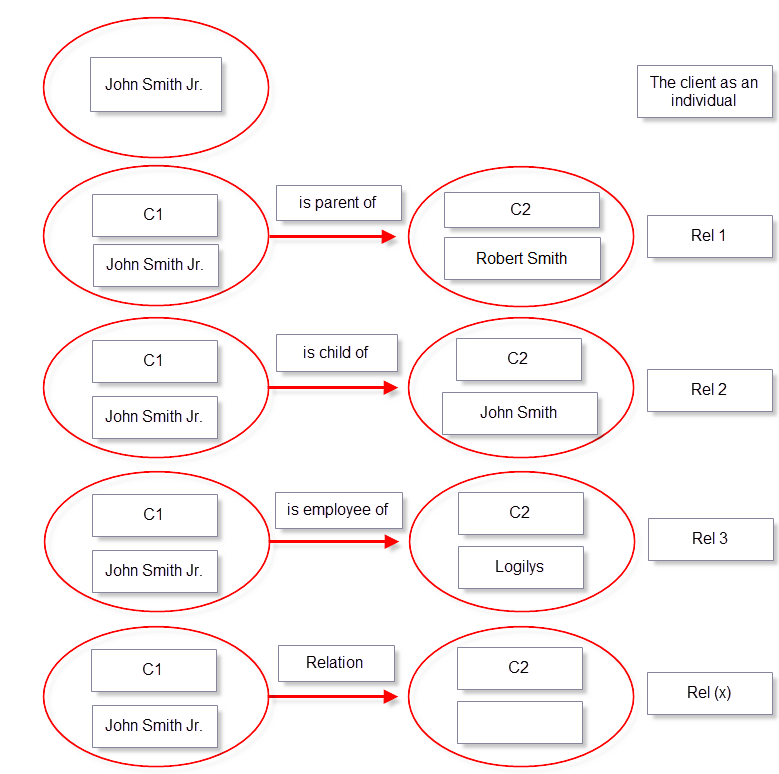
One should understand this:
Add a relation type
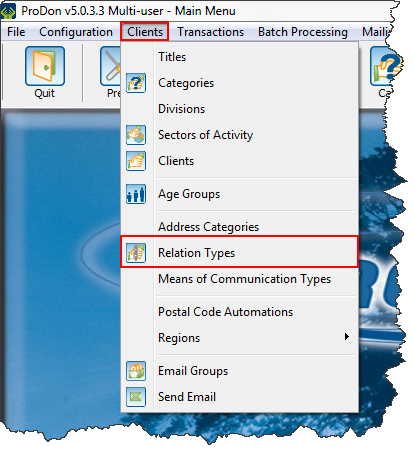
To add a relation type, go to the "Client" tab of the homepage and click on "Relation types".
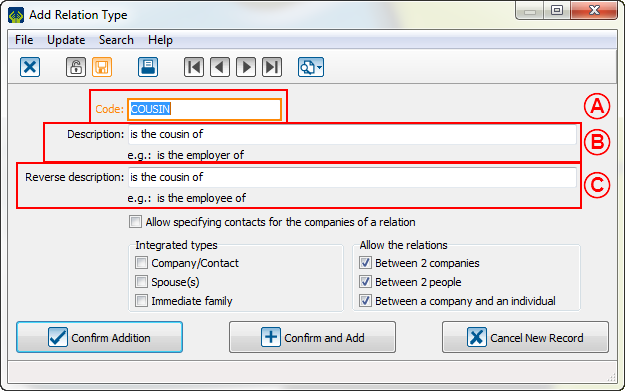
| Then, this window will open:
|
|
|
A: The "Code" section is used to name a relation.
|
B: The "Description" section is used to explain the link from client 1 to client 2.
|
| C: The "Reverse description" section is used to explain the link from client 2 to client 1.
|
The "Integrated types" section shows preset configurations for a relation.

|
|
A: When the option "Company/Contact" is checked, automatically the options of the section "Allow the relations" are checked. The context where this option must be selected is when new relation type must be limited to a company and an individual.
|
B: Please observe that by selecting this potion in the "Integrated types", the other options of the same section and also the section "Allow the relations" become locked.
|

|
|
A: When the option "Spouse(s)" is checked, automatically the options of the section "Allow the relations" and the "Immediate family" box are checked. The context where this option must be selected is when new relation type must be limited to two persons that are in couple.
|
B: Please observe that by selecting this potion in the "Integrated types", the other options of the same section and also the section "Allow the relations" become locked.
|

|
|
A: When the option "Immediate family" is checked, automatically the options of the section "Allow the relations" are checked. The context where this option must be selected is when new relation type must be limited to two persons that are from the same family.
|
B: Please observe that by selecting this potion in the "Integrated types", the other options of the same section and also the section "Allow the relations" become locked.
|
The "Allow the relations" section allows the customization of the configuration of the relation types.

|
|
A: When the option "Between 2 companies" is checked, the relation will be able to be set between 2 companies.
|
B: When the option "Between 2 individuals" is checked, the relation will be able to be set between 2 individuals.
|
| C: When the option "Between a company and an individual" is checked, the relation will be able to be set between a company and an individual.
|
Edit a relation type
Ideally, a relation type should be edited before creating a relation that will be using it because the used sections will be locked. It is mostly identical to the addition of a relation type: it is possible to edit the "Code", the "Description", the "Reverse description", the "Integrated types" options and the "Allow the relations" section. To do so, select the relation to edit and click on the  button.
CAUTION!
In the following example, the relation has been configured in function that everything could be spouse of everything.
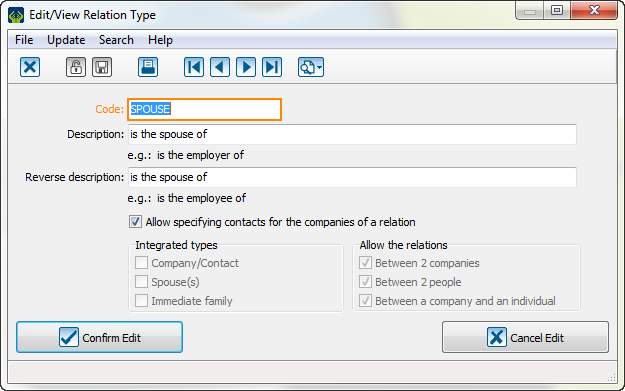
So, it creates cases like these:
| Possible relations from this template
|
| C1
|
Relation
|
C2
|
| Individual
|
is spouse of
|
Individual
|
| Individual
|
is spouse of
|
Company
|
| Company
|
is spouse of
|
Individual
|
| Company
|
is spouse of
|
Company
|
So, because there is already existing cases that imply all possibilities in this ProDon database, it is not possible to edit this relation example before adjusting all relations using this relation type first. Please be cautious to not create a/an catch-all/holdall relation.
Remove a relation type
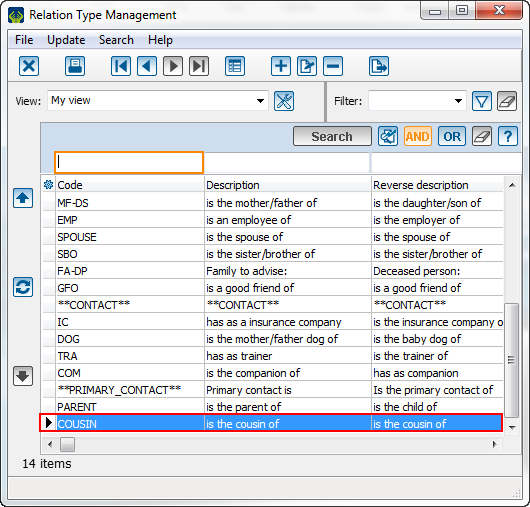
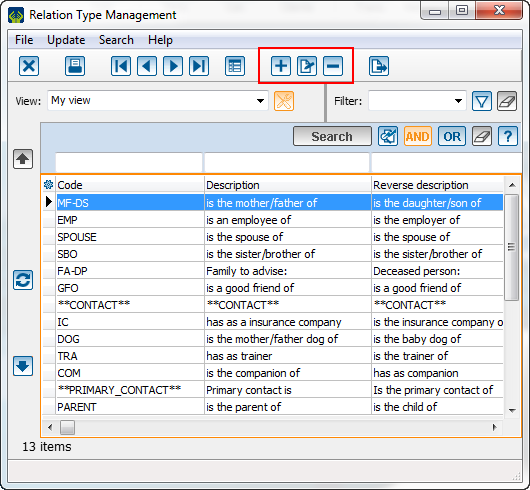
It is possible to remove the relation types that are not used anymore. If the type is still used, the software will block the removal.
Please select the relation type that must be removed and select the  button in the Relation type management.
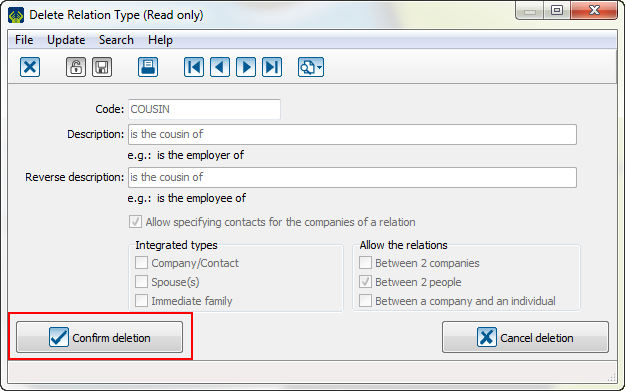
Then, click on "Confirm deletion" to finish the operation.
Add a relation
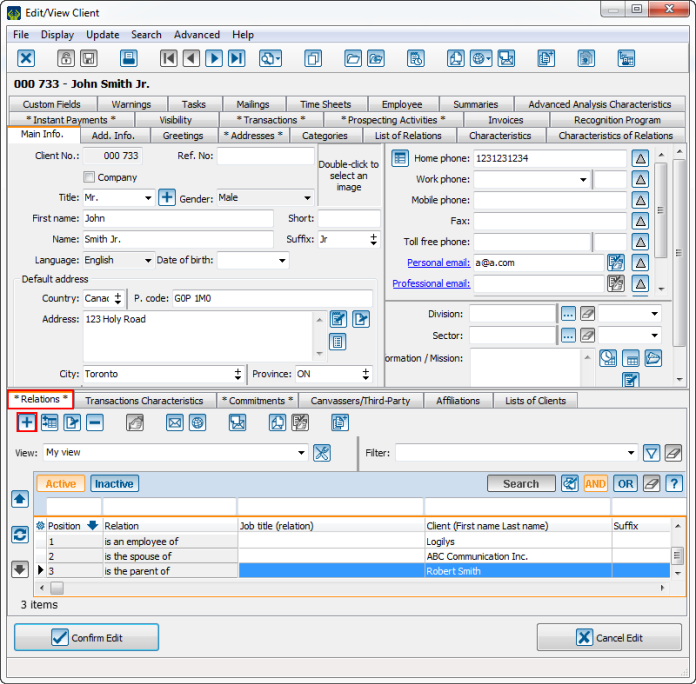
To add a relation, go to the relation tab of a client's file.
Pour ajouter une relation, il faut aller dans l'onglet relation de la fiche d'un client.
The "Main info" tab
| Press on the + button to add a relation.
Il faut appuyer sur le bouton  pour ajouter une relation. pour ajouter une relation.
|
|
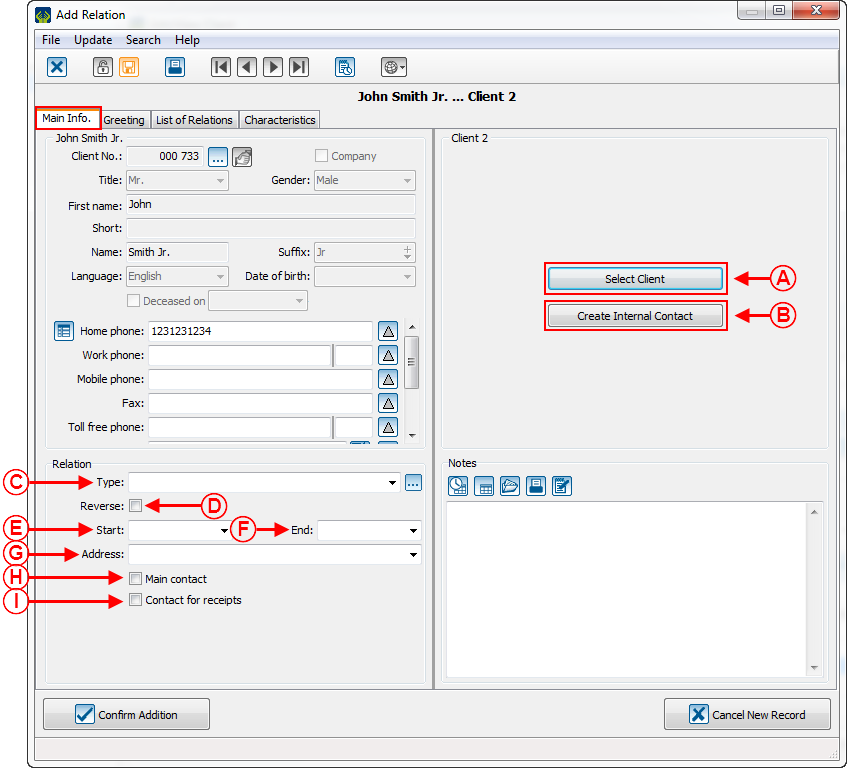
| Then, this page opens:
Ensuite cette page s'ouvre:
|
|
|
A: This option allows the selection among all clients and all companies of the database.
Cette option permet de choisir parmi tous les clients et toutes les compagnies de la base de données.
|
B: This option allows the creation of a contact who will be visible only as C" in ProDon. Even if a client number will be reserved for this C2, the result will not be an official client file, it will be a file accessible only from this relation.
Cette option permet de créer un contact qui sera uniquement visible en C2 dans ProDon. Même si un numéro de client est réservé pour ce C2, ce ne sera pas officiellement une fiche client, ce sera une fiche accessible seulement à partir de la relation.
|
C: This option allows the determination of the relation type between these two parties.
Cette option permet de déterminer le type de relation il y a entre les deux parties.
|
D: The "Reverse" checkbox allows the inversion of the selected relation in the type. For example, if the relation is "is the parent of", when the "Reverse" checkbox is checked, the relation should become "is child of".
La case « Inverse » permet d'inverser la relation choisie dans le type. Par exemple, si la relation est « est parent de », lorsque la case « Inverse » est cochée, la relation deviendrait « est enfant de ».
|
| E: This section is used to indicate when the relation between these 2 parties has started.
Cette section sert à indiquer quand la relation entre les deux parties à débuter.
|
F: This section is used to indicate when thje relation between these 2 parties has ended. Usually, this section is documented later.
Cette section sert à indiquer quand la relation entre les deux parties a pris fin. Normalement, cette section est documentée plus tard.
|
| G: The address option allows C1 (Client 1) address to be placed as the origin of the address of C2 (Client 2).
L'option adresse permet de placer l'adresse du C1(Client 1) comme la provenance de l'adresse du C2 (Client 2).
|
H: This checkbox allows C2 to become the main contact of C1. A company cannot become the main contact of an individual. This information will be stored in the relation.
Cette case à cocher permet au C2 de devenir le contact principal de C1. Une compagnie ne peut pas devenir le contact principal d'un individu. Cette information sera emmagasinée dans la relation.
|
| I: If this box is checked, C2 will become the contact for receipts of C1. This information will be stored in the relation.
Si cette case est cochée, C2 deviendra le contact pour les reçus de C1. Cette information sera emmagasinée dans la relation.
|
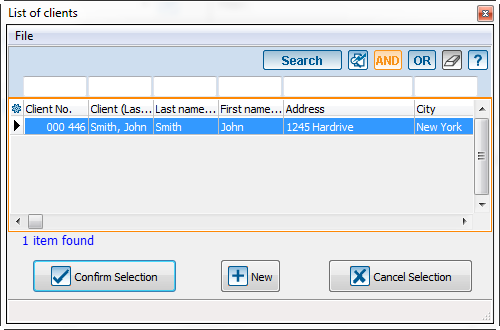
| If the option A is selected, this window will open:
Si l'option A est sélectionnée, cette fenêtre s'ouvrira:
|
|
| In this window, there will be all clients of the database. The user will have to select the client 2 with whom the client 1 is in relation .
Dans cette fenêtre, il y aura tous les clients de ProDon. Il suffira de choisir le client 2 avec lequel le client 1 est en relation.
|
|
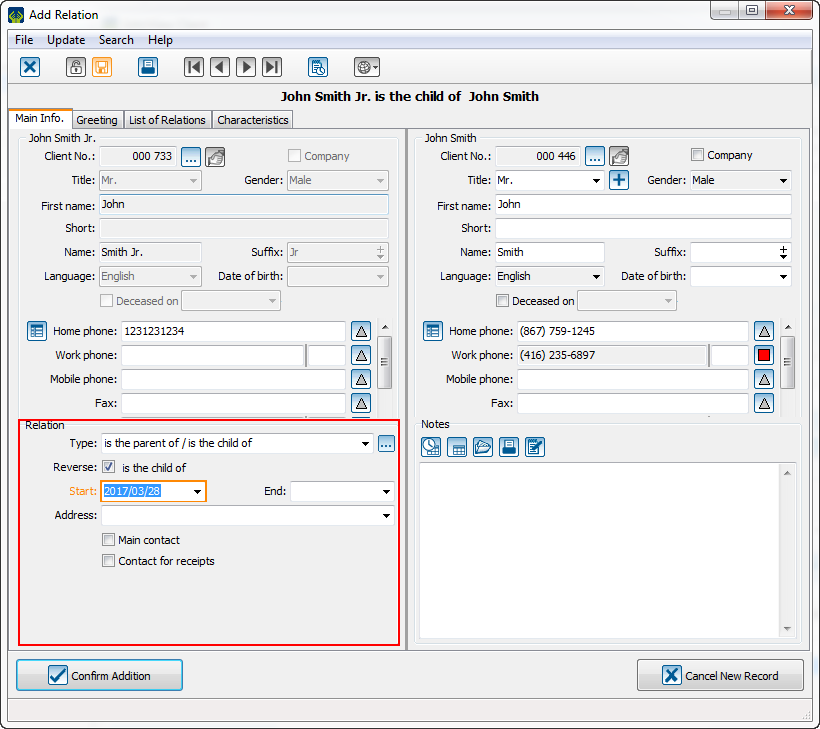
| Then, the user will have to complete the relation section.
Il faudra ensuite compléter la section relation.
|
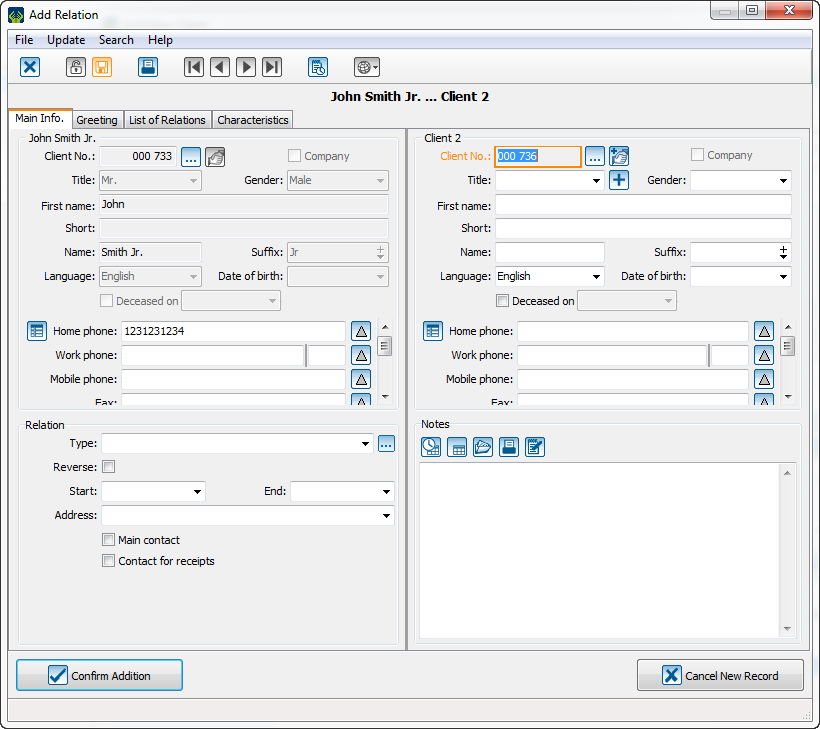
| If the option B is selected, this window will open:
Si l'option B est sélectionnée, cette fenêtre s'ouvrira:
|
|
| The user will have to enter the information as if it was a new client and then complete the relation section. Note: A client number will be preset.
Il faudra entrer les informations comme si c'était un nouveau client et ensuite compléter la section relation. Remarque: Un numéro de client sera prédéterminé.
|
The "Greeting" tab
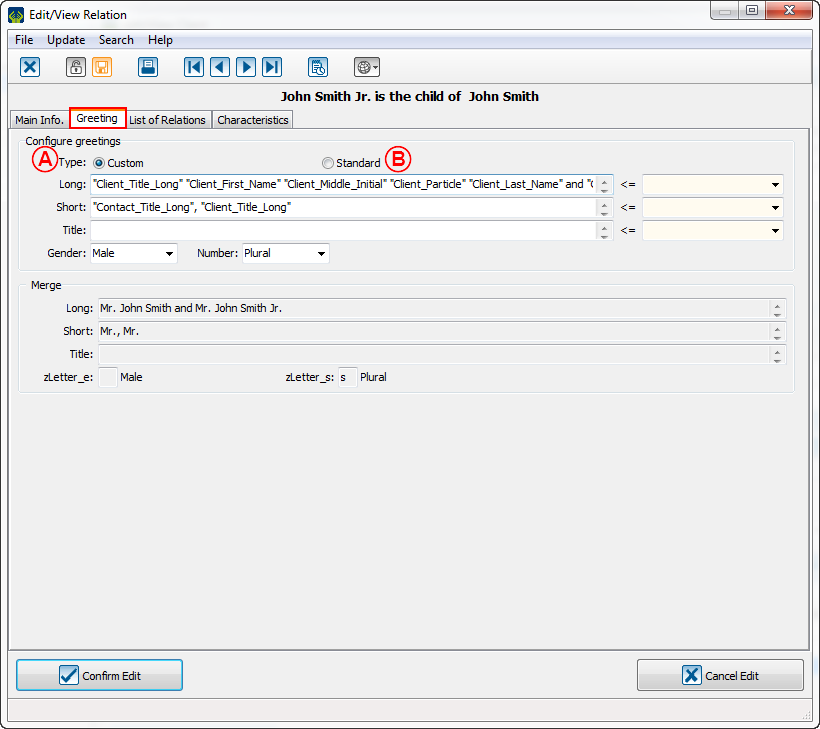
It is possible to customize the greetings or it is possible to use the standard greetings.
Il est possible de personnaliser les salutations ou il est possible d'utiliser les salutations standards.
|
| When the option A is selected, it is possible to customize which merge fields will be used when a user will have to send documents for the 2 contacts of the relation.
Quand l'option A est sélectionnée, il est possible de choisir quels champs de fusion seront utilisés lorsque qu'il faudra écrire un document qui s'adressera aux deux contacts de la relation.
|
When the option B is selected, all choices are preset. Quand l'option B est sélectionnée, tous les choix sont prédéterminés.
|
Edit a relation
To edit a relation, go to the relation tab of the client file, position on the relation that need to be edited and click on the EDIT button or double-click on the relation.
Pour modifier une relation, il faut aller dans l'onglet relation de la fiche client, se positionner sur la relation à modifier et appuyer sur le bouton  ou double-cliquer sur la relation.
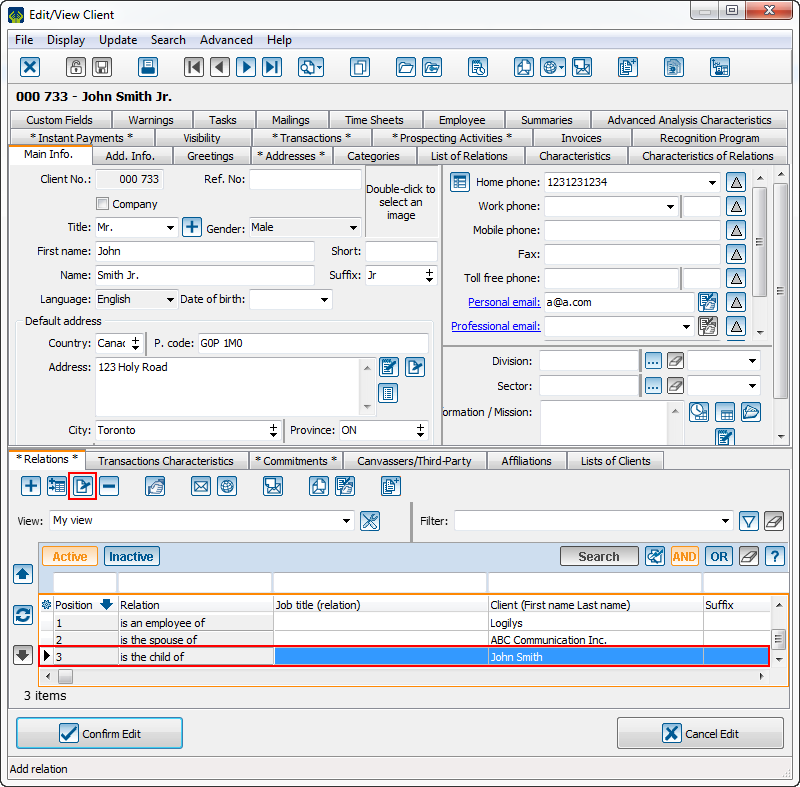
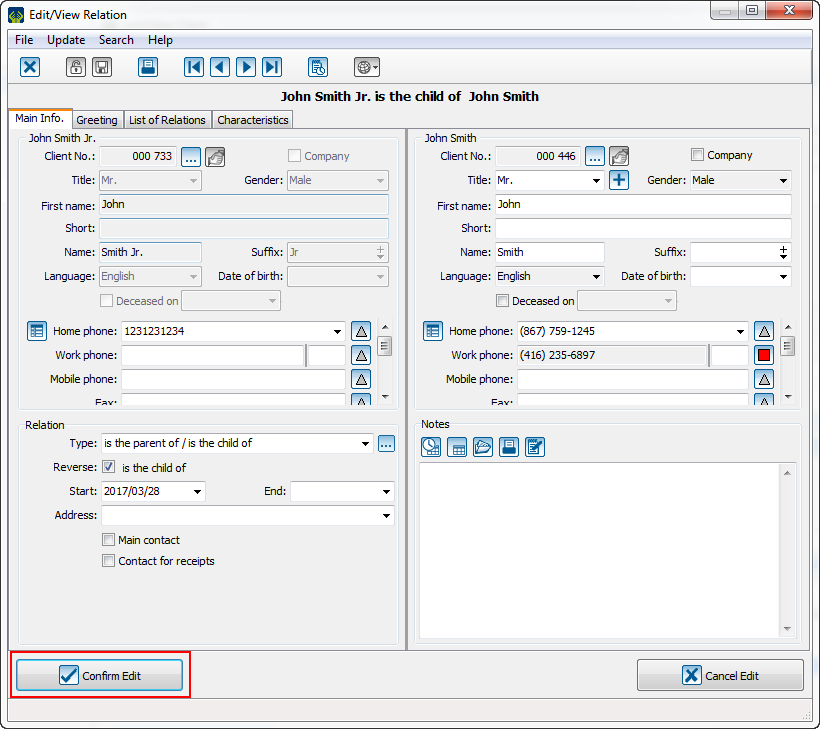
| Then, the user will edit what needs edition and click on "Confirm Edit" to edit the link between these clients.
Ensuite, il faut modifier ce qu'il y a à modifier et cliquer sur « Confirmer la modification » pour modifier le lien entre les clients.
|
|
NOTE: To archive a relation, set it an end date. So, the organization will be able to keep traces in its database inactive relations. To see them, go to the relation tab of the client management and click on the  button.
Pour archiver une relation, il faut lui mettre une date de fin. Alors, de cette manière, l'organisation pourra garder une trace dans sa base de donnée des relations qui ne sont plus actives. Pour les voir, il faudra aller dans l'onglet relation de la gestion des clients et cliquer sur le bouton Bouton R-Inactive.png.
Delete a relation
To delete a relation, go to the relation tab of the client file, position on the relation to delete and click on the - button.
Pour retirer une relation, il faut aller dans l'onglet relation de la fiche client, se positionner sur la relation à retirer et appuyer sur le bouton  .
.
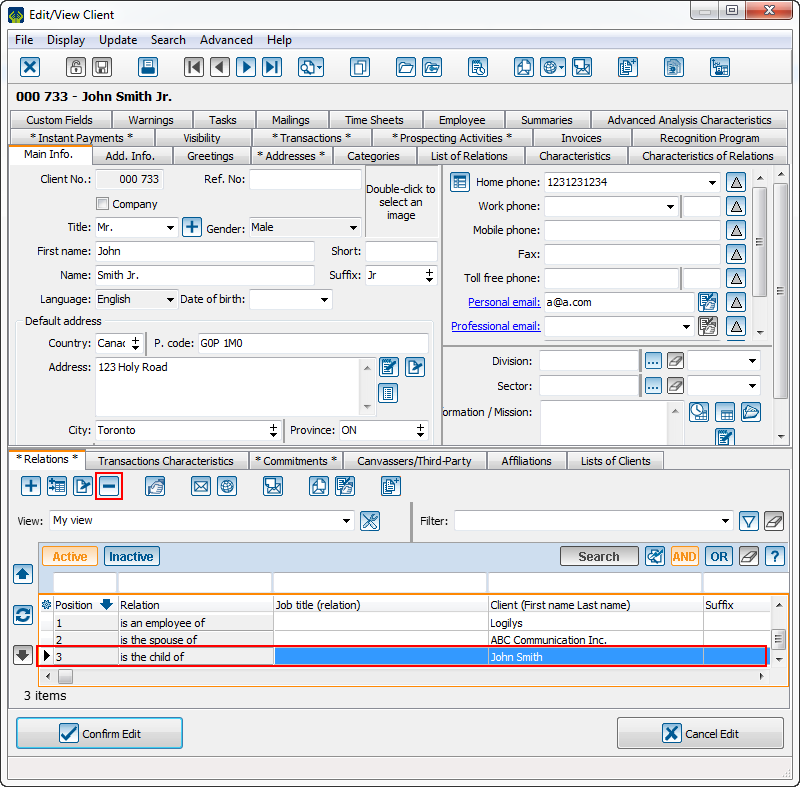
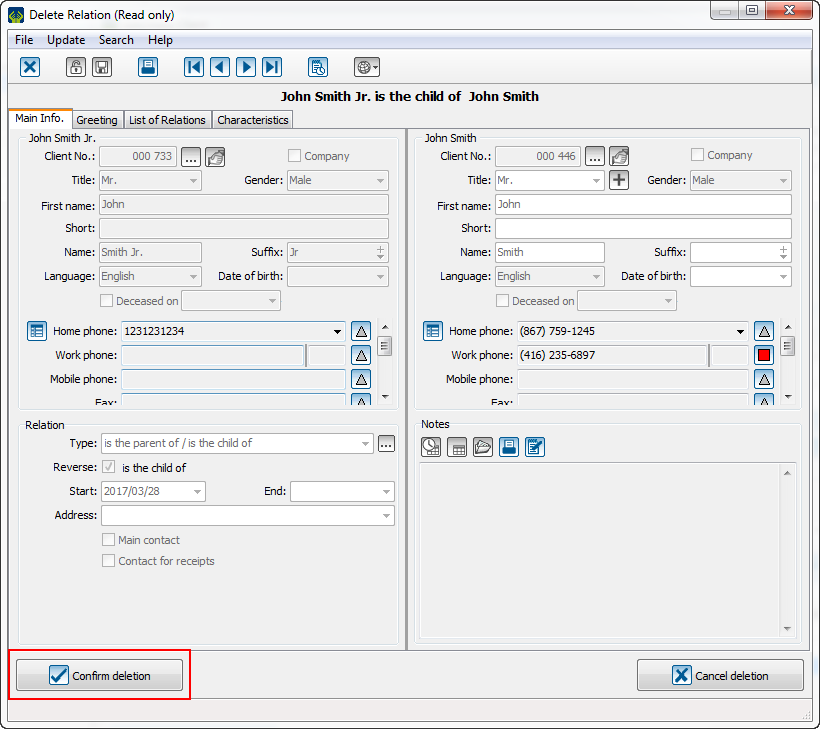
| Then, click on the "Confirm Deletion" to delete the link between these clients.
Ensuite, il faut cliquer sur « Confirmer le retrait » pour retirer le lien entre les clients.
|
|
Document name: ProDon:Relations
Version : 5.0.3.3

![]() button.
button.
![]() button in the Relation type management.
button in the Relation type management.


![]() ou double-cliquer sur la relation.
ou double-cliquer sur la relation.
![]() button.
button.
![]() .
.


