Difference between revisions of "ProDon:Region Management"
(Tag: Visual edit) |
|||
| (11 intermediate revisions by one other user not shown) | |||
| Line 1: | Line 1: | ||
{{Header_TOC}}<br> | {{Header_TOC}}<br> | ||
| − | '''<u>CAUTION</u>''' : This document is for '''VERSION''' '''5''' of '''''Prodon'''''. To go to the document for version 4, [[ | + | '''<u>CAUTION</u>''' : This document is for '''VERSION''' '''5''' of '''''Prodon'''''. To go to the document for version 4, [[Common functions:Region Management (version 4)|click here]]. <br> |
| − | |||
| − | |||
| − | |||
| − | <br> | ||
| + | <br><br> | ||
== Introduction == | == Introduction == | ||
| − | In the software, there are three notions related to regions: | + | In the software, there are three notions related to regions : " Region Types ", " Regions " and " Region Definitions ". |
| − | Region | + | " Region Types " allow you to specify the kind of regions, for example: administrative region, touristic region, etc. The " Regions " allow you to build the regions list and to specify their types, for example: Niagara, Durham, etc. The " Region Definitions " allow you to set up the postal code range or the cities within one region. |
| − | + | {| width="200" cellspacing="1" cellpadding="1" border="1" class="wikitable" | |
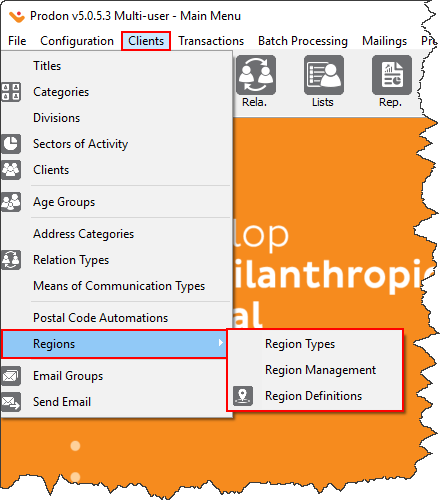
| − | + | |These functions are all accessible in the " Clients " menu of the software's home page. | |
| − | These functions are accessible in the "Clients" menu of the software home page. | + | |- |
| − | + | |[[File:Prodon5 Region Management 001.png|center|504x504px]] | |
| − | |||
| − | |||
|} | |} | ||
<br> | <br> | ||
| − | == Region | + | == Region Types Management == |
| − | The four default region types are: Region, | + | The four default " region types " are: Region, Touristic region, Administrative region and County.<br> |
{| width="200" cellspacing="1" cellpadding="1" border="1" class="wikitable" | {| width="200" cellspacing="1" cellpadding="1" border="1" class="wikitable" | ||
|- | |- | ||
| | | | ||
| − | If you click on the "Region | + | If you click on the " Region Types " option in the " Clients " menu, it is possible to customize the " region types " by double-clicking on the one you wish to edit (e.g. County). |
|- | |- | ||
| − | | [[File:Region | + | | [[File:Prodon5 Region Management 002.png]] |
|} | |} | ||
| Line 39: | Line 34: | ||
{| width="50%" cellspacing="1" cellpadding="1" border="1" class="wikitable" | {| width="50%" cellspacing="1" cellpadding="1" border="1" class="wikitable" | ||
|- | |- | ||
| − | | colspan="2" | [[File:Region | + | | colspan="2" | [[File:Prodon5 Region Management 003.png|469x469px]]<br> |
|- | |- | ||
| | | | ||
| Line 46: | Line 41: | ||
| | | | ||
<span style="color: rgb(255, 0, 0);">'''B:'''</span> Allows you to specify how the automations will be programmed for this region type. | <span style="color: rgb(255, 0, 0);">'''B:'''</span> Allows you to specify how the automations will be programmed for this region type. | ||
| − | |||
| − | |||
| − | |||
| − | |||
| − | |||
| − | |||
| − | |||
|} | |} | ||
| Line 61: | Line 49: | ||
|- | |- | ||
| colspan="2" | | | colspan="2" | | ||
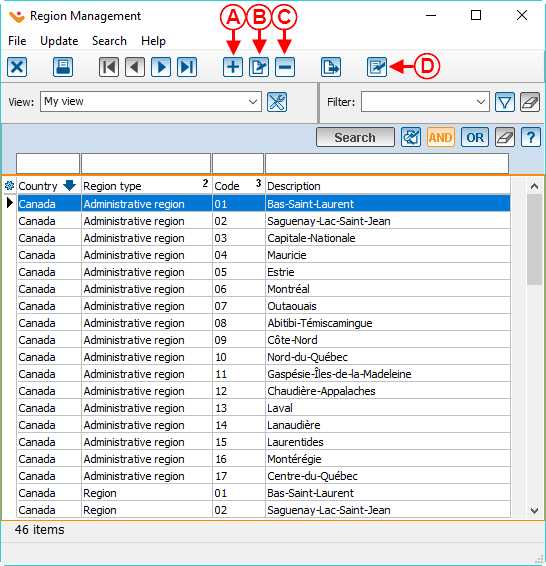
| − | By clicking on the " | + | By clicking on the " Region Management " option in the " Clients " menu, it is possible to add, remove or edit regions. |
|- | |- | ||
| − | | colspan="2" | [[File:Region | + | | colspan="2" | [[File:Prodon5 Region Management 004.png]] |
|- | |- | ||
| width="50%" | | | width="50%" | | ||
| − | '''<span style="color: rgb(255, 0, 0);">A:</span>''' Allows you to add a region. | + | '''<span style="color: rgb(255, 0, 0);">A:</span>''' Allows you to add a region. To add a new region, you simply need to click on the [[File:Button add plus.png]] button |
| width="50%" | | | width="50%" | | ||
| − | '''<span style="color: rgb(255, 0, 0);">B: </span>'''Allows you to edit an existing region. To | + | '''<span style="color: rgb(255, 0, 0);">B: </span>'''Allows you to edit an existing region. To edit it, you simply need to select the region to edit, then click on the [[Image:Button Edit.png]] button or double-click on the region selected. |
|- | |- | ||
| width="50%" | | | width="50%" | | ||
| − | <span style="color: rgb(255, 0, 0);">'''C:'''</span> Allows you to | + | <span style="color: rgb(255, 0, 0);">'''C:'''</span> Allows you to delete a region. To delete it, you simply need to select the region to be deleted, then click on the [[Image:Button Minus remove delete.png]] button. |
| − | | width="50%" | < | + | | width="50%" | <span style="color: rgb(255, 0, 0);">'''D:'''</span> This button [[File:Button Generate transfer.png]] Allows you to update the modifications that you have done in the " Region Management " grid into the active client files in the database. |
|} | |} | ||
| Line 85: | Line 73: | ||
{| width="50%" cellspacing="1" cellpadding="1" border="1" class="wikitable" | {| width="50%" cellspacing="1" cellpadding="1" border="1" class="wikitable" | ||
|- | |- | ||
| − | | colspan="2" | [[File:Region | + | | colspan="2" | [[File:Prodon5 Region Management 005.png]] |
|- | |- | ||
| width="50%" | | | width="50%" | | ||
| − | '''<span style="color: rgb(255, 0, 0);">A: </span>'''Choose one of the [[ProDon:Region Management# | + | '''<span style="color: rgb(255, 0, 0);">A: </span>'''Choose one of the four [[ProDon:Region Management#Region Types Management|" Region Types "]]. |
| width="50%" | | | width="50%" | | ||
| − | '''<span style="color: rgb(255, 0, 0);">B: </span>'''Specify in which country | + | '''<span style="color: rgb(255, 0, 0);">B: </span>'''Specify in which country that region is. If the field remains empty, the client's "Country" field will also be empty. |
|- | |- | ||
| width="50%" | | | width="50%" | | ||
| − | '''<span style="color: rgb(255, 0, 0);">C: </span>'''Enter the | + | '''<span style="color: rgb(255, 0, 0);">C: </span>'''Enter the code that you want for the region. |
| width="50%" | | | width="50%" | | ||
| − | '''<span style="color: rgb(255, 0, 0);">D: </span>''' | + | '''<span style="color: rgb(255, 0, 0);">D: </span>'''Allows you to enter the name of the region. |
|} | |} | ||
| Line 104: | Line 92: | ||
== Region Definition Management == | == Region Definition Management == | ||
| − | By defining the regions, automations will be created: | + | By defining the regions, automations will be created : the region will appear automatically when entering the city or the postal code in a clients file if it has been predefined. |
<br> | <br> | ||
| − | |||
{| width="677" cellspacing="1" cellpadding="1" border="1" class="wikitable" | {| width="677" cellspacing="1" cellpadding="1" border="1" class="wikitable" | ||
|- | |- | ||
| colspan="2" | | | colspan="2" | | ||
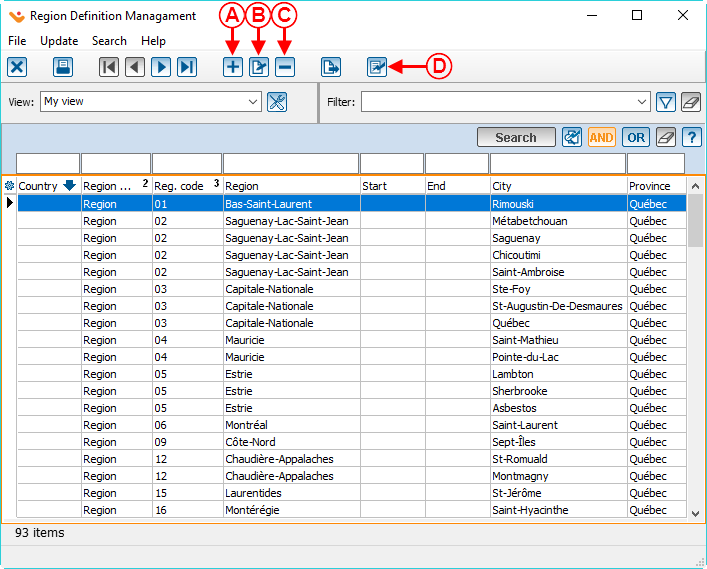
| − | By clicking on the "Region | + | By clicking on the " Region Definitions " option in the " Clients " menu, it is possible to manage the " |
| + | |||
| + | Region Definitions " . | ||
|- | |- | ||
| − | | colspan="2" | [[File:Region | + | | colspan="2" | [[File:Prodon5 Region Management 006.png]] |
|- | |- | ||
| width="50%" | | | width="50%" | | ||
| Line 120: | Line 109: | ||
| width="50%" | | | width="50%" | | ||
| − | '''<span style="color: rgb(255, 0, 0);">B: </span>'''Allows you to edit an existing definition. To | + | '''<span style="color: rgb(255, 0, 0);">B: </span>'''Allows you to edit an existing definition. To edit it, you simply need to select the definition that will be edited, then click on the [[Image:Button Edit.png]] button or double-click on the definition you wish to edit. |
|- | |- | ||
| width="50%" | | | width="50%" | | ||
| − | '''<span style="color: rgb(255, 0, 0);">C: </span>'''Allows you to | + | '''<span style="color: rgb(255, 0, 0);">C: </span>'''Allows you to delete a definition. To delete it, you simply need to select the definition to be deleted, then click on the [[Image:Button Minus remove delete.png]] button. |
| − | | width="50%" | < | + | | width="50%" | '''<span style="color: rgb(255, 0, 0);">D: </span>'''This button [[File:Button Generate transfer.png]] allows you to update the clients regions. |
|} | |} | ||
| Line 133: | Line 122: | ||
{| width="50%" cellspacing="1" cellpadding="1" border="1" class="wikitable" | {| width="50%" cellspacing="1" cellpadding="1" border="1" class="wikitable" | ||
|- | |- | ||
| − | | [[ | + | | [[File:Prodon5 Region Management 007.png|frameless|538x538px]] |
| − | | [[ | + | | [[File:Prodon5 Region Management 008.png|frameless|538x538px]] |
|- | |- | ||
| | | | ||
| − | '''<span style="color: rgb(255, 0, 0);">A:</span>'''<span style="color: rgb(255, 0, 0);"> </span>Allows you to indicate the type of region to be defined. The type also determines the method to use in <span style="color: rgb(255, 0, 0);">''' | + | '''<span style="color: rgb(255, 0, 0);">A:</span>'''<span style="color: rgb(255, 0, 0);"> </span>Allows you to indicate the type of region to be defined. The type also determines the method to use in <span style="color: rgb(255, 0, 0);">'''D'''</span>, whether the limits are determined in accordance with a city or with postal codes. |
| | | | ||
| − | '''<span style="color: rgb(255, 0, 0);">B:</span>''' The country determines | + | '''<span style="color: rgb(255, 0, 0);">B:</span>''' The country determines which regions will be available in <span style="color: rgb(255, 0, 0);">'''C'''</span>. It is impossible to edit it after a region is selected. |
|- | |- | ||
| | | | ||
| − | <span style="color: rgb(255, 0, 0);">'''C:'''</span> Allows you to specify the region for which the limits will be determined. By | + | <span style="color: rgb(255, 0, 0);">'''C:'''</span> Allows you to specify the region for which the limits will be determined. By pressing the [[File:Button Selection 3 dots.png]] button you can select the region you want. If the wanted region has not previously been created, you can create a new one by clicking on the [[Image:Button add plus.png]] button in the region selection window. |
| | | | ||
| − | '''<span style="color: rgb(255, 0, 0);">D: </span>''' | + | '''<span style="color: rgb(255, 0, 0);">D: </span>'''It is with these boxes that the rule to use can be created. To edit the method of defining the regions (by city, province and country or by postal code and country), see [[ProDon:Region Management#Region_Type_Management|" Region Type Management "]]. |
| − | + | In the example on the left, all the clients who live in " Victoriaville " will automatically be attributed the " Centre-du-Québec " administrative region. | |
| − | |||
| − | |||
| − | + | In the example on the right, all the clients having postal codes between A0A 0A0 and A0A 9A9, will automatically be attributed the " Centre-du-Québec " tourist region. | |
| − | |||
| − | In the example on the right, all the clients having postal codes between | ||
| + | The [[File:Prodon5 Region Management Lightning Button.png]] button will generate all of the possible codes from the 3 first characters. | ||
| + | |- | ||
| + | | colspan="2" |'''<span style="color: rgb(255, 0, 0);">E: </span>'''If the region wanted was not created earlier, you can confirm the addition of the one that you are consulting and create another region right away by clicking on the [[File:Button add plus.png]] button. | ||
|} | |} | ||
<br> | <br> | ||
| − | + | {{Footer_ProDon_Version|5.0.5}}<br> | |
| − | |||
| − | |||
| − | |||
| − | {{Footer_ProDon_Version| | ||
Latest revision as of 10:30, 17 August 2018
| Region Management |
CAUTION : This document is for VERSION 5 of Prodon. To go to the document for version 4, click here.
Introduction
In the software, there are three notions related to regions : " Region Types ", " Regions " and " Region Definitions ".
" Region Types " allow you to specify the kind of regions, for example: administrative region, touristic region, etc. The " Regions " allow you to build the regions list and to specify their types, for example: Niagara, Durham, etc. The " Region Definitions " allow you to set up the postal code range or the cities within one region.
| These functions are all accessible in the " Clients " menu of the software's home page. |
Region Types Management
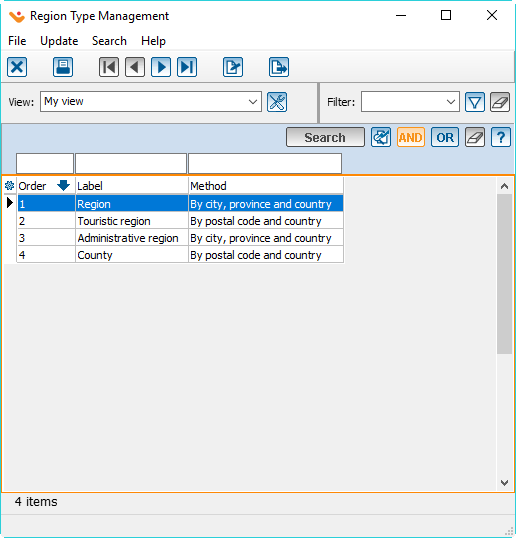
The four default " region types " are: Region, Touristic region, Administrative region and County.
|
If you click on the " Region Types " option in the " Clients " menu, it is possible to customize the " region types " by double-clicking on the one you wish to edit (e.g. County). |
|
 | |
|
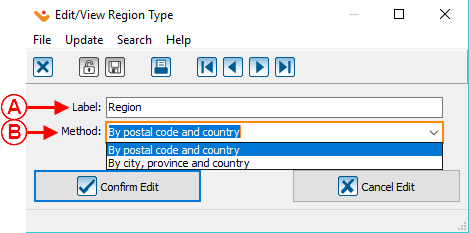
A: Allows you to rename the region type (e.g. rename "County" for "Regional Municipality"). |
B: Allows you to specify how the automations will be programmed for this region type. |
Region Management
| |
|
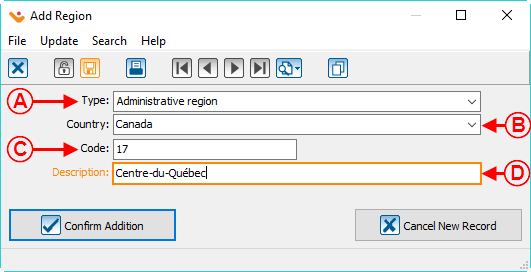
A: Choose one of the four " Region Types ". |
B: Specify in which country that region is. If the field remains empty, the client's "Country" field will also be empty. |
|
C: Enter the code that you want for the region. |
D: Allows you to enter the name of the region. |
Region Definition Management
By defining the regions, automations will be created : the region will appear automatically when entering the city or the postal code in a clients file if it has been predefined.
|
|
|
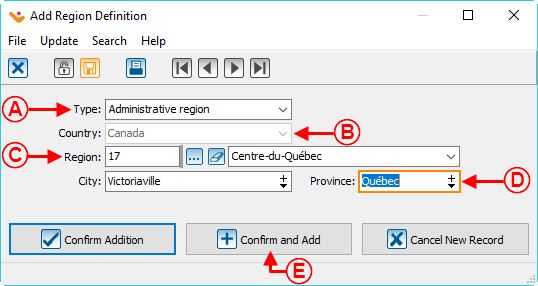
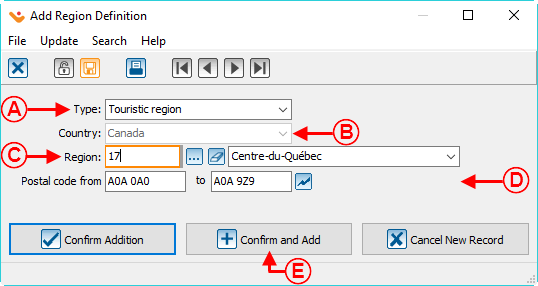
A: Allows you to indicate the type of region to be defined. The type also determines the method to use in D, whether the limits are determined in accordance with a city or with postal codes. |
B: The country determines which regions will be available in C. It is impossible to edit it after a region is selected. |
|
C: Allows you to specify the region for which the limits will be determined. By pressing the |
D: It is with these boxes that the rule to use can be created. To edit the method of defining the regions (by city, province and country or by postal code and country), see " Region Type Management ". In the example on the left, all the clients who live in " Victoriaville " will automatically be attributed the " Centre-du-Québec " administrative region. In the example on the right, all the clients having postal codes between A0A 0A0 and A0A 9A9, will automatically be attributed the " Centre-du-Québec " tourist region. The |
| E: If the region wanted was not created earlier, you can confirm the addition of the one that you are consulting and create another region right away by clicking on the | |
Document name: ProDon:Region Management
Version : 5.0.5
