ProDon:Donation Occasion Management
| Donation Occasion Management |
ProDon:Table of Contents
CAUTION : This document is for VERSION 5 of Prodon. To go to the document for version 4, click here.
WARNING : This document is currently being edited/revised, it is possible that some parts are missing or obsolete.
Introduction
A donation occasion is a source of funding. It is the centre of ProDon's financial structure. An event is a donation occasion; but other sources of income, such as general donations or planned gifts are also donation occasions. Each donation occasion comprises activities and expenditures.
For instance :
For a gala dinner, it is possible to define:
The activities that generate revenues, such as:
- Tickets
- Platinum Sponsorship
- Gold Sponsorship
- Donations
The expenditures for carrying out the gala dinner, such as:
- Reception hall rental
- Caterer
- Entertainement expenses
For an annual fundraising campaign, it is possible to define:
The solicitation activities, such as:
- First mailing
- Second mailing as a reminder
- First mailing - Commitment (recurring donations, requires the " Prospecting and Commitments Module ")
- Second mailing - Commitment (recurring donations, requires the " Prospecting and Commitments Module ")
- Unsolicitated donations
The expenditures for carrying out the campaign, such as:
- Postal charges
- Promotional material
NOTE: For donation occasions related to " In Memoriam gifts " and " Beneficiary Donation Occasions ", consult these documents:
Donation Occasion Management
|
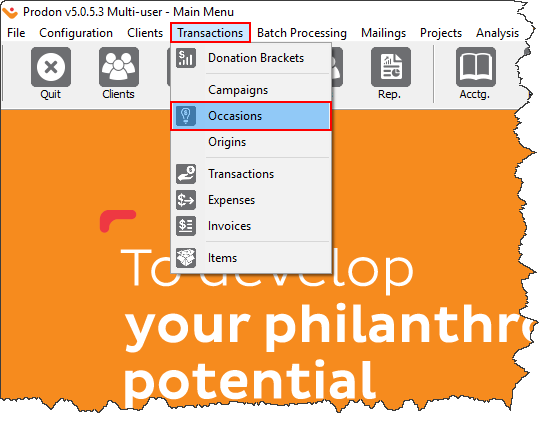
To go to the " Donation Occasion Management ", from the software home page, click on the " Transactions " menu, then select " |
 |
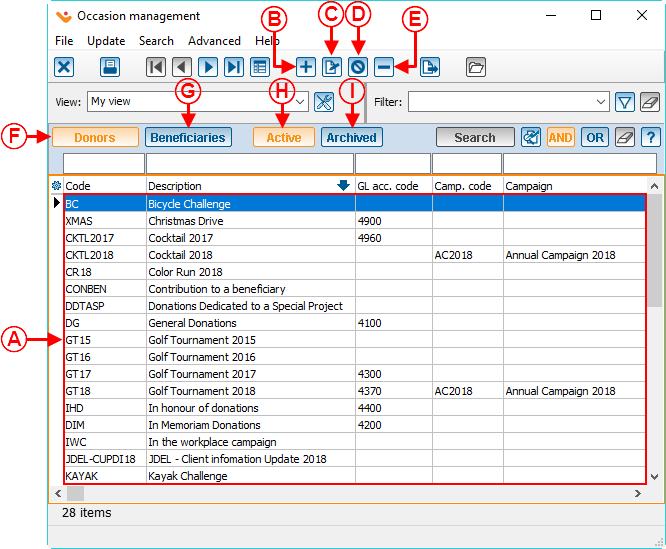 | |
| A: The |
B: The |
| C: The |
D: The NOTE: This option is not recommended, it is preferable to deactivate an occasion rather than deleting it. |
|
E: The " Donors " button contains the list all the donation occasions that are not beneficiaries. |
F: The " Beneficiaries " button contains the list of all the beneficiary donation occasions. For more details concerning the beneficiary donation occasions, consult this procedure. |
|
G: The " Active " button contains the list of all active donation occasions in the database. |
H: The " Archived " button contains the list of the deactivated donation occasions. To learn how to reactivate a donation occasion, click here and check letter F . |
| I: This is a list of all the occasions listed according to the buttons that are selected (in orange). To select more than one button you need to press the " Ctrl " key + the button wanted. | |
Adding / Editing a Donation Occasion
Main Window / Editing a Donation Occasion
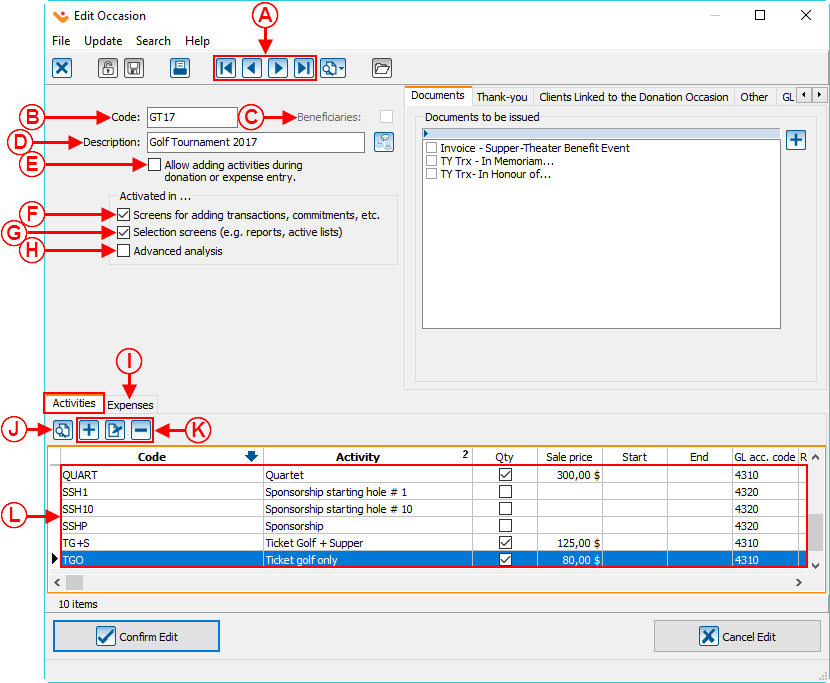 | |
| A: These buttons |
B: This line contains the donation occasion code. This code can be used as a shortcut in order to accelerate subsequent donation entry. |
| C: This box must be checked if it is a beneficiary donation occasion. For more information concerning beneficiary donation occasions, consult this procedure. | D: This line contains the description of the donation occasion. This description is actually the name of the donation occasion and it is this name that appears on the receipts. |
| E: If this box is checked, it is possible to create a new activity when entering a transaction. | F: By unchecking this box, the donation occasion is deactivated. Once the donation occasion is deactivated, it is found in the " Archived " list of donation occasion. For more information see letter C: in the " Donation Occasion Management "
NOTE: It is also possible to deactivate a donation occasion from the " Donation Occasion Management ", but it is only possible to reactivate it from this box. |
| G: By unchecking this box, the donation occasion is no longer included in reports and lists. To include the donation occasion back in the reports and lists, you simply need to check this box again.
NOTE: Generally, when a donation occasion has not been active for about 5 years, it is irrelevant to include it in reports and lists. |
H: By checking this box, the donation occasion will be included in the Advanced Analysis, that is in the Advanced Custom Report Templates. |
| I: The "Expenses" tab contains the expense activities for the chosen donation occasion. For more information concerning expenses, consult the "Adding / Editing an Expenses Activity" section. | J: This button activates the search bar. |
| K: These buttons |
L: This is the list of the different activities that are in the donation occasion identified in letter D . |
| M: This button Note: It is only available when a donation occasion is being created. | |
" Documents " Tab
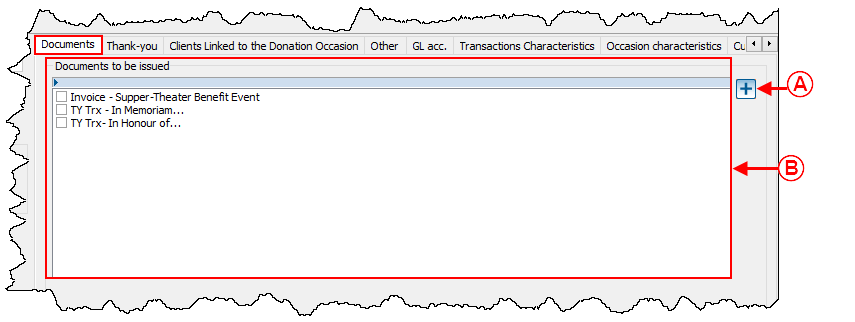
This tab allows you to choose the documents to be issued once the donation transaction is transferred. This document can, for instance, be a thank-you letter that will be sent to the donor. For more details concerning the documents to be issued, click here.
 | |
|
A: The |
B: This is the list of the documents already created that can be issued for this donation occasion. To select one of them, simply check the documents wanted. CAUTION: By selecting a document for a donation occasion, it is produced for all activities. To learn how to select a specific document for an activity, consult the " Main Window / Editing an Activity " section. |
" Thank-you " Tab
This tab allows you to activate customized fields in order to manage notions that do not exist in ProDon.
 | |
|
A: If this box is checked, it will be possible to modify the thank-you chosen in B. If it is left unchecked, it will be the thank-you that will be generated by default when issuing the receipts. |
B: If a thank-you is chosen the receipt issued will be a receipt with an intergrated thank-you and the thank-you chosen will be intergrated by default on the receipt. For more information on the receipts with intergrated thank-you's click here. |
"Client link" Tab
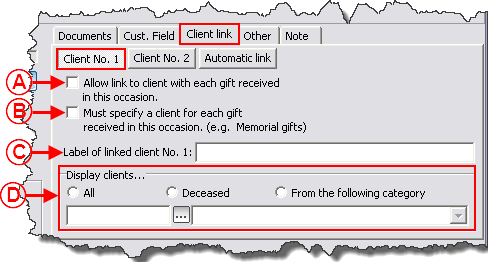
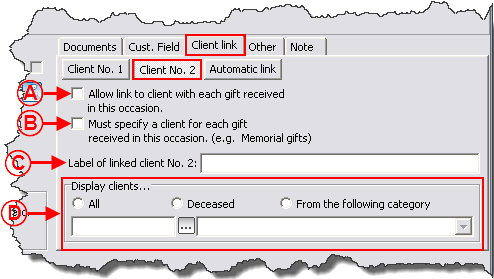
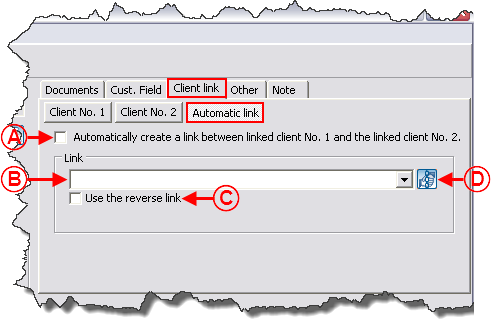
This tab allows you to document a client, other than the payer of the transaction. For example, if a donation in honour of someone is made, "Client No. 1" could be the person to be honoured, then "Client No. 2" could be the person to be notified of the gift.
 | |
|
A: If this box is checked, it is possible to automatically link the person to be notified to the person to be honoured once a first transaction is entered for this donation occasion. The link between "Client No. 1" and "Client No. 2" is created in their client files. |
B: This box allows you to indicate the link, for example, "Person to be honoured / Person to be notified". For more details on links, consult this procedure. |
|
C: If this box is checked, the reverse link is used, for example, instead of "Person to be honoured / Person to be notified" in B, it would be "Person to be notified / Person to be honoured". |
D: By clicking on the |
"Other" Tab
 | |
|
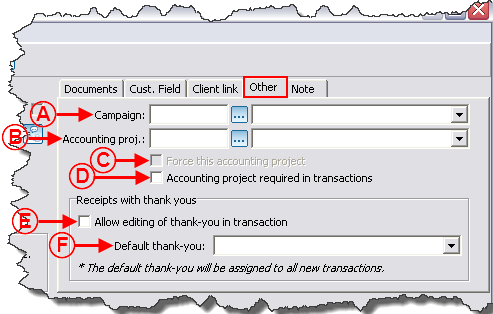
A: Allows you to select the campaign to which this donation occasion is linked. For more information on campaign management, click here. |
B: Allows you to specify the accounting project account of the donation occasion. |
|
C: If this box is checked, the accounting project specified in B is entered automatically during a transaction entry and it is impossible to modify it. |
D: If this box is checked, it is impossible to leave the accounting project empty when entering a transaction. |
|
E: If this box is checked, it is possible to modify the thank-you chosen in F. If it is not checked, the default thank-you will inevitably be used in the issuance of the receipts. |
F: If a thank-you is chosen, the issued receipt is a receipt with integrated thank-you, and the thank-you chosen here will be integrated by default to the receipt. For more details on the receipts with integrated thank-you, click here. |
" Cust. field " Tab
This tab allows you to activate customized fields in order to manage notions that do not exist in ProDon.
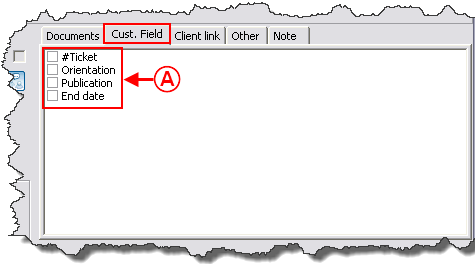 |
|
A: To activate a customized field, simply check the box of the wanted field. The selected field or fields will be visible when entering transactions related to this donation occasion. CAUTION: By selecting a field for the donation occasion, it will be visible for all activities. To learn how to select a field specific to an activity, consult the "Main Window / Editing an Activity" section. NOTE: The customized fields visible in the list have previously been created. These are transaction type customized fields. To learn how to edit or create new ones, consult the "Customized Field Configuration" document. |
"Note" Tab
This tab allows you to write a note for internal management purposes. This note will only be visible in this management screen.
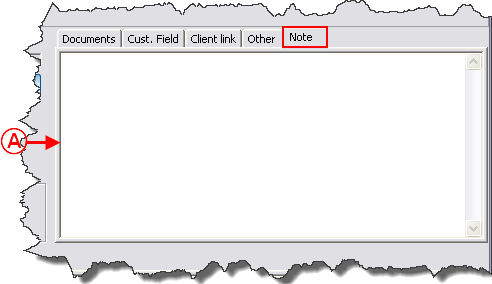 |
|
A: Write the note for internal management purposes here. |
Adding / Editing a Revenue Activity
To learn how to add or edit a revenue activity, consult letter L of "Main Window / Editing a Donation Occasion" of the "Adding / Editing a Donation Occasion" section.
Main screen / Editing an Activity
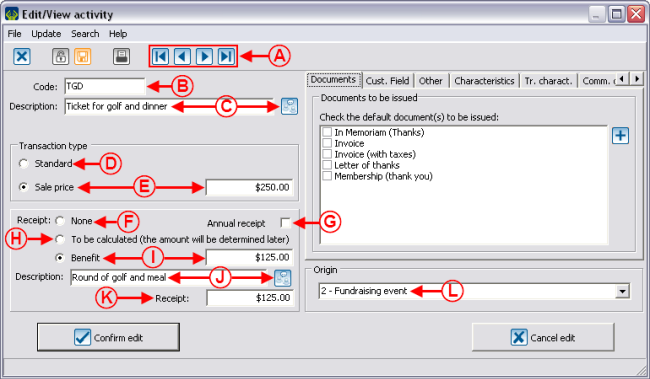 | |
|
A: These buttons allow you to browse from one revenue activity to the other without necessarily having to return to the "Edit donation occasion" screen. |
B: This line contains the code of the revenue activity. This code can be used as a shortcut to accelerate the subsequent donation entry. |
|
C: This line contains the description of the revenue activity. This description actually is the name of the activity and it is this name that will appear on the receipts. |
D: If this option is activated, it is an activity for which the amount of the donation has not been defined beforehand. The amount will be known only when entering the transaction (e.g. Gift only). |
|
E: If this option is activated, it is an activity for which the sale price has been defined beforehand (e.g. sales of tickets, items, etc.). |
F: This option is activated if no receipt has to be issued for the activity. |
|
G: This option allows you to send only one annual receipt for this activity. For more information on annual receipts, consult the "Processing Receipts to be Issued" document. |
H: This option must be activated if the amount of the receipt and the amount paid by the donor are different because the value of the benefit has to be considered and also because the value is not known yet. If this box is checked, the receipts will be in the "Receipts to be calculated" tab of the "Processing Receipts to be Issued" until the value is entered. For more information, click here. |
|
I: This option must be activated when the value of the benefit is known. The value of the benefit is the amount the donor receives, for example, the round of golf and the dinner in a golf tournament. In this example, the value of the benefit is $125.00 and the participant pays $250.00 for the purchase of the ticket, the receipt will be for $125.00. |
J: This line allows you to enter the description of the benefit. This description appears on the receipts as required by Canada Revenue Agency. In this example, the donor will participate in a round of golf and will have dinner. Moreover, the |
|
K: This line indicates the amount of the receipt that is automatically calculated by ProDon, according to the difference between the paid amount and the value of the benefit. In this example, the ticket price is $250.00 and the benefit is $125.00, so the amount of the receipt will be $125.00. |
L: This line allows you to specify the origin of the donation. To learn how to add or edit origin codes, see the " Origin Code Management" document. |
"Documents" Tab
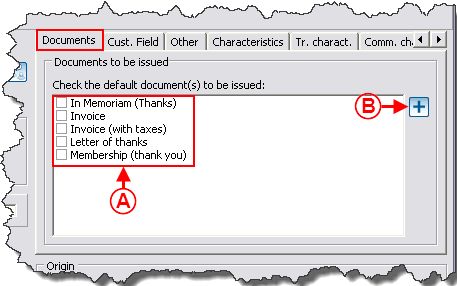 | |
|
A: It is the list of documents to be issued for this specific activity. To select any, simply check the wanted document or documents. |
B: The |
"Cust. field" Tab
This tab allows you to activate customized fields to manage notions that do not exist in ProDon.
 |
|
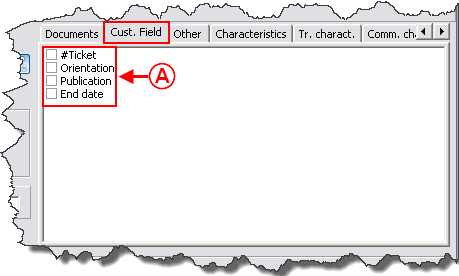
A: To activate a customized field, simply check the box of the wanted field. The selected field or fields will be visible when entering a transaction for this specific activity. NOTE: The customized fields visible in the list have been created beforehand.These are transaction type customized fields. To learn how to modify or create new ones, consult the "Customized Field Configuration" document. |
"Other" Tab
 | |
|
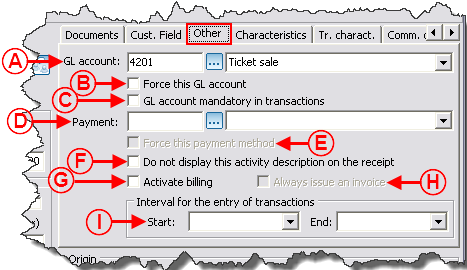
A: Allows you to indicate the default General Ledger code to be used for this revenue activity when entering transactions. To be able to choose it here, it must have previously been defined in the "Chart of Account Management". |
B: If this box is checked, the General Ledger account specified in A is automatically entered when entering a transaction and it is impossible to modify it. |
|
C: If this box is checked, it is impossible to leave the General Ledger code field empty when entering the transaction. |
D: Allows you to indicate the default payment method to be used for this revenue activity when entering transactions. To be able to choose it here, it must have previously been defined in the "Payment method management". To learn how to add or modify payment methods, see this procedure. |
|
E: If this box is checked, the payment method specified in D is automatically entered when entering a transaction and it is impossible to modify it. |
F: If this box is checked, the description of the activity will not be displayed on the receipt. |
|
G: Allows you to activate the billing. In order for this box to be accessible, the invoicing module must be activated. For more details on invoicing, see the "Invoicing Module" document. |
H: If this box is checked, an invoice is always issued when a transaction is performed in this revenue activity. In order for this box to be accessible, the box in G must be checked. |
|
I: The interval of entry ensures that it is impossible to enter a transaction before or after the specified dates. This function is mainly used for pre-sale activities, when a price changes on a specific date. |
|
"Characteristics" Tab
This tab allows you to enter the characteristics of the activity. These characteristics are visible only in this management screen.
For more details on the characteristics, click here.
 | |
|
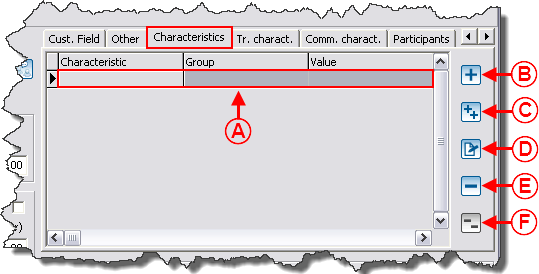
A: The characteristics will be listed here once they are added. |
B: The |
|
C: The |
D: The |
|
E: The |
F: The |
|
NOTE: To add a characteristic or a group of characteristics to the list, they must have previously been created in the "Characteristic management". | |
"Tr. charact." Tab
"Tr. charact." means transaction type characteristic. This tab allows you to choose characteristics that will always be present when entering transactions related to this activity. This tab is mainly used for information that must be documented in a systematic way.
For more details on the characteristics, click here.
|
|
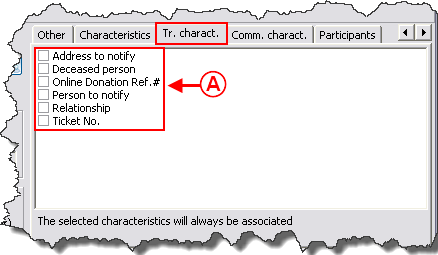
A: Choose the appropriate characteristics from the list. The list of the visible characteristics is the list of all the transaction type characteristics. To add characteristics to the list, consult the "Characteristic management" document. |
"Comm. charact." Tab
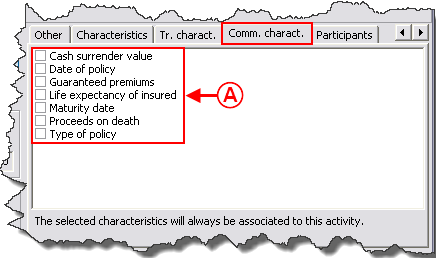
"Comm. charact." means commitment characteristic. This tab allows you to choose characteristics that will be present in the commitments related to the activity. This tab is mainly used for the information that must be documented in a systematic way.
CAUTION: The commitment characteristics are only available if the "Prospecting and Commitments Module" is activated.
For more details on the characteristics, click here.
|
|
A: Choose the appropriate characteristics from the list. The list of visible characteristics is the list of all the commitment type characteristics. To add characteristics to the list, consult the "Characteristic management" document. |
"Participants" Tab
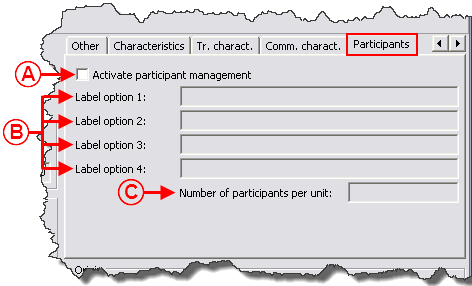
This tab allows you to activate the "Participant management" for this activity. For more details on the "Participant management", click here.
| |
|
A: Allows you to activate the "Participant management" for this activity. For more details on the "Participant management", click here. |
B: Allows you to name fields in order to add specific elements to the activity. For instance, for a golf tournament, the labels to be added could be "Shotgun start" or "Table number" for the dinner. NOTE: It is possible to add labels only if the box in A is checked. |
|
C: The line is present only if the activity is of "Sale price" type. It allows you to specify the number of participants based on the quantity entered in the transaction. For instance, if someone buys 4 tickets for an activity and that here it is specified "1" participant per unit, there would be 4 participants. If, on the other hand, someone buys 4 tickets for an activity and that it is specified "4" participants per unit, there would be 16 participants. NOTE: This field becomes shaded as soon as a first transaction is entered in the activity. CAUTION: A transaction in ProDon can not be divided in several payers. Therefore, even though an activity has a sale price, it can have many participants; it is not possible to specify more than one payer. A single receipt for the total amount of the gift and to the name of the entered donor can be generated per transaction. | |
Adding / Editing an Expenditure Activity
|
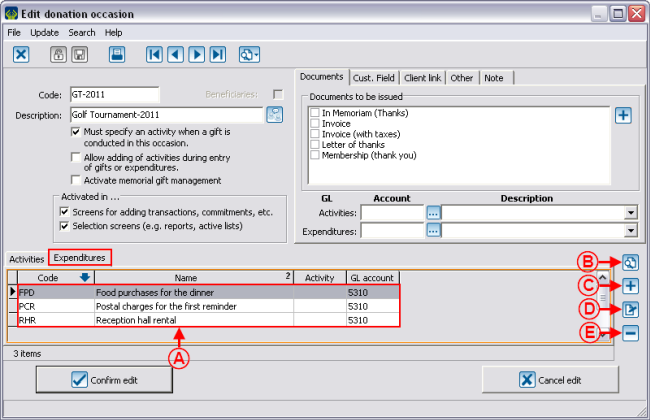
In the "Edit donation occasion" window, go to the "Expenditures" tab. | |
| |
|
A: It is the list of the expenditure activities. |
B: The |
|
D: The | |
| |
|
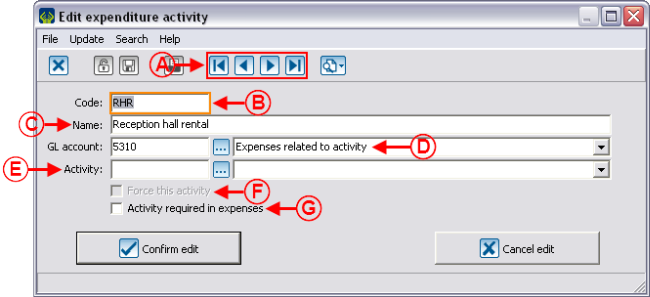
A: These buttons allow you to browse from one expenditure activity to the other without having to return to the "Edit donation occasion" screen. |
B: This line contains the code of the expenditure activity. This code can be used as a shortcut to accelerate the subsequent entry of expenditures. |
|
C: This line contains the description of the expenditure activity. This description is actually the name of the activity and it is the name that will be the most visible element in the reports and analysis tools. |
D: Allows you to indicate the default General Ledger account to be used in the entry of transactions for this expenditure activity. To be able to choose it here, it must have previously been defined in the "Chart of Account Management". |
|
E: Allows you to indicate a revenue activity specific to the expenditure activity. Generally, the notion of activity is left empty. In this example, the "Reception hall rental" expenditure is not related to a precise revenue activity because it is an expense for the donation occasion in general. |
F: If this box is checked, the expenditure activity specified in E is automatically entered in the entry of a transaction and it is impossible to modify it. |
|
G: If this box is checked, it is impossible to leave the revenue activity field empty when entering a transaction for this expenditure activity. |
NOTE: In a donation occasion like an annual campaign, the expenses are usually linked to an activity. For instance, the expenses related to the first mass mailing are linked to the "First mass mailing" activity. Each mailing is linked to a precise revenue activity to be able to differentiate the expenses of the first mailing from the ones of the different reminders. |
Document name: ProDon:Donation Occasion Management
Version : 4.6.5.13
