Difference between revisions of "ProDon:Preferences"
(Tag: Visual edit) |
(Tag: Visual edit) |
||
| Line 5: | Line 5: | ||
== Introduction == | == Introduction == | ||
| − | The preferences tab allows the user to customize general configuration settings in the software. For example, the activation/deactivation of some fields or options in the software, the configuration of the format or the setting | + | The preferences tab allows the user to customize the general configuration settings in the software. For example, the activation/deactivation of some fields or options in the software, the configuration of the format or the setting for the layout of some fields. <br> |
There are 2 types of preferences: system preferences and user preferences.<br> | There are 2 types of preferences: system preferences and user preferences.<br> | ||
| Line 14: | Line 14: | ||
|- | |- | ||
| colspan="2" | | | colspan="2" | | ||
| − | To configure the preferences from the main page of the software, click on the " Configuration " menu, then select " [[File:Prodon5 Preferences Button.png]]Preferences ". | + | To configure the preferences from the main page of the software, click on the " Configuration " menu, then select " [[File:Prodon5 Preferences Button.png]] Preferences ". |
|- | |- | ||
| Line 22: | Line 22: | ||
== User preferences == | == User preferences == | ||
| − | The user preferences can be customized by | + | The user preferences can be customized by any user. The changes done in this section will only be applied to the current user profile.<br> |
| − | '''NOTE :''' If some users are not able to edit their user preferences, it is because they do not have the necessary accesses. To get the access needed go to [[ProDon:User Management|User Management]] page to give the users the rights to customize their preferences. <br> | + | '''NOTE :''' If some users are not able to edit their user preferences, it is because they do not have the necessary accesses. To get the access needed go to the [[ProDon:User Management|" User Management "]] page to give the users the rights to customize their preferences. <br> |
<br> | <br> | ||
| Line 30: | Line 30: | ||
=== " Shortcut Bar " tab === | === " Shortcut Bar " tab === | ||
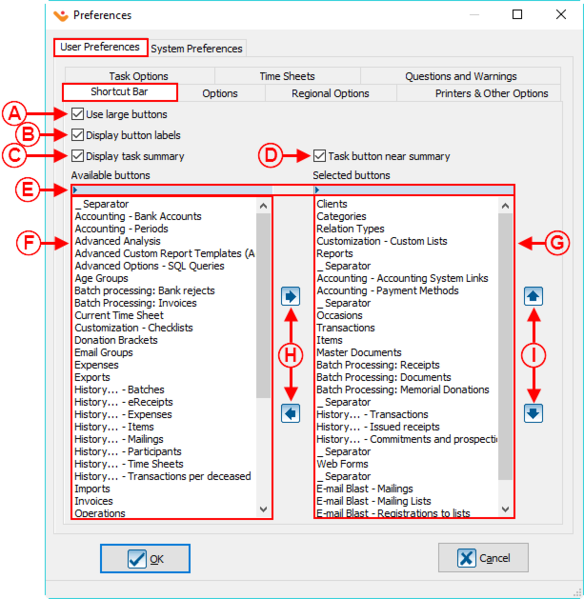
| − | The " Shortcut Bar " tab allows the shortcut bar to be | + | The " Shortcut Bar " tab allows the shortcut bar to be modified by the user. The Shortcut bar is at the top of the homepage and contains different buttons/icons, allowing the users to access different management grids or sections of the software in a single click. |
{| width="200" cellspacing="1" cellpadding="1" border="1" class="wikitable" | {| width="200" cellspacing="1" cellpadding="1" border="1" class="wikitable" | ||
| Line 50: | Line 50: | ||
'''NOTE:''' The box <span style="color: rgb(255, 0, 0);">'''C'''</span> must be checked for this option to be activated. | '''NOTE:''' The box <span style="color: rgb(255, 0, 0);">'''C'''</span> must be checked for this option to be activated. | ||
| − | |||
|- | |- | ||
| − | | | + | |<span style="color: rgb(255, 0, 0);">'''E:'''</span> To activate the search bar, click on the blue bar on top of the " Available Button " section (see <span style="color: rgb(255, 0, 0);">'''F'''</span>) and the " Selected Buttons " section (see <span style="color: rgb(255, 0, 0);">'''G'''</span>). It will help in finding a specific button faster. |
| − | <span style="color: rgb(255, 0, 0);">'''E:'''</span> | + | |<span style="color: rgb(255, 0, 0);">'''F:'''</span> This is the list of all the available buttons in the software. To add a button to the Shortcut Bar, use this arrow button [[File:Button right arrow long.png|frameless]] see <span style="color: rgb(255, 0, 0);">'''H'''</span>. |
| − | |||
| − | | | ||
| − | <span style="color: rgb(255, 0, 0);">'''F:'''</span> This is the list of the buttons | ||
| − | |||
|- | |- | ||
| | | | ||
| − | <span style="color: rgb(255, 0, 0);">'''G:'''</span> | + | <span style="color: rgb(255, 0, 0);">'''G:'''</span> This is the list of the buttons actually displayed in the Shortcut Bar. To remove a button from this list, use this arrow button [[File:Button left arrow long.png|frameless]] see <span style="color: rgb(255, 0, 0);">'''H'''</span>. |
| | | | ||
| − | <span style="color: rgb(255, 0, 0);">'''H:'''</span> The [[File:Button right arrow long.png|frameless]] and [[File:Button left arrow long.png|frameless]] buttons allow the addition or | + | <span style="color: rgb(255, 0, 0);">'''H:'''</span> The [[File:Button right arrow long.png|frameless]] and [[File:Button left arrow long.png|frameless]] arrow buttons allow the addition or removal of buttons from the Shortcut Bar. |
|- | |- | ||
| colspan="2" | | | colspan="2" | | ||
| − | <span style="color: rgb(255, 0, 0);">'''I:'''</span> The [[File:Button Arrow down.png|frameless]] and [[File:Button Arrow up.png|frameless]] buttons allow the display order of the buttons | + | <span style="color: rgb(255, 0, 0);">'''I:'''</span> The [[File:Button Arrow down.png|frameless]] and [[File:Button Arrow up.png|frameless]] arrow buttons allow the user to customize the display order of the buttons in the Shortcut Bar. |
|} | |} | ||
| Line 80: | Line 75: | ||
|- | |- | ||
| width="50%" | | | width="50%" | | ||
| − | <span style="color: rgb(255, 0, 0);">'''A:'''</span> Allows a user to choose the display language of the software. | + | <span style="color: rgb(255, 0, 0);">'''A:'''</span> Allows a user to choose the display language of the software. |
| width="50%" | | | width="50%" | | ||
| − | <span style="color: rgb(255, 0, 0);">'''B:'''</span> Allows the user the option to change the background color. | + | <span style="color: rgb(255, 0, 0);">'''B:'''</span> Allows the user the option to change the background color (orange or purple). |
|- | |- | ||
|<span style="color: rgb(255, 0, 0);">'''C:'''</span> When searching, if the option " When the button is clicked " is selected, click on the button [[Common_functions:Search_Bar|" Search "]] of the Search Bar or press the " Enter " key on the keyboard to start the search once the search criteria is specified. Also, a delay can be selected to automatically launch the search when the time criteria is complete. | |<span style="color: rgb(255, 0, 0);">'''C:'''</span> When searching, if the option " When the button is clicked " is selected, click on the button [[Common_functions:Search_Bar|" Search "]] of the Search Bar or press the " Enter " key on the keyboard to start the search once the search criteria is specified. Also, a delay can be selected to automatically launch the search when the time criteria is complete. | ||
| − | |<span style="color: rgb(255, 0, 0);">'''D:'''</span> Allows the user the choice of selecting when the Web Section of the main page will be refreshed. For example, the user can choose if the refresh type will be done as soon as '''''Logilys''''' modifies something, when the user starts up the software, or | + | |<span style="color: rgb(255, 0, 0);">'''D:'''</span> Allows the user the choice of selecting when the Web Section of the main page will be refreshed. For example, the user can choose if the refresh type will be done as soon as '''''Logilys''''' modifies something, when the user starts up the software, or to not display (not recommended). |
|- | |- | ||
| | | | ||
| Line 96: | Line 91: | ||
|- | |- | ||
| | | | ||
| − | <span style="color: rgb(255, 0, 0);">'''G:'''</span> Allows the user to choose which of the available shortcuts are to be created in the Start menu. | + | <span style="color: rgb(255, 0, 0);">'''G:'''</span> Allows the user to choose which of the available shortcuts are to be created in the Start menu. The shortcuts available are: '''''Prodon''''', the Support Center, the backup software, the web update software, the Wiki documentation, and the '''''Logilys''''' web site. |
| − | |||
| − | The shortcuts available are: '''''Prodon''''', the Support Center, the backup software, the web update software, the Wiki documentation, and the '''''Logilys''''' web site. | ||
| | | | ||
| Line 117: | Line 110: | ||
|<span style="color: rgb(255, 0, 0);">'''M:'''</span> Allows the last filtered period to be automatically selected at the top right corner of the Analysis and history of transactions grid when opening it again. | |<span style="color: rgb(255, 0, 0);">'''M:'''</span> Allows the last filtered period to be automatically selected at the top right corner of the Analysis and history of transactions grid when opening it again. | ||
| − | |<span style="color: rgb(255, 0, 0);">'''N:'''</span> If this box is activated, '''''Prodon''''' will display a window informing the user that there are online donations to import at each opening of the software (the Online Donation | + | |<span style="color: rgb(255, 0, 0);">'''N:'''</span> If this box is activated, '''''Prodon''''' will display a window informing the user that there are online donations to import at each opening of the software (the [[ProDon:Table of Contents#Online donation module|" Online Donation Module "]] must be activated to be able to see this box). |
|- | |- | ||
Revision as of 13:01, 4 July 2018
| Preferences |
Contents
[hide]- 1 Introduction
- 2 Access to preferences
- 3 User preferences
- 4 System Preferences
- 4.1 Security and languages
- 4.2 Regional Options
- 4.3 Clients
- 4.4 Addresses
- 4.5 Means of communication
- 4.6 Duplicates
- 4.7 Transactions
- 4.8 Commitments
- 4.9 Time Sheets
- 4.10 Greetings
- 4.11 Reports
- 4.12 Display
- 4.13 E-mail Blast / eReceipts
- 4.14 Other
- 4.15 Performances
- 4.16 Tasks
- 4.17 Documents
- 4.18 Mailings
CAUTION : This document is for VERSION 5 of Prodon. To go to the document for version 4, click here.
WARNING : This document is currently being edited/revised, it is possible that some parts are missing or obsolete.
Introduction
The preferences tab allows the user to customize the general configuration settings in the software. For example, the activation/deactivation of some fields or options in the software, the configuration of the format or the setting for the layout of some fields.
There are 2 types of preferences: system preferences and user preferences.
Access to preferences
|
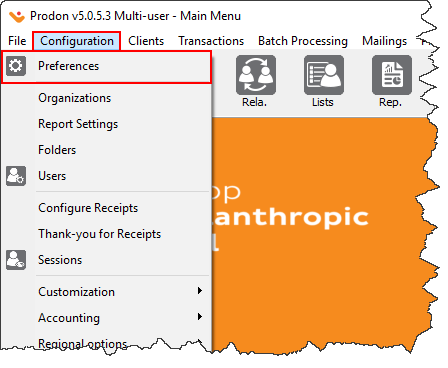
To configure the preferences from the main page of the software, click on the " Configuration " menu, then select " | |
|
User preferences
The user preferences can be customized by any user. The changes done in this section will only be applied to the current user profile.
NOTE : If some users are not able to edit their user preferences, it is because they do not have the necessary accesses. To get the access needed go to the " User Management " page to give the users the rights to customize their preferences.
" Shortcut Bar " tab
The " Shortcut Bar " tab allows the shortcut bar to be modified by the user. The Shortcut bar is at the top of the homepage and contains different buttons/icons, allowing the users to access different management grids or sections of the software in a single click.
" Options " Tab
| |
|
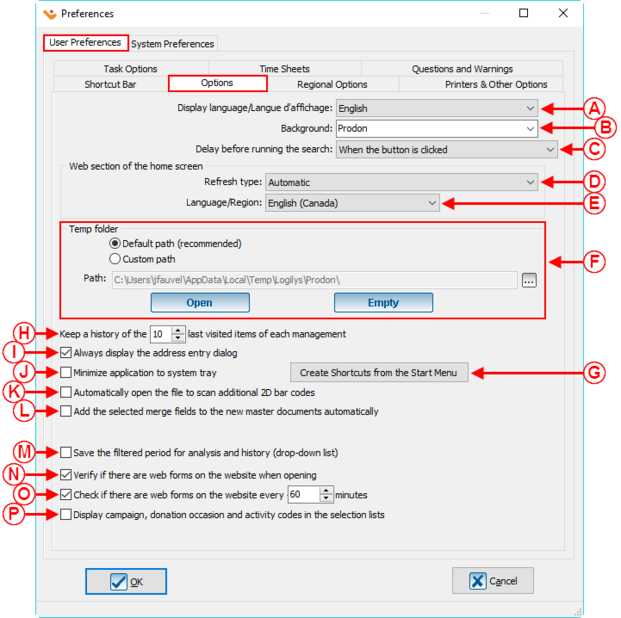
A: Allows a user to choose the display language of the software. |
B: Allows the user the option to change the background color (orange or purple). |
| C: When searching, if the option " When the button is clicked " is selected, click on the button " Search " of the Search Bar or press the " Enter " key on the keyboard to start the search once the search criteria is specified. Also, a delay can be selected to automatically launch the search when the time criteria is complete. | D: Allows the user the choice of selecting when the Web Section of the main page will be refreshed. For example, the user can choose if the refresh type will be done as soon as Logilys modifies something, when the user starts up the software, or to not display (not recommended). |
|
E: Allows the user to choose the language in which the Web section of the main page will be displayed. |
F: Allows for the customization of the path to the temporary folder. This configuration is usually done by the technicians at Logilys. |
|
G: Allows the user to choose which of the available shortcuts are to be created in the Start menu. The shortcuts available are: Prodon, the Support Center, the backup software, the web update software, the Wiki documentation, and the Logilys web site. |
H: Prodon automatically keeps a history of the last item visited. This option allows the users to choose how many items they want to keep in their history. |
|
I: Allows a window to open up which contains address fields (number, type of road, road name, point of call, etc.) to help users to use a consistent template for their client files. |
J: Allows the minimization of Prodon and places it in the notification zone of Windows at the bottom right of the screen. |
| K: Allows to automatically open the scan file for additionnal 2D bar codes. | L: This option will allow you to automatically add the selected merge fields to be inserted in a new Master Documents when it opens for the first time. |
| M: Allows the last filtered period to be automatically selected at the top right corner of the Analysis and history of transactions grid when opening it again. | N: If this box is activated, Prodon will display a window informing the user that there are online donations to import at each opening of the software (the " Online Donation Module " must be activated to be able to see this box). |
| O: If this box is activated, Prodon will display a window informing the user that there are online donations to import every X minutes (the Online Donation module must be activated to be able to see this box). A number of minutes can be set for each user. | P: Allows the codes for the campaigns, occasions, and activities to be displayed in the selection lists. |
" Regional Options " Tab
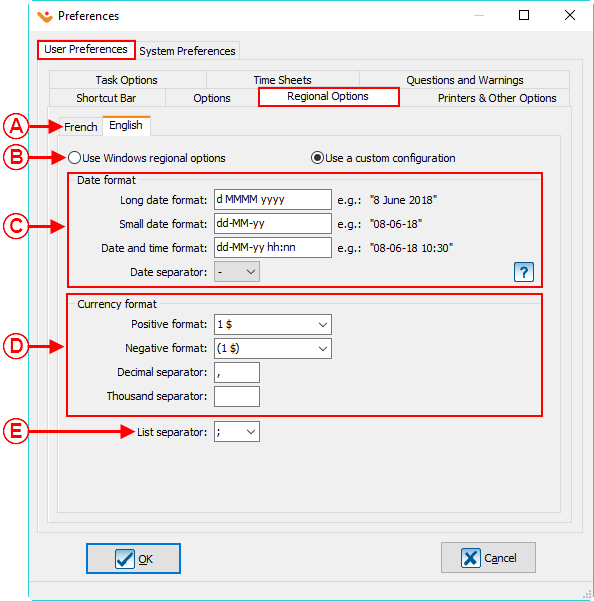
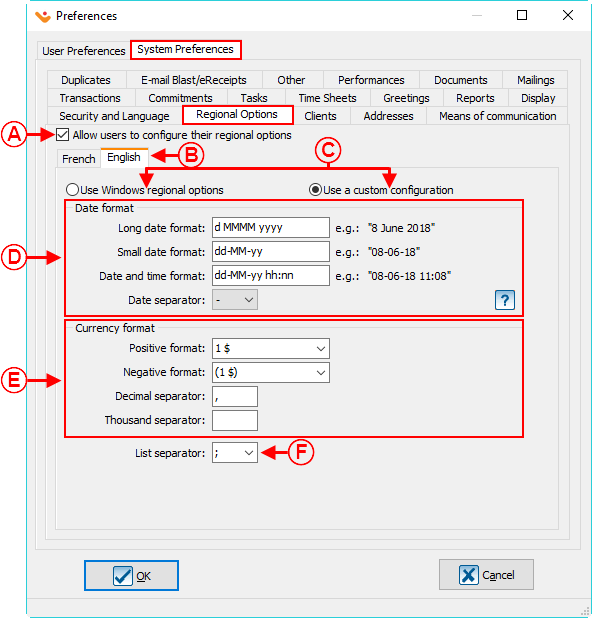
NOTE: This tab is only displayed in the " User Preferences " if the option has been activated in the " System Preferences ", see " Regional Options " point A in the " System Preferences ".
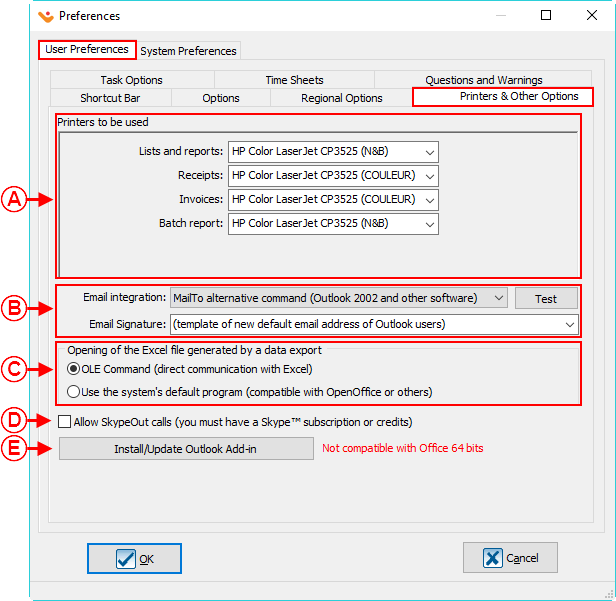
Printers and other options
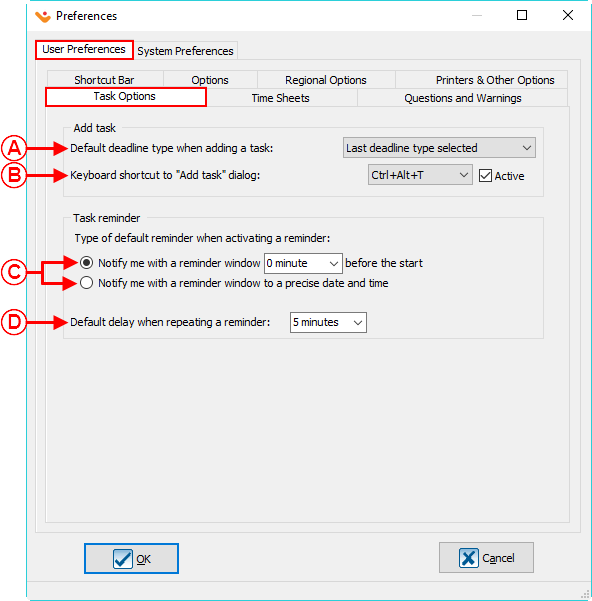
Task options
| |
|
A: Allows a deadline to be determined by default when adding a new task.
|
B: If the box " Active " is checked, it will be possible to quickly add a task by pressing the " Ctrl " + " Alt " + " T " keys from any management list in Prodon. |
|
C: These two options are associated to reminders for tasks. It is possible to choose between the two choices, the default value that will be assigned when creating a new task. For more informations about these options, consult the section " Reminder Tab " of the " Task and History Management " document. |
D: Allows the default delay for the reminders to be set. |
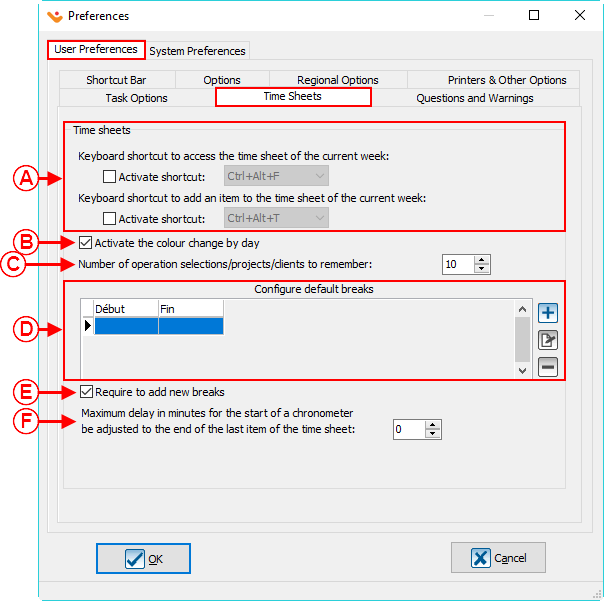
Time sheet
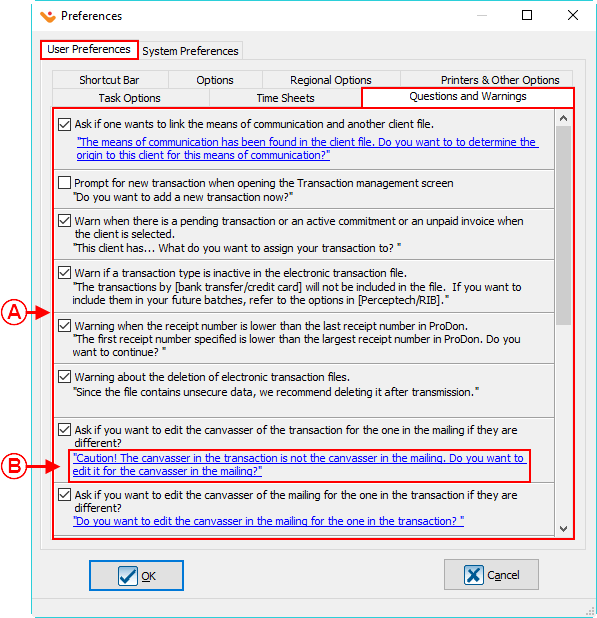
Questions and warnings
System Preferences
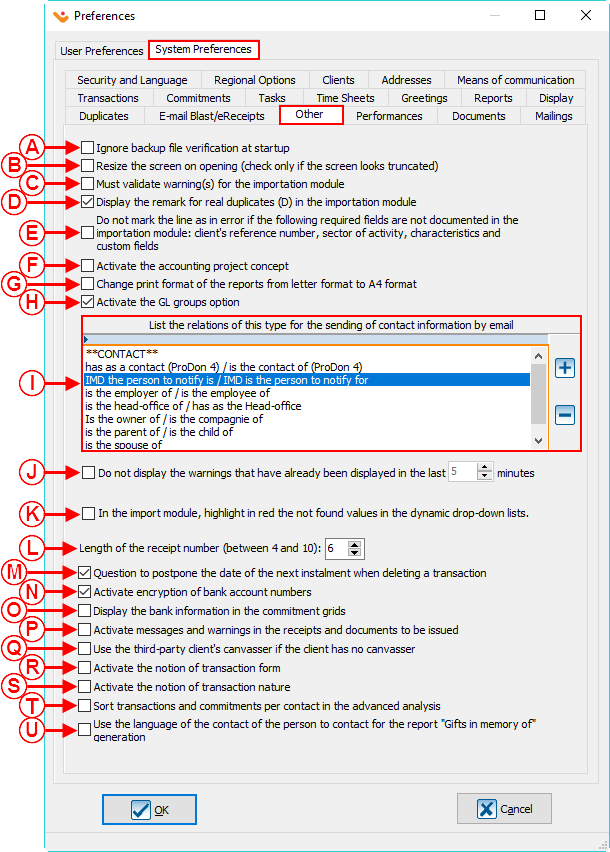
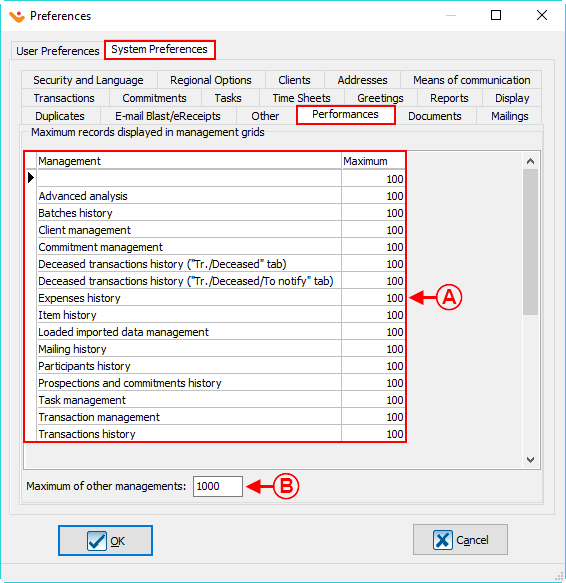
System preferences can only be edited by the " Supervisor " profile of Prodon. In the Network Version, please be advised that the changes done to these preferences will be applied to all of the users of Prodon.
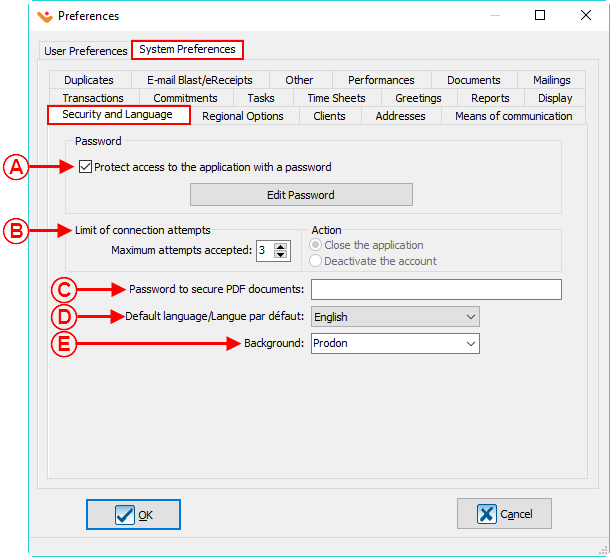
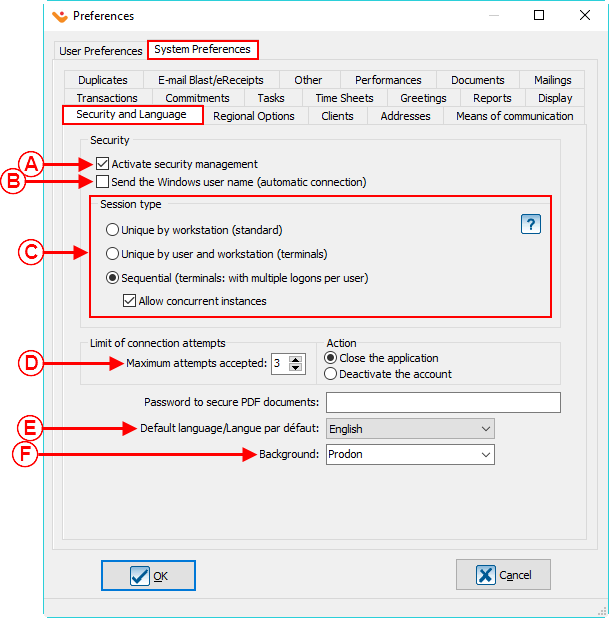
Security and languages
Standard Version
Network Version
Regional Options
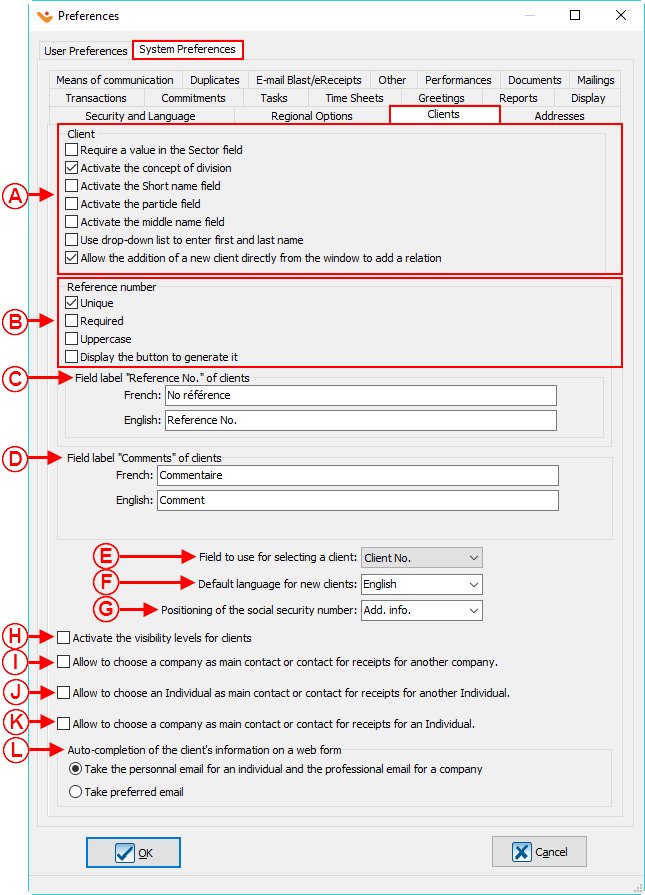
Clients
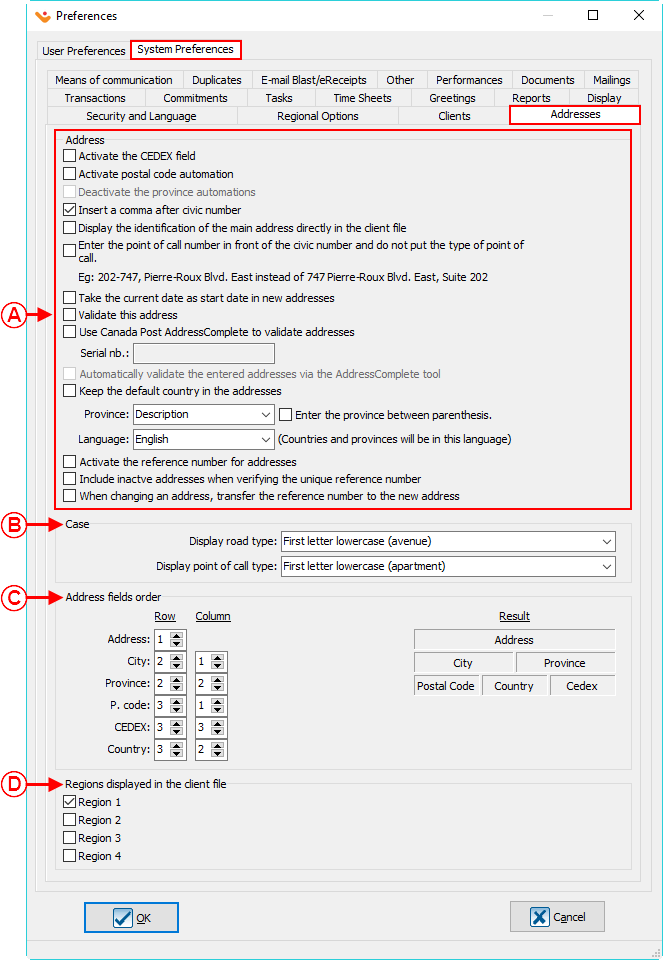
Addresses
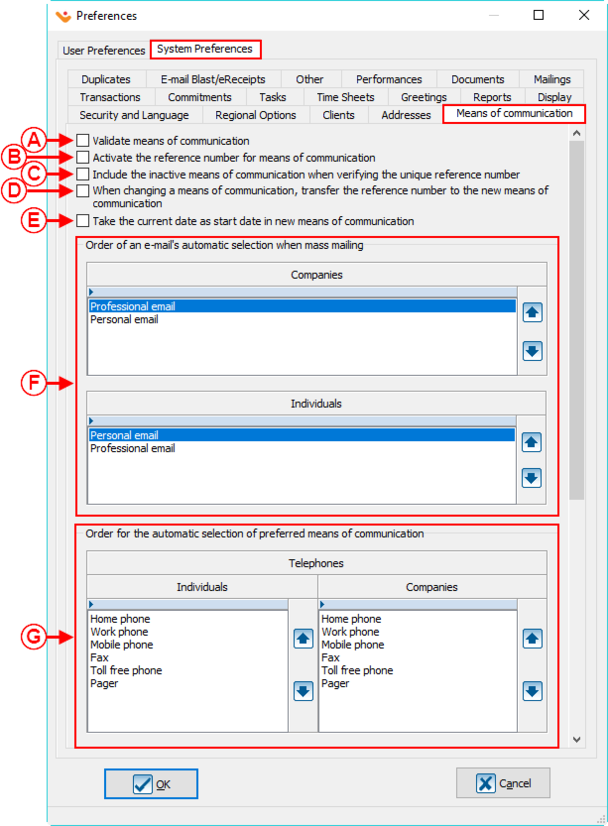
Means of communication
Duplicates
| |
|
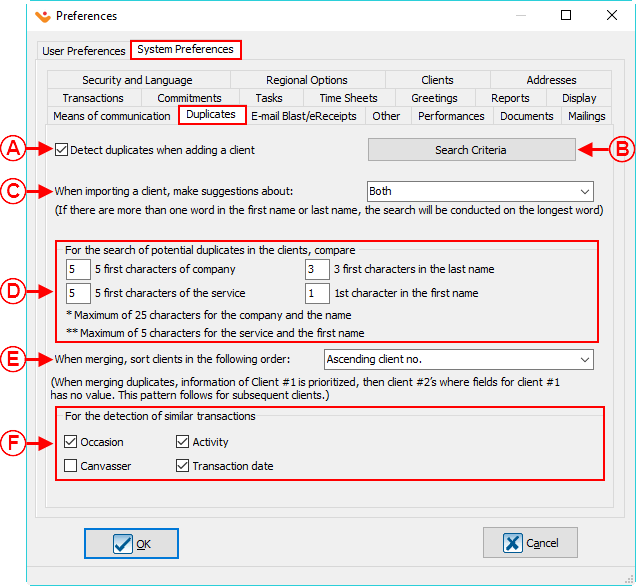
A: Allows the detection of potential duplicates when creating a new client file. |
B: Allows the search criteria for duplicates to be defined. |
|
C: Allows the user to choose the detection method for duplicates when importing client files. This option is only available with the " Importation Modules ". |
D: Allows the user to choose how many characters Prodon will use to search for duplicates. |
|
E: Allows the user to choose the order of sorting the clients when merging duplicates. |
F: Allows the selection of which fields Prodon will use to detect the identical transactions. |
| NOTE: For the search and the deletion of potential duplicates in the database, go to this procedure. | |
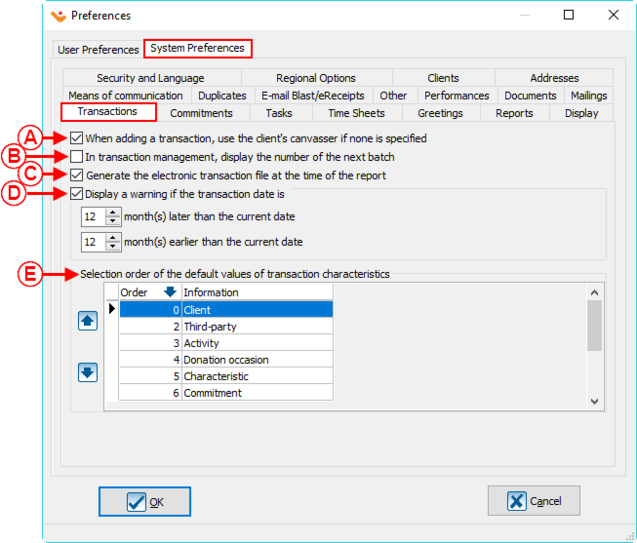
Transactions
Commitments
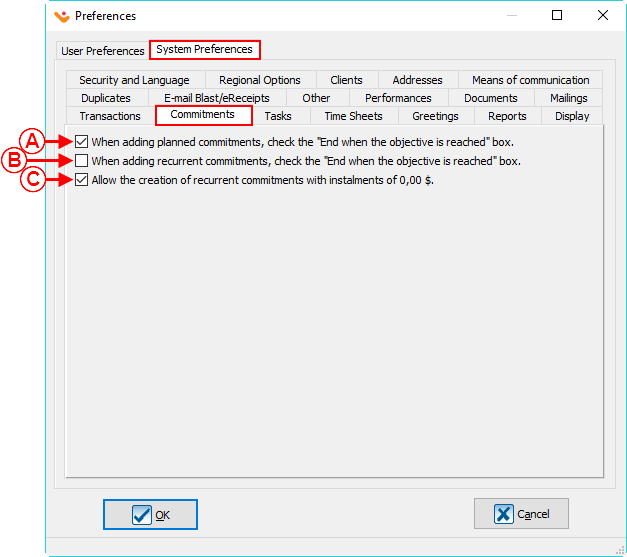
NOTE: This tab is only visible and these options are only editable if the " Commitments Module " is activated in the database.
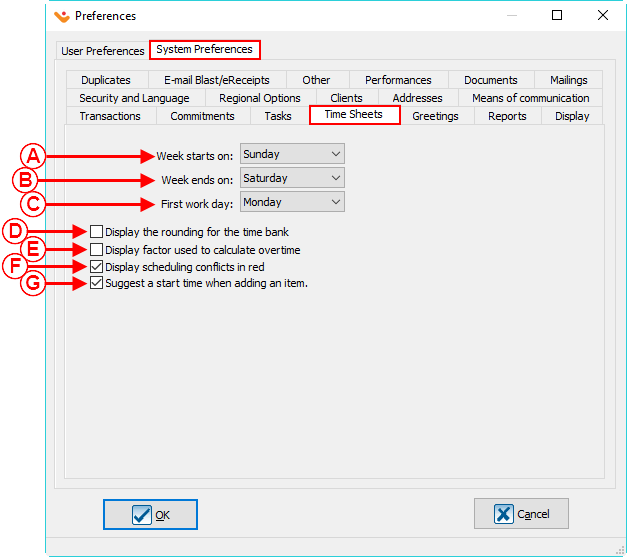
Time Sheets
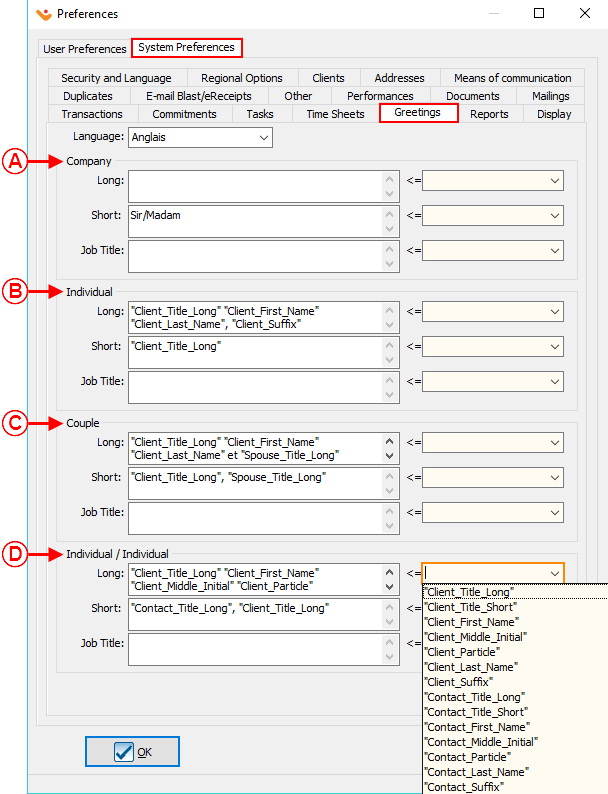
Greetings
Reports
| |
|
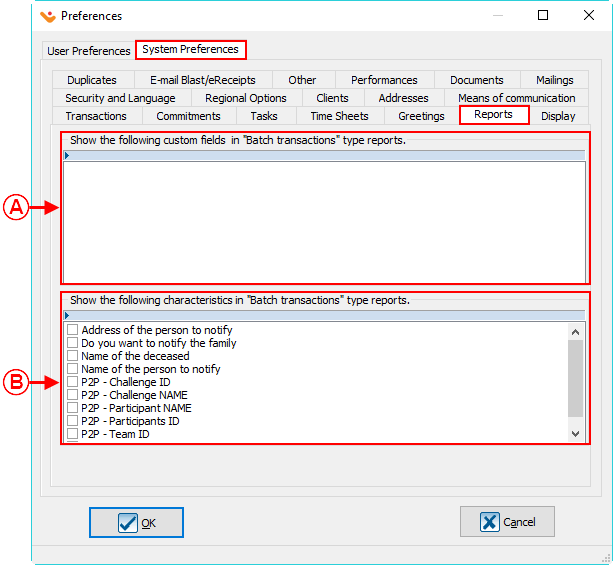
A : Allows the desired custom fields to be displayed in the " Batch Transactions " type reports. |
B : Allows the desired characteristics to be displayed in the " Batch Transactions " type reports. |
Display
| |
|
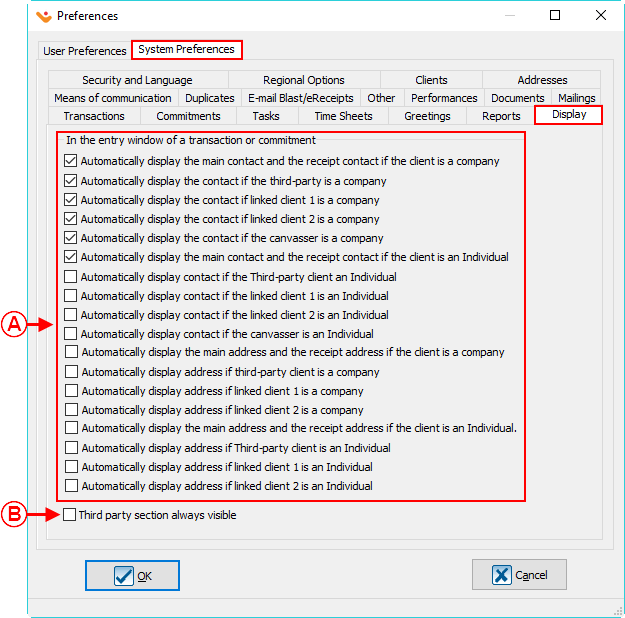
A : Allows the user to decide which contact and adress information will be displayed in the entry window of a transaction or commitment. |
B : Allows the " Third-party " section to be displayed. |
E-mail Blast / eReceipts
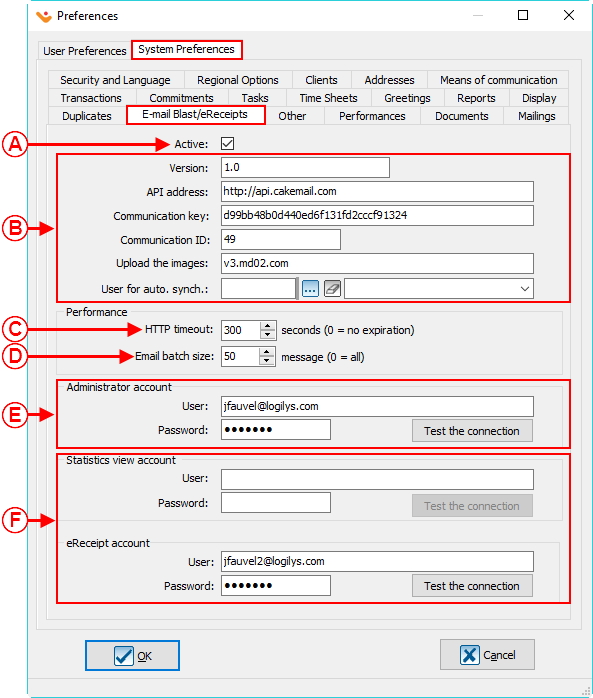
NOTE: This tab is only visible and the options are only editable if the " E-mail Blast module " or " eReceipts " module is active.
Other
Performances
Tasks
| |
|
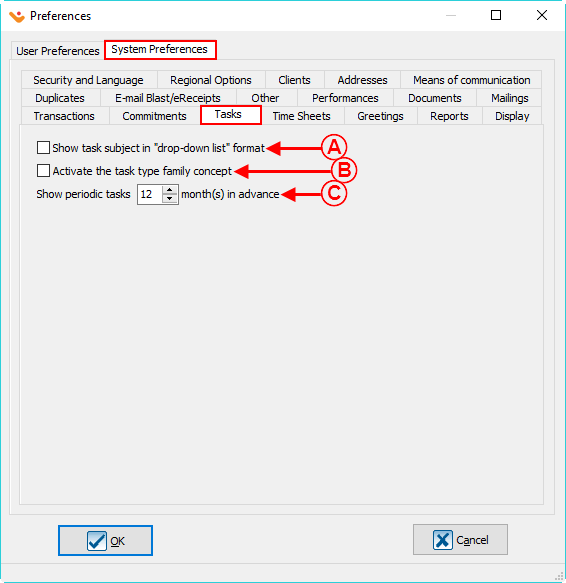
A: Allows the task subject to be displayed in " drop-down list " format. |
B: Allows tasks to be gathered in a family type concept. |
|
C: Allows periodic tasks to be seen in advance. | |
Documents
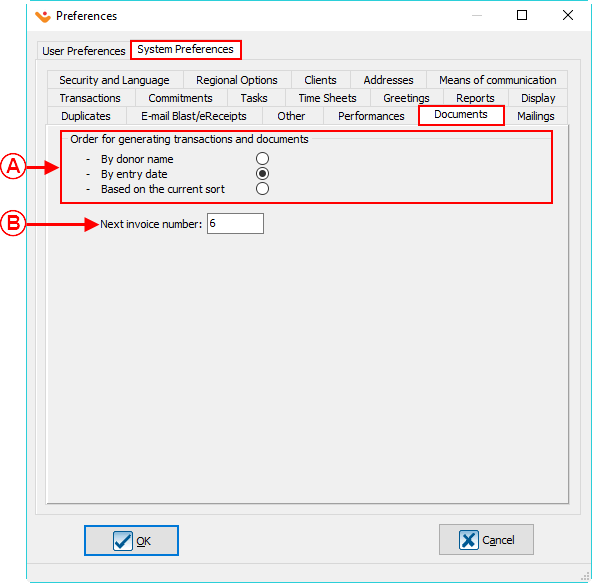
When receipts or documents (e.g.: Thank-you letters) are generated, it is now possible to specify in which order they will be opened for the purpose of having them printed in a precise order. Thus, if, for example a receipt series and a document series must be printed, both categories of documents will be in the same order.
| |
|
A: Allows the user to generate documents in a preset order. |
B: Allows the setting of the next invoice number. NOTE : This field is only available if the " Invoicing module " is activated in the database. |
Mailings
| |
|
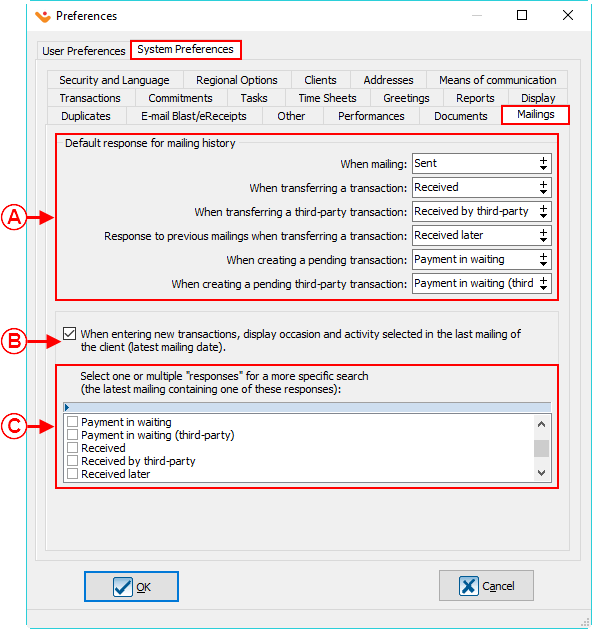
A: Allows the configuration of the default responses for Mailing history. |
B: If this option is checked, the selected occasion and activity used in the last mailing for the client (latest mailing date) will be displayed when entering new transactions. |
|
C: These options are only available if the option in B is checked and allow to search a mailing by " Responses ". For example, you want the occasion and activity of the last mailing that has " Payment in waiting " is automatically entered when you are entering the next transaction |
NOTE : For more information about Mailing History, click here. |
Document name: ProDon:Preferences
Version : 5.0.5
