Difference between revisions of "ProDon:Summary Management"
(→Summary Management) |
|||
| Line 11: | Line 11: | ||
== Summary Management == | == Summary Management == | ||
| − | First, go to the "Summary management". | + | First, go to the "Summary management". |
| − | {| cellspacing="1" cellpadding="1" border="1 | + | {| cellspacing="1" cellpadding="1" border="1" style="width: 321px; height: 362px;" class="wikitable" |
|- | |- | ||
| | | | ||
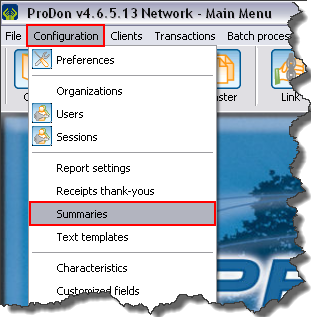
| − | To do so, from the software home page, click on the "Configuration" menu and then select "Summaries". | + | To do so, from the software home page, click on the "Configuration" menu and then select "Summaries". |
|- | |- | ||
| − | | [[Image: | + | | [[Image:Summary Management 001.png]] |
|} | |} | ||
<br> | <br> | ||
| − | {| | + | {| cellspacing="1" cellpadding="1" border="1" class="wikitable" style="width: 549px; height: 452px;" |
|- | |- | ||
| − | | colspan="2" | | + | | colspan="2" | [[Image:Summary_Management_002.png]] |
|- | |- | ||
| width="50%" | | | width="50%" | | ||
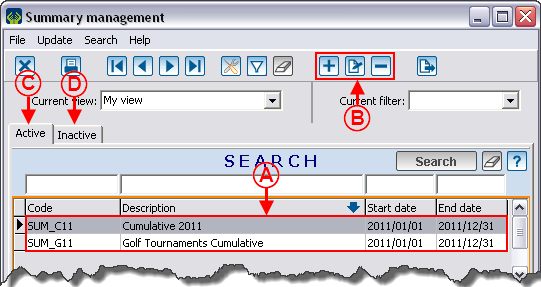
| − | '''<span style="color: rgb(255, 0, 0);">A: </span>'''It is the list of active summaries. | + | '''<span style="color: rgb(255, 0, 0);">A: </span>'''It is the list of active summaries. |
| width="50%" | | | width="50%" | | ||
| − | '''<span style="color: rgb(255, 0, 0);">B: </span>'''The [[Image: | + | '''<span style="color: rgb(255, 0, 0);">B: </span>'''The [[Image:Button add plus.png]] button allows you to create a new summary. The [[Image:Button Edit.png]] button allows you to edit an existing summary. The [[Image:Button Minus remove delete.png]] button allows you to delete a summary from the list. |
|- | |- | ||
| width="50%" | | | width="50%" | | ||
| − | '''<span style="color: rgb(255, 0, 0);">C: </span>'''The "Active" tab contains the active summaries. To learn how to activate and deactivate a summary, see letter <span style="color: rgb(255, 0, 0);">'''C'''</span> of the "Add/Edit a Summary" section. | + | '''<span style="color: rgb(255, 0, 0);">C: </span>'''The "Active" tab contains the active summaries. To learn how to activate and deactivate a summary, see letter <span style="color: rgb(255, 0, 0);">'''C'''</span> of the "Add/Edit a Summary" section. |
| width="50%" | | | width="50%" | | ||
| − | '''<span style="color: rgb(255, 0, 0);">D: </span>'''The "Inactive tab contains the inactive summaries. To learn how to activate and deactivate a summary, see letter '''<span style="color: rgb(255, 0, 0);">C</span>''' of the "Add/Edit a Summary" section. | + | '''<span style="color: rgb(255, 0, 0);">D: </span>'''The "Inactive tab contains the inactive summaries. To learn how to activate and deactivate a summary, see letter '''<span style="color: rgb(255, 0, 0);">C</span>''' of the "Add/Edit a Summary" section. |
|} | |} | ||
| Line 49: | Line 49: | ||
==== "Summary" Tab ==== | ==== "Summary" Tab ==== | ||
| − | {| | + | {| cellspacing="1" cellpadding="1" border="1" class="wikitable" style="width: 557px; height: 663px;" |
|- | |- | ||
| colspan="2" | | | colspan="2" | | ||
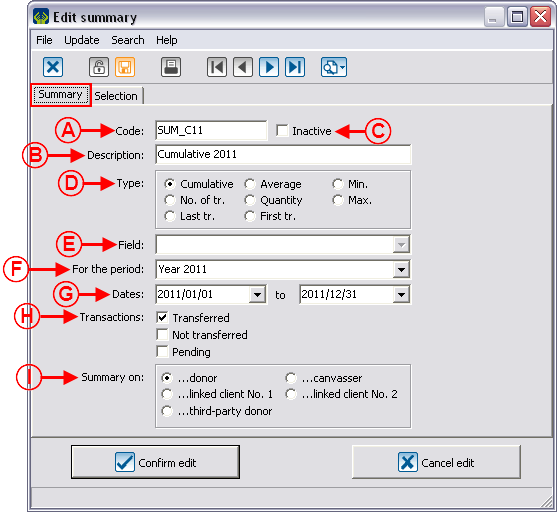
| + | After clicking on the [[Image:Button_add_plus.png]] or [[Image:Button_Edit.png]] buttons, this window opens. | ||
| + | |||
|- | |- | ||
| − | | colspan="2" | | + | | colspan="2" | [[Image:Summary_Management_003.png]] |
|- | |- | ||
| width="50%" | | | width="50%" | | ||
| + | '''<span style="color: rgb(255, 0, 0);">A: </span>'''This line contains the summary code. | ||
| + | |||
| width="50%" | | | width="50%" | | ||
| + | '''<span style="color: rgb(255, 0, 0);">B: </span>'''This line contains the description of the summary. It si actually the summary name. | ||
| + | |||
|- | |- | ||
| width="50%" | | | width="50%" | | ||
| + | '''<span style="color: rgb(255, 0, 0);">C: </span>'''This box allows you to deactivate or reactivate a summary. If it is checked, the summary would be in the "Inactive" tab. | ||
| + | |||
| width="50%" | | | width="50%" | | ||
| + | '''<span style="color: rgb(255, 0, 0);">D: </span>'''Allows you to choose the type of calculation to be performed to obtain the wanted summary. | ||
| + | |||
|- | |- | ||
| width="50%" | | | width="50%" | | ||
| + | '''<span style="color: rgb(255, 0, 0);">E: </span>'''This field is only usable with the "Last tr." type. It allows you to search the information of the targeted field for the client's last transaction. For example, the "Date" field would allow you to find the date of the client's last transaction. | ||
| + | |||
| width="50%" | | | width="50%" | | ||
| + | '''<span style="color: rgb(255, 0, 0);">F: </span>'''Allows you to select the period on which the summary must be calculated. By selecting a period, the "Date" field is filled out automatically. For more information on the period management, click here. | ||
| + | |||
|- | |- | ||
| width="50%" | | | width="50%" | | ||
| + | '''<span style="color: rgb(255, 0, 0);">G: </span>'''These are the dates corresponding to the period chosen in <span style="color: rgb(255, 0, 0);">'''F'''</span>. For example, if the summary is on the "Year 2011" period, the entered dates will be from "2011/01/01" to 2011/12/31", as configured in the "Period management". | ||
| + | |||
| width="50%" | | | width="50%" | | ||
| + | '''<span style="color: rgb(255, 0, 0);">H: </span>'''Allows you to specify the types of transactions that you have to take into account to perform the calculation of the summary. | ||
| + | |||
|- | |- | ||
| width="50%" | | | width="50%" | | ||
| + | '''<span style="color: rgb(255, 0, 0);">I: </span>'''Allows you to choose from which client of the transaction the summary will be done. In this example, the search is on the total of the transactions made by "Donor" for the year 2011, all the transactions transferred in 2011 classified per donor will then be found. It would also have been possible to search the total of the transactions made by "Canvasser" in 2011, all the transactions transferred in 2011 classified per canvasser would then be found. For more information on the different clients of a transaction, consult this procedure. | ||
| + | |||
| width="50%" | | | width="50%" | | ||
|} | |} | ||
| Line 75: | Line 95: | ||
==== "Selection" Tab ==== | ==== "Selection" Tab ==== | ||
| − | {| | + | {| cellspacing="1" cellpadding="1" border="1" class="wikitable" style="width: 625px; height: 583px;" |
|- | |- | ||
| − | | colspan="2" | | + | | colspan="2" | [[Image:Summary_Management_004.png]] |
|- | |- | ||
| width="50%" | | | width="50%" | | ||
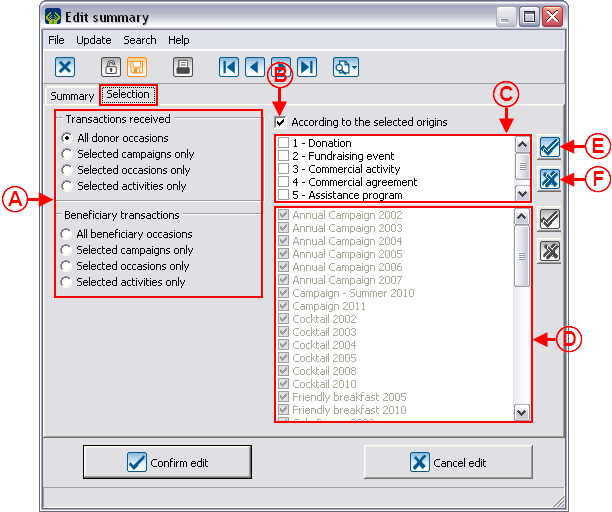
| + | '''<span style="color: rgb(255, 0, 0);">A: </span>'''Allows you to choose whether the summary has to be done on beneficiary transactions or received, then to specify if it has to be done with regards to the campaigns, the donation occasions or the activities. | ||
| + | |||
| + | '''NOTE: '''The "Beneficiary transactions" section is only available if the "Beneficiary Transactions" module is activated. | ||
| + | |||
| width="50%" | | | width="50%" | | ||
| + | '''<span style="color: rgb(255, 0, 0);">B: </span>'''If this box is checked, it is possible to specify the origin codes to be used. | ||
| + | |||
|- | |- | ||
| width="50%" | | | width="50%" | | ||
| + | '''<span style="color: rgb(255, 0, 0);">C: </span>'''Check one or more origin codes on which the summary must be done. | ||
| + | |||
| width="50%" | | | width="50%" | | ||
| + | '''<span style="color: rgb(255, 0, 0);">D: </span>'''Depending on the choice checked in '''<span style="color: rgb(255, 0, 0);">A</span>''', this section will be available or not. It allows you to choose the campaigns '''OR '''the donation occasions '''OR''' the activities on which the summary must be done. | ||
| + | |||
|- | |- | ||
| width="50%" | | | width="50%" | | ||
| + | '''<span style="color: rgb(255, 0, 0);">E: </span>'''By clicking on the [[Image:Button_funky_check_mark.png]] button, all the boxes will be checked at the same time. | ||
| + | |||
| width="50%" | | | width="50%" | | ||
| + | '''<span style="color: rgb(255, 0, 0);">F: </span>'''By clicking on the [[Image:Button_funky_x.png]] button, all the boxes will be unchecked at the same time. | ||
| + | |||
|} | |} | ||
Revision as of 11:29, 20 October 2011
Contents
[hide]Introduction
The summaries allow you to target information relating to a client's transaction history. They are used as:
- merge field of a master document;
- field in a custom report;
- period in the "Clients with detailed history" report.
Summary Management
First, go to the "Summary management".
|
To do so, from the software home page, click on the "Configuration" menu and then select "Summaries". |

|
Add/Edit a Summary
"Summary" Tab
"Selection" Tab
Document name: ProDon:Summary Management


