Difference between revisions of "ProDon:Preferences"
Jguillemette (talk | contribs) (→Engagement) |
Jguillemette (talk | contribs) (→Commitments) |
||
| Line 571: | Line 571: | ||
=== Commitments === | === Commitments === | ||
| − | '''NOTE: ''' This tab is only visible and these options are only editable if the [[ProDon: | + | '''NOTE: ''' This tab is only visible and these options are only editable if the [[ProDon:Prospecting_and_Commitments_Module|" Prospecting and Commitments Module "]] is activated in the database. |
| − | Cet onglet est visible et les options sont modifiables que si le [[ProDon: | + | Cet onglet est visible et les options sont modifiables que si le [[ProDon:Prospecting_and_Commitments_Module|" Prospecting and Commitments Module "]] est actif dans la base de données. |
{| width="200" cellspacing="1" cellpadding="1" border="1" class="wikitable" | {| width="200" cellspacing="1" cellpadding="1" border="1" class="wikitable" | ||
|- | |- | ||
| − | | colspan="2" | [[ | + | | colspan="2" | [[File:Prodon5 Preferences 017.png]] |
|- | |- | ||
| | | | ||
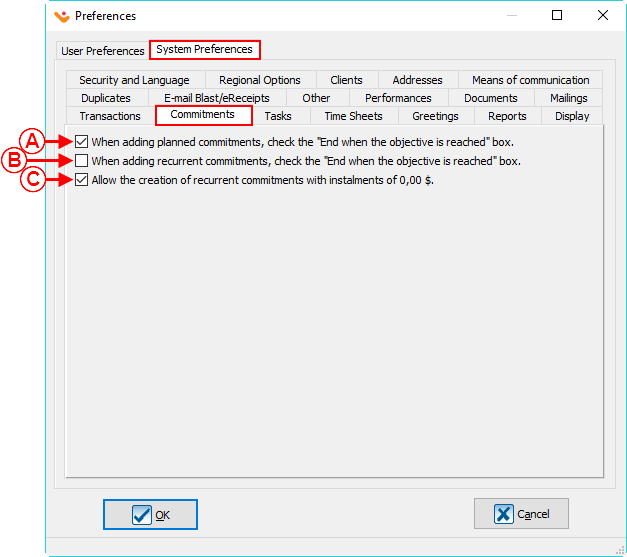
| − | <span style="color: rgb(255, 0, 0);">'''A :'''</span> Il s'agit de l'emplacement où seront enregistrés les documents joints aux engagements. | + | <span style="color: rgb(255, 0, 0);">'''A :'''</span> This is where the files attached to the commitments will be saved. |
| − | |<span style="color: rgb(255, 0, 0);">'''B :'''</span> Permet de cocher automatiquement la case «Terminer lorsque l'objectif est atteint» pendant un ajout par objectif. | + | |
| + | Il s'agit de l'emplacement où seront enregistrés les documents joints aux engagements. | ||
| + | |<span style="color: rgb(255, 0, 0);">'''B :'''</span> Allows to automatically check the box " End when the objective is reached " when you add a commitment by objective. | ||
| + | Permet de cocher automatiquement la case «Terminer lorsque l'objectif est atteint» pendant un ajout par objectif. | ||
|- | |- | ||
| − | |<span style="color: rgb(255, 0, 0);">'''C :'''</span> Permet de cocher automatiquement la case «Terminer lorsque l'objectif est atteint» pendant un ajout automatique. | + | |<span style="color: rgb(255, 0, 0);">'''C :'''</span> Allows to automatically check the box " End vhen the objective is reached " when adding an automatic commitment. |
| − | |<span style="color: rgb(255, 0, 0);">'''D :'''</span> Permet l'ajout d'engagement avec des montants de versements à 0.00$. | + | |
| + | Permet de cocher automatiquement la case «Terminer lorsque l'objectif est atteint» pendant un ajout automatique. | ||
| + | |<span style="color: rgb(255, 0, 0);">'''D :'''</span> Allows to add commitment with instalment equal to $0.00. | ||
| + | Permet l'ajout d'engagement avec des montants de versements à 0.00$. | ||
|} | |} | ||
<br> | <br> | ||
Revision as of 09:47, 24 November 2016
| Preferences |
Contents
[hide]- 1 Introduction
- 2 Access to preferences
- 3 User preferences
- 4 System Preferences
- 4.1 Security and languages
- 4.2 Regional Options
- 4.3 Clients
- 4.4 Adresses
- 4.5 Duplicates
- 4.6 Transactions
- 4.7 Dépenses
- 4.8 Commitments
- 4.9 Feuilles de temps
- 4.10 Salutations
- 4.11 Rapports
- 4.12 Affichage
- 4.13 PubliCourriel / Reçus électroniques
- 4.14 Autre
- 4.15 Performances
- 4.16 Tâches
- 4.17 Documents
- 4.18 Envois
CAUTION : This document is for VERSION 5 of ProDon. To get to the document of version 4, click here.
Caution : This document is being revised, it is possible that some parts are missing or outdated.
Introduction
The preferences allow you to do general configurations in the software. For example, the activation/deactivation of some fields or some options of the software and the configuration of the format or the edition of the layout of some fields.
There are 2 types of preferences: system preferences and user preferences.
Access to preferences
|
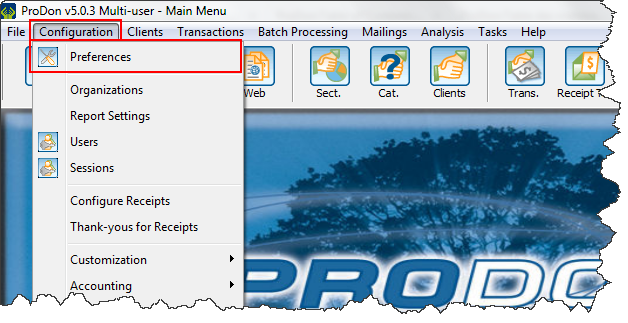
To configure the preferences from the main page of the software, click on the " Configuration " menu, then select " | |
|
User preferences
The user preferences can be customized by a user. The changes done in this part will only be applied to the current user profile.
NOTE : If some users are not able to edit their user preferences, it is because they do not have the necessary access. Then, you will have to go to User Management to give the users the rights to customize their preferences.
" Shortcut bar" Tab
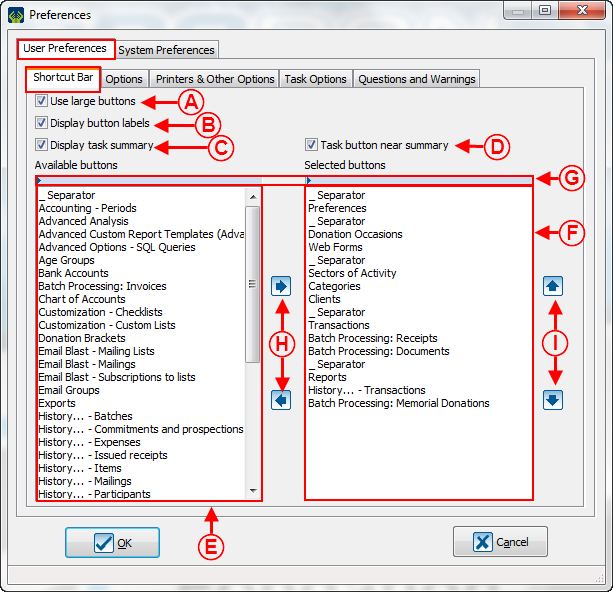
The "Shortcut bar" Tab allows an edit of the shortcut bar by the user. The Shortcut bar is at the top of the homepage and contains different buttons/icons, allowing your users to access different managements or sections of the software in a click.
" Options " Tab
 | |
|
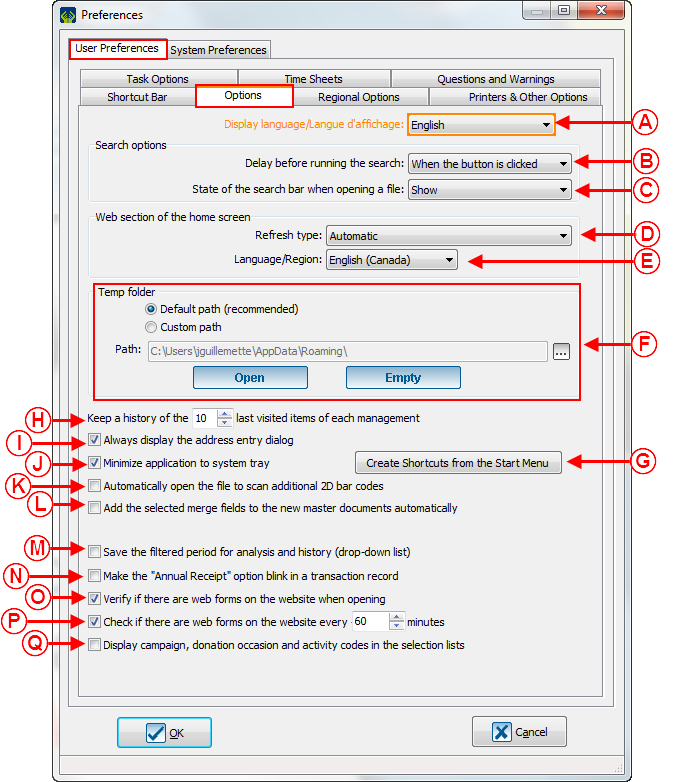
A : Allow a user to choose the display language of the software. |
B : When you do a search, if the option " When the button is clicked " is selected, you will have to click on the button " Search " of the Search Bar or press the " Enter " key on the keyboard once the search criteria is specified to start the search. You are able to select a delay to automatically launch the search when the time is over. |
|
C : Allows you display the Search bar Search bar by default. |
D : Allows you to choose when the Web Section (green section) of the main page will be refreshed. For example, you can choose if the refresh will be done as soon as Logilys will do an edition, or only when the next opening of the software, etc. |
|
E : Allows the user to choose the language in which the Web section (green section) of the main page will be displayed. |
F : Allows to customize the path of the temporary folder. This configuration is usually done by Logilys' technicians. |
|
G : Allows to create shortcuts that will be available in the Start menu. ProDon, the Support Center , the backup software, the Web update software, the wiki documentation, and Logilys Web site are the shortcuts that can be created in the Start menu. |
H : ProDon automatically keeps a history of the last item visited. This option allows the users to choose how many items they want to keep in their history. |
|
I : Allows to display a window which contains address fields (number, type of road, road name, point of call, etc.), to give a consistent template for the client files. |
J : Allows to minimize ProDon in the Windows notification zone at the bottom right of the screen. |
| K : Allows to open automatically the scan file when you add a transaction. | L : This option will allow the merge fields checked in the Master Documents configuration to be automatically inserted in a new Master Documents at its first opening. |
| M : Allows to keep the last selected period at the top right of the Transactions analysis and history. It will stay selected at the next opening of Transactions analysis and history. | N : Allows to make the label "Annual receipt" flash when you enter transactions if necessary. |
| O : If this box is activated, ProDon will display a window informing if there are online donations to import at each opening of the software (the Online Donation module must be activated to let you see this box). | P : If this box is activated, ProDon will display a window informing if there are online donations to import at each X minutes (the Online Donation module must be activated to let you see this box). A number of minutes can be set for each user. |
| Q : Allows to display the codes of the campaign, occasion, and activities in the selection lists. | |
" Regional Options " Tab
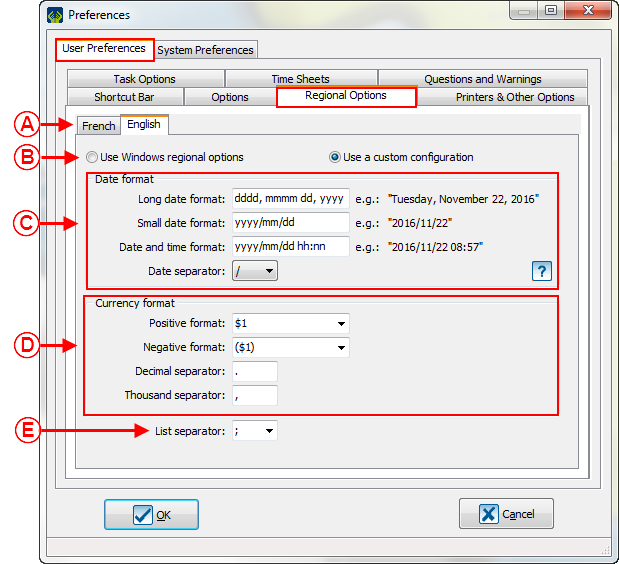
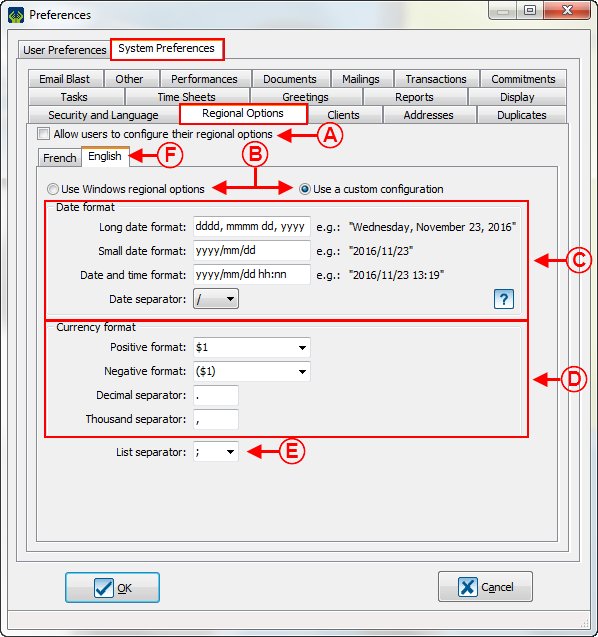
NOTE : This tab is only displayed in the " User Preferences " if the option has been activated in the " System Preferences ", see « Regional Options » point A of the « System preferences ».
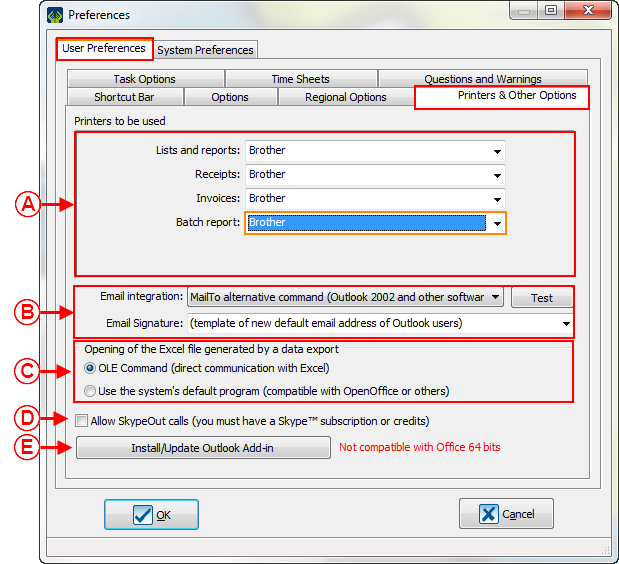
Printers and other options
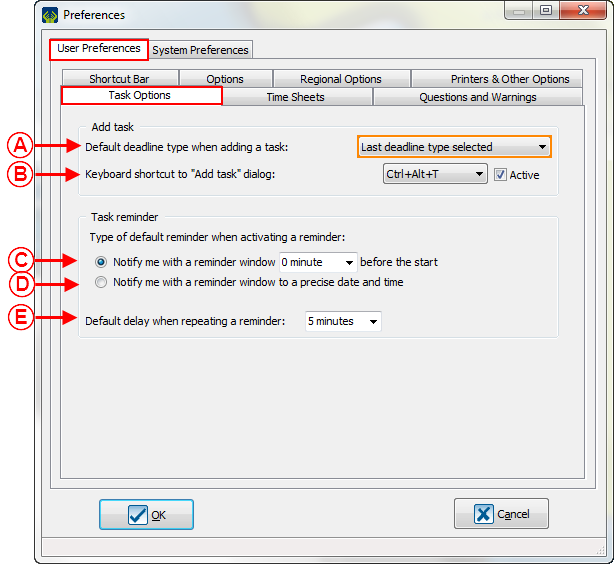
Task options
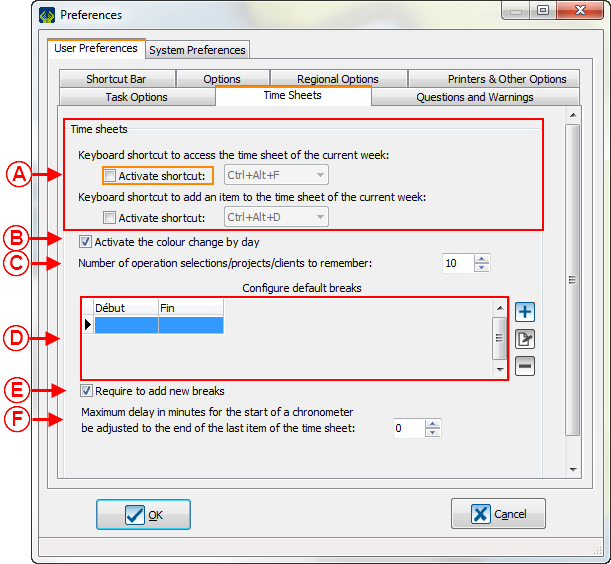
Time sheet
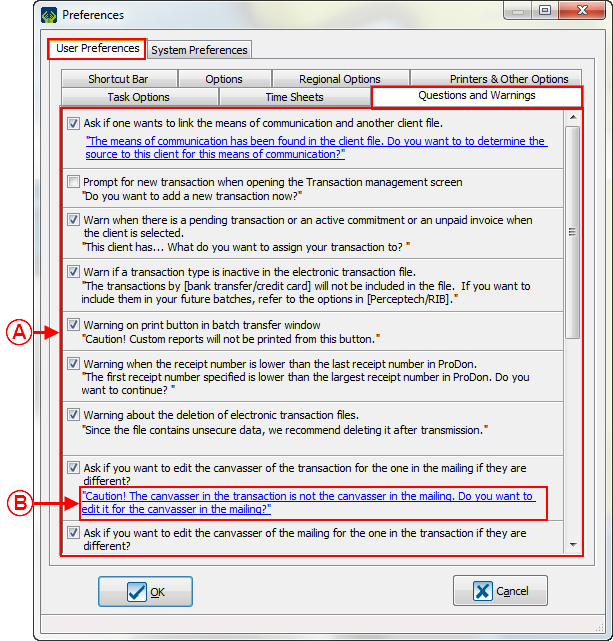
Questions and warnings
System Preferences
System preferences can only be edited by the " Supervisor " profile of ProDon. In a Network Version, you must know that the changes done to this preferences will be applied to all users of ProDon.
Les préférences système ne peuvent être modifiées que par le profil « Superviseur » de ProDon. Dans une version réseau, il est important de savoir que les changements apportés à ces préférences affecteront tous les utilisateurs de ProDon.
Security and languages
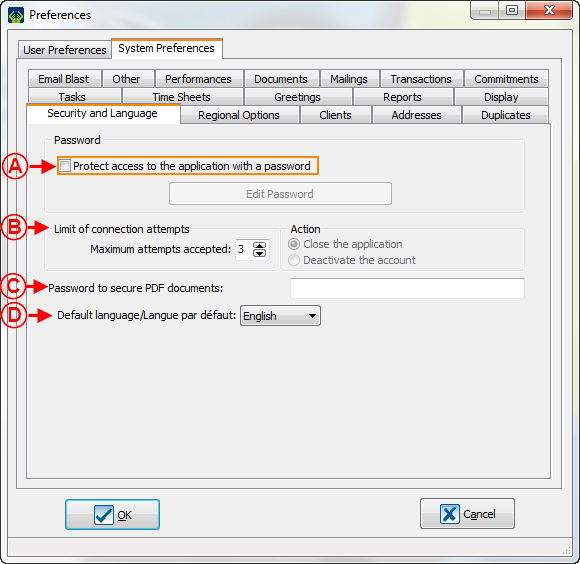
Standard Version
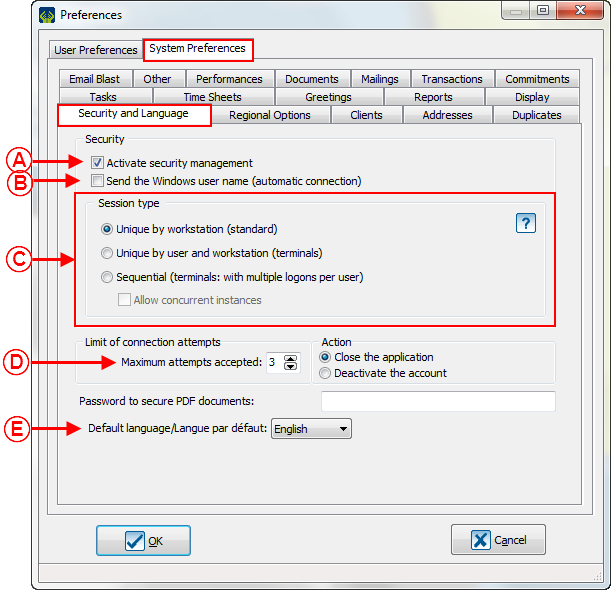
Network Version
Regional Options
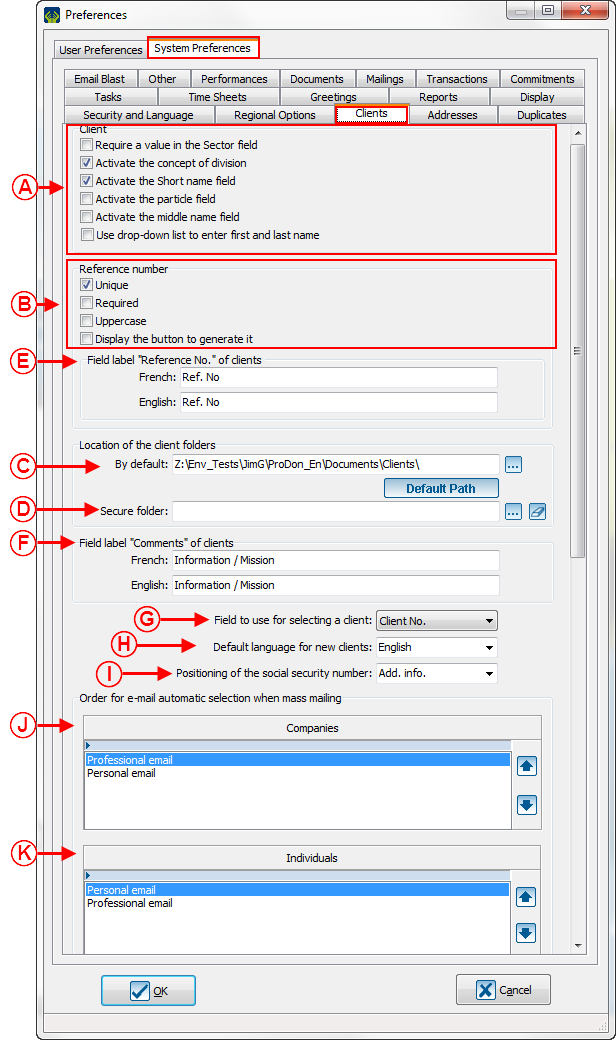
Clients
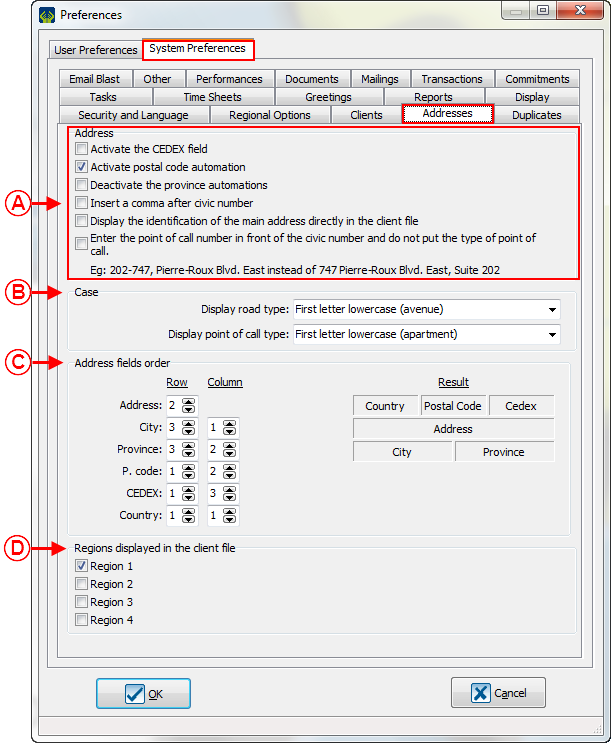
Adresses
Duplicates
 | |
|
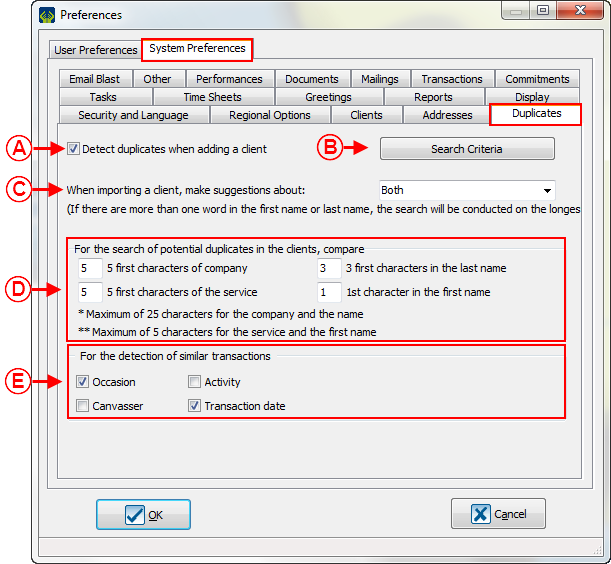
A : Allows the verification of potential duplicates when you create new client files. Permet la vérification de doublon potentiel lors de la création de nouvelles fiches clients. |
B : Allows to define the search criteria for duplicates. Permet de définir les critères de recherche de doublons. |
|
C : Allows to choose the detection method for duplicates linked to the client importation. This option is linked to the "Importation Modules". Permet de choisir le mode de détection de doublon lié à l’importation de clients. Cette option est relié au «module d'importation». |
D : Allows to choose how many characters on which ProDon will base itself to search for duplicates. Permet de choisir le nombre de caractères sur lesquelles ProDon doit se baser pour rechercher les doublons. |
|
E : Allows to select by which field ProDon will detect the identical transactions. Permet de sélectionner par quel champ ProDon va faire la détection de transactions semblables. |
NOTE : For the search and the deletion of potential diplucates in the database, go to this procedure
Pour la recherche et l'élimination de doublons potentiels dans la base de données, consulter cette procédure. |
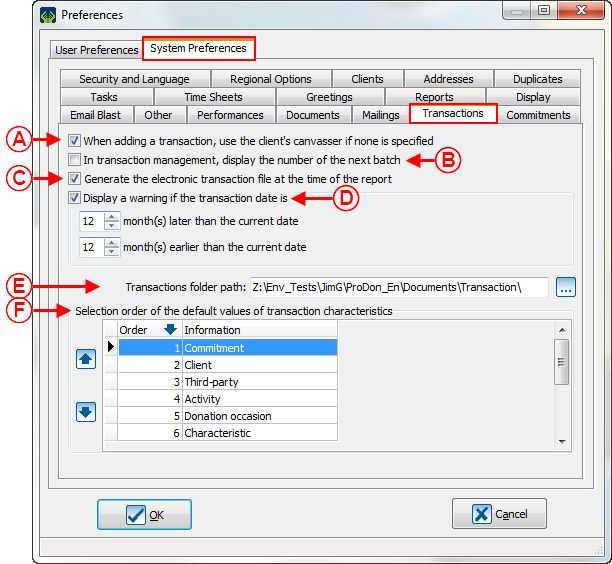
Transactions
Dépenses
| 580x580px | |
|
A : Permet de modifier le pourcentage des taxes relié aux dépenses qui seront saisies. |
Commitments
NOTE: This tab is only visible and these options are only editable if the " Prospecting and Commitments Module " is activated in the database.
Cet onglet est visible et les options sont modifiables que si le " Prospecting and Commitments Module " est actif dans la base de données.
Feuilles de temps
| 587x587px | |
|
A : Permet de sélectionner la journée qui débute une semaine. |
B : Permet de sélectionner la journée que prend fin une semaine. |
|
C : Permet de spécifier le premier jour de travail. |
D : Permet d'afficher la banque d'heure. |
| E : Affiche les détails des heures supplémentaires. | |
Salutations
| 583x583px | |
|
A : Permet de modifier le résultat des champs de fusion « Salutation longue » et « Salutation courte » pour une compagnie. |
B : Permet de modifier le résultat des champs de fusion « Salutation longue » et «Salutation courte » pour un individu. |
| C : Permet de modifier le résultat des champs de fusion « Salutation longue » et « Salutation courte » pour un couple. | NOTE : Les listes déroulantes de droite permettent de choisir les champs désirés afin de les envoyer dans le champ de gauche. Il suffit de les sélectionner un à un pour que les champs s'ajoutent dans la section de gauche. |
Rapports
| 615x615px | |
|
A : Permet d'afficher les champs personnalisés désirés sur les rapports de type «Transactions d'un lot». |
B : Permet d'afficher les caractéristiques désirées sur les rapports de type «Transactions d'un lot». |
Affichage
| 587x587px | |
|
A : Affiche le contact sur les documents et reçus si le client est une compagnie. |
B : Affiche le contact sur les documents et reçus si le client est un tiers. |
| C : Affiche le contact sur les documents et reçus si le client lié 1 est une compagnie. | D : Affiche le contact sur les documents et reçus si le client lié 2 est une compagnie. |
| E : Affiche le contact sur les documents et reçus si le solliciteur est une compagnie. | F : Permet d'afficher la section «tiers». |
PubliCourriel / Reçus électroniques
NOTE: Cet onglet est visible et les options sont modifiables que si le module PubliCourriel est actif.
| 649x649px | |
|
A : Permet d'activer le module PubliCourriel. |
B : Ces options sont des configurations techniques assumées par Logilys. |
|
C : Permet de définir les compte administrateur. Cette option est également une configuration assumée par Logilys. |
D : Permet de définir le compte de consultation des statistiques. Cette option est également une configuration assumée par Logilys. |
|
E : Permet de déterminer le temps avant l’appel d’une expiration de délais pour une synchronisation de listes. |
F : Permet de déterminer la taille des lots de courriel lors de la synchronisation de listes. |
Autre
| 851x851px | |
|
A : Permet de désactiver, à l'ouverture de ProDon, le message d’avertissement suggérant fortement de faire une sauvegarde de données si la dernière sauvegarde date de plus de 7 jours. |
B : Permet d’ajuster l’écran, si l'écran utilisé pour effectuer le travail n'a pas une bonne résolution. |
|
C : Oblige la validation des lignes dans le module d'importation. |
D : Permet d'afficher les remarques en lien avec les doublons réels dans le module d'importation. |
|
E : Permet de ne pas mettre la ligne en erreur si les champs obligatoires numéro de référence du client, secteur d'activité, caractéristiques et champs personnalisés ne sont pas documentés à partir du module d'importation. |
F : Permet l'activation de la gestion des projets comptables. |
| G : Permet de changer le format lettre des rapports en format A4. | H : Permet de sélectionner la liste des relations utilisées pour les envois courriels. |
| I : Configuration permettant l'utilisation des envois courriels via le programme Outlook. | J : Permet de configurer l'affichage des alertes. |
| K : Permet d'ajuster le nombre de chiffres compris dans le numéro de reçu. | L : Afficher la question pour reculer la date du prochain versement lors de la suppression d'une transaction en lien avec un engagement. |
| M : Permet l'affichage des numéros de compte de banque. | N : Permet d'afficher les informations bancaires dans la grille de gestion des engagements. |
| O : Permet d'utiliser les alertes et messages à partir de la gestion des reçus et des documents à émettre. | P : Permet d'identifier le solliciteur d'un client tiers si le client n'a pas de solliciteur relié. |
| Q : Permet d'afficher différentes formes de transactions. | R : Permet d'afficher la nature de la transaction. |
| S : Permet de séparer les transactions et engagements par contacts. | T : Permet de gérer les comptes de Grand Livre en groupe. |
Performances
| 580x580px | |
|
A : Permet de déterminer le nombre de lignes affichées dans les différentes gestions. |
B : Permet de déterminer le nombre de lignes affichées dans les différentes gestions n'apparaissant pas plus haut. |
| NOTE : Plus il y a de lignes affichées, plus le logiciel a besoin d'un serveur performant. | |
Tâches
| 580x580px | |
|
A : Permet d'afficher l'objets des tâches en format «Liste déroulante». |
B : Permet de regrouper les tâches par type de famille. |
|
C : Permet de voir les tâches en avance. |
|
Documents
Lorsque des reçus ou des documents (ex. : lettres de remerciements) sont générée, il est possible de spécifier l'ordre dans lequel ils ouvriront afin que les documents soient tous imprimés dans un ordre précis. Ainsi, si, par exemple une série de reçus et une série de lettres de remerciements doivent être imprimés, les deux piles de documents seront dans le même ordre.
| 608x608px | |
|
A : Génère les documents dans une ordre préétabli. |
B : Permet de définir le numéro de départ pour les factures. NOTE : Ce champ est disponible seulement si le module facturation est activé dans la base de données. |
Envois
| 584x584px | |
|
A : Permet de configurer les réponses par défaut pour l’historique des envois. |
B : Si cette option est cochée, l'occasion et l'activité sélectionnées dans le dernier envoi documenté dans le dossier du client s'inscriront automatiquement lors de l'entrée d'une nouvelle transaction. |
|
C : Ces options sont disponibles seulement si l'option en B est cochée et permettent de rechercher un envoi par « Réponse ». Par exemple, je veux que lors de la prochaine entrée d'une transaction, l'occasion et l'activité du dernier envoi ayant la réponse « Paiement en attente » s'inscrivent automatiquement. |
NOTE : Pour plus d'informations concernant l'historique d'envois, cliquer ici. |
