Difference between revisions of "Common functions:Region Management (version 4)"
| Line 77: | Line 77: | ||
<br> | <br> | ||
| − | {| cellspacing="1" cellpadding="1" border="1 | + | {| cellspacing="1" cellpadding="1" border="1" style="width: 693px; height: 424px;" class="wikitable" |
|- | |- | ||
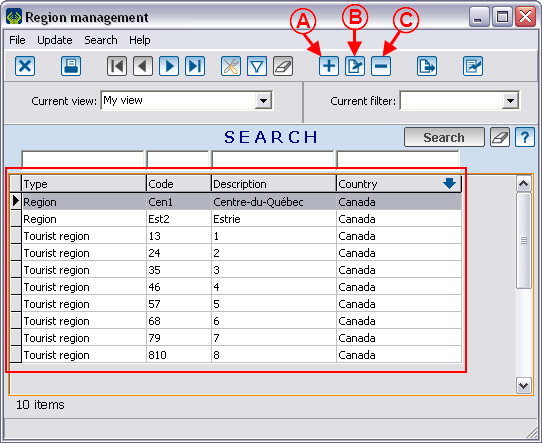
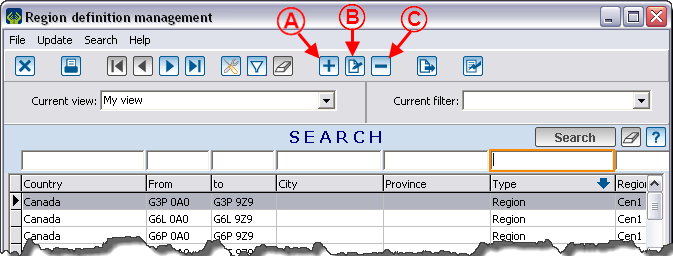
| colspan="2" | By clicking on the "Region definitions" option of the "Clients" menu, it is possible to manage the regions definitions.<br> | | colspan="2" | By clicking on the "Region definitions" option of the "Clients" menu, it is possible to manage the regions definitions.<br> | ||
| Line 86: | Line 86: | ||
| '''<span style="color: rgb(255, 0, 0);">B: </span>'''Allows you to edit an existing definition. To modify it, you simply need to select the definition to be edited, then click on the [[Image:Button Edit.png]] button or double-click on the definition you wish to modify. | | '''<span style="color: rgb(255, 0, 0);">B: </span>'''Allows you to edit an existing definition. To modify it, you simply need to select the definition to be edited, then click on the [[Image:Button Edit.png]] button or double-click on the definition you wish to modify. | ||
|- | |- | ||
| − | | '''<span style="color: rgb(255, 0, 0);">C: </span>'''Allows you to remove a definition. To | + | | '''<span style="color: rgb(255, 0, 0);">C: </span>'''Allows you to remove a definition. To remove it, you simply need to select the definition to be deleted, then click on the [[Image:Button Minus remove delete.png]] button. |
| | | | ||
|} | |} | ||
| Line 102: | Line 102: | ||
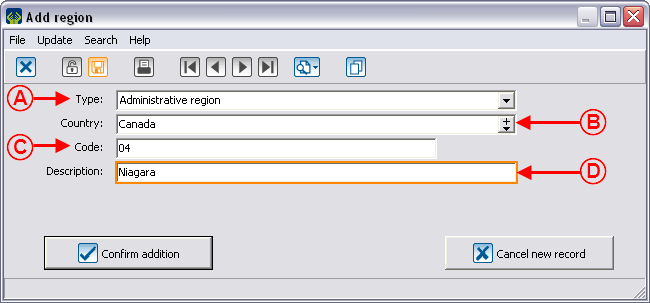
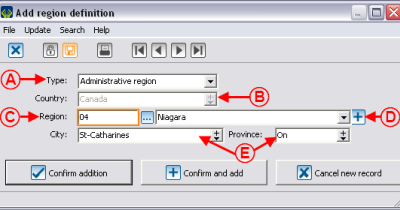
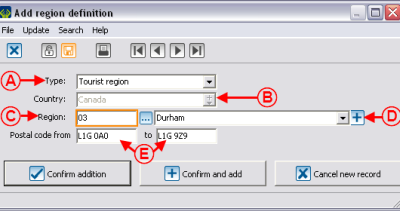
| '''<span style="color: rgb(255, 0, 0);">B:</span>''' The country determines the regions available in <span style="color: rgb(255, 0, 0);">'''C'''</span>. It is impossible to modify it after a region. | | '''<span style="color: rgb(255, 0, 0);">B:</span>''' The country determines the regions available in <span style="color: rgb(255, 0, 0);">'''C'''</span>. It is impossible to modify it after a region. | ||
|- | |- | ||
| − | | <span style="color: rgb(255, 0, 0);">'''C:'''</span> Allows you to specify the region for which the limits will be determined. By entering | + | | <span style="color: rgb(255, 0, 0);">'''C:'''</span> Allows you to specify the region for which the limits will be determined. By entering the reference number, the desired region will appear. |
| − | | '''<span style="color: rgb(255, 0, 0);">D: </span>'''If the wanted region has not previously created, you can create a new one by clicking on the [[Image:Button add plus.png]] button. | + | | '''<span style="color: rgb(255, 0, 0);">D: </span>'''If the wanted region has not previously been created, you can create a new one by clicking on the [[Image:Button add plus.png]] button. |
|- | |- | ||
| colspan="2" | | | colspan="2" | | ||
Revision as of 14:15, 28 June 2011
Contents
Introduction
In the software, there are three notions related to regions: region types, regions, region definitions.
Region types allow you to specify the kind of regions, for example: administrative region, tourist region, etc. The regions allow you to build the regions list and to specify their types, for example: Niagara, Durham, etc. The region definitions allow you to set the postal codes interval or the cities in one region.
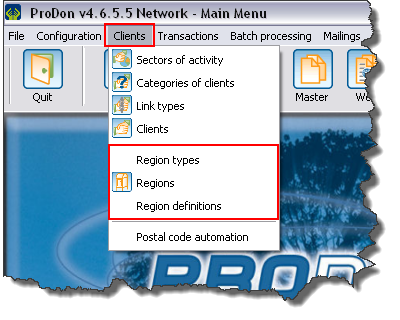
These functions are accessible in the "Clients" menu of the software main menu.
Region types management
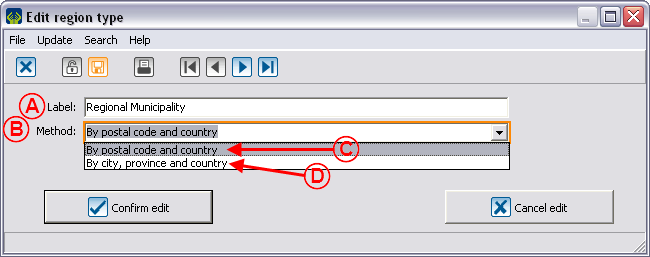
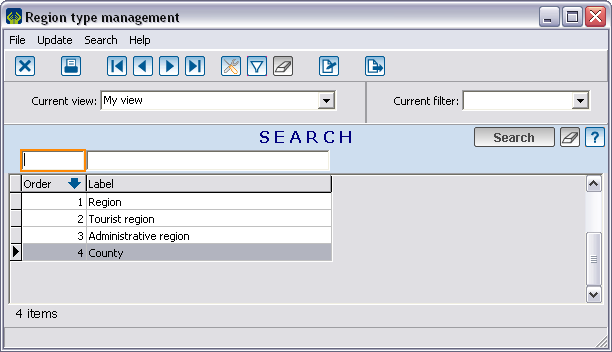
The four default region types are: Region, Tourist region, Administrative region and County.
| If you click on the "Region types" option of the "Clients" menu, it is possible to customize the region types by double-clicking on the one you wish to edit (e.g. County). |
 |
Region management
Region definitions management
By defining the regions, automations will be created: in a client's file, by only entering the city or the postal code, the given region will automatically appear if it has previously been defined.
Document name: Common functions:Region Management (version 4)
