Difference between revisions of "Common functions:View Management"
(→Adding, Modifying and Deleting a View) (Tag: Visual edit) |
|||
| (19 intermediate revisions by 4 users not shown) | |||
| Line 1: | Line 1: | ||
| − | {{ | + | {{Header_TOC}}<br> |
== Introduction == | == Introduction == | ||
| Line 19: | Line 19: | ||
<br> | <br> | ||
| − | The view management tool is represented by the [[Image:Bouton configurer.png]] button, that is always at the top, under the menu bar. | + | The view management tool is represented by the [[Image:Bouton configurer.png]] button, that is always at the top, under the menu bar. |
== Adding, Modifying and Deleting a View == | == Adding, Modifying and Deleting a View == | ||
| − | {| | + | {| width="656" cellspacing="1" cellpadding="1" border="1" class="wikitable" |
|- | |- | ||
| colspan="2" | | | colspan="2" | | ||
| Line 51: | Line 51: | ||
|- | |- | ||
| − | | width="50%" | | + | | colspan="2" width="50%" | |
'''<span style="color: rgb(255, 0, 0);">E: </span>'''Allows you to delete the view selected at <span style="color: rgb(255, 0, 0);">'''A'''</span>. For more details concerning the deletion of a view, see [[Common functions:View Management#Deleting_a_View|this section]]. | '''<span style="color: rgb(255, 0, 0);">E: </span>'''Allows you to delete the view selected at <span style="color: rgb(255, 0, 0);">'''A'''</span>. For more details concerning the deletion of a view, see [[Common functions:View Management#Deleting_a_View|this section]]. | ||
| − | |||
| − | |||
| − | |||
| − | |||
| − | |||
|} | |} | ||
| Line 69: | Line 64: | ||
'''NOTE: '''When a view is created in a management, it is only available in this management. The following example is made from the "Client management", but the view management tool [[Image:Bouton configurer.png]] works in the same way in all the managements in which it is available. | '''NOTE: '''When a view is created in a management, it is only available in this management. The following example is made from the "Client management", but the view management tool [[Image:Bouton configurer.png]] works in the same way in all the managements in which it is available. | ||
| − | {| | + | {| cellspacing="1" cellpadding="1" border="1" style="width: 472px; height: 251px;" class="wikitable" |
|- | |- | ||
| [[Image:View Management 002.png]]<br> | | [[Image:View Management 002.png]]<br> | ||
| Line 82: | Line 77: | ||
<br> | <br> | ||
| − | {| | + | {| cellspacing="1" cellpadding="1" border="1" style="width: 386px; height: 194px;" class="wikitable" |
|- | |- | ||
| colspan="2" | | | colspan="2" | | ||
| Line 100: | Line 95: | ||
<br> | <br> | ||
| − | {| | + | {| cellspacing="1" cellpadding="1" border="1" style="width: 660px; height: 253px;" class="wikitable" |
|- | |- | ||
| colspan="2" | | | colspan="2" | | ||
| − | After clicking on the "OK" button of the window allowing to name the new view, this window | + | After clicking on the "OK" button of the window allowing to name the new view, this window is onscreen. |
|- | |- | ||
| Line 132: | Line 127: | ||
The following example is made from the "Client management", but the view management tool [[Image:Bouton configurer.png]] works in the same way in all the managements in which it is available. | The following example is made from the "Client management", but the view management tool [[Image:Bouton configurer.png]] works in the same way in all the managements in which it is available. | ||
| − | {| | + | {| cellspacing="1" cellpadding="1" border="1" class="wikitable" style="width: 519px; height: 238px;" |
|- | |- | ||
| [[Image:View Management 005.png]]<br> | | [[Image:View Management 005.png]]<br> | ||
| Line 143: | Line 138: | ||
<br> | <br> | ||
| − | {| | + | {| cellspacing="1" cellpadding="1" border="1" class="wikitable" style="width: 665px; height: 294px;" |
|- | |- | ||
| colspan="2" | | | colspan="2" | | ||
| Line 164: | Line 159: | ||
| width="50%" | | | width="50%" | | ||
| − | '''<span style="color: rgb(255, 0, 0);">D: </span>'''The [[Image:Bouton modifier nom vue.png]] button allows you to modify the name of the selected view at<span style="color: rgb(255, 0, 0);">''' B'''</span>. After clicking on the | + | '''<span style="color: rgb(255, 0, 0);">D: </span>'''The [[Image:Bouton modifier nom vue.png]] button allows you to modify the name of the selected view at<span style="color: rgb(255, 0, 0);">''' B'''</span>. After clicking on the [[Image:Bouton modifier nom vue.png]] button, [[#adding2|this window]] opens to rename the view. |
|- | |- | ||
| Line 185: | Line 180: | ||
<br> | <br> | ||
| − | {| | + | {| width="50%" cellspacing="1" cellpadding="1" border="1" class="wikitable" |
|- | |- | ||
| colspan="2" | [[Image:View Management 007.png]]<br> | | colspan="2" | [[Image:View Management 007.png]]<br> | ||
| Line 197: | Line 192: | ||
|- | |- | ||
| width="50%" | | | width="50%" | | ||
| − | '''<span style="color: rgb(255, 0, 0);">C: </span>'''It is the list of fields that will appear when the view is displayed in the management. To see | + | '''<span style="color: rgb(255, 0, 0);">C: </span>'''It is the list of fields that will appear when the view is displayed in the management. To see a preview of the view field order, go to "Example of filtered view" in the management screen, see point <span style="color: rgb(255, 0, 0);">'''B'''</span> of the [[Common functions:View Management#Preview_of_the_View_in_the_Management|"Preview of a View in the Management"]] section. |
| width="50%" | | | width="50%" | | ||
| Line 223: | Line 218: | ||
<br> | <br> | ||
| − | {| | + | {| width="50%" cellspacing="1" cellpadding="1" border="1" class="wikitable" |
|- | |- | ||
| colspan="2" | [[Image:View Management 008.png]]<br> | | colspan="2" | [[Image:View Management 008.png]]<br> | ||
| Line 242: | Line 237: | ||
|- | |- | ||
| width="50%" | | | width="50%" | | ||
| − | '''<span style="color: rgb(255, 0, 0);">E: </span>'''Allows you to choose if the information of the fields at <span style="color: rgb(255, 0, 0);">'''C'''</span> will be sorted by ascending or descending alphabetical order. If the field is sorted in descending alphabetical order, the statement "DESC" is added at the right of the field name at <span style="color: rgb(255, 0, 0);">'''C'''</span>''. ''To sort a field in | + | '''<span style="color: rgb(255, 0, 0);">E: </span>'''Allows you to choose if the information of the fields at <span style="color: rgb(255, 0, 0);">'''C'''</span> will be sorted by ascending or descending alphabetical order. If the field is sorted in descending alphabetical order, the statement "DESC" is added at the right of the field name at <span style="color: rgb(255, 0, 0);">'''C'''</span>''. ''To sort a field in descending order, select the field at <span style="color: rgb(255, 0, 0);">'''C'''</span>'', ''then click on this button. |
| width="50%" | | | width="50%" | | ||
| Line 261: | Line 256: | ||
<br> | <br> | ||
| − | {| | + | {| width="50%" cellspacing="1" cellpadding="1" border="1" class="wikitable" |
|- | |- | ||
| | | | ||
| Line 268: | Line 263: | ||
|- | |- | ||
| | | | ||
| − | The "Filter" tab is configured in the exact same way as the addition of a filter in the management. To learn how to configure the tabs [[Common functions:Filter Data (Queries)#.22Special.22_Tab|"Special"]], [[Common functions:Filter Data (Queries)#.22Fields.22_Tab|"Fields"]] and [[Common functions:Filter Data (Queries)#.22Query.22_Tab|"Query"]], see the [[Common functions:Filter Data (Queries)|"Filter Data (Queries)"]] document. In this example, only the entries containing the value "Toronto" will be displayed | + | The "Filter" tab is configured in the exact same way as the addition of a filter in the management. To learn how to configure the tabs [[Common functions:Filter Data (Queries)#.22Special.22_Tab|"Special"]], [[Common functions:Filter Data (Queries)#.22Fields.22_Tab|"Fields"]] and [[Common functions:Filter Data (Queries)#.22Query.22_Tab|"Query"]], see the [[Common functions:Filter Data (Queries)|"Filter Data (Queries)"]] document. In this example, only the entries containing the value "Toronto" in the "City" field will be displayed. |
'''NOTE: '''When a filter is applied to a view, a filter icon appears next to the name of the view in the management. To view an example of a filtered view icon, see point<span style="color: rgb(255, 0, 0);">''' A'''</span> of the [[Common functions:View Management#Preview_of_the_View_in_the_Management|"Preview of the View in the Management"]] section. | '''NOTE: '''When a filter is applied to a view, a filter icon appears next to the name of the view in the management. To view an example of a filtered view icon, see point<span style="color: rgb(255, 0, 0);">''' A'''</span> of the [[Common functions:View Management#Preview_of_the_View_in_the_Management|"Preview of the View in the Management"]] section. | ||
| Line 286: | Line 281: | ||
==== "Visibility" Tab ==== | ==== "Visibility" Tab ==== | ||
| − | This tab is visible only if the "Network Module" is activated in the software. It allows you to specify which users of the database can see, use or modify the view. | + | This tab is visible only if the "Network Module" is activated in the software. It allows you to specify which users of the database can see, use or modify the view. <br> |
| + | '''CAUTION:''' For the most recent version of this option, [[Common_functions:Visibility_in_views,_filters,_tasks,_etc.|click here]]. | ||
| + | |||
<br> | <br> | ||
| − | {| | + | {| width="50%" cellspacing="1" cellpadding="1" border="1" class="wikitable" |
|- | |- | ||
| colspan="2" | [[Image:View Management 010.png]]<br> | | colspan="2" | [[Image:View Management 010.png]]<br> | ||
| Line 307: | Line 304: | ||
|} | |} | ||
| − | <br> | + | <br> |
=== Preview of the View in the Management === | === Preview of the View in the Management === | ||
| − | {| | + | {| width="50%" cellspacing="1" cellpadding="1" border="1" class="wikitable" |
|- | |- | ||
| colspan="2" | [[Image:View Management 011.png]]<br> | | colspan="2" | [[Image:View Management 011.png]]<br> | ||
| Line 331: | Line 328: | ||
<br> | <br> | ||
| − | {| | + | {| cellspacing="1" cellpadding="1" border="1" class="wikitable" style="width: 504px; height: 255px;" |
|- | |- | ||
| [[Image:View Management 012.png]]<br> | | [[Image:View Management 012.png]]<br> | ||
| Line 342: | Line 339: | ||
<br> | <br> | ||
| − | {| | + | {| cellspacing="1" cellpadding="1" border="1" class="wikitable" style="width: 416px; height: 198px;" |
|- | |- | ||
| | | | ||
| Line 359: | Line 356: | ||
== Selecting a Default View == | == Selecting a Default View == | ||
| − | It is possible to choose which view, among the existing ones, must | + | It is possible to choose which view, among the existing ones, must appear by default when entering in the different managements of the database. When a view is created, it only exists in the management in which it has been created. It is therefore necessary to determine a default view for each management (e.g. "Client management", "Analysis and history", "Transaction management", etc.).<br> |
<br> | <br> | ||
| Line 378: | Line 375: | ||
<br> | <br> | ||
| − | {| cellspacing="1" cellpadding="1" border="1" style="width: 416px; height: 351px; | + | {| cellspacing="1" cellpadding="1" border="1" class="wikitable" style="width: 416px; height: 351px;" |
|- | |- | ||
| colspan="2" | | | colspan="2" | | ||
| Line 412: | Line 409: | ||
<br> | <br> | ||
| − | {{Footer_Common_Functions}} | + | {{Footer_Common_Functions}}<br> |
Latest revision as of 10:58, 14 July 2023
| View Management |
Contents
Introduction
The view management tool allows you to create and configure grids that are visible in the different managements of the database. For each created view, it is possible to determine the fields (last name, first name, telephone, address, etc.) that will be visible in the grid. Each field is then represented by a column in order to allow you to search quickly on any field of the database that appears in the grid.
It is possible to create as many views as desired in virtually all the managements of the software in order to use them subsequently. Moreover, if the network module is active in the software, it is also possible to manage the users who can see and use the created views.
In addition to choosing the fields (last name, first name, e-mail address, etc.) that must appear in the grid, this tool offers the possibility to apply a filter to a view. For instance, if you want to see only the people who are part of a precise category in the "Client management", or to only see the transactions linked to the "Golf" donation occasions in the "Analysis and history management".
It is also possible to determine the view that should appear by default when opening each management of the database ("Client management", "Tasks and history management", "Analysis and history", etc.).
The view management tool is represented by the ![]() button, that is always at the top, under the menu bar.
button, that is always at the top, under the menu bar.
Adding, Modifying and Deleting a View
|
The following examples are made from the "Client management", but the view management tool works in the same way in all managements. | |
| |
|
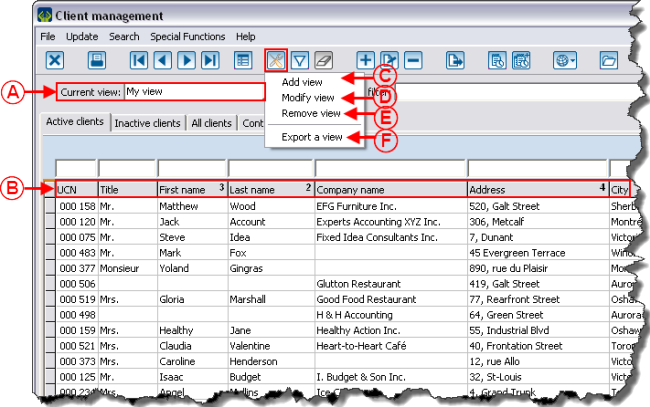
A: It is the name of the currently displayed view at B. To choose a different view, use the drop-down arrow. NOTE: The view named "My view" is the default one in all the managements with the purchase of the software. It is possible to modify it, to rename it, but it is not possible to delete it. |
B: Each column represents the field chosen for the view selected at A. |
|
C: Allows you to add a view that will be available at A. For more details concerning the addition of a view, see this section. NOTE: The new view is based on the criteria of the view selected at A. This new view will therefore comprise the same fields visible onscreen and the same specifications, but it will be possible to modify them. It is therefore advantageous to first choose, at A, the view that contains the desired fields for more rapidity. |
D: Allows you to modify the view selected at A. For more details concerning the modification of a view, see this section. |
|
E: Allows you to delete the view selected at A. For more details concerning the deletion of a view, see this section. | |
Adding a View
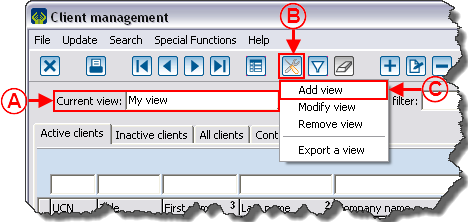
To add a view, first go to the management in which a view has to be added.
NOTE: When a view is created in a management, it is only available in this management. The following example is made from the "Client management", but the view management tool ![]() works in the same way in all the managements in which it is available.
works in the same way in all the managements in which it is available.
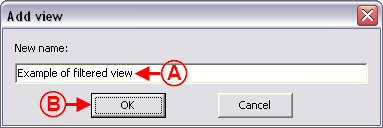
See the "Configuring the View Using Tabs" section in order to configure the tabs "Columns", "Sort", "Filter", "Visibility".
Modifying a View
To modify a view, first go to the management in which the view must be modified.
NOTE: When a view is created, it is available only in this management.
The following example is made from the "Client management", but the view management tool ![]() works in the same way in all the managements in which it is available.
works in the same way in all the managements in which it is available.
 |
|
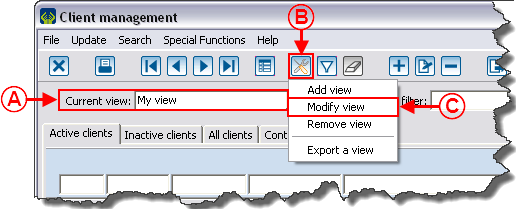
To modify a view, once in the management in which the view has been created, select the view to modify at A, click on the |
|
After clicking on "Modify view", this window opens. | |
 | |
|
A: It is the name of the currently displayed view in the management grid. |
B: It is the name of the view that is currently being modified. NOTE: It is possible to select another view to modify, using the drop-down arrow on the right. |
|
C: The |
D: The |
|
E: The |
|
See the "Configuring the View Using Tabs" section to learn how to configure the tabs "Columns", "Sort", "Filter", and "Visibility".
Configuring the View Using Tabs
"Columns" Tab
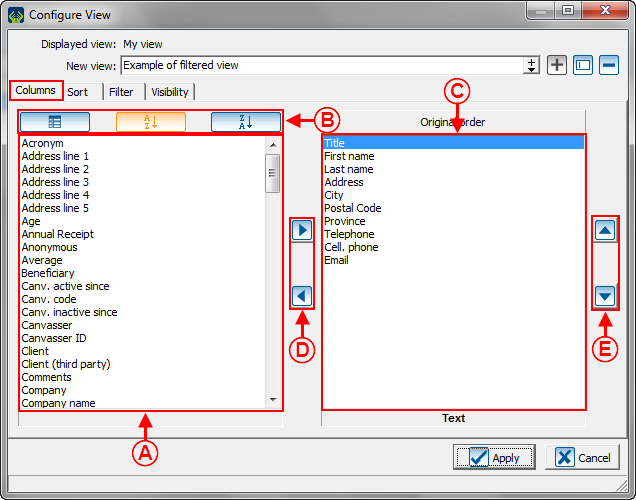
This tab allows you to determine the fields that must be visible in the management grid. Each field is then represented by a column to allow quick search on any field of the database (Last name, first name, e-mail address, etc.), that appears in the grid.
 | |
|
A: It is the list of all the fields available in the management where the view has been created. |
B: These buttons allow you to choose the order in which the fields at A should appear. |
|
C: It is the list of fields that will appear when the view is displayed in the management. To see a preview of the view field order, go to "Example of filtered view" in the management screen, see point B of the "Preview of a View in the Management" section. |
D: The |
|
E: The NOTE: The first field at the top will appear at the far left; this means that it is going to be the first column displayed in the management grid. |
|
If the configuration of the view is complete, click on the "![]() Apply" button.
Apply" button.
To carry on with the configuration using other tabs, see the sections ""Sort" Tab", ""Filter" Tab" and ""Visibility" Tab".
"Sort" Tab
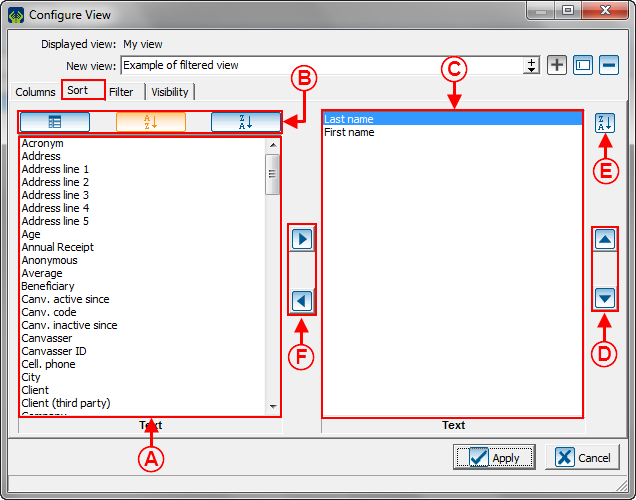
This tab allows you to determine a sort order for the presentation of the view in the management grid. It is possible to choose on which field the sorting must be performed first, second, third, etc. as well as to choose to display the data in ascending or descending order.
If the configuration of the view is complete, click on the "![]() Apply" button.
Apply" button.
To carry on with the configurations using other tabs, see sections ""Columns" Tab", ""Filter" Tab" and ""Visibility" Tab".
"Filter" Tab
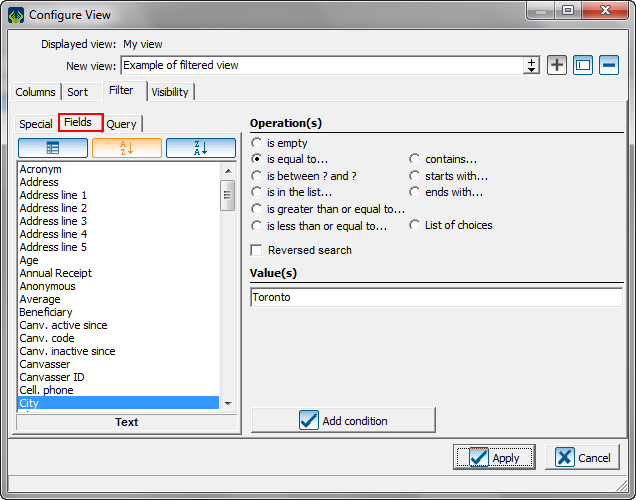
This tab allows you to apply a filter to the view.
|
The "Filter" tab is configured in the exact same way as the addition of a filter in the management. To learn how to configure the tabs "Special", "Fields" and "Query", see the "Filter Data (Queries)" document. In this example, only the entries containing the value "Toronto" in the "City" field will be displayed. NOTE: When a filter is applied to a view, a filter icon appears next to the name of the view in the management. To view an example of a filtered view icon, see point A of the "Preview of the View in the Management" section. |
If the configuration of the view is complete, click on the "![]() Apply" button.
Apply" button.
To carry on with the configurations using other tabs, ""Columns" Tab", ""Sort" Tab", and ""Visibility" Tab".
"Visibility" Tab
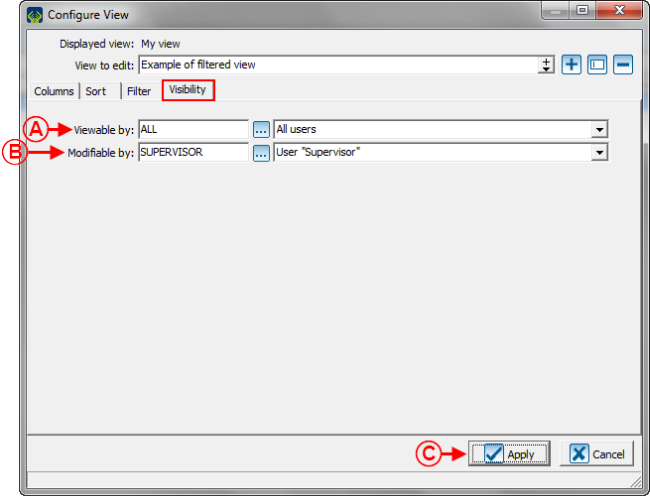
This tab is visible only if the "Network Module" is activated in the software. It allows you to specify which users of the database can see, use or modify the view.
CAUTION: For the most recent version of this option, click here.
 | |
|
A: Allows you to choose which users can see and use the view. In this example, all the users of the database are able to see and use this view. |
B: Allows you to choose the users who will be able to modify the view. In this example, only the user "Supervisor" can modify this view. |
|
C: After configuring all the desired options of the view and the "Columns", "Sort", "Filter" and "Visibility" tabs, click on the " |
|
Preview of the View in the Management
 | |
|
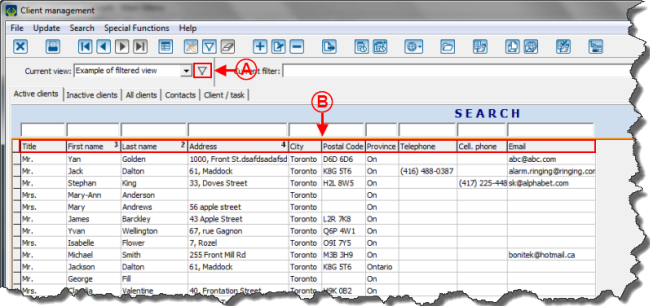
A: It is the icon that indicates that the current view is filtered. |
B: These are the fields chosen in the "Columns" tab. |
Deleting a View
To delete a view, first go to the management in which a view has to be deleted.
 |
|
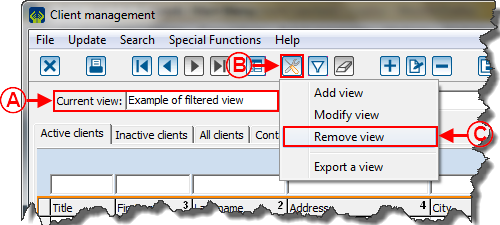
Once in the desired management, select the view to delete at A, using the drop-down arrow on the right, click on the |
|
After clicking on "Remove view", this window opens. |
 |
|
Click on the " NOTE: By clicking on " |
Selecting a Default View
It is possible to choose which view, among the existing ones, must appear by default when entering in the different managements of the database. When a view is created, it only exists in the management in which it has been created. It is therefore necessary to determine a default view for each management (e.g. "Client management", "Analysis and history", "Transaction management", etc.).
|
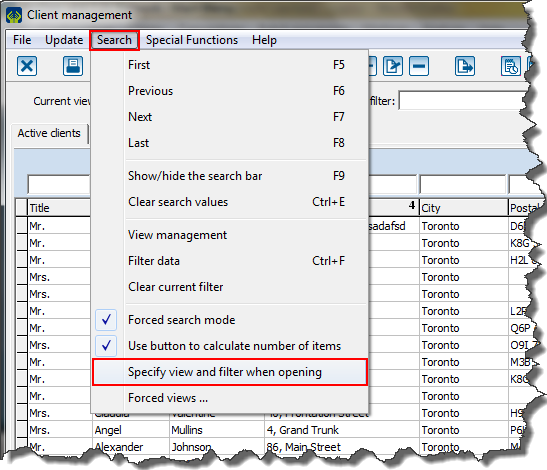
To select a default view, first go to the desired management. |
 |
|
Click on the "Search" menu, then select "Specify view and filter when opening". |
Document name: Common functions:View Management
