ProDon:Label Configuration
| Label Configuration |
Introduction
The Online Donation module allows donors to make donations directly through the Web.
In order for donors to make donations, a website must first be created and configured. The creation of an online donation website includes the configuration of the home page, as well as the creation of different Web forms.
While configuring the website and the different Web forms, virtually all the fields can be renamed. The name assigned to each field is called a label. To learn how to modify the labels of the website, see this section. To learn how to modify the labels of the Web forms, see this section.
Label Configuration
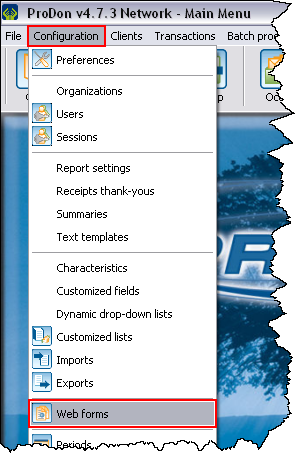
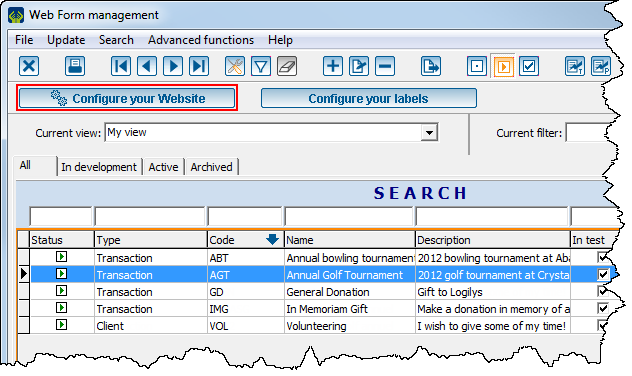
To configure labels, first open the "Web form management".
|
To do so, click on the "Configuration" menu, then select " | |
|
Website Label Configuration
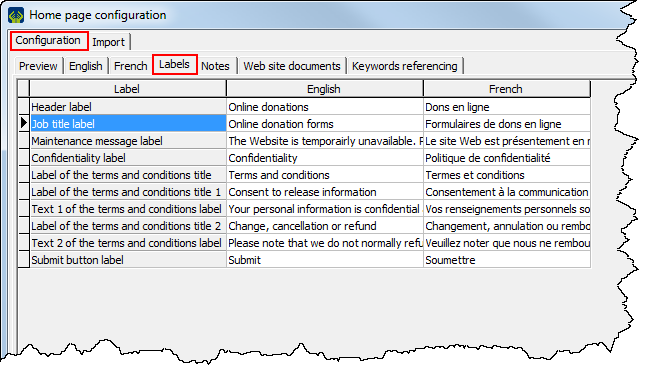
The labels of the website are the ones present on the home page, the website maintenance page and on the terms and conditions page.
|
After clicking on the " | |
 | |
|
After clicking on the | |
 | |
|
To view examples of labels, as well as their location on the website, see the "Labels" Tab" section of the "Home Page and Website Configuration" document. |
Web Form Label Configuration
Each Web form consists of different label groups:
- 1 group of form labels
- 1 group of form transaction labels
- 1 or more groups of country labels
To configure label groups, see this section.
To assign label groups to a Web form, see this section.
To modify the labels of the different groups, see this section.
Label Group Configuration
|
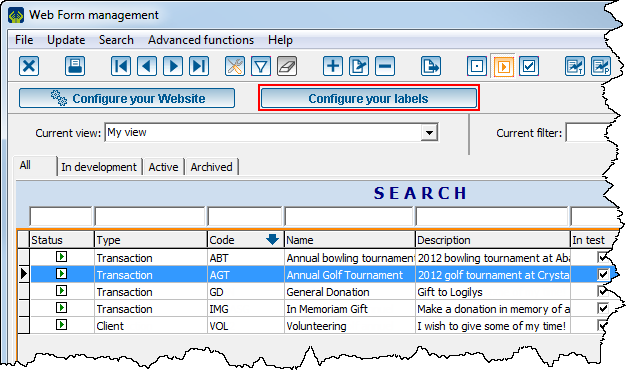
After clicking on the " | |
| |
|
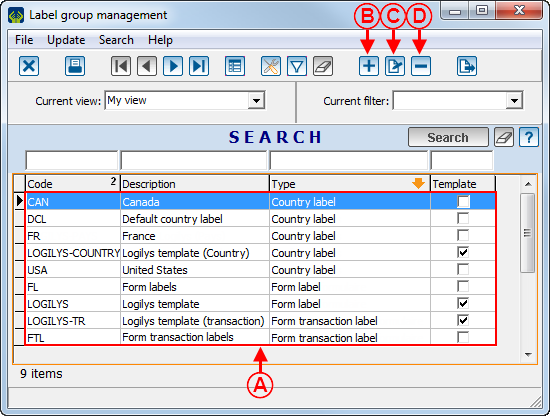
After clicking on the | |
| |
|
A: These are all the label groups that have been created in ProDon. A label group contains Web form fields and each form must contain a minimum of three label groups: one "Form labels" type, one "Form transaction labels" type and at least one "Country labels" types. |
B: The |
|
C: The |
D: The |
|
NOTE: The same label group may be used in more than one Web form; therefore, it is not necessary to create a label group per form. | |
Add/Edit Label Group
|
After clicking on the | |
| |
|
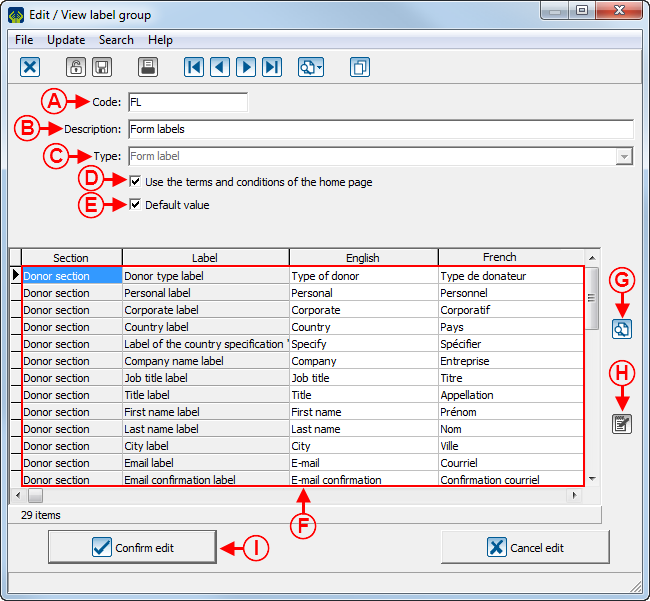
A: Allows you to assign a code to a label group. |
B: Allows you to assign a name to a label group. |
|
C: Choose whether the group to be added is a "Form labels" type or a "Form transaction labels" type. NOTE: It is not possible to modify the label group type when it is being modified, it is only possible to select it during the creation. |
D: If this checkbox is checked, the terms and conditions page will be the same on the home page and on the Web form. If the checkbox is unchecked, fields will be added to the list at F in order to modify the field labels of the terms and conditions page that is available from a Web form. |
|
E: Allows you to indicate that the label group specified at B is the one that will be on all the Web forms by default. |
F: This is the list of labels for the label group specified at B. For more information concerning the fields and their location, see this section. |
|
G: The |
H: The NOTE: It is also possible to modify a label simply by double-clicking on it. |
|
I: Once all the labels are specified, click on the " |
|
Assignment of Label Groups to a Web Form
To assign a label group to a Web form, you must go to the Web form edit window.
|
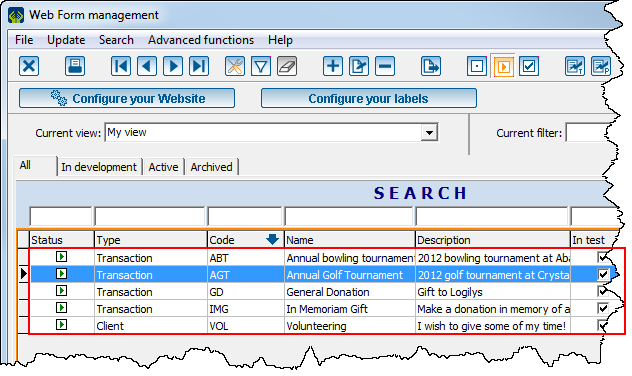
To open the Web form edit window, from the Web form management, double-click on the Web form for which label groups must be modified. | |
 |
To learn how to assign the "Form labels" and "Form transaction labels" groups to a Web form, see this section.
To learn how to assign country label groups to a Web form, see this section.
"Form Labels" and "Form Transaction Labels" Label Groups
|
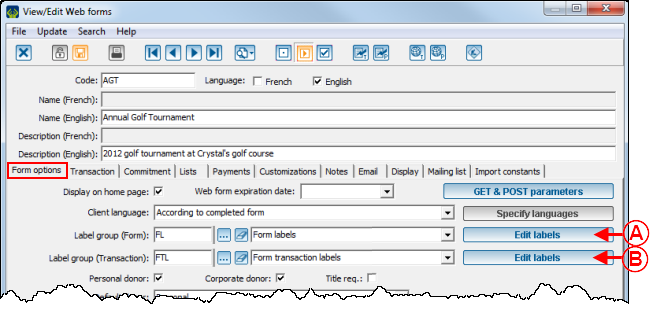
After double-clicking on the line of the form for which label groups must be modified from this window, the following window opens. Go to the "Form options" tab. | |
 | |
|
Drop-down lists allow you to choose the label groups that should be assigned to the form. The |
To learn how to configure the labels of the "Transactions" section of the Web form, click here.
To learn how to configure all the other labels of the Web form, click here.
Country Label Groups
A country label group must be assigned to each country added to the Web form.
|
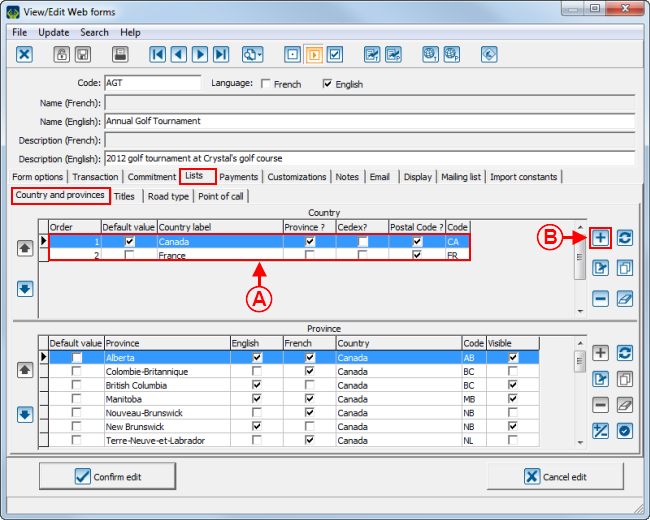
After double-clicking on the line of the form for which country label groups must be modified from this window, the following window opens. Go to the "Lists" tab, then to the "Country and provinces" tab. | |
 | |
|
A: To modify the labels of a country that is already present in the list, double-click on the right country. |
B: To add a new country in the options of the Web form and assign a label group to it, click on the |
|
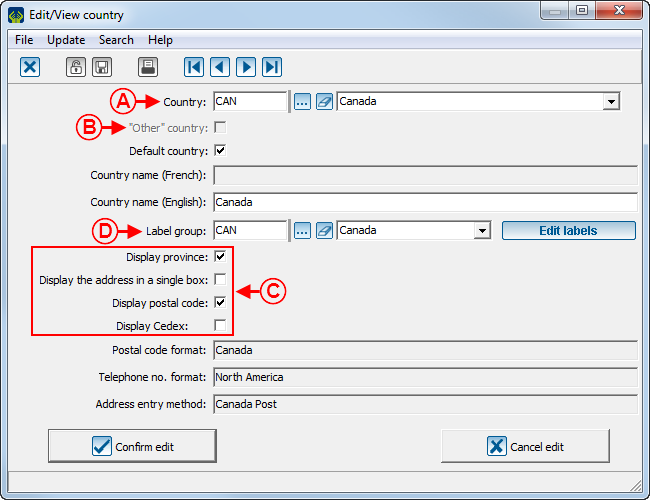
After double-clicking on a country or clicking on the | |
| |
|
A: Indicate the country for which the label group has to be modified. |
B: If this checkbox is checked, donors will be able to specify a country, even if it is not associated with a label group. To view an example of "Other" country option, see point D of example 1 of the "Examples of Web Form Labels" section. NOTE: This option is only available if no instant payment method is used in the form, or if it is a client form. If an instant payment method is used, the country must inevitably be specified. |
|
C: The labels of the elements specified here will appear on the Web form only if the checkboxes here are checked and if the country configurations allow it. |
D: The |
To learn how to configure country labels, click here.
Editing Labels of Different Label Groups
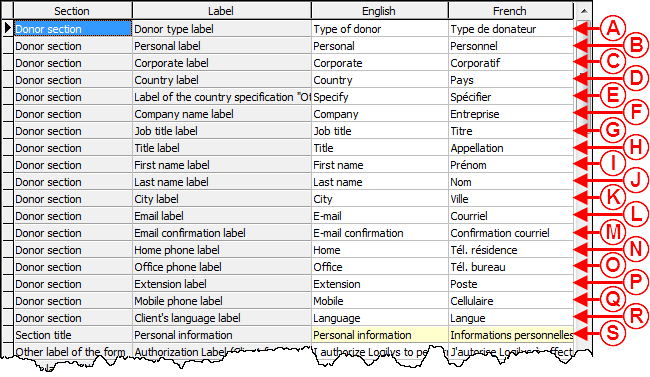
To modify a label, double-click on the label to be modified.
Form Labels
 | |
|
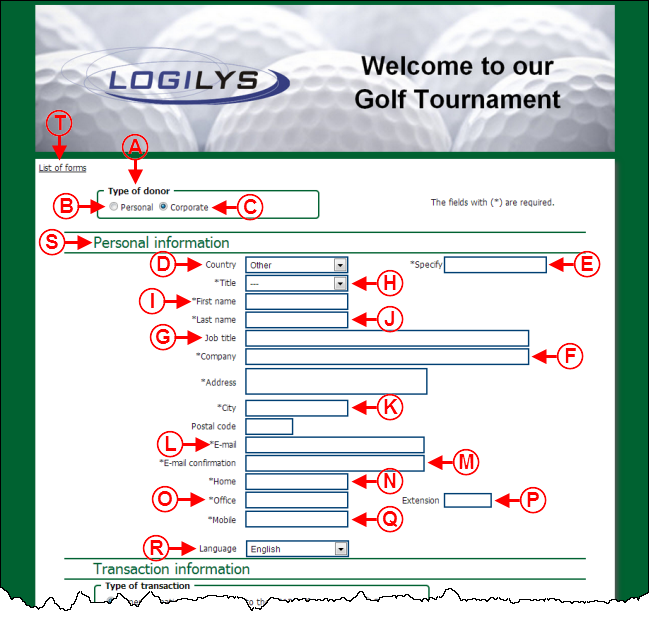
A: To view an example of a donor type label, see point A of example 1 of the "Web Form Label Examples" section. |
B: To view an example of personal label, see point B of example 1 of the "Web Form Label Examples" section. |
|
C: To view an example of corporate label, see point C of example 1 of the "Web Form Label Examples" section. |
D: To view an example of country label, see point D of example 1 of the "Web Form Label Examples" section. |
|
E: To view an example of "Other" country specification, see point E of example 1 of the "Web Form Label Examples" section. |
F: To view an example of company name label, see point F of example 1 of the "Web Form Label Examples" section. |
|
G: To view an example of job title label, see point G of example 1 of the "Web Form Label Examples" section. |
H: To view an example of title label, see point H of example 1 of the "Web Form Label Examples" section. |
|
I: To view an example of first name label, see point I of example 1 of the "Web Form Label Examples" section. |
J: To view an example of last name label, see point J of example 1 of the "Web Form Label Examples" section. |
|
K: To view an example of city label, see point K of example 1 of the "Web Form Label Example" section. |
L: To view an example of email label, see point L of example 1 of the "Web Form Label Examples" section. |
|
M: To view an example of email confirmation label, see point M of example 1 of the "Web Form Label Examples" section. |
N: To view an example of home phone label, see point N of example 1 of the "Web Form Label Examples" section. |
|
O: To view an example of office phone label, see point O of example 1 of the "Web Form Label Examples" section. |
P: To view an example of extension label, see point P of example 1 of the "Web Form Label Example" section. |
|
Q: To view an example of mobile phone label, see point Q of example 1 of the "Web Form Label Examples" section. |
R: To view an example of client's language, see point R of example 1 of the "Web Form Label Examples" section. |
|
S: To view an example of the "Personal information" section title label, see point S of example 1 of the "Web Form Label Examples" section. |
|
 | |
|
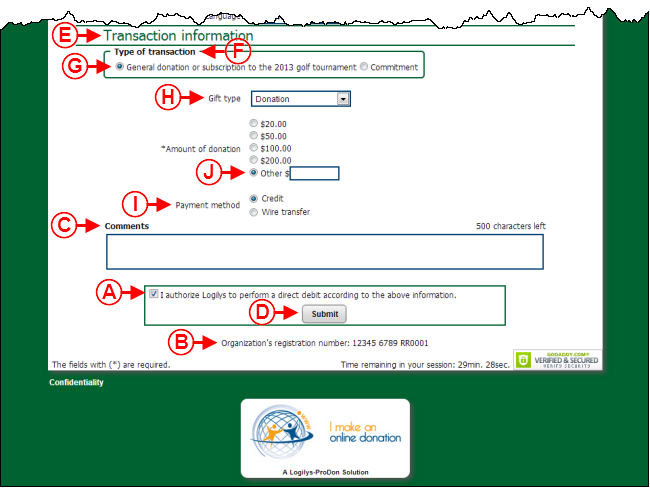
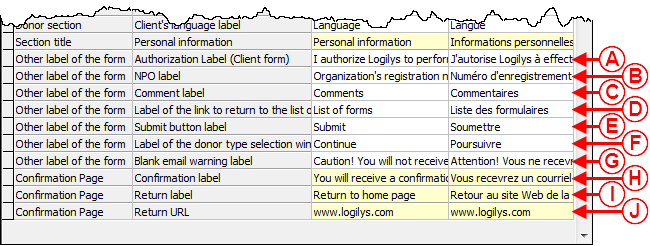
A: To view an authorisation label (client form), see point A of example 2 of the "Web Form Label Examples" section. |
B: To view an example of NPO label, see point B of example 2 of the "Web Form Label Examples" section. |
|
C: To view an example of comment label, see point C of example 2 of the "Web Form Label Examples" section. |
D: To view an example of the return link to the list of forms label, see point T of example 1 of the "Web Form Label Examples" section. |
|
E: To view an example of submit button label, see point D of example 2 of the "Web Form Label Examples" section. |
F: To view an example of the label of the donor type selection window button, see point A of example 7 of the "Web Form Label Examples" section. |
|
G: To view an example of empty email warning label, see point A of example 4 of the "Web Form Label Examples" section. |
H: To view an example of confirmation label, see point A of example 5 of the "Web Form Label Examples" section. |
|
I: To view an example of return label, see point B of example 6 of the "Web Form Label Examples" section. |
J: To view an example of return URL label, see point B of example 6 of the "Web Form Label Examples" section. |
Form Transaction Labels
 | |
|
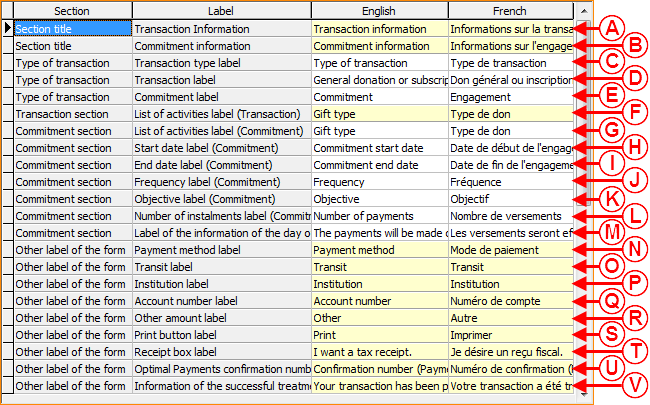
A: To view an example of title of the "Transaction information" section label, see point E of example 2 of the "Web Form Label Examples" section. |
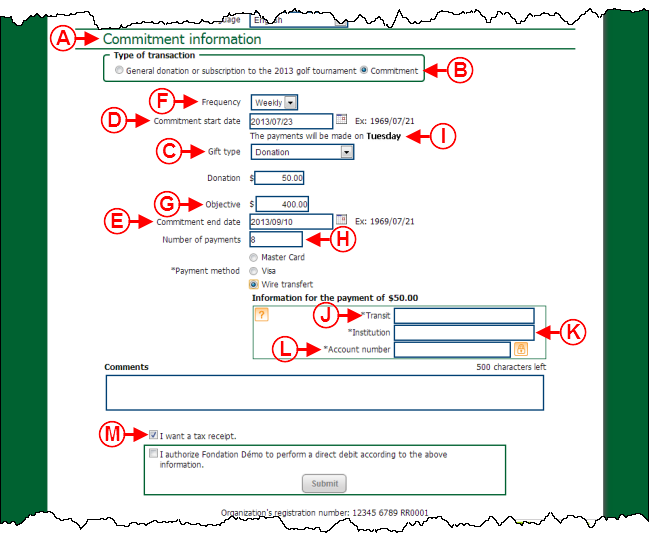
B: To view an example of the "Commitment information" section label, see point A of example 3 of the "Web Form Label Examples" section. |
|
C: To view an example of a transaction type label, see point F of example 2 of the "Web Form Label Examples" section. |
D: To view an example of transaction label, see point G of example 2 of the "Web Form Label Examples" section. |
|
E: To view an example of commitment label, see point B of example 3 of the "Web Form Label Examples" section. |
F: To view an example of the list of activities (transaction) label, see point H of example 2 of the "Web Form Label Examples" section. |
|
G: To view an example of the list of activities (commitment) label, see point C of example 3 of the "Web Form Label Examples" section. |
H: To view an example of start date (commitment) label, see point D of example 3 of the "Web Form Label Examples" section. |
|
I: To view an example of end date (commitment) label, see point E of example 3 of the "Web Form Label Examples" section. |
J: To view an example of frequency (commitment) label, see point F of example 3 of the "Web Form Label Examples" section. |
|
K: To view an example of objective (commitment) label, see point G of example 3 of the "Web Form Label Examples" section. |
L: To view an example of number of instalments (commitment) label, see point H of example 3 of the "Web Form Label Examples" section. |
|
M: To view an example of information on the day of the instalment label, see point I of example 3 of the "Web Form Label Examples" section. |
N: To view an example of payment method label, see point I of example 2 of the "Web Form Label Examples" section. |
|
O: To view an example of transit label, see point J of example 3 of the "Web Form Label Examples" section. |
P: To view an example of institution label, see point K of example 3 of the "Web Form Label Examples" section. |
|
Q: To view an example of account number label, see point L of example 3 of the "Web Form Label Examples" section. |
R: To view an example of other amount label, see point J of example 2 of the "Web Form Label Examples" section. |
|
S: To view an example of print button label, see point A of example 5 of the "Web Form Label Examples" section. |
T: To view an example of receipt box label, see point M of example 3 of the "Web Form Label Examples" section. |
|
U: To view an example of PaySafe confirmation number label, see point C of example 6 of the "Web Form Label Examples" section. |
V: To view an example of information of successful treatment of the transaction label, see point B of example 5 of the "Web Form Label Examples" section. |
Country Labels
|
After clicking on the | |
 | |
|
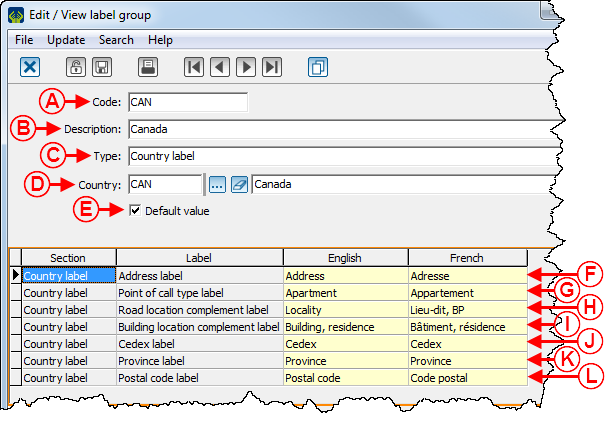
A: Enter a code for the label group. |
B: Enter a label group name. |
|
C: Select the "Country label" type. |
D: Select to which country of the database the label group will be assigned. |
|
E: Indicate if the selection at D must appear by default on the Web form. |
F: To view an example of address label when the "Display the address in a single box" checkbox at point C of this window is checked, see point A of example 1 of the "Country Label Examples" section. To view an example of address label when the "Display the address in a single box" checkbox at point C of this window is not checked, see point C of example 2 of the "Country Label Examples" section. |
|
G: To view an example of point of call label, see point A of example 2 of the "Country Label Examples" section. |
H: To view an example of road location complement label, see point D of example 2 of the "Country Label Examples" section. |
|
I: To view an example of building location complement label, see point B of example 2 of the "Country Label Examples" section. |
J: To view an example of Cedex label, see point E of example 2 of the "Country Label Examples" section. |
|
K: To view an example of province label, see point B of example 1 of the "Country Label Examples" section. |
L: To view an example of postal code label, see point C of example 1 of the "Country Label Examples" section. |
|
NOTE: To be displayed on the form, the field must be checked at C of this window, then activated in the country configurations. | |
Label Examples
Web Form Label Examples
Example 1
Example 2
Example 3
Example 4
 | |
|
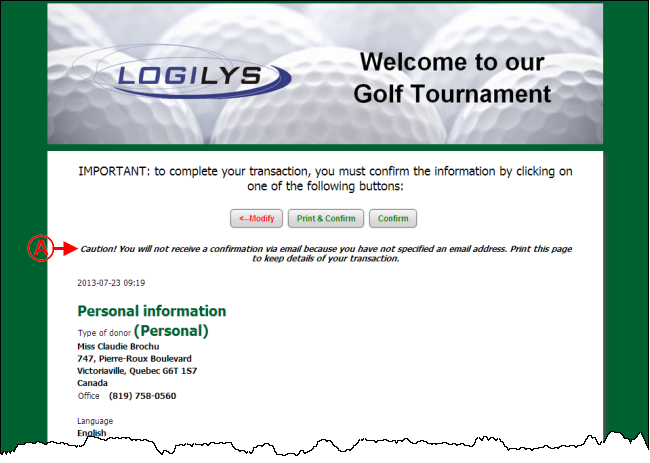
A: Label stating that no confirmation e-mail will be sent and that no e-mail address has been entered in the previous page. NOTE: This window only appears for Pivotal payments. For PaySafe payments, entry of the e-mail address is required. Moreover, in order for this label to appear, the checkbox requiring e-mail address entry must be unchecked when configuring the options of the Web form. To learn how to make the e-mail address entry optional, see points N and O of the "Form Options" Tab section of the "Creating a Web Form" document. |
Example 5
 | |
|
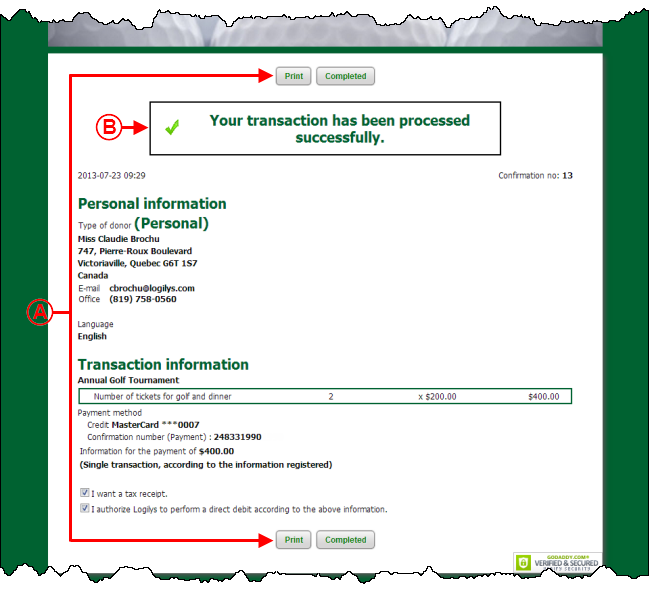
A: Label of the button allowing donors to print the information of the transaction. |
B: Label confirming that the transaction has been processed successfully. |
Example 6
 | |
|
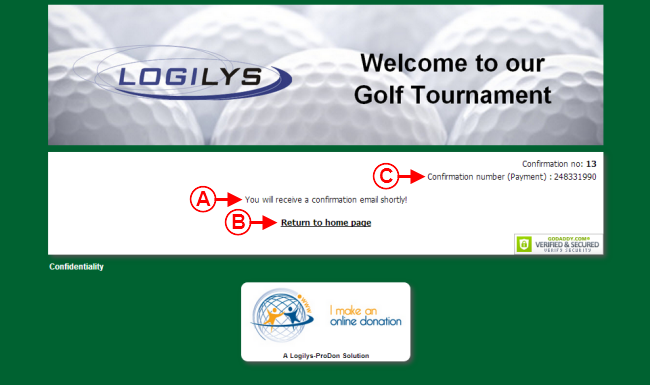
A: Label informing donors that they will receive a confirmation e-mail shortly. |
B: Label of the link to the foundation website. This link goes back to the address specified at point J of the second image of this section. |
|
C: Label displaying the confirmation number of PaySafe payments. NOTE: This label only appears when a PaySafe payment has been made. |
|
Example 7
 | |
|
A: Label of the button allowing donors to confirm the selection of the type of donor when it has to be specified before the entry of the form. NOTE: This window only opens if the option "Ask before form entry" is active when creating the Web form. To learn how to activate this option, see point L of the "Form Options" Tab section of the "Creating a Web Form" document. |
Country Label Examples
Example 1
| |
|
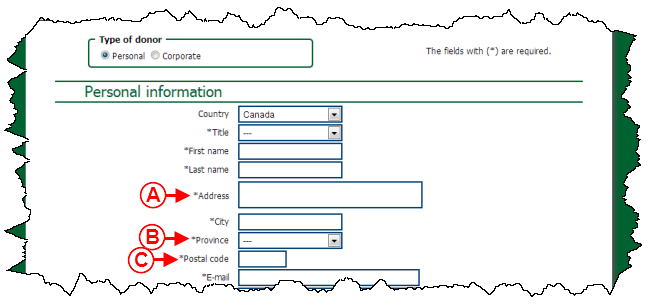
A: Label of the field allowing donors to specify their address. NOTE: The box "Display address in a single box" at point C of this window has been checked. |
B: Label of the field allowing donors to specify their province. |
|
C: Label of the field allowing donors to specify their postal code. |
NOTE: In order to appear on the form, this field must be checked at point C of this window, then activated in the country configurations. |
Example 2
| |
|
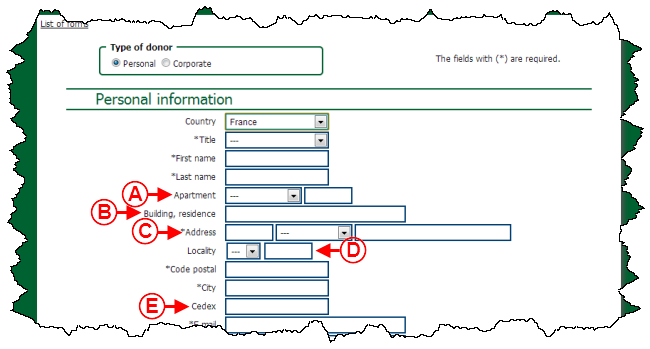
A: Label of the field allowing donors to specify the point of call type. NOTE: This field is mainly used in Europe. |
B: Label of the field allowing donors to specify the type of building. NOTE: This field is mainly used in Europe. |
|
C: Label of the field allowing donors to specify their address. NOTE: The box "Display the address in a single box" at point C of this window has not been checked. |
D: Label of the field allowing donors to specify the road location complement. NOTE: This field is mainly used in Europe. |
|
E: Label of the field allowing donors to specify the Cedex. NOTE: This field is mainly used in Europe. |
NOTE: In order to appear on the form, the field must be checked at point C of this window, then activated in the country configurations. |
Document name: ProDon:Label Configuration
Version : 4.6.9.6
