ProDon:Cancelling, Reissuing and Reprinting Receipts (Version 4)
| Cancelling, Reissuing and Reprinting Receipts (Version 4) |
CAUTION : This document is for VERSION 4 of Prodon. To go to the document for version 5, click here.
Introduction
Once a receipt has been issued, it is possible to cancel, reissue or reprint it. These three functions can be used in different situations. For instance, when a receipt is lost, the user will have to reissue it, when the organization receive an uncovered cheque, the user will have to cancel the receipt and credit or cancel the transaction. When a transaction has been entered and transferred by mistake, the user will also have to cancel the receipt and credit or cancel the transaction, etc.
CAUTION: The reprinting of receipts should not be used, except for internal purposes.
In ProDon, it is possible to cancel, reissue and reprint receipts from two different places; the client file and "Analysis and history".
Cancelling, Reissuing and Reprinting Receipts
To cancel, reissue or reprint the receipt of a particular client, open his or her client file.
|
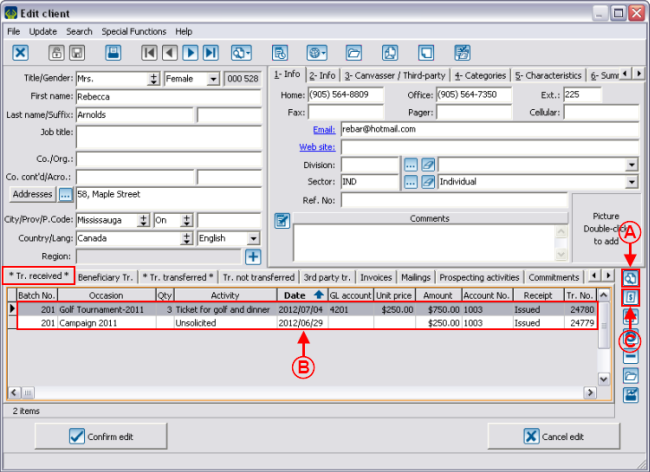
Once in the client file, go to the "Tr. received" tab. | |
 | |
|
A: The |
B: Select the transaction for which the receipt must be cancelled, reissued or reprinted. |
|
NOTE: It is possible to cancel, reissue or reprint one receipt at a time from a client file. | |
By clicking on the ![]() button, these three options become available:
button, these three options become available:
Cancelling a Receipt
Most of the time, if a receipt must be cancelled, the transaction that is linked to it must also be credited or cancelled.
In the event, for example, that the organization receive an uncovered cheque; the deposit has been done, but no payment was received. Therefore the user will have to cancel the receipt and credit the transaction. If a payment is received subsequently, a new transaction will have to be entered and a new receipt will be issued for this new transaction. It is also possible, instead of crediting the transaction, to cancel the transaction linked to the receipt, but in this case the user will have to make sure that the information has been sent to the accounting software.
|
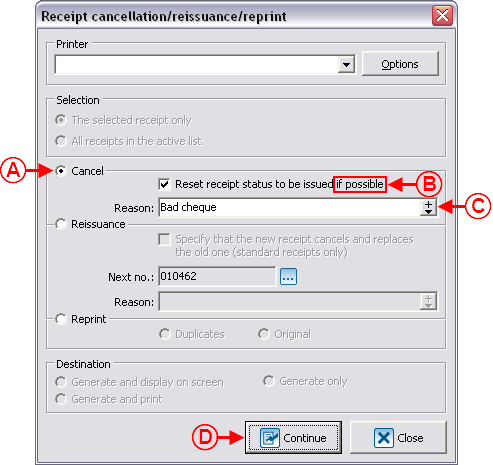
To cancel the receipt, select the transaction of the receipt to be cancelled as explained at A and B of this section, then click on the | |
 | |
|
A: This feature allows a receipt that has already been issued to be cancelled. |
B: By checking this box, the status will be modified automatically to "To be issued", if it is possible, depending on ProDon's validations. For instance, it will be possible to reissue a receipt if a client has asked to never receive receipts or if the activity in question does not allow for the issuance of receipts, etc. |
|
C: This field allows the reason for the receipt cancellation to be entered. |
D: After checking the desired information, click on the " |
|
NOTE: Do not check the box at B if the transaction linked to the receipt must be credited or cancelled. This box must be checked only if a new receipt must be issued for this transaction (for instance, a receipt lost by the donor).
| |
|
|
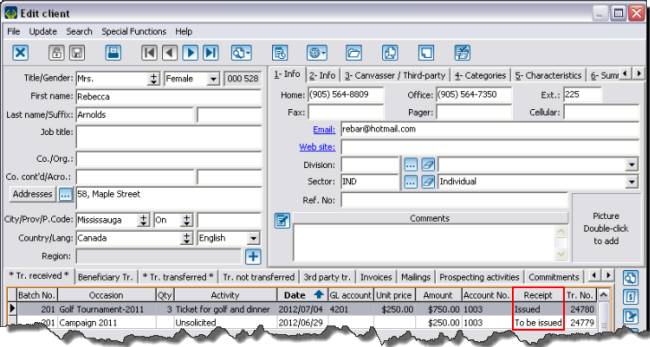
After clicking on " NOTE: Depending on ProDon's validations, it is possible that the receipt can not be reissued, for instance, if the client has asked to never receive receipts or if the activity in question does not allow for the reissuance of receipts, etc. CAUTION: It is important to check if the status change has been made, since ProDon does not display any error message on that matter. In this example, since the box "Reset receipt status to be issued if possible" has been checked, the receipt status is modified to "To be issued" instead of "Issued". The receipt also appears in "Batch processing: Receipts", in order to issue the receipt again. If the box "Reset receipt status to be issued if possible" had not been checked, the receipt status would have been modified to "None" instead of "Issued". In this case, the receipt does not appear in "Batch processing: Receipts". |
Once the receipt is cancelled, two options are possible:
- Cancel or credit the transaction linked to the cancelled receipt
- Leave the "To be issued" receipt awaiting for a subsequent payment. Upon receipt of the payment, proceed to the reissuance of the receipt from a client file or from "Batch processing: Receipts"
CAUTION: Make sure that the information has been sent to accounting since there will not be any other transaction to be entered in ProDon.
Cancelling or Crediting a Transaction of the Cancelled Receipt
In the case where the receipt is cancelled because of an error in the transaction, it might also be necessary to cancel or credit the transaction.
To learn how to cancel a transaction, see the "Cancelling a Transaction" procedure.
To learn how to credit a transaction, see the "Negative Transaction Entry" procedure..
Reissuing a Receipt from the Client File upon Receipt of a Payment
|
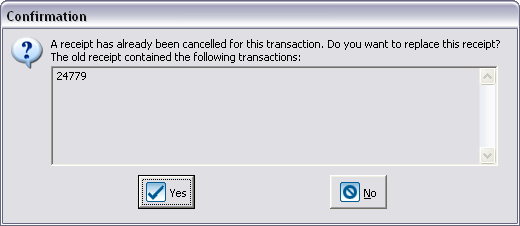
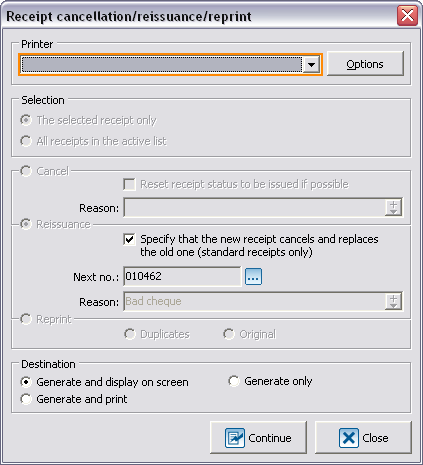
To reissue the receipt from the client file, select the transaction of the receipt to be reissued as explained at A and B, then click on the |
|
|
The receipt status is then modified to "Issued" in the client file.
Reissuing a Receipt from "Batch processing: Receipts" upon Receipt of a Payment
To learn how to issue a receipt from "Batch processing: Receipts", see the "Processing Receipts to be Issued" procedure.
Reissuing a Receipt
|
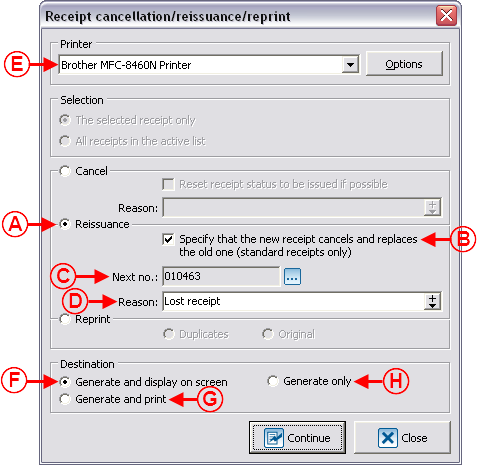
To reissue a receipt, select the transaction of the receipt to be reissued as explained at A and B, then click on the | |
| |
|
A: This feature allows a receipt that has already been issued to be reissued. |
B: If this box is checked, a box stating that the new receipt cancels and replaces the old one is displayed on the new receipt. |
|
C: This field indicates the next receipt number that will be used. |
D: This field allows the reason for the receipt cancellation to be entered. |
|
E: Allows the choice the printer by which the receipt will be printed. |
F: Allows the new receipt to be generated and displayed onscreen. NOTE: If this box is selected, the user will then have to print the receipt manually. |
|
G: Allows the new receipt to be generated and printed. NOTE: This option is not recommended since it does not allow the verification of the receipt onscreen prior to printing. |
H: Allows the receipt to be generated onscreen without printing it. |
Once the desired options are checked, click on "![]() Continue".
Continue".
After clicking on the "![]() Continue", the receipt will be generated, displayed onscreen or printed depending on the option checked at F, G or H.
Continue", the receipt will be generated, displayed onscreen or printed depending on the option checked at F, G or H.
If the receipt is displayed onscreen, verify it, and print it. Then close the receipt window.
Reprinting a Receipt
|
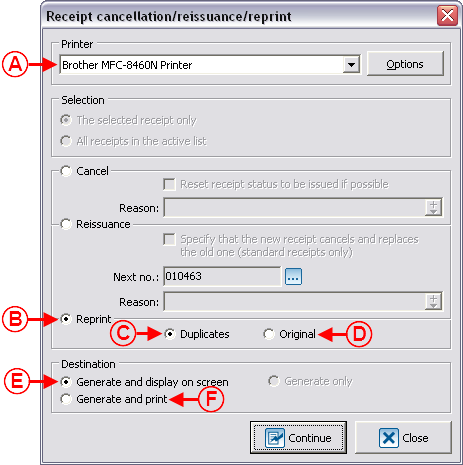
To reprint a receipt, select the transaction of the receipt to be reprinted as explained at A and B, then click on the | |
| |
|
A: Allows the choice of which printer will be print the receipt. |
B: This feature allows a receipt that has already been issued to be reprinted. |
|
C: Allows a copy of the receipt that has already been issued to be printed. CAUTION: Verify with the CRA the cases where it is possible to use a "Duplicate" receipt. |
D: Allows the original copy of the receipt that has already been issued to be printed. |
|
E: Allows the receipt to be generated and displayed onscreen. NOTE: If this box is selected, the user will then have to print the receipt manually. |
F: Allows the receipt to be generated and printed. NOTE: This option is not recommended since it does not allow for verification on the receipt onscreen prior to printing it. |
|
CAUTION: The reprinting option is strongly not recommended and must be used only for internal purposes. It is preferable to always cancel the issued receipt or to reissue it rather than reprinting it. | |
Once the desired options have been checked, click on "![]() Continue".
Continue".
After clicking on the "![]() Continue" button, the receipt will be generated, displayed onscreen or printed depending on the option checked at E or F.
Continue" button, the receipt will be generated, displayed onscreen or printed depending on the option checked at E or F.
If the receipt is displayed onscreen, verify it and print it. Then close the receipt window.
|
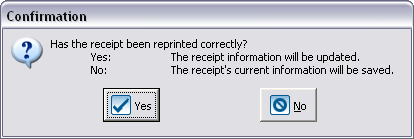
After having clicked on " |
|
|
If the receipt has been generated and printed adequately, click on " |
Cancelling, Reissuing, Reprinting Receipts from "Analysis and History"
From ProDon's "Analysis and history management", it is possible to perform massive changes for many receipts at the same time.
To cancel, reissue or reprint many receipts at a time, contact Logilys' technical support.
Document name: ProDon:Cancelling, Reissuing and Reprinting Receipts (Version 4)
Version : 4.6.6.7

