Difference between revisions of "ProDon:Preparing the Master Document"
(→Formatting Rules) |
|||
| Line 193: | Line 193: | ||
*To encourage people to transfer the email to someone else, use hyperlink "[FORWARD]".<br>To learn how to add a hyperlink to a '''''Word''''' document, see the [[ProDon:Preparing the Master Document#Adding_Hyperlinks|"Adding Hyperlinks"]] section. <br> | *To encourage people to transfer the email to someone else, use hyperlink "[FORWARD]".<br>To learn how to add a hyperlink to a '''''Word''''' document, see the [[ProDon:Preparing the Master Document#Adding_Hyperlinks|"Adding Hyperlinks"]] section. <br> | ||
*To inform people that it is possible to view the email with an Internet navigator, use hyperlink "[SHOWEMAIL]".<br>To learn how to add a hyperlink to a '''''Word''''' document, see the [[ProDon:Preparing the Master Document#Adding_Hyperlinks|"Adding Hyperlinks"]] section. | *To inform people that it is possible to view the email with an Internet navigator, use hyperlink "[SHOWEMAIL]".<br>To learn how to add a hyperlink to a '''''Word''''' document, see the [[ProDon:Preparing the Master Document#Adding_Hyperlinks|"Adding Hyperlinks"]] section. | ||
| − | * | + | *To offer people the option to unsubscribe, use hyperlink "[UNSUBSCRIBE]".<br>To learn how to add a hyperlink to a '''''Word''''' document, see the [[ProDon:Preparing the Master Document#Adding_Hyperlinks|"Adding Hyperlinks"]] section.<br>'''CAUTION:''' The unsubscription link must be clear and must specify for which distribution list the unsubscription will be made.<br> |
| − | * | + | *To offer people the option to unsubscribe from all distribution lists (no longer receive E-mail Blasts from the organization), use hyperlink "[GLOBAL_UNSUBSCRIBE]".<br>To learn how to add a hyperlink to a '''''Word''''' document, see the [[ProDon:Preparing the Master Document#Adding_Hyperlinks|"Adding Hyperlinks"]] section.<br> |
| − | * | + | *To offer people who do receive E-mail Blasts the option to subscribe to distribution lists, use hyperlink "[SUBSCRIBE]", for instance, if someone transfers the email to a friend, this friend could subscribe to the list.<br>To learn how to add a hyperlink to a '''''Word''''' document, see the [[ProDon:Preparing the Master Document#Adding_Hyperlinks|"Adding Hyperlinks"]] section.<br> |
| − | * | + | *To offer people to generate a URL address to share the E-mail Blast on ''Facebook, Twitter,'' etc, use hyperlink "[SHARE]".<br>To learn how to add a hyperlink to a '''''Word''''' document, see the [[ProDon:Preparing the Master Document#Adding_Hyperlinks|"Adding Hyperlinks"]] section. <br> |
| − | * | + | *The law on massive emailing requires the sender to enter his or her address in all E-mail Blasts. To display the address of the organization, write in text in the master document, where the address should be displayed [CLIENTS.ADDRESS].<br>'''CAUTION:''' If tag [CLIENTS.ADDRESS] has not been added to the E-mail Blast, it will automatically be added by '''''ProDon''''' at the end of the E-mail Blast.<br> |
| − | * | + | *Always use the "Save" button and not "Save as". '''''ProDon''''' saves the document in a particular location and you must not modify its location.<br> |
| − | |||
| − | <br> | ||
==== Examples of Layouts<br> ==== | ==== Examples of Layouts<br> ==== | ||
Revision as of 06:25, 15 December 2014
Contents
Introduction
The E-mail Blast module allows you to send emails massively and compile statistics for each mailing made (number of emails sent, opened, rejected, etc.), in order to assess the effectiveness of the mailings. A reject management is also integrated to avoid any problem with spam. To learn how to view mailing statistics, see this document.
Moreover, Internet users can subscribe to distribution lists to receive information emails of interest to them, from the organization website. Following their subscription, they receive an automatic confirmation email specifically designed for that purpose.
Sending an E-mail Blast can be summed up in three steps: You must first prepare the master document, then prepare the distribution list and finally send the E-mail Blast.
This document focuses on the preparation of the master document. To learn how to prepare a distribution list, see this document. To learn how to send an E-mail Blast, see this document.
Preparing the E-mail Blast Master Document
You must prepare the master document prior to sending the E-mail Blast.
There are two types of master documents: customized master documents and general master documents. A general master document is a document that does not contain any merge fields. A customized master document is a document that contains merge fields, in order to customize the E-mail Blast for each recipient.
The preparation of the master document implies either updating the existing master document, or creating a new master document.
CAUTION: A master document designed for a mass mailing cannot be used for an E-mail Blast and vice-versa, since a document designed for an E-mail Blast must respect many formatting rules.
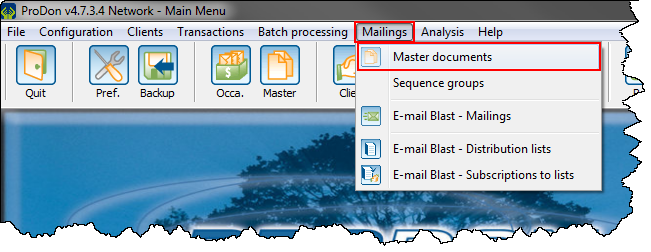
To update an old master document or to create a new master document, go to the "Master document management".
|
To do so, click on the "Mailings" menu, then select " | |
|
Adding, Modifying or Duplicating the E-mail Blast Master Document
|
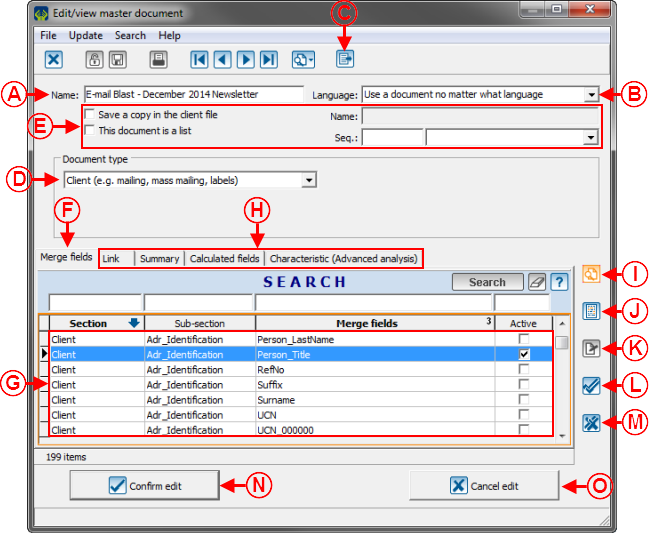
After clicking on the | |
| |
|
A: Name the master document. NOTE: It is recommended to enter "E-mails Blast" in the name of the master document in order to easily find master documents intended for the E-mail Blast. |
B: Always select option "Use a document no matter what language" because option "A document per language" does not work for for E-mail Blast master documents. Therefore, you must always create 1 master document for each language in which the document will be sent. |
|
C: The |
D: Select the type of document "Client (e.g. mailing, mass mailing, labels)". All other types of documents do not work for the E-mails Blast. |
|
E: Those fields cannot be used in E-mail Blast master documents. |
F: This tab allows you to choose the merge fields that will be available when editing the master document in Word. |
|
G: Select the merge fields that should be on the master document. To do so, select the field, then press the space bar of the keyboard. |
H: Those tabs cannot be used in an E-mail Blast master document.
|
|
I: The |
|
|
K: The |
L: The |
|
M: The |
N: After entering all the desired information, click on the " |
|
O: To cancel the modifications or the creation of the master document, click on the " |
|
|
CAUTION: It is important to only check, at G, the merge fields necessary for the customization of the E-mail Blast, since the fields that were activated here cannot be deactivated once the mailing is made. For each mailing, all the fields checked will therefore have to be synchronized one by one with the fields included in the distribution list, which will significantly increase the time of the E-mail Blast mailing. To deactivate fields on the mailing server website of teh E-mail Blast, contact Logilys. NOTE: It is mandatory to check at least one field at G, so when writing a general type E-mail Blast, you must check at least one field here and not check anything in the distribution list. When producing general type E-mail Blasts, it is recommended to always check the same merge field in each master document (e.g. "Title"). | |
Editing the Master Document
After clicking on the ![]() button of this window, Word opens in order to create the master document.
button of this window, Word opens in order to create the master document.
Formatting Rules
There are several rules to follow when editing a master document, in order for the layout to be suitable for the E-mail Blast, here they are:
- Since the document will be converted in an HTML page form Word, the text must be written in a table in order for the HTML document to be as alike as possible when receiving the E-mail Blast on Outlook, Hotmail, Gmail, etc.
To view an example of master document in a table, see point A of the "Examples of Layouts" section.
- Only one image can be inserted per cell and do not write any text with an image.
To view an example of image in a cell, see point B of the "Examples of Layouts" section.
- Always import an image with the right size (do not crop or resize once in the Word document) because it will be pixelated.
- If an image is used as header or footer banner, make sure it is exactly the same width as the table by resizing it with the image properties.
- The maximum size of an image is 450 pixels wide by 1110 pixels high.
- Do not use any image in bitmap (.bmp) or animated gif (.gif) format, because these formats are optimized for the Web.
- The use of rules in Word (e.g. if... therefore... otherwise) do not work in an E-mail Blast.
- Do not use any text box in a master document.
- Be careful with the use of special characters in a master document, some do not work (e.g. special bullets). If this type of character is used, make sure to test the email well prior to sending the real mailing.
- Use only one type of font (colour, size, font, etc) per cell.
- Never fraction the cells, create a table with many columns right from the start.
- If the width of the cells has to be modified, resize them by using the table properties and not by simply sliding a line of the table from left to right.
- Use carriage returns, because certain people configure their default emails in double-space and by using carriage returns, you want to avoid that the E-mail Blast to be double-spaced, regardless of the configuration of the recipient.
- When adding hyperlinks in an email, do not write the Internet address, use a link like "Click here" instead.
To view examples of hyperlinks, see point C of the "Examples of Layouts" section.
- To encourage people to transfer the email to someone else, use hyperlink "[FORWARD]".
To learn how to add a hyperlink to a Word document, see the "Adding Hyperlinks" section.
- To inform people that it is possible to view the email with an Internet navigator, use hyperlink "[SHOWEMAIL]".
To learn how to add a hyperlink to a Word document, see the "Adding Hyperlinks" section. - To offer people the option to unsubscribe, use hyperlink "[UNSUBSCRIBE]".
To learn how to add a hyperlink to a Word document, see the "Adding Hyperlinks" section.
CAUTION: The unsubscription link must be clear and must specify for which distribution list the unsubscription will be made.
- To offer people the option to unsubscribe from all distribution lists (no longer receive E-mail Blasts from the organization), use hyperlink "[GLOBAL_UNSUBSCRIBE]".
To learn how to add a hyperlink to a Word document, see the "Adding Hyperlinks" section.
- To offer people who do receive E-mail Blasts the option to subscribe to distribution lists, use hyperlink "[SUBSCRIBE]", for instance, if someone transfers the email to a friend, this friend could subscribe to the list.
To learn how to add a hyperlink to a Word document, see the "Adding Hyperlinks" section.
- To offer people to generate a URL address to share the E-mail Blast on Facebook, Twitter, etc, use hyperlink "[SHARE]".
To learn how to add a hyperlink to a Word document, see the "Adding Hyperlinks" section.
- The law on massive emailing requires the sender to enter his or her address in all E-mail Blasts. To display the address of the organization, write in text in the master document, where the address should be displayed [CLIENTS.ADDRESS].
CAUTION: If tag [CLIENTS.ADDRESS] has not been added to the E-mail Blast, it will automatically be added by ProDon at the end of the E-mail Blast.
- Always use the "Save" button and not "Save as". ProDon saves the document in a particular location and you must not modify its location.
Examples of Layouts
|
Après avoir cliqué sur le bouton NOTE : Bien respecter toutes les règles de mise en page. | |
File:ProDon Préparation du document maître 004.png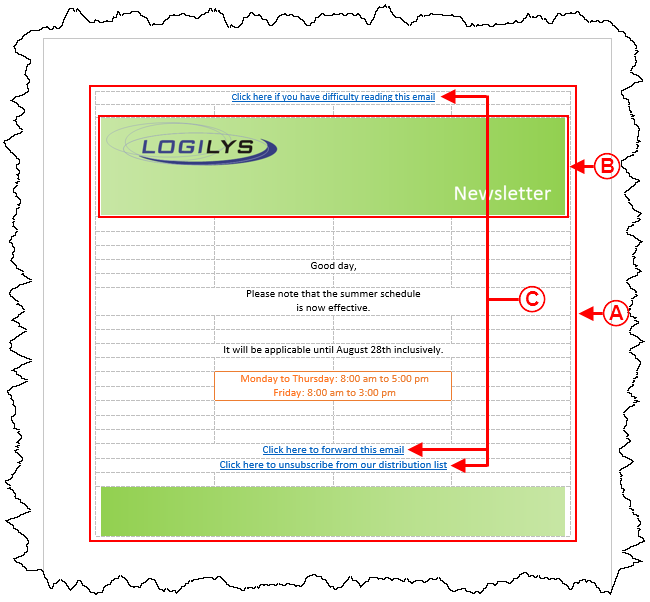
| |
|
A : Il est très important de créer le document maître dans un tableau. ATTENTION : Lors de la création du tableau, insérer suffisamment de colonnes pour ne pas avoir à en ajouter plus tard. Éviter également de redimensionner les colonnes du tableau en déplaçant une ligne du tableau avec la souris, aller plutôt dans les propriétés du tableau. NOTE : Il est possible de rendre les lignes du tableau invisibles, afin qu'elles n'apparaissent pas dans le courriel. |
B : Ne jamais ajouter plus d'une image par cellule. Si l'image doit prendre plus d'une cellule, fusionner les cellules avant d'insérer l'image. Dans cet exemple, 4 cellules ont été fusionnées afin que l'image puisse prendre toute la largeur du tableau et la hauteur s'est ajustée automatiquement. NOTE : L'image doit avoir la bonne dimension avant d'être insérée dans le tableau, il ne faut pas la redimensionner. |
|
C : Il s'agit de trois liens hypertextes. Pour savoir comment ajouter des liens hypertextes, consulter cette section. |
NOTE : Pour savoir comment ajouter des champs de fusion dans le document, consulter la section « Édition d'un document », du document « Gestion des documents maîtres ». |
Une fois que le document maître est édité, l'enregistrer, puis fermer Word.
NOTE : Consulter la section « Règles de mise en page » pour savoir comment enregistrer le document.
Après avoir fermé Word, revenir dans ProDon, cette fenêtre devrait encore être ouverte. Si toutes les informations nécessaires ont été spécifiées, cliquer sur le bouton « ![]() Confirmer la modification ».
Confirmer la modification ».
Adding Hyperlinks
| |
|
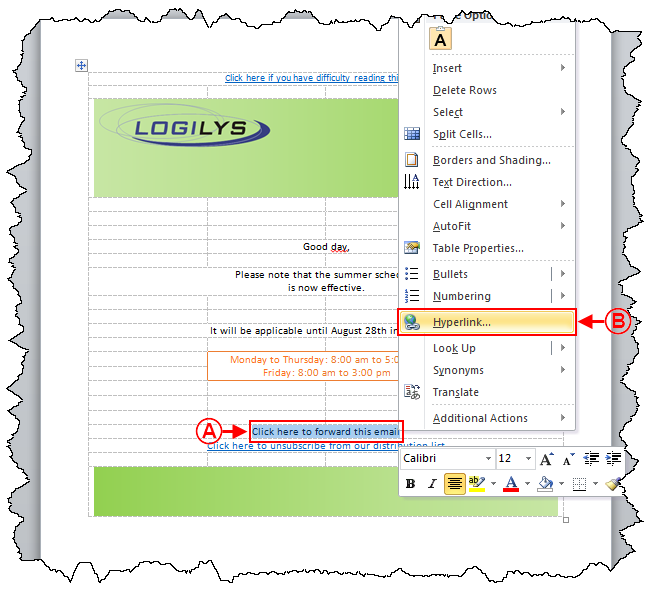
A : Pour ajouter un lien hypertexte, sélectionner le texte sur lequel le lien doit être ajouté, puis faire un clic-droit. |
B : Après avoir fait un clic-droit sur le texte sélectionné en A, ce menu s'ouvre, cliquer sur « File:Bouton lien hypertexte.png Lien hypertexte... ». |
|
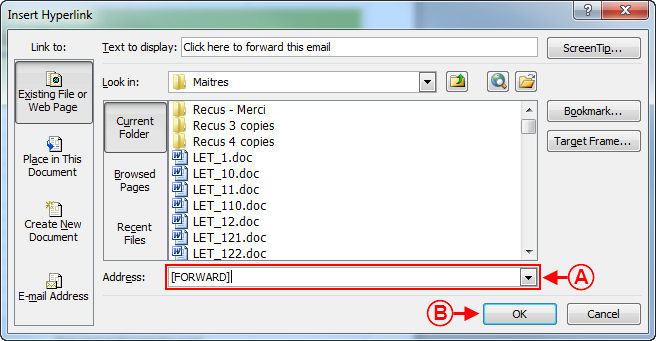
Après avoir cliqué sur « File:Bouton lien hypertexte.png Lien hypertexte... », la fenêtre suivante s'ouvre. | |
| |
|
A : Inscrire l'adresse vers laquelle le lien doit pointer. Le lien de cet exemple sert à transférer le courriel à quelqu'un. |
B : Après avoir inscrit l'adresse vers laquelle le lien doit pointer, cliquer sur le bouton « OK ». |
----
Document name: ProDon:Preparing the Master Document
