Difference between revisions of "ProDon:General Configuration of the Receipt"
(→Introduction) |
|||
| Line 17: | Line 17: | ||
<br> | <br> | ||
| − | == General Configuration of the Receipt<br> == | + | == General Configuration of the Receipt<br> == |
| − | <br> | + | Usually, only the user "Supervisor" has access to the "System preferences", the other users have a read-only access to them. So, to be able to make the following modifications, enter '''''ProDon''''' with the user name "Supervisor". |
| + | |||
| + | <br> | ||
=== Organization Management<br> === | === Organization Management<br> === | ||
| + | |||
| + | Before performing the configuration of the receipt, you have to correctly configure the organization. | ||
<br> | <br> | ||
| − | {| cellspacing="1" cellpadding="1" border="1" | + | {| cellspacing="1" cellpadding="1" border="1" class="wikitable" style="width: 410px; height: 249px;" |
|- | |- | ||
| − | | | + | | |
| + | To do so, from the software home page, click on the "Configuration" menu, then select "Organizations". | ||
| + | |||
|- | |- | ||
| − | | <br> | + | | style="text-align: center;" | [[Image:General_Configuration_of_the_Receipt_001.png]]<br> |
|} | |} | ||
| Line 37: | Line 43: | ||
|- | |- | ||
| colspan="2" | | | colspan="2" | | ||
| + | After clicking on "Organizations", the Organization management" window opens. | ||
| + | |||
|- | |- | ||
| − | | colspan="2" | | + | | colspan="2" style="text-align: center;" | [[Image:General_Configuration_of_the_Receipt_002.png]] |
|- | |- | ||
| − | | width="50%" | < | + | | width="50%" | |
| − | | width="50%" | < | + | '''<span style="color: rgb(255, 0, 0);">A: </span>'''If there are more than one organization, select the one for which the receipt must be configured. |
| + | |||
| + | | width="50%" | | ||
| + | '''<span style="color: rgb(255, 0, 0);">B: </span>'''Click on the [[Image:Button_Edit.png]] button. | ||
| + | |||
|} | |} | ||
| Line 49: | Line 61: | ||
|- | |- | ||
| colspan="2" | | | colspan="2" | | ||
| + | After clicking on the [[Image:Button_Edit.png]] button, the "Edit/View organization settings" window opens. | ||
| + | |||
|- | |- | ||
| − | | colspan="2" | | + | | colspan="2" | [[Image:General_Configuration_of_the_Receipt_003.png]] |
|- | |- | ||
| width="50%" | | | width="50%" | | ||
| + | '''<span style="color: rgb(255, 0, 0);">C: </span>'''If not already done so, it is possible to enter here the information related to the foundation. Some of the information will appear on the receipt. | ||
| + | |||
| width="50%" | | | width="50%" | | ||
| + | '''<span style="color: rgb(255, 0, 0);">D: </span>'''The [[Image:Button_translate.png]] button, which is at the end of the line of the "Address" field allows you to translate the address main line for all the active languages in '''''ProDon'''''. | ||
| + | |||
|} | |} | ||
<br> | <br> | ||
| − | {| cellspacing="1" cellpadding="1" border="1" | + | {| cellspacing="1" cellpadding="1" border="1" class="wikitable" style="width: 510px; height: 227px;" |
|- | |- | ||
| | | | ||
| + | After clicking on the [[Image:Button_translate.png]] button, the "Translation of a value" window opens. | ||
| + | |||
|- | |- | ||
| − | | | + | | style="text-align: center;" | [[Image:General_Configuration_of_the_Receipt_004.png]] |
|- | |- | ||
| | | | ||
| + | Enter the right address in the corresponding languages. | ||
| + | |||
|} | |} | ||
| + | <br> | ||
| + | <br> | ||
| + | === Configuration of the Receipt === | ||
| + | In the "Edit/View organization settings" window, the tabs "Receipt", "Receipt (opt.)" and "Receipt" (pos.)" are available to configure the receipt. The first tab allows you to perform the general configuration of the receipt and the two other ones allow you to configure the standard type receipt. | ||
| − | |||
| + | ==== "Receipt" Tab ==== | ||
| − | + | The "Receipt" tab allows you to perform the general configuration of the receipt. | |
| − | |||
| − | |||
{| cellspacing="1" cellpadding="1" border="1" width="50%" class="wikitable" | {| cellspacing="1" cellpadding="1" border="1" width="50%" class="wikitable" | ||
| Line 96: | Line 120: | ||
|} | |} | ||
| + | <br> | ||
| + | For the configuration of the standard receipt, click here. | ||
| + | For the configuration of the '''''Word''''' receipt, click here. | ||
| + | <br> | ||
| + | <br> | ||
| − | + | <br> | |
| − | |||
{{Footer_ProDon}} | {{Footer_ProDon}} | ||
Revision as of 12:05, 20 September 2011
Contents
Introduction
There are two types of receipts in ProDon, the standard receipts and the Word receipts.
The standard receipt is available in many formats, but its customizability is limited. This receipt is constantly being updated by Logilys and it is complying with the CRA (Canada Revenue Agency) and with the Canadian standards. Therefore, if the software version is updated regularly, the receipt is updated as well.
The Word receipt is complying with the Canadian standards at the time of the delivery of the software. This receipt is a Word document customized with the trainer in accordance with the requests. Since it is a Word document, the customizability options are infinite. On the other hand, this type of receipt is not updated by Logilys, so it is important to update it in accordance with the Canadian standards. You also have to take into consideration that this type of document is generally more complex than a standard Word document and that you need to have a certain mastery of Word to update it. Finally, since this receipt uses Word, it is slower to produce than the standard receipt.
General Configuration of the Receipt
Usually, only the user "Supervisor" has access to the "System preferences", the other users have a read-only access to them. So, to be able to make the following modifications, enter ProDon with the user name "Supervisor".
Organization Management
Before performing the configuration of the receipt, you have to correctly configure the organization.
|
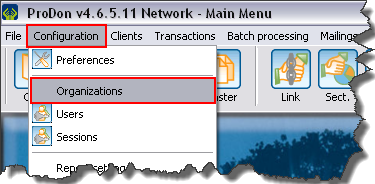
To do so, from the software home page, click on the "Configuration" menu, then select "Organizations". |
 |
|
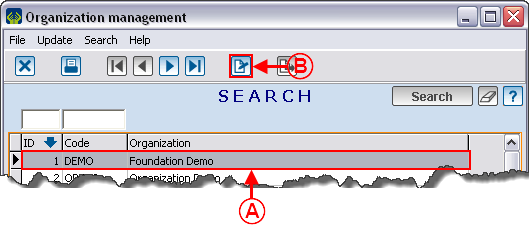
After clicking on "Organizations", the Organization management" window opens. | |

| |
|
A: If there are more than one organization, select the one for which the receipt must be configured. |
|
|
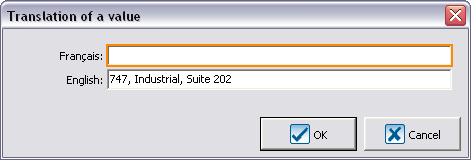
After clicking on the |

|
|
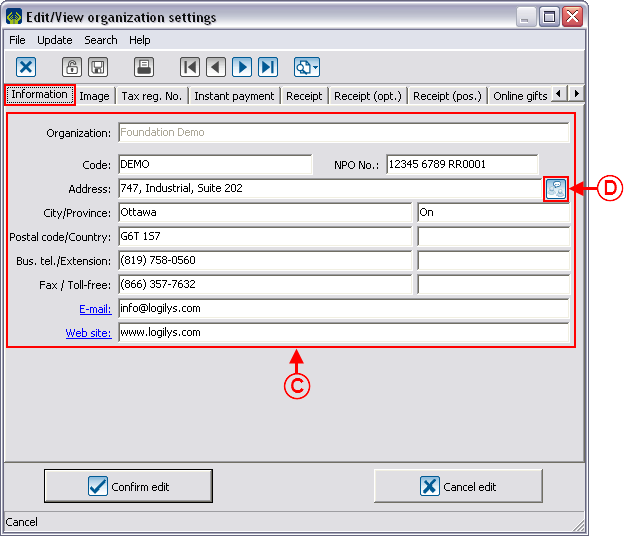
Enter the right address in the corresponding languages. |
Configuration of the Receipt
In the "Edit/View organization settings" window, the tabs "Receipt", "Receipt (opt.)" and "Receipt" (pos.)" are available to configure the receipt. The first tab allows you to perform the general configuration of the receipt and the two other ones allow you to configure the standard type receipt.
"Receipt" Tab
The "Receipt" tab allows you to perform the general configuration of the receipt.
For the configuration of the standard receipt, click here.
For the configuration of the Word receipt, click here.
Document name: ProDon:General Configuration of the Receipt
