Difference between revisions of "ProDon:Expenditure Transaction Logging"
| Line 7: | Line 7: | ||
== Adding an Expenditure Transaction<br> == | == Adding an Expenditure Transaction<br> == | ||
| − | To add an expenditure transaction, first go to the "Transaction Management". | + | To add an expenditure transaction, first go to the "Transaction Management". |
| − | {| cellspacing="1" cellpadding="1" border="1 | + | {| cellspacing="1" cellpadding="1" border="1" style="width: 418px; height: 445px;" class="wikitable" |
|- | |- | ||
| | | | ||
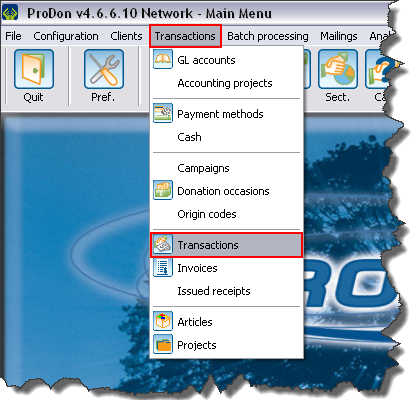
| − | To do so, from the software home page, click on the "Transactions" menu, then select "[[Image: | + | To do so, from the software home page, click on the "Transactions" menu, then select "[[Image:Bouton transactions.png]] Transactions". |
|- | |- | ||
| − | | [[Image: | + | | [[Image:Expenditure Transaction Logging 001.png]]<br> |
|} | |} | ||
<br> | <br> | ||
| − | {| cellspacing="1" cellpadding="1" border="1 | + | {| cellspacing="1" cellpadding="1" border="1" style="width: 552px; height: 424px;" class="wikitable" |
|- | |- | ||
| | | | ||
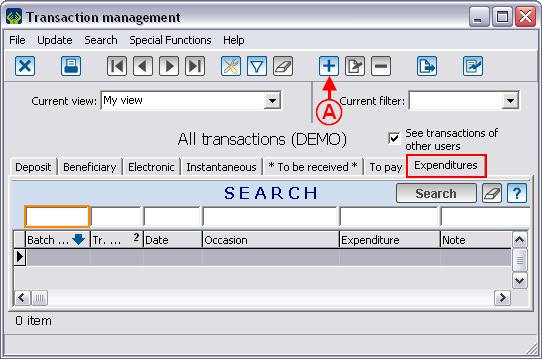
| − | After clicking on "[[Image: | + | After clicking on "[[Image:Bouton transactions.png]] Transactions", this window opens, go to the "Expenditures" tab. |
|- | |- | ||
| − | | [[Image: | + | | [[Image:Expenditure Transaction Logging 002.png]]<br> |
|- | |- | ||
| | | | ||
| − | '''<span style="color: rgb(255, 0, 0);">A: </span>'''In the "Expenditures" tab of the "Transaction management", click on the [[Image: | + | '''<span style="color: rgb(255, 0, 0);">A: </span>'''In the "Expenditures" tab of the "Transaction management", click on the [[Image:Button add plus.png]] button, in order to add a new expenditure transaction. |
|} | |} | ||
| Line 35: | Line 35: | ||
<br> | <br> | ||
| − | {| cellspacing="1" cellpadding="1" border="1" | + | {| cellspacing="1" cellpadding="1" border="1" class="wikitable" style="width: 610px; height: 734px;" |
|- | |- | ||
| − | | colspan="2" | | + | | colspan="2" | |
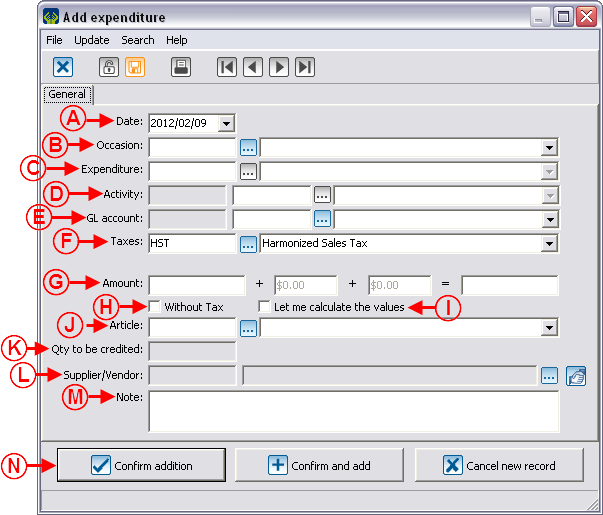
| + | After clicking on the [[Image:Button_add_plus.png]] button, this window opens. | ||
| + | |||
|- | |- | ||
| − | | colspan="2" | <br> | + | | colspan="2" | [[Image:Expenditure_Transaction_Logging_003.png]]<br> |
|- | |- | ||
| − | | width="50%" | < | + | | width="50%" | |
| − | | width="50%" | < | + | '''<span style="color: rgb(255, 0, 0);">A: </span>'''Enter the transaction date. The current date is automatically entered by default. |
| + | |||
| + | | width="50%" | | ||
| + | '''<span style="color: rgb(255, 0, 0);">B: </span>'''By clicking on the [[Image:Button_Selection_3_dots.png]] button, select the donation occasion for which the transaction must be performed. | ||
| + | |||
|- | |- | ||
| − | | width="50%" | < | + | | width="50%" | |
| − | | width="50%" | < | + | '''<span style="color: rgb(255, 0, 0);">C: </span>'''Select the expenditure by clicking on the [[Image:Button_Selection_3_dots.png|20x20px]] button. The expenditure options have previously been added when creating the donation occasion. |
| + | |||
| + | | width="50%" | | ||
| + | '''<span style="color: rgb(255, 0, 0);">D: </span>'''Enter, if necessary, the activity for which the expenditure has been done. | ||
| + | |||
|- | |- | ||
| − | | width="50%" | < | + | | width="50%" | |
| − | | width="50%" | < | + | '''<span style="color: rgb(255, 0, 0);">E: </span>'''Enter the General Ledger code that must be assigned to the transaction. |
| + | |||
| + | | width="50%" | | ||
| + | '''<span style="color: rgb(255, 0, 0);">F: </span>'''Select the tax(es) that will be applied to the paid item or service. | ||
| + | |||
|- | |- | ||
| − | | width="50%" | < | + | | width="50%" | |
| − | | width="50%" | < | + | '''<span style="color: rgb(255, 0, 0);">G: </span>'''Enter the amount of the transaction in the first box, the 3 other boxes will be filled in automatically. |
| + | |||
| + | | width="50%" | | ||
| + | '''<span style="color: rgb(255, 0, 0);">H: </span>'''If no tax is applied to the transaction, check this box. | ||
| + | |||
|- | |- | ||
| − | | width="50%" | < | + | | width="50%" | |
| − | | width="50%" | < | + | '''<span style="color: rgb(255, 0, 0);">I: </span>'''If the tax(es) amount must be calculated manually, check this box. It will then be possible to modify the boxes in <span style="color: rgb(255, 0, 0);">'''G'''</span>. |
| + | |||
| + | | width="50%" | | ||
| + | '''<span style="color: rgb(255, 0, 0);">J: </span>'''If an item is bought and that an inventory management is used in '''''ProDon''''', select the item purchased. | ||
| + | |||
|- | |- | ||
| − | | width="50%" | < | + | | width="50%" | |
| − | | width="50%" | < | + | '''<span style="color: rgb(255, 0, 0);">K: </span>'''Enter the number of purchased items. |
| + | |||
| + | | width="50%" | | ||
| + | '''<span style="color: rgb(255, 0, 0);">L: </span>'''Enter the supplier for the purchased item. | ||
| + | |||
|- | |- | ||
| − | | width="50%" | < | + | | width="50%" | |
| − | | width="50%" | < | + | '''<span style="color: rgb(255, 0, 0);">M: </span>'''Allows you to write down a note relative to the transaction. |
| + | |||
| + | | width="50%" | | ||
| + | '''<span style="color: rgb(255, 0, 0);">N: </span>'''By clicking on "[[Image:Button_Check_mark_Confirm.png]] Confirm addition", the transaction will be registered and '''''ProDon''''' will go back to the transactions screen. | ||
| + | |||
|} | |} | ||
Revision as of 15:48, 9 February 2012
Contents
Introduction
ProDon allows you to log expenditure transactions linked to donation occasions that have previously been defined in the "Adding/Editing an Expenditure Activity" section of the "Donation Occasion Management" document.
Adding an Expenditure Transaction
To add an expenditure transaction, first go to the "Transaction Management".
|
To do so, from the software home page, click on the "Transactions" menu, then select " |
 |
Verification and Transfer of Expenditure Transactions
Verification of the Expenditure Transaction Batch
| | |
| | |
| |
|
| | |
| | |
| |
|
| | |
| | |
| |
|
| |
|
| |
| |
| |
Transfer of Expenditure Transactions
Document name: ProDon:Expenditure Transaction Logging

