Difference between revisions of "ProDon:Customized Field Configuration"
| (20 intermediate revisions by 2 users not shown) | |||
| Line 1: | Line 1: | ||
| − | {{ | + | {{Header_TOC}}<br> |
== Introduction == | == Introduction == | ||
| − | Customized | + | Customized fields are entirely configurable. Their main use is to manage information for which no field is provided in the software. |
<br> | <br> | ||
| − | It is possible to configure customized fields in several managements; for instance, the "Client management", | + | It is possible to configure customized fields in several managements; for instance, the "Client management", "Transaction management", etc. |
<br> | <br> | ||
| − | '''NOTE:''' There are 3 types of customizations, client categories, customized fields and characteristics. To make sure that the customized field is the one that suits you best, read the [[ProDon:Categories vs Customized Fields vs Characteristics|"Categories vs Customized Fields vs Characteristics"]] document.<br> | + | '''NOTE:''' There are 3 types of customizations, client categories, customized fields and characteristics. To make sure that the customized field is the one that suits you best, read the [[ProDon:Categories vs Customized Fields vs Characteristics|"Categories vs Customized Fields vs Characteristics"]] document.<br> |
| + | |||
| + | <br> | ||
== Configuration of Customized Fields<br> == | == Configuration of Customized Fields<br> == | ||
| Line 29: | Line 31: | ||
|- | |- | ||
| colspan="2" | | | colspan="2" | | ||
| − | After clicking on "Customized | + | After clicking on "Customized fields", this window opens. |
|- | |- | ||
| Line 49: | Line 51: | ||
|- | |- | ||
| | | | ||
| − | <span style="color: rgb(255, 0, 0);">'''E:'''</span> These are the customized fields of the "Clients" tab. To create a new customized field, double-click on the line containing the desired field type (the type specified at <span style="color: rgb(255, 0, 0);">'''F'''</span>) and for which the label (at <span style="color: rgb(255, 0, 0);">G</span>) is empty. To modify a customized field, double-click on the line containing the label to be modified. After double-clicking on | + | <span style="color: rgb(255, 0, 0);">'''E:'''</span> These are the customized fields of the "Clients" tab. To create a new customized field, double-click on the line containing the desired field type (the type specified at <span style="color: rgb(255, 0, 0);">'''F'''</span>) and for which the label (at '''<span style="color: rgb(255, 0, 0);">G</span>''') is empty. To modify a customized field, double-click on the line containing the label to be modified. After double-clicking on the line, see [[ProDon:Customized Field Configuration#Add.2FEdit_Customized_Fields|this section]], that explains how to add or modify a customized field. <br> |
| | | | ||
| Line 56: | Line 58: | ||
|- | |- | ||
| | | | ||
| − | <span style="color: rgb(255, 0, 0);">'''G:'''</span> These are the labels, names given to customized fields. The empty labels are the fields that are not used. They are therefore available | + | <span style="color: rgb(255, 0, 0);">'''G:'''</span> These are the labels, names given to customized fields. The empty labels are the fields that are not used. They are therefore available for creating new customized fields. |
| | | | ||
| − | <span style="color: rgb(255, 0, 0);">'''H:'''</span> Buttons [[Image:Button Arrow up.png]] and [[Image:Bouton flèche bas.png]] allow you to move the fields at <span style="color: rgb(255, 0, 0);">'''E'''</span>. To do so, select the field to be moved, then click on the | + | <span style="color: rgb(255, 0, 0);">'''H:'''</span> Buttons [[Image:Button Arrow up.png]] and [[Image:Bouton flèche bas.png]] allow you to move the fields at <span style="color: rgb(255, 0, 0);">'''E'''</span>. To do so, select the field to be moved, then click on the [[Image:Button Arrow up.png]] button to move it upward and on the [[Image:Bouton flèche bas.png]] button to move it downward. |
|- | |- | ||
| colspan="2" | | | colspan="2" | | ||
| − | '''CAUTION:''' The number of customized fileds is limited. The number varies depending on the management in which | + | '''CAUTION:''' The number of customized fileds is limited. The number varies depending on the management in which the customized fields were created and according to the type selected. |
|} | |} | ||
| − | <br> | + | <br> |
== Add/Edit Customized Fields<br> == | == Add/Edit Customized Fields<br> == | ||
| Line 82: | Line 84: | ||
<br> | <br> | ||
| − | Simply click on the link of the right type to continue with the addition | + | Simply click on the link of the right type to continue with the addition or the modification. |
<br> | <br> | ||
| Line 102: | Line 104: | ||
| width="50%" | | | width="50%" | | ||
| − | <span style="color: rgb(255, 0, 0);">'''B:'''</span> Indicates the type of customized field ("Text", "Numeric", "Date and time" and "Yes/No"). The type is not modifiable from this window. To learn how to modify the type of field, see '''points''' <span style="color: rgb(255, 0, 0);">'''E'''</span> and <span style="color: rgb(255, 0, 0);">'''F'''</span> [[#ConfigurationCustomField|this window]].<br> | + | <span style="color: rgb(255, 0, 0);">'''B:'''</span> Indicates the type of customized field ("Text", "Numeric", "Date and time" and "Yes/No"). The type is not modifiable from this window. To learn how to modify the type of field, see '''points''' <span style="color: rgb(255, 0, 0);">'''E'''</span> and <span style="color: rgb(255, 0, 0);">'''F'''</span> of [[#ConfigurationCustomField|this window]].<br> |
|- | |- | ||
| Line 117: | Line 119: | ||
|- | |- | ||
| | | | ||
| − | <span style="color: rgb(255, 0, 0);">'''E:'''</span> Allows you to make the field | + | <span style="color: rgb(255, 0, 0);">'''E:'''</span> Allows you to make the field mandatory. |
| | | | ||
<span style="color: rgb(255, 0, 0);">'''F:'''</span> Displays the customized field in a report.<br> | <span style="color: rgb(255, 0, 0);">'''F:'''</span> Displays the customized field in a report.<br> | ||
| − | '''NOTE:''' This option is only available for transaction customized fields. | + | '''NOTE:''' This option is only available for transaction type customized fields. |
|- | |- | ||
| Line 129: | Line 131: | ||
| | | | ||
| − | <span style="color: rgb(255, 0, 0);">'''H:'''</span> Allows you to choose whether the answer to the customized field must be | + | <span style="color: rgb(255, 0, 0);">'''H:'''</span> Allows you to choose whether the answer to the customized field must be text or list of choices. |
|- | |- | ||
| Line 145: | Line 147: | ||
|} | |} | ||
| − | <br> | + | <br> |
=== "Numeric" Type === | === "Numeric" Type === | ||
| Line 154: | Line 156: | ||
|- | |- | ||
| colspan="2" | | | colspan="2" | | ||
| − | After double-clicking on the line of a | + | After double-clicking on the line of a "Numeric" type customized field at '''<span style="color: rgb(255, 0, 0);">E</span>''' of [[#ConfigurationCustomField|this window]], the following window opens to add or modify a field. |
|- | |- | ||
| Line 163: | Line 165: | ||
| width="50%" | | | width="50%" | | ||
| − | <span style="color: rgb(255, 0, 0);">'''B:'''</span> Indicates the type of customized field ("Text", "Numeric", "Date and time" or "Yes/No"). The type is modifiable from this window. To learn how to modify the type of field, see '''points''' <span style="color: rgb(255, 0, 0);">'''E'''</span> and <span style="color: rgb(255, 0, 0);">'''F'''</span> of [[#ConfigurationCustomField|this window]].<br> | + | <span style="color: rgb(255, 0, 0);">'''B:'''</span> Indicates the type of customized field ("Text", "Numeric", "Date and time" or "Yes/No"). The type is not modifiable from this window. To learn how to modify the type of field, see '''points''' <span style="color: rgb(255, 0, 0);">'''E'''</span> and <span style="color: rgb(255, 0, 0);">'''F'''</span> of [[#ConfigurationCustomField|this window]].<br> |
|- | |- | ||
| Line 178: | Line 180: | ||
|- | |- | ||
| | | | ||
| − | <span style="color: rgb(255, 0, 0);">'''E'''</span><span style="color: rgb(255, 0, 0);">''':'''</span> Allows you to make the customized | + | <span style="color: rgb(255, 0, 0);">'''E'''</span><span style="color: rgb(255, 0, 0);">''':'''</span> Allows you to make the customized field mandatory. <br> |
| | | | ||
<span style="color: rgb(255, 0, 0);">'''F:'''</span> Displays the customized field in a report. | <span style="color: rgb(255, 0, 0);">'''F:'''</span> Displays the customized field in a report. | ||
| − | '''NOTE:''' This option is only available for transaction customized fields. <br> | + | '''NOTE:''' This option is only available for transaction type customized fields. <br> |
|- | |- | ||
| Line 190: | Line 192: | ||
| | | | ||
| − | <span style="color: rgb(255, 0, 0);">'''H:'''</span> The | + | <span style="color: rgb(255, 0, 0);">'''H:'''</span> The [[Image:Formats button.png]] button allows you to determine which format the "Numeric" type customized field will have (money, percentage or quantity). The [[Image:Bouton point interrogation.png]] button allows you to have more information about the different numeric formats. |
|- | |- | ||
| Line 201: | Line 203: | ||
|} | |} | ||
| − | <br> | + | <br> |
=== "Date and time" Type === | === "Date and time" Type === | ||
| − | A "Date and time" type customized field is a field for which a date, a time or a date and a time.<br> | + | A "Date and time" type customized field is a field for which the response is a date, a time or a date and a time.<br> |
{| width="200" cellspacing="1" cellpadding="1" border="1" class="wikitable" | {| width="200" cellspacing="1" cellpadding="1" border="1" class="wikitable" | ||
|- | |- | ||
| colspan="2" | | | colspan="2" | | ||
| − | After double-clicking on the line of a "Date and time" type customized field at '''<span style="color: rgb(255, 0, 0);">E</span>''' of [[#ConfigurationCustomField|this window]], the following window opens | + | After double-clicking on the line of a "Date and time" type customized field at '''<span style="color: rgb(255, 0, 0);">E</span>''' of [[#ConfigurationCustomField|this window]], the following window opens to add or modify a field. |
|- | |- | ||
| Line 219: | Line 221: | ||
| width="50%" | | | width="50%" | | ||
| − | <span style="color: rgb(255, 0, 0);">'''B:'''</span> Indicates the type of | + | <span style="color: rgb(255, 0, 0);">'''B:'''</span> Indicates the type of customized field ("Text", "Numeric", "Date and Time" or "Yes/No").The type is not modifiable from this window. To learn how to modify the field type, see '''points''' <span style="color: rgb(255, 0, 0);">'''E'''</span> and <span style="color: rgb(255, 0, 0);">'''F'''</span> of [[#ConfigurationCustomField|this window]].<br> |
|- | |- | ||
| | | | ||
| − | <span style="color: rgb(255, 0, 0);">'''C | + | <span style="color: rgb(255, 0, 0);">'''C:'''</span> Allows you to activate and deactivate the customized field. If the checkbox is checked, the customized field is active. |
| − | '''NOTE | + | '''NOTE:''' When a customized field is inactive, it can no longer be used.<br> |
| | | | ||
| − | <span style="color: rgb(255, 0, 0);">'''D | + | <span style="color: rgb(255, 0, 0);">'''D:'''</span> Displays the customized field in the management grid. |
| − | '''NOTE | + | '''NOTE:''' In order for the customized field to be displayed in the management grid, you must add the field to the view of the right management grid in addition to checking this checkbox. To learn how to modify a view, see [[Common functions:View Management|this document]].<br> |
|- | |- | ||
| | | | ||
| − | <span style="color: rgb(255, 0, 0);">'''E | + | <span style="color: rgb(255, 0, 0);">'''E:'''</span> Allows you to make the field mandatory. <br> |
| | | | ||
| − | <span style="color: rgb(255, 0, 0);">'''F | + | <span style="color: rgb(255, 0, 0);">'''F:'''</span> Allows you to name the customized field.<br> |
|- | |- | ||
| | | | ||
| − | <span style="color: rgb(255, 0, 0);">'''G | + | <span style="color: rgb(255, 0, 0);">'''G:'''</span> The [[Image:Formats button.png]] button allows you to determine which format the "Date and time" type customized field will have (date, time , date and time). |
| − | + | The [[Image:Bouton point interrogation.png]] button allows you to get more information on the different date and time formats.<br> | |
| | | | ||
| − | <span style="color: rgb(255, 0, 0);">'''H | + | <span style="color: rgb(255, 0, 0);">'''H:'''</span> Indicates the selected format. In this example, it is a "Quantity" format.<br> |
|- | |- | ||
| | | | ||
| − | <span style="color: rgb(255, 0, 0);">'''I | + | <span style="color: rgb(255, 0, 0);">'''I:'''</span> After specifying all information, click on the "[[Image:Button Check mark Confirm.png]] Confirm edit" button. <br> |
| <br> | | <br> | ||
|} | |} | ||
| − | <br> | + | <br> |
=== "Yes/No" Type === | === "Yes/No" Type === | ||
| − | + | A "Yes/No" type customized field is presented in the form of a checkbox.<br> | |
{| width="200" cellspacing="1" cellpadding="1" border="1" class="wikitable" | {| width="200" cellspacing="1" cellpadding="1" border="1" class="wikitable" | ||
|- | |- | ||
| colspan="2" | | | colspan="2" | | ||
| − | + | After double-clicking on the line of a "Yes/No" type customized field at '''<span style="color: rgb(255, 0, 0);">E</span>''' of [[#ConfigurationCustomField|this window]], this window opens to add or modify a field. | |
|- | |- | ||
| Line 270: | Line 272: | ||
|- | |- | ||
| width="50%" | | | width="50%" | | ||
| − | <span style="color: rgb(255, 0, 0);">'''A | + | <span style="color: rgb(255, 0, 0);">'''A:'''</span> Indicates where the field can be used in '''''ProDon''''' (For instance: "Client, Transaction, Expenditure management" etc.). To learn how to create a field for another management, see '''points '''<span style="color: rgb(255, 0, 0);">'''A'''</span>, <span style="color: rgb(255, 0, 0);">'''B'''</span> and <span style="color: rgb(255, 0, 0);">'''C'''</span> of [[#ConfigurationCustomField|this window]].<br> |
| width="50%" | | | width="50%" | | ||
| − | <span style="color: rgb(255, 0, 0);">'''B | + | <span style="color: rgb(255, 0, 0);">'''B:'''</span> Indicates the type of customized field ("Text", "Numeric", "Date and time" or "Yes/No"). The type is not modifiable from this window. To learn how to modify the field type, see '''points''' <span style="color: rgb(255, 0, 0);">'''E'''</span> and <span style="color: rgb(255, 0, 0);">'''F'''</span> of [[#ConfigurationCustomField|this window]].<br> |
|- | |- | ||
| | | | ||
| − | <span style="color: rgb(255, 0, 0);">'''C | + | <span style="color: rgb(255, 0, 0);">'''C:'''</span> Allows you to activate and deactivate the customized field. If the checkbox is checked, the customized field is active. |
| − | '''NOTE | + | '''NOTE:''' When the customized field is inactive, it can no longer be used. |
| | | | ||
| − | <span style="color: rgb(255, 0, 0);">'''D | + | <span style="color: rgb(255, 0, 0);">'''D:'''</span> Displays the customized field in the management grid. |
| − | '''NOTE | + | '''NOTE:''' In order for the customized field to be displayed in the management grid, you must add the field to the view of the right management grid, in addition to checking this checkbox. To learn how to modify a view, see [[Common functions:View Management|this document]].<br> |
|- | |- | ||
| | | | ||
| − | <span style="color: rgb(255, 0, 0);">'''E | + | <span style="color: rgb(255, 0, 0);">'''E:'''</span> Allows you to name the customized field.<br> |
| | | | ||
| − | <span style="color: rgb(255, 0, 0);">'''F | + | <span style="color: rgb(255, 0, 0);">'''F:'''</span> After specifying all information, click on the "[[Image:Button Check mark Confirm.png]] Confirm edit" button. |
|} | |} | ||
| − | <br> | + | <br> |
== Using Customized Fields == | == Using Customized Fields == | ||
| − | + | Customized fields are available in many managements of '''''ProDon'''''. They can be used and viewed from:: <br> | |
| − | *[[ProDon:Configuration | + | *[[ProDon:Customized Field Configuration#From_the_.22Client_management.22.C2.A0|The "Client management"]] |
| − | *[[ProDon:Configuration | + | *[[ProDon:Customized Field Configuration#From_the_Addition_File_of_a_Donation_Occasion_or_a_Donation_Occasion_Activity|The "Addition of a Donation Occasion or a Donation Occasion Activity"]] |
| − | *[[ProDon:Configuration | + | *[[ProDon:Customized Field Configuration#From_the_Addition_File_of_a_Transaction|The "Addition File of a Transaction"]]<br> |
| − | *[[ProDon:Configuration | + | *[[ProDon:Customized Field Configuration#From_the_.22Analysis_and_history.22|The "Analysis and History"]] |
| − | *[[ProDon:Configuration | + | *[[ProDon:Customized Field Configuration#From_the_Addition_File_of_an_Expenditure.C2.A0|The "Addition File of an Expenditure"]] |
<br> | <br> | ||
| − | '''NOTE | + | '''NOTE:''' A transaction customized field must first be activated in a donation occasion or in a donation occasion activity prior to using it in a transaction. If the field has not been activated in the donation occasion or activity, it will simply not appear during the transaction entry.<br> |
<br> | <br> | ||
| Line 315: | Line 317: | ||
=== From the "Client management" === | === From the "Client management" === | ||
| − | + | To use a customized field from the "Client management", you must first go to a client file. | |
{| width="200" cellspacing="1" cellpadding="1" border="1" class="wikitable" | {| width="200" cellspacing="1" cellpadding="1" border="1" class="wikitable" | ||
|- | |- | ||
| colspan="2" | | | colspan="2" | | ||
| − | + | To do so, from the software home page, click on the "Clients" menu, then select "[[Image:Client button (colour).png]] Clients".<br> | |
|- | |- | ||
| Line 331: | Line 333: | ||
|- | |- | ||
| colspan="2" | | | colspan="2" | | ||
| − | + | After clicking on "[[Image:Client button (colour).png]] Clients", this window opens.<br> | |
|- | |- | ||
| Line 337: | Line 339: | ||
|- | |- | ||
| width="50%" | | | width="50%" | | ||
| − | <span style="color: rgb(255, 0, 0);">'''A | + | <span style="color: rgb(255, 0, 0);">'''A:'''</span> Search, using the [[Common functions:Search Bar|search bar]], the client for whom a piece of information must be specified in a customized field.<br> |
| width="50%" | | | width="50%" | | ||
| − | <span style="color: rgb(255, 0, 0);">'''B | + | <span style="color: rgb(255, 0, 0);">'''B:'''</span> To open the client file, double-click on the corresponding line.<br> |
|- | |- | ||
| | | | ||
| − | <span style="color: rgb(255, 0, 0);">'''C | + | <span style="color: rgb(255, 0, 0);">'''C:'''</span> Here are a few examples of customized fields visible in the management grid. To learn how to display customized fields in the management grid, see the [[Common functions:View Management|"View management"]] document. |
| | | | ||
| − | '''NOTE | + | '''NOTE:''' In the "Client management", it is possible to display only the clients' customized fields. |
|} | |} | ||
| Line 356: | Line 358: | ||
|- | |- | ||
| colspan="2" | | | colspan="2" | | ||
| − | + | After doucle-clicking on the line of the client for whom a piece of information must be specified in a customized field, this window opens. | |
|- | |- | ||
| Line 362: | Line 364: | ||
|- | |- | ||
| colspan="2" | | | colspan="2" | | ||
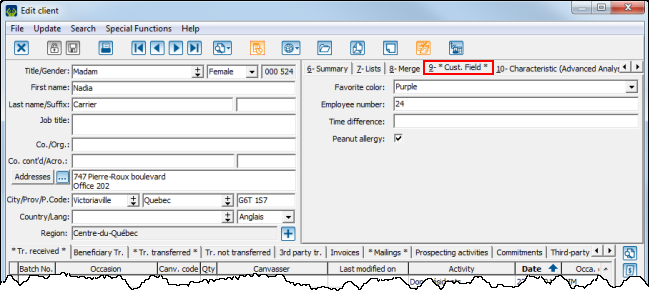
| − | + | All client customized fields appear under the "9-Cust. Field" tab. Check the checkboxes or specify the right information in the fields. | |
|} | |} | ||
| Line 370: | Line 372: | ||
=== From the Addition File of a Donation Occasion or a Donation Occasion Activity === | === From the Addition File of a Donation Occasion or a Donation Occasion Activity === | ||
| − | + | The addition files of donation occasions or donation occasion acitivities simply allow you to activate a customized field, so it appears during transaction entry, if this donation occasion/activity is selected in the transaction.<br> | |
| − | + | To activate a customized field from the addition file of a donation occasion or donation occasion activity, go to the "Donation occasion management".<br> | |
{| width="200" cellspacing="1" cellpadding="1" border="1" class="wikitable" | {| width="200" cellspacing="1" cellpadding="1" border="1" class="wikitable" | ||
|- | |- | ||
| colspan="2" | | | colspan="2" | | ||
| − | + | To do so, from the software home page, click on the "Transactions" menu, then select "[[Image:Bouton Occasion de dons.png]] Donations occasions".<br> | |
|- | |- | ||
| Line 388: | Line 390: | ||
|- | |- | ||
| colspan="2" | | | colspan="2" | | ||
| − | + | After clicking on " [[Image:Bouton Occasion de dons.png]] Donation occasions", this window opens.<br> | |
|- | |- | ||
| Line 394: | Line 396: | ||
|- | |- | ||
| width="50%" | | | width="50%" | | ||
| − | <span style="color: rgb(255, 0, 0);">'''A | + | <span style="color: rgb(255, 0, 0);">'''A:'''</span> Search, using the [[Common functions:Search Bar|search bar]], the donation occasion for which a customized field must be activated.<br> |
| width="50%" | | | width="50%" | | ||
| − | <span style="color: rgb(255, 0, 0);">'''B | + | <span style="color: rgb(255, 0, 0);">'''B:'''</span> Double-click on the donation occasion for which a customized field must be activated.<br> |
|} | |} | ||
| Line 406: | Line 408: | ||
|- | |- | ||
| colspan="2" | | | colspan="2" | | ||
| − | + | After double-clicking on the donation occasion for which a customized field must be activated, this window opens.<br> | |
|- | |- | ||
| Line 412: | Line 414: | ||
|- | |- | ||
| width="50%" | | | width="50%" | | ||
| − | <span style="color: rgb(255, 0, 0);">'''A | + | <span style="color: rgb(255, 0, 0);">'''A:'''</span> Under the "Cust. Field" tab, this is the list of all existing transaction type customized fields. To activate one, simply click in the checkbox. |
| − | '''NOTE | + | '''NOTE:''' To create a new transaction customized field or to modify an existing one, see [[ProDon:Customized Field Configuration#Configuration_of_Customized_Fields|this section]].<br> |
| width="50%" | | | width="50%" | | ||
| − | <span style="color: rgb(255, 0, 0);">'''B | + | <span style="color: rgb(255, 0, 0);">'''B:'''</span> To activate a customized field for a donation occasion activity, double-click on the activity for which a customized field must be created. |
|} | |} | ||
| Line 426: | Line 428: | ||
|- | |- | ||
| colspan="2" | | | colspan="2" | | ||
| − | + | After clicking on the donation occasion activity for which a customized field must be activated, this window opens.<br> | |
|- | |- | ||
| Line 432: | Line 434: | ||
|- | |- | ||
| colspan="2" | | | colspan="2" | | ||
| − | + | Under the "Cust. Field" tab, is the list of all existing transaction customized fields. To activate one, simply click in the checkbox. To create new ones or to modify an existing one, see [[ProDon:Customized Field Configuration#Configuration_of_Customized_Fields|this section]]. | |
|} | |} | ||
| Line 440: | Line 442: | ||
=== From the Addition File of a Transaction === | === From the Addition File of a Transaction === | ||
| − | + | To use a customized field from the addition file of a transaction, you must create a transaction for a client.<br> | |
{| width="200" cellspacing="1" cellpadding="1" border="1" class="wikitable" | {| width="200" cellspacing="1" cellpadding="1" border="1" class="wikitable" | ||
|- | |- | ||
| colspan="2" | | | colspan="2" | | ||
| − | + | To learn how to create a transaction for a client, see the [[ProDon:Transaction Logging|"Transaction Logging"]] document. | |
|- | |- | ||
| Line 451: | Line 453: | ||
|- | |- | ||
| colspan="2" | | | colspan="2" | | ||
| − | + | After selecting the donation occasion and/or the donation occasion activity, if a customized field has been activated in this donation occasion/activity, a customized field appears at the bottom of the file. | |
| − | '''NOTE | + | '''NOTE:''' To learn how to activate a customized field in a donation occasion/activity, see [[ProDon:Customized Field Configuration#From_the_Addition_File_of_a_Donation_Occasion_or_a_Donation_Occasion_Activity|this section]].<br> |
|} | |} | ||
| Line 461: | Line 463: | ||
=== From the "Analysis and history" === | === From the "Analysis and history" === | ||
| − | + | The "Analysis and History" allows you to view the transaction customized fields that were completed when [[ProDon:Customized Field Configuration#From_the_Addition_File_of_a_Transaction|adding the transaction]]. | |
{| width="200" cellspacing="1" cellpadding="1" border="1" class="wikitable" | {| width="200" cellspacing="1" cellpadding="1" border="1" class="wikitable" | ||
|- | |- | ||
| colspan="2" | | | colspan="2" | | ||
| − | + | To go to the "Analysis and History" from the software home page, click on the "Analysis" menu, then select "[[Image:Button analysis and history.png]] Analysis and History".<br> | |
|- | |- | ||
| Line 477: | Line 479: | ||
|- | |- | ||
| colspan="2" | | | colspan="2" | | ||
| − | + | After clicking on "[[Image:Button analysis and history.png]] Analysis and History", this window opens.<br> | |
|- | |- | ||
| Line 483: | Line 485: | ||
|- | |- | ||
| width="50%" | | | width="50%" | | ||
| − | <span style="color: rgb(255, 0, 0);">'''A | + | <span style="color: rgb(255, 0, 0);">'''A:'''</span> Here is an example of customized fields visible in the management grid.To learn how to display customized fields in a management grid, see the [[Common functions:View Management|"View Management"]] document. |
| width="50%" | | | width="50%" | | ||
| − | '''NOTE | + | '''NOTE:''' In the "Analysis and History", it is possible to display only the transaction customized fields. |
|} | |} | ||
| Line 494: | Line 496: | ||
=== From the Addition File of an Expenditure === | === From the Addition File of an Expenditure === | ||
| − | + | To use a customized field from the addition file of an expenditure, you must create an expenditure for the client.<br> | |
{| width="200" cellspacing="1" cellpadding="1" border="1" class="wikitable" | {| width="200" cellspacing="1" cellpadding="1" border="1" class="wikitable" | ||
|- | |- | ||
| colspan="2" | | | colspan="2" | | ||
| − | + | To learn how to create an expenditure for a client, see the [[ProDon:Transaction Logging|"Transaction Logging"]] document.<br> | |
|- | |- | ||
| Line 505: | Line 507: | ||
|- | |- | ||
| colspan="2" | | | colspan="2" | | ||
| − | + | To view the expenditure customized fields, go under the "Cust. Field" tab.<br> | |
| − | '''NOTE | + | '''NOTE:''' All existing expenditure customized fields are displayed here. It is not possible to choose, as for a [[ProDon:Customized Field Configuration#From_the_Addition_File_of_a_Transaction|transaction customized field]], for which donation occasion/activity an expenditure customized field must be displayed.<br> |
|} | |} | ||
| − | {{ | + | {{Footer_ProDon_Version|4.6.7.24}}<br> |
Latest revision as of 16:56, 4 May 2016
| Customized Field Configuration |
Introduction
Customized fields are entirely configurable. Their main use is to manage information for which no field is provided in the software.
It is possible to configure customized fields in several managements; for instance, the "Client management", "Transaction management", etc.
NOTE: There are 3 types of customizations, client categories, customized fields and characteristics. To make sure that the customized field is the one that suits you best, read the "Categories vs Customized Fields vs Characteristics" document.
Configuration of Customized Fields
|
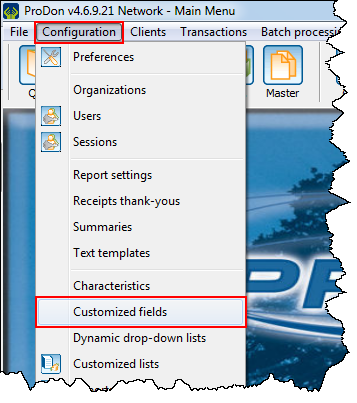
To configure a customized field, first click on the "Configuration" menu, then select "Customized fields". | |
 |
|
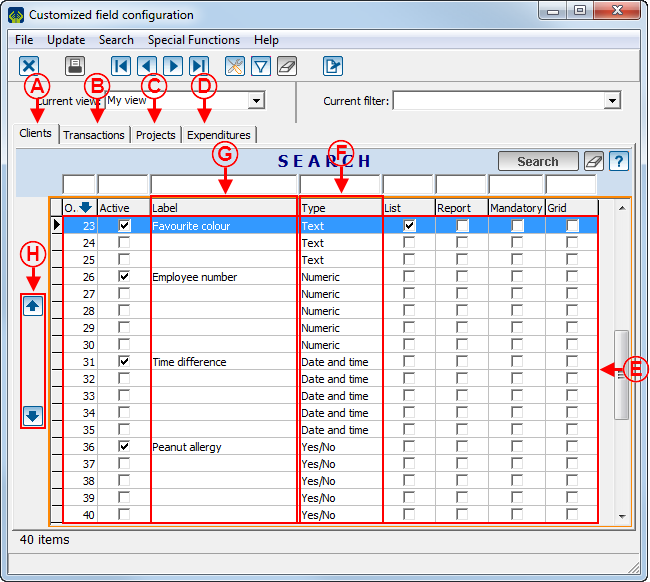
After clicking on "Customized fields", this window opens. | |
| |
|
A: The "Clients" tab contains the customized fields available to the clients.These fields are only visible in the client management. |
B: The "Transactions" tab contains the customized fields available for transactions. These fields are only visible in the transactions. |
|
C: The "Projects" tab contains the customized fields available for projects. These fields are only visible in the projects. |
D: The "Expenditures" tab contains the customized fields available for expenditures. These fields are only visible in the expenditures. |
|
E: These are the customized fields of the "Clients" tab. To create a new customized field, double-click on the line containing the desired field type (the type specified at F) and for which the label (at G) is empty. To modify a customized field, double-click on the line containing the label to be modified. After double-clicking on the line, see this section, that explains how to add or modify a customized field. |
F: It is the type of customized field. There are 4 different types of fields: "Text", "Numeric", "Date and time" and "Yes/No". |
|
G: These are the labels, names given to customized fields. The empty labels are the fields that are not used. They are therefore available for creating new customized fields. |
H: Buttons |
|
CAUTION: The number of customized fileds is limited. The number varies depending on the management in which the customized fields were created and according to the type selected. | |
Add/Edit Customized Fields
After double-clicking on the line of the customized field to be added or modified at E of the previous window, the addition or modification window of a customized field of a precise type opens.
There are 4 types of customized fields:
- "Text" type
- "Numeric" type
- "Date and time" type
- "Yes/No" type
Simply click on the link of the right type to continue with the addition or the modification.
"Text" Type
A "Text" type customized field is a field for which the answer may be text or list of choices.
|
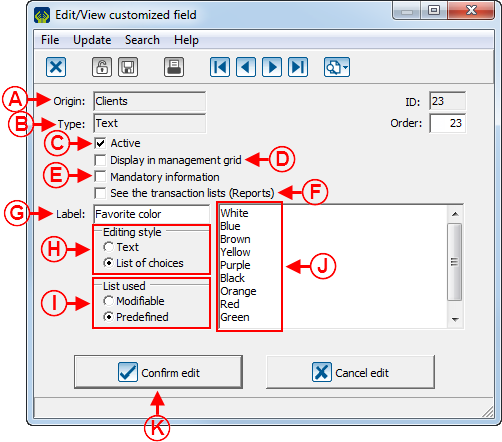
After double-clicking on the line of a "Text" type customized field at E of this window, this window opens, in order to add or modify a field. | |
 | |
|
A: Indicates where the field can be used in ProDon (For instance: "Client, Transaction, Expenditure management", etc.). To learn how to create a field for another management, see points A, B and C of this window. |
B: Indicates the type of customized field ("Text", "Numeric", "Date and time" and "Yes/No"). The type is not modifiable from this window. To learn how to modify the type of field, see points E and F of this window. |
|
C: Allows you to activate and deactivate the customized field. If the checkbox is checked, the customized field is active. NOTE: When a customized field is inactive, it can no longer be used. |
D: Displays the customized field in the management grid. NOTE: In order for this field to be displayed in the management grid, you must add the field to the view of the right management grid in addition to checking this checkbox. To learn how to modify a view, see this document. |
|
E: Allows you to make the field mandatory. |
F: Displays the customized field in a report. NOTE: This option is only available for transaction type customized fields. |
|
G: Allows you to name the customized field. |
H: Allows you to choose whether the answer to the customized field must be text or list of choices. |
|
I: If option "List of choices" is checked at H, choose whether the list of choices must be predefined or modifiable. |
J: If option "List of choices" is checked at H and that option "Predefined" is chosen at I, enter here the answer choices that will be available. |
|
K: After specifying the information, click on the " |
|
"Numeric" Type
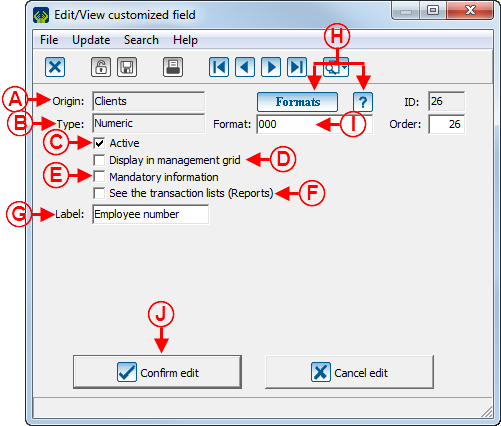
A "Numeric" type customized field is a field for which the answer is an amount of money, a percentage or a quantity.
|
After double-clicking on the line of a "Numeric" type customized field at E of this window, the following window opens to add or modify a field. | |
 | |
|
A: Indicates where the field may be used in ProDon (For instance: "Client, Transaction, Expenditure management", etc.). To learn how to create a field for another management, see points A, B and C of this window. |
B: Indicates the type of customized field ("Text", "Numeric", "Date and time" or "Yes/No"). The type is not modifiable from this window. To learn how to modify the type of field, see points E and F of this window. |
|
C: Allows you to activate or deactivate the customized field. If the checkbox is checked, the customized field is active. NOTE: When a customized field is inactive, it can no longer be used. |
D: Displays the customized field in the management grid. NOTE: In order for the customized field to be displayed in the management grid, you must add the field to the view of the right management grid in addition to checking this checkbox. To learn how to modify a view, see this document. |
|
E: Allows you to make the customized field mandatory. |
F: Displays the customized field in a report. NOTE: This option is only available for transaction type customized fields. |
|
G: Allows you to name the customized field. |
H: The |
|
I: Indicates the selected format. In this example, it is a "Quantity" format. |
J: After specifying all information, click on the " |
"Date and time" Type
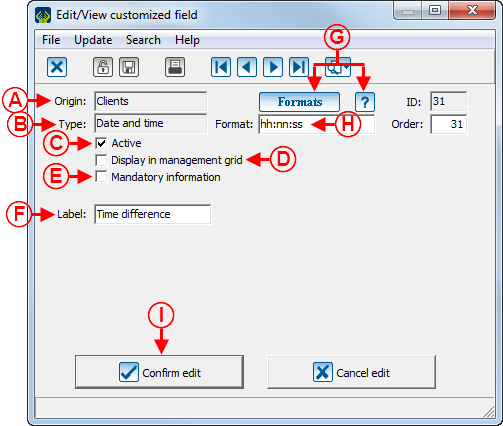
A "Date and time" type customized field is a field for which the response is a date, a time or a date and a time.
|
After double-clicking on the line of a "Date and time" type customized field at E of this window, the following window opens to add or modify a field. | |
 | |
|
A: Indicates where the field can be used in ProDon (For instance, "Client, Transaction, Expenditure management", etc.). To learn how to create a field for another management, see points A, B and C of this window. |
B: Indicates the type of customized field ("Text", "Numeric", "Date and Time" or "Yes/No").The type is not modifiable from this window. To learn how to modify the field type, see points E and F of this window. |
|
C: Allows you to activate and deactivate the customized field. If the checkbox is checked, the customized field is active. NOTE: When a customized field is inactive, it can no longer be used. |
D: Displays the customized field in the management grid. NOTE: In order for the customized field to be displayed in the management grid, you must add the field to the view of the right management grid in addition to checking this checkbox. To learn how to modify a view, see this document. |
|
E: Allows you to make the field mandatory. |
F: Allows you to name the customized field. |
|
G: The The |
H: Indicates the selected format. In this example, it is a "Quantity" format. |
|
I: After specifying all information, click on the " |
|
"Yes/No" Type
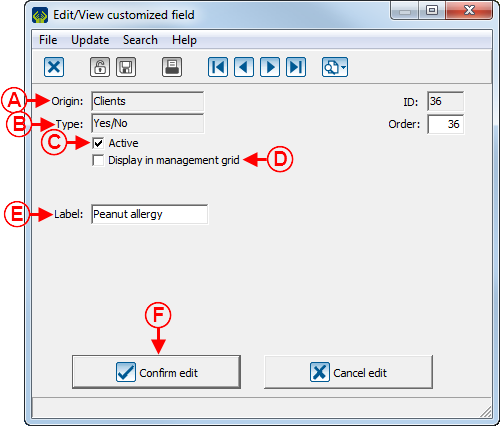
A "Yes/No" type customized field is presented in the form of a checkbox.
|
After double-clicking on the line of a "Yes/No" type customized field at E of this window, this window opens to add or modify a field. | |
 | |
|
A: Indicates where the field can be used in ProDon (For instance: "Client, Transaction, Expenditure management" etc.). To learn how to create a field for another management, see points A, B and C of this window. |
B: Indicates the type of customized field ("Text", "Numeric", "Date and time" or "Yes/No"). The type is not modifiable from this window. To learn how to modify the field type, see points E and F of this window. |
|
C: Allows you to activate and deactivate the customized field. If the checkbox is checked, the customized field is active. NOTE: When the customized field is inactive, it can no longer be used. |
D: Displays the customized field in the management grid. NOTE: In order for the customized field to be displayed in the management grid, you must add the field to the view of the right management grid, in addition to checking this checkbox. To learn how to modify a view, see this document. |
|
E: Allows you to name the customized field. |
F: After specifying all information, click on the " |
Using Customized Fields
Customized fields are available in many managements of ProDon. They can be used and viewed from::
- The "Client management"
- The "Addition of a Donation Occasion or a Donation Occasion Activity"
- The "Addition File of a Transaction"
- The "Analysis and History"
- The "Addition File of an Expenditure"
NOTE: A transaction customized field must first be activated in a donation occasion or in a donation occasion activity prior to using it in a transaction. If the field has not been activated in the donation occasion or activity, it will simply not appear during the transaction entry.
From the "Client management"
To use a customized field from the "Client management", you must first go to a client file.
|
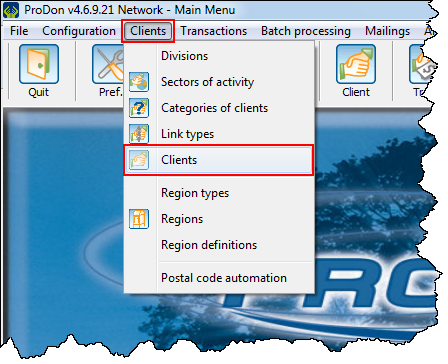
To do so, from the software home page, click on the "Clients" menu, then select " | |
 |
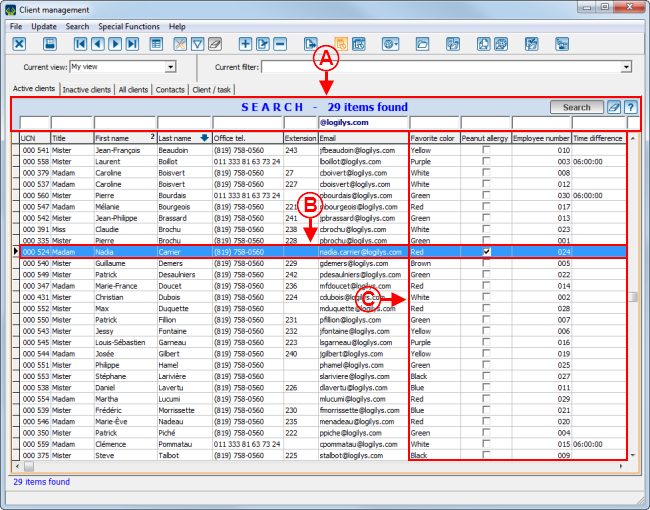 | |
|
A: Search, using the search bar, the client for whom a piece of information must be specified in a customized field. |
B: To open the client file, double-click on the corresponding line. |
|
C: Here are a few examples of customized fields visible in the management grid. To learn how to display customized fields in the management grid, see the "View management" document. |
NOTE: In the "Client management", it is possible to display only the clients' customized fields. |
From the Addition File of a Donation Occasion or a Donation Occasion Activity
The addition files of donation occasions or donation occasion acitivities simply allow you to activate a customized field, so it appears during transaction entry, if this donation occasion/activity is selected in the transaction.
To activate a customized field from the addition file of a donation occasion or donation occasion activity, go to the "Donation occasion management".
|
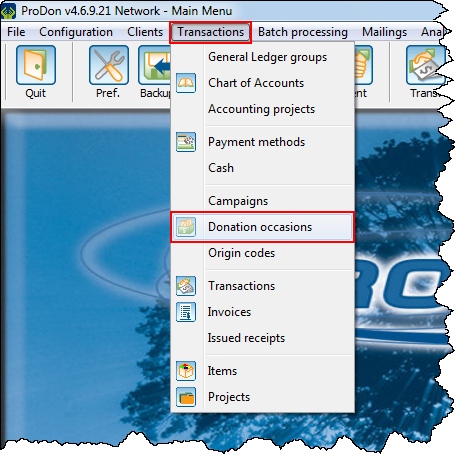
To do so, from the software home page, click on the "Transactions" menu, then select " | |
|
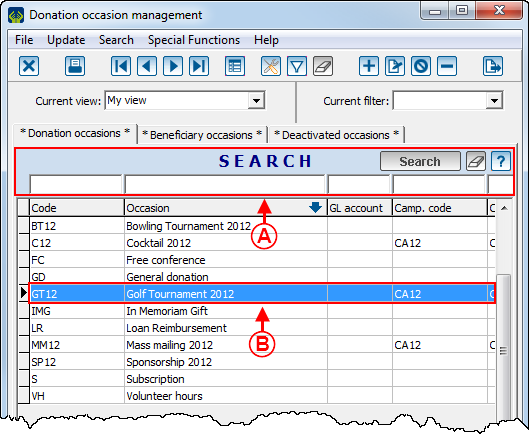
| |
|
A: Search, using the search bar, the donation occasion for which a customized field must be activated. |
B: Double-click on the donation occasion for which a customized field must be activated. |
|
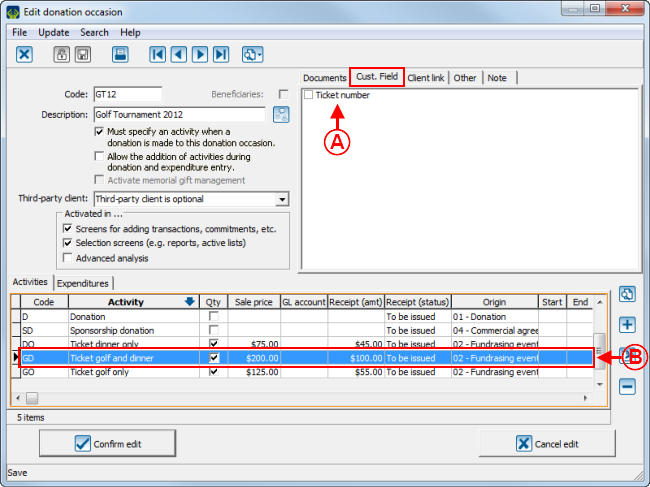
After double-clicking on the donation occasion for which a customized field must be activated, this window opens. | |
| |
|
A: Under the "Cust. Field" tab, this is the list of all existing transaction type customized fields. To activate one, simply click in the checkbox. NOTE: To create a new transaction customized field or to modify an existing one, see this section. |
B: To activate a customized field for a donation occasion activity, double-click on the activity for which a customized field must be created. |
|
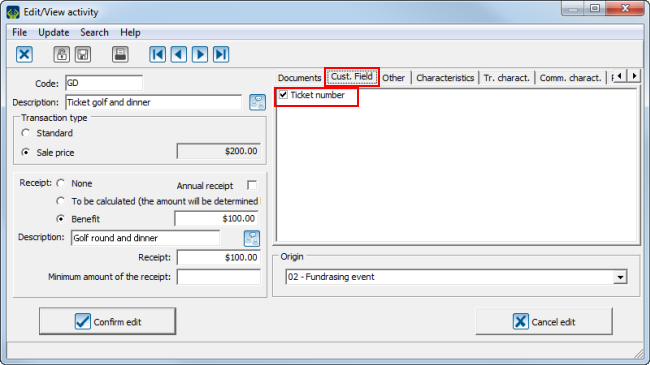
After clicking on the donation occasion activity for which a customized field must be activated, this window opens. | |
| |
|
Under the "Cust. Field" tab, is the list of all existing transaction customized fields. To activate one, simply click in the checkbox. To create new ones or to modify an existing one, see this section. |
From the Addition File of a Transaction
To use a customized field from the addition file of a transaction, you must create a transaction for a client.
|
To learn how to create a transaction for a client, see the "Transaction Logging" document. | |
| |
|
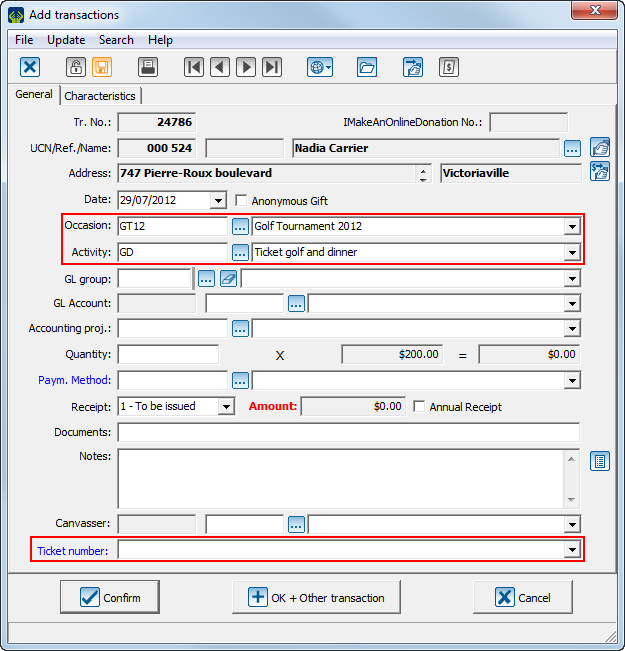
After selecting the donation occasion and/or the donation occasion activity, if a customized field has been activated in this donation occasion/activity, a customized field appears at the bottom of the file. NOTE: To learn how to activate a customized field in a donation occasion/activity, see this section. |
From the "Analysis and history"
The "Analysis and History" allows you to view the transaction customized fields that were completed when adding the transaction.
|
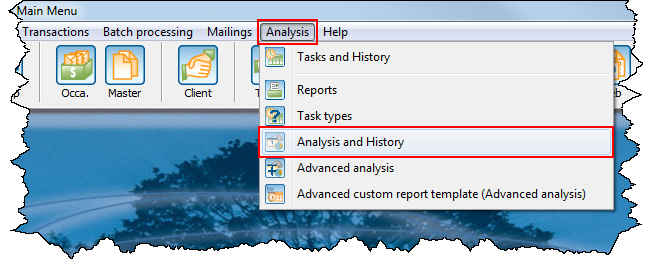
To go to the "Analysis and History" from the software home page, click on the "Analysis" menu, then select " | |
|
|
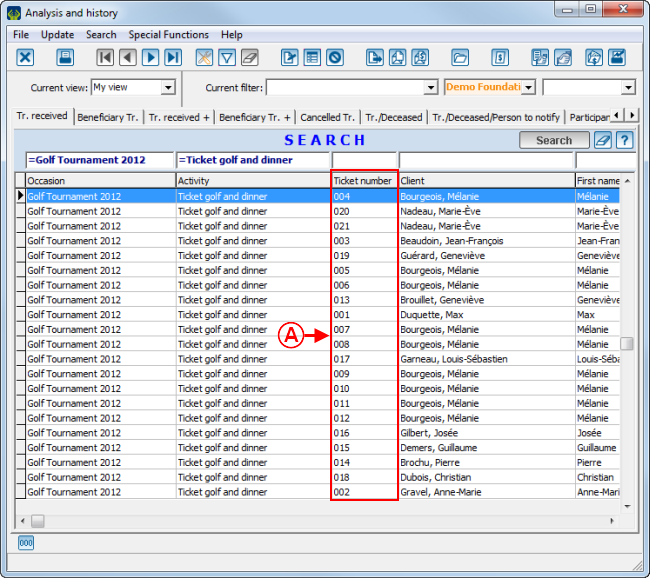
After clicking on " | |
| |
|
A: Here is an example of customized fields visible in the management grid.To learn how to display customized fields in a management grid, see the "View Management" document. |
NOTE: In the "Analysis and History", it is possible to display only the transaction customized fields. |
From the Addition File of an Expenditure
To use a customized field from the addition file of an expenditure, you must create an expenditure for the client.
|
To learn how to create an expenditure for a client, see the "Transaction Logging" document. | |
| |
|
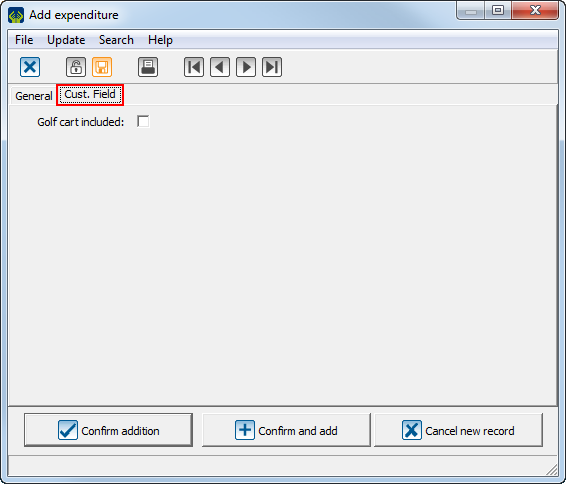
To view the expenditure customized fields, go under the "Cust. Field" tab. NOTE: All existing expenditure customized fields are displayed here. It is not possible to choose, as for a transaction customized field, for which donation occasion/activity an expenditure customized field must be displayed. |
Document name: ProDon:Customized Field Configuration
Version : 4.6.7.24
