Difference between revisions of "ProDon:Configuration of a Thank-you Letter Integrated to a Receipt"
| Line 19: | Line 19: | ||
=== Creating the Thank you Letter === | === Creating the Thank you Letter === | ||
| − | {| cellspacing="1" cellpadding="1" border="1 | + | {| cellspacing="1" cellpadding="1" border="1" style="width: 440px; height: 306px;" class="wikitable" |
|- | |- | ||
| | | | ||
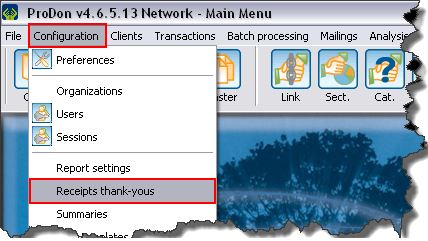
| − | To modify or create a thank you letter, from the software home page, click on the "Configuration" menu, then select "Receipts thank-yous". | + | To modify or create a thank you letter, from the software home page, click on the "Configuration" menu, then select "Receipts thank-yous". |
|- | |- | ||
| − | | [[Image: | + | | [[Image:Receipt Integrated 001.png]] |
|} | |} | ||
<br> | <br> | ||
| − | {| cellspacing="1" cellpadding="1" border="1 | + | {| cellspacing="1" cellpadding="1" border="1" style="width: 498px; height: 384px;" class="wikitable" |
|- | |- | ||
| colspan="2" | | | colspan="2" | | ||
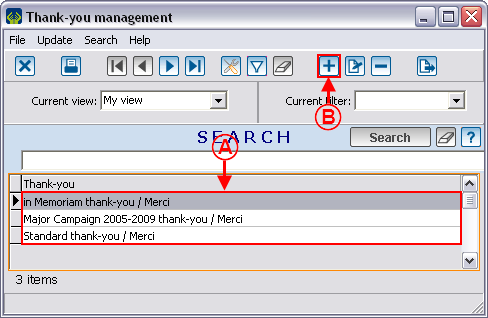
| − | After clicking on "Receipts thank-yous", the "Thank-you management" window opens. | + | After clicking on "Receipts thank-yous", the "Thank-you management" window opens. |
|- | |- | ||
| − | | colspan="2" | [[Image: | + | | colspan="2" | [[Image:Receipt Integrated 002.png]] |
|- | |- | ||
| width="50%" | | | width="50%" | | ||
| − | '''<span style="color: rgb(255, 0, 0);">A: </span>'''To modify an existing thank-you, double-click on the thank-you to modify. | + | '''<span style="color: rgb(255, 0, 0);">A: </span>'''To modify an existing thank-you, double-click on the thank-you to modify. |
| width="50%" | | | width="50%" | | ||
| − | '''<span style="color: rgb(255, 0, 0);">B: </span>'''To create a new integrated thank-you, click on the [[Image: | + | '''<span style="color: rgb(255, 0, 0);">B: </span>'''To create a new integrated thank-you, click on the [[Image:Button add plus.png]] button. |
|} | |} | ||
| Line 51: | Line 51: | ||
|- | |- | ||
| colspan="2" | | | colspan="2" | | ||
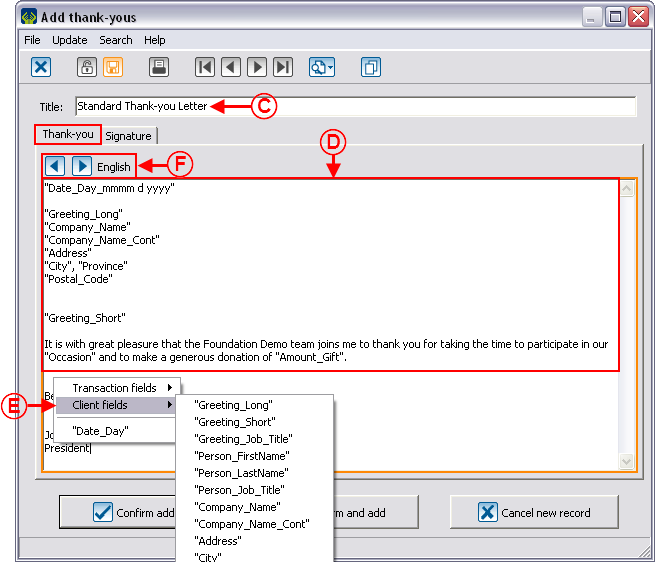
| − | After clicking on the [[Image: | + | After clicking on the [[Image:Button add plus.png]] button, the "Add thank-yous" window opens. Go to the "Thank-you" tab. |
|- | |- | ||
| − | | colspan="2" | [[Image: | + | | colspan="2" | [[Image:Receipt Integrated 003.png]] |
|- | |- | ||
| width="50%" | | | width="50%" | | ||
| − | '''<span style="color: rgb(255, 0, 0);">C: </span>'''Name the thank-you. | + | '''<span style="color: rgb(255, 0, 0);">C: </span>'''Name the thank-you. |
| width="50%" | | | width="50%" | | ||
| − | '''<span style="color: rgb(255, 0, 0);">D: </span>'''Write the letter. | + | '''<span style="color: rgb(255, 0, 0);">D: </span>'''Write the letter. |
|- | |- | ||
| width="50%" | | | width="50%" | | ||
| − | '''<span style="color: rgb(255, 0, 0);">E: </span>'''To add the merge fields, right-click anywhere in the blank area of the window. The field is inserted where the cursor is. | + | '''<span style="color: rgb(255, 0, 0);">E: </span>'''To add the merge fields, right-click anywhere in the blank area of the window. The field is inserted where the cursor is. |
| + | |||
| + | | width="50%" | | ||
| + | '''<span style="color: rgb(255, 0, 0);">F: </span>'''The [[Image:Button_left_arrow.png]] and [[Image:Button_right_arrow.png]] buttons allow you to browse between languages to write the appropriate letters. | ||
| − | |||
|} | |} | ||
| Line 74: | Line 76: | ||
|- | |- | ||
| colspan="2" | | | colspan="2" | | ||
| + | After filling in the "Thank-you" tab, go to the "Signature" tab. | ||
| + | |||
|- | |- | ||
| colspan="2" | | | colspan="2" | | ||
|- | |- | ||
| colspan="2" | | | colspan="2" | | ||
| + | '''NOTE: '''If the receipt with integrated thank-you is of Word type, the signature does not integrate to the thank-you. You need to manually add it in the master document. | ||
| + | |||
|- | |- | ||
| width="50%" | | | width="50%" | | ||
| + | '''<span style="color: rgb(255, 0, 0);">G: </span>'''Allows you to insert a signature on the thank-you letter (may be different from the one on the receipts). | ||
| + | |||
| width="50%" | | | width="50%" | | ||
| + | '''<span style="color: rgb(255, 0, 0);">H: </span>'''Allows you to specify the positioning of the signature on the thank-you letter. | ||
| + | |||
|- | |- | ||
| width="50%" | | | width="50%" | | ||
| + | '''<span style="color: rgb(255, 0, 0);">I: </span>'''Allows you to specify the size of the signature. | ||
| + | |||
| width="50%" | | | width="50%" | | ||
| + | '''<span style="color: rgb(255, 0, 0);">J: </span>'''Makes sure that the dimensions of the signature of the thank-you letter and the one of the receipts are identical. This option is useful if the same signature is used for the letter and the receipts. | ||
| + | |||
|} | |} | ||
Revision as of 10:05, 28 September 2011
Contents
Introduction
A receipt with an integrated thank you letter is usually generated in two copies. The thank you letter is placed at the top of the sheet and followed by both copies of the receipt.
The main asset of the receipt with integrated thank yous is that it saves paper since a single sheet is sent to the donor (rather than a receipt and a letter on two separate sheets of paper).
On a standard type receipt, the space intended for the thank you letter will always remain the same from one letter to the other. If the thank you letter is shorter than the space available, the remaining space will be blank. Therefore, the receipts are always at the place on the sheet.
On a Word type receipt, the integrated thank you letter is inserted like a merge field predefined in the master document. There is no specific space allotted for the letter in the master document. If the letter is too short, you need to manually insert "Enter" in the writing of the letter to make sure that the receipts are always at the same place on the sheet.
Configuration of the Receipt
Before proceeding with the configuration of the thank you letter, perform the general configuration of the receipt, as the case may be, the configuration of the standard type receipt or the configuration of the Word type receipt.
Configuration of the Thank you Letter Integrated to the Receipt
Creating the Thank you Letter
|
To modify or create a thank you letter, from the software home page, click on the "Configuration" menu, then select "Receipts thank-yous". |

|
|
After filling in the "Thank-you" tab, go to the "Signature" tab. | |
|
NOTE: If the receipt with integrated thank-you is of Word type, the signature does not integrate to the thank-you. You need to manually add it in the master document. | |
|
G: Allows you to insert a signature on the thank-you letter (may be different from the one on the receipts). |
H: Allows you to specify the positioning of the signature on the thank-you letter. |
|
I: Allows you to specify the size of the signature. |
J: Makes sure that the dimensions of the signature of the thank-you letter and the one of the receipts are identical. This option is useful if the same signature is used for the letter and the receipts. |
Choice of Thank you Letter to be Integrated to the Receipt
Integrating the Thank you Letter to the Receipt
Standard Type Receipt
WordType Receipt
Document name: ProDon:Configuration of a Thank-you Letter Integrated to a Receipt

