Difference between revisions of "ProDon:Chart of Account Management (Prodon 4)"
(Tag: Visual edit) |
(Tag: Visual edit) |
||
| (18 intermediate revisions by 2 users not shown) | |||
| Line 1: | Line 1: | ||
| − | {{ | + | {{Header_TOC}} |
| − | '''<u>CAUTION</u>''': This document is for ''' | + | '''<u>CAUTION</u>''' : This document is for '''VERSION''' 4 of '''''Prodon'''''. To go to the document for version 5, [[ProDon:Accounting System Links Management|click here]]. |
| + | ==Introduction== | ||
| + | The "Chart of Account Management" allows you to create the General Ledger accounts used in the database. Usually, these General Ledger accounts are linked to the accounts used for accounting; that is, the ones used in the accounting software of the organization. | ||
| − | + | '''NOTE: '''The "Chart of Account Management" contains accounts for revenues and expenditures. | |
| − | + | ==Chart of Account Management== | |
| − | + | To add or modify General Ledger accounts, you must first go to the "Chart of Account Management". | |
| − | + | {| class="wikitable" width="463" cellspacing="1" cellpadding="1" border="1" | |
| − | |||
| − | |||
| − | |||
| − | |||
| − | |||
| − | |||
| − | == | ||
| − | |||
| − | To | ||
| − | |||
| − | {| | ||
| − | |||
| − | |||
| − | |||
| − | |||
| − | |||
| − | |||
| − | |||
| − | |||
| − | |||
| − | |||
| − | |||
| − | |||
| − | |||
| − | |||
| − | |||
| − | |||
| − | |||
| − | |||
| − | |||
| − | |||
| − | |||
| − | |||
| − | |||
| − | |||
| − | |||
| − | |||
| − | |||
|- | |- | ||
| − | | | + | |To do so, from the software home page, click on the "Transactions" menu, then select "[[Image:Button General Ledger.png|link=http://wikien.logilys.com/index.php/File:Button_General_Ledger.png]] Chart of Accounts". |
|- | |- | ||
| − | | | + | |[[Image:Chart of Account Management 001.png|link=http://wikien.logilys.com/index.php/File:Chart_of_Account_Management_001.png]] |
| − | |||
| − | |||
| − | |||
| − | |||
| − | |||
|} | |} | ||
| − | + | {| class="wikitable" width="50%" cellspacing="1" cellpadding="1" border="1" | |
| − | |||
| − | |||
| − | {| width=" | ||
|- | |- | ||
| − | | colspan="2" | | + | | colspan="2" |After clicking on "[[Image:Button General Ledger.png|link=http://wikien.logilys.com/index.php/File:Button_General_Ledger.png]] Chart of Accounts", this window opens. |
| − | After clicking on | ||
|- | |- | ||
| − | | colspan="2" |[[ | + | | colspan="2" |[[Image:Chart of Account Management 002.png|link=http://wikien.logilys.com/index.php/File:Chart_of_Account_Management_002.png]] |
|- | |- | ||
| − | | width="50%" | | + | | width="50%" |'''<span style="color: rgb(255, 0, 0);">A: </span>'''This is the list of all the existing active GL accounts in '''''ProDon'''''. |
| − | <span style="color: rgb(255, 0, 0);"> | + | | width="50%" |'''<span style="color: rgb(255, 0, 0);">B: </span>'''The [[Image:Button add plus.png|link=http://wikien.logilys.com/index.php/File:Button_add_plus.png]] button allows you to create a new GL account. To learn how to fill in the addition or editing of GL accounts window, [[ProDon:Chart of Account Management#Add .2F Edit a General Ledger Account|click here]]. |
| − | |||
| − | | width="50%" | | ||
| − | <span style="color: rgb(255, 0, 0);"> | ||
| − | |||
| − | | | ||
| − | |||
| − | |||
| − | |||
| − | |||
|- | |- | ||
| − | | | + | | width="50%" |'''<span style="color: rgb(255, 0, 0);">C: </span>'''The [[Image:Button Edit.png|link=http://wikien.logilys.com/index.php/File:Button_Edit.png]] button allows you to modify a GL account from the list at <span style="color: rgb(255, 0, 0);">'''A'''</span>. To learn how to fill in the addition or editing of GL accounts window, [[ProDon:Chart of Account Management#Add .2F Edit a General Ledger Account|click here]]. |
| − | + | | width="50%" |'''<span style="color: rgb(255, 0, 0);">D: </span>'''The [[Image:Button Minus remove delete.png|link=http://wikien.logilys.com/index.php/File:Button_Minus_remove_delete.png]] button allows you to delete a GL account from the list at '''<span style="color: rgb(255, 0, 0);">A</span>'''. | |
| + | '''NOTE: '''It is preferable to deactivate an account rather than deleting it. To learn how to deactivate a GL account, see point <span style="color: rgb(255, 0, 0);">'''H'''</span> of the [[ProDon:Chart of Account Management#Add .2F Edit a General Ledger Account|"Add /Edit a General Ledger Account"]] section. | ||
|- | |- | ||
| − | | | + | | width="50%" |'''<span style="color: rgb(255, 0, 0);">E: </span>'''The "Active" tab contains all the GL accounts that are currently active in '''''ProDon'''''. |
| − | | | + | | width="50%" |'''<span style="color: rgb(255, 0, 0);">F: </span>'''The "Inactive" tab contains all the GL accounts that are currently inactive in '''''ProDon'''''. |
| − | | | + | '''NOTE: '''To learn how to activate or deactivate a GL account, see point <span style="color: rgb(255, 0, 0);">'''H'''</span> of the [[ProDon:Chart of Account Management#Add .2F Edit a General Ledger Account|"Add / Edit a General Ledger Account"]] section. |
| − | <span style="color: rgb(255, 0, 0);">''' | ||
| − | |||
|} | |} | ||
| − | + | ===Add / Edit a General Ledger Account=== | |
| − | + | {| class="wikitable" width="50%" cellspacing="1" cellpadding="1" border="1" | |
| − | |||
| − | |||
| − | |||
| − | |||
| − | |||
| − | |||
| − | |||
| − | |||
| − | |||
| − | {| width=" | ||
| − | |||
|- | |- | ||
| − | | | + | | colspan="2" |After clicking on the [[Image:Button add plus.png|link=http://wikien.logilys.com/index.php/File:Button_add_plus.png]] or [[Image:Button Edit.png|link=http://wikien.logilys.com/index.php/File:Button_Edit.png]] button, this window opens. |
| − | |||
| − | |||
| − | |||
| − | |||
| − | |||
|- | |- | ||
| − | | | + | | colspan="2" |[[Image:Chart of Account Management 003.png|link=http://wikien.logilys.com/index.php/File:Chart_of_Account_Management_003.png]] |
| − | |||
| − | |||
| − | | | ||
| − | |||
| − | |||
| − | |||
| − | |||
| − | |||
| − | |||
| − | |||
|- | |- | ||
| − | | | + | | width="50%" |'''<span style="color: rgb(255, 0, 0);">A: </span>'''Enter the GL account number that will be visible in '''''ProDon'''''. |
| − | + | | width="50%" |'''<span style="color: rgb(255, 0, 0);">B: </span>'''Enter the GL account number used in the accounting software of the organization. | |
| + | '''NOTE: '''This field is visible only if the [[ProDon:Accounting Integration Module|"Accounting Integration Module"]] is active in '''''ProDon'''''. | ||
|- | |- | ||
| − | | | + | | width="50%" |'''<span style="color: rgb(255, 0, 0);">C: </span>'''Name the GL account. |
| − | + | | width="50%" |'''<span style="color: rgb(255, 0, 0);">D: </span>'''If more than one language are active in '''''ProDon''''', the [[Image:Button translate.png|link=http://wikien.logilys.com/index.php/File:Button_translate.png]] button allows you to translate the name of the GL account specified at <span style="color: rgb(255, 0, 0);">'''C'''</span>. | |
| − | | width="50%" | | ||
| − | <span style="color: rgb(255, 0, 0);">''' | ||
| − | |||
| − | | | ||
| − | <span style="color: rgb(255, 0, 0);">''' | ||
| − | |||
|- | |- | ||
| − | | | + | | width="50%" |'''<span style="color: rgb(255, 0, 0);">E: </span>'''Allows you to indicate which tax(es) must be considered for this GL account. |
| − | <span style="color: rgb(255, 0, 0);"> | + | '''CAUTION: '''Use this option only when entering expenditure transactions. |
| − | + | | width="50%" |'''<span style="color: rgb(255, 0, 0);">F: </span>'''Allows you to assign this GL account to a donation intended for a deceased person. Moreover, if this box is checked, the name of the GL account will appear on the receipt; so this is a receipt for designated gifts. | |
| − | | | ||
| − | <span style="color: rgb(255, 0, 0);"> | ||
| − | |||
|- | |- | ||
| − | | | + | | width="50%" |'''<span style="color: rgb(255, 0, 0);">G: </span>'''Displays the GL account on the "Deposit Summary" report. |
| − | + | | width="50%" |'''<span style="color: rgb(255, 0, 0);">H: </span>'''Allows you to activate or deactivate the GL account. If the box is checked, it is because the GL account is inactive. | |
| − | |||
| − | | | ||
| − | <span style="color: rgb(255, 0, 0);"> | ||
| − | |||
|- | |- | ||
| − | | | + | | width="50%" |'''<span style="color: rgb(255, 0, 0);">I: </span>'''Allows you to write notes in relation to the GL account. |
| − | ''' | + | | width="50%" |'''<span style="color: rgb(255, 0, 0);">J: </span>'''After specifying all the necessary information, click on the "[[Image:Button Check mark Confirm.png|link=http://wikien.logilys.com/index.php/File:Button_Check_mark_Confirm.png]] Confirm edit" button, in order to save the information. |
| − | + | |}{{Footer_ProDon_Version|4.6.7.25}}{{Header_TOC}} | |
| − | |||
| − | |||
| − | < | ||
| − | |||
| − | |||
| − | |||
| − | |||
| − | |||
| − | |||
| − | |||
| − | |||
| − | |||
| − | |||
| − | |||
| − | {{ | ||
| − | |||
| − | |||
Latest revision as of 12:51, 30 May 2018
| Chart of Account Management (Prodon 4) |
CAUTION : This document is for VERSION 4 of Prodon. To go to the document for version 5, click here.
Introduction
The "Chart of Account Management" allows you to create the General Ledger accounts used in the database. Usually, these General Ledger accounts are linked to the accounts used for accounting; that is, the ones used in the accounting software of the organization.
NOTE: The "Chart of Account Management" contains accounts for revenues and expenditures.
Chart of Account Management
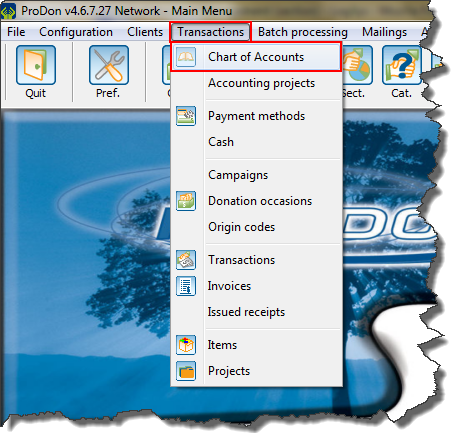
To add or modify General Ledger accounts, you must first go to the "Chart of Account Management".
| To do so, from the software home page, click on the "Transactions" menu, then select " |

|
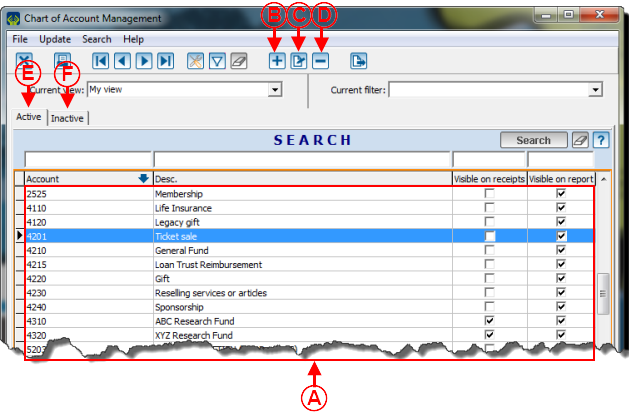
| After clicking on " | |

| |
| A: This is the list of all the existing active GL accounts in ProDon. | B: The |
| C: The |
D: The NOTE: It is preferable to deactivate an account rather than deleting it. To learn how to deactivate a GL account, see point H of the "Add /Edit a General Ledger Account" section. |
| E: The "Active" tab contains all the GL accounts that are currently active in ProDon. | F: The "Inactive" tab contains all the GL accounts that are currently inactive in ProDon.
NOTE: To learn how to activate or deactivate a GL account, see point H of the "Add / Edit a General Ledger Account" section. |
Add / Edit a General Ledger Account
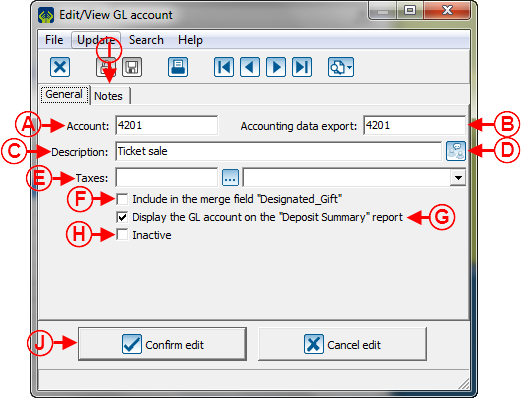
| After clicking on the | |

| |
| A: Enter the GL account number that will be visible in ProDon. | B: Enter the GL account number used in the accounting software of the organization.
NOTE: This field is visible only if the "Accounting Integration Module" is active in ProDon. |
| C: Name the GL account. | D: If more than one language are active in ProDon, the |
| E: Allows you to indicate which tax(es) must be considered for this GL account.
CAUTION: Use this option only when entering expenditure transactions. |
F: Allows you to assign this GL account to a donation intended for a deceased person. Moreover, if this box is checked, the name of the GL account will appear on the receipt; so this is a receipt for designated gifts. |
| G: Displays the GL account on the "Deposit Summary" report. | H: Allows you to activate or deactivate the GL account. If the box is checked, it is because the GL account is inactive. |
| I: Allows you to write notes in relation to the GL account. | J: After specifying all the necessary information, click on the " |
Document name: ProDon:Chart of Account Management (Prodon 4)
Version : 4.6.7.25
| Chart of Account Management (Prodon 4) |