Difference between revisions of "Common functions:View Management"
| Line 23: | Line 23: | ||
== Adding, Modifying and Deleting a View == | == Adding, Modifying and Deleting a View == | ||
| − | {| | + | {| cellspacing="1" cellpadding="1" border="1" class="wikitable" style="width: 716px; height: 583px;" |
|- | |- | ||
| colspan="2" | | | colspan="2" | | ||
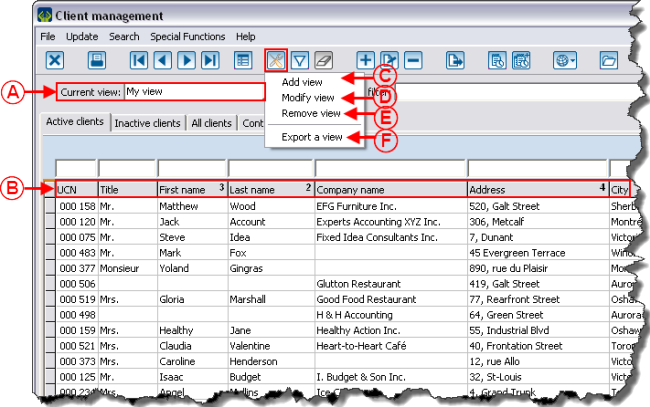
| − | The following examples are made from the "Client management", but the view management tool works in the same way in all managements. | + | The following examples are made from the "Client management", but the view management tool works in the same way in all managements. |
| − | After clicking on the [[Image: | + | After clicking on the [[Image:Bouton configurer.png]] button, this menu opens. |
|- | |- | ||
| − | | colspan="2" | | + | | colspan="2" | [[Image:View_Management_001.png]] |
|- | |- | ||
| width="50%" | | | width="50%" | | ||
| + | '''<span style="color: rgb(255, 0, 0);">A: </span>'''It is the name of the currently displayed view at <span style="color: rgb(255, 0, 0);">'''B'''</span>. To choose a different view, use the drop-down arrow. | ||
| + | |||
| + | '''NOTE: '''The view named "My view" is the default one in all the managements with the purchase of the software. It is possible to modify it, to rename it, but it is not possible to delete it. | ||
| + | |||
| width="50%" | | | width="50%" | | ||
| + | '''<span style="color: rgb(255, 0, 0);">B: </span>'''Each column represents the fields chosen for the view selected at <span style="color: rgb(255, 0, 0);">'''A'''</span>. | ||
| + | |||
|- | |- | ||
| width="50%" | | | width="50%" | | ||
| + | '''<span style="color: rgb(255, 0, 0);">C: </span>'''Allows you to add a view that will be available at <span style="color: rgb(255, 0, 0);">'''A'''</span>. For more details concerning the addition of a view, see this section. | ||
| + | |||
| + | '''NOTE: '''The new view will be based on the criteria of the view selected at <span style="color: rgb(255, 0, 0);">'''A'''</span>. This new view will therefore comprise the same fileds visible onscreen and the same specifications, but it will not be possible to modify them. It is therefore advantageous to first choose, at <span style="color: rgb(255, 0, 0);">'''A'''</span>, the view that contains the desired fields for more rapidity. | ||
| + | |||
| width="50%" | | | width="50%" | | ||
| + | '''<span style="color: rgb(255, 0, 0);">D: </span>'''Allows you to modify the view selected at<span style="color: rgb(255, 0, 0);">''' A'''</span>. For more details concerning the modification of a view, see this section. | ||
| + | |||
|} | |} | ||
| Line 104: | Line 116: | ||
|} | |} | ||
| − | <br> | + | <br> |
=== Configuring the View Using Tabs === | === Configuring the View Using Tabs === | ||
Revision as of 13:11, 6 July 2012
Template:Header Common Functions
Contents
Introduction
The view management tool allows you to create and configure grids that are visible in the different managements of the database. For each created view, it is possible to determine the fields (last name, first name, telephone, address, etc.) visible in the grid. Each field is then represented as columns in order to allow you to search quickly on any field of the database, appearing in the grid.
It is possible to create as many views as desired in virtually all the managements of the software in order to use them subsequently. Moreover, if the network module is active in the software, it is also possible to manage the users who can see and use the created views.
In addition to choosing the fields (last name, first name, e-mail address, etc.) that must appear in the grid, this tool offers the possibility to apply a filter to a view. For instance, if you want to see only the people who are part of a precise category in the "Client management", or to only see the transactions linked to the "Golf" donation occasions in the "Analysis and history management".
It is also possible to determine which view that should appear by default when opening each management of the database ("Client management", "Tasks and history management", "Analysis and history", etc.
The view management tool is represented by the ![]() button, that is always at the top, under the menu bar.
button, that is always at the top, under the menu bar.
Adding, Modifying and Deleting a View
Adding a View
Modifying a View
Configuring the View Using Tabs
"Columns" Tab
"Sort" Tab
"Filter" Tab
"Visibility" Tab
Preview of the View in the Management
Deleting a View
Selecting a Default View
Document name: Common functions:View Management
