ProDon:Task and History Management - Customer Relationship Management (CRM)

From Logilys
Revision as of 22:07, 26 July 2012 by Ncarrier (talk | contribs)
Jump to: navigation, search

Template:Header ProDon

Introduction

Task and history management is a tool that is integrated to ProDon, which allows you to manage all communications and follow-ups with the clients of the database and to keep a history.

With this tool, it is possible to activate the reminder option on precise date and time in order to receive a notification at the desired time to do prompt follow-ups.

Moreover, it is also possible to insert documents (Word, PDF, emails, etc.) directly in a task folder to classify any information specifically related to a follow-up.

Also, if the "Network module" (multi-user) is active, it is possible to manage the accessibility to share information or to assign a task to another member of the team.

Task Summary when Opening ProDon

To login to ProDon, if the "Network" (multi-user) module is activated, the user name and the password are always the same. If the "Network" (multi-user) module is active, each user enters his or her user name and password.


When opening ProDon, this window opens. It contains the task summary "Red square.png Late", "Yellow diamond button.png On time" and "Green circle button.png Early" for the current user.

Task and History Management 001.png


Reminder Window

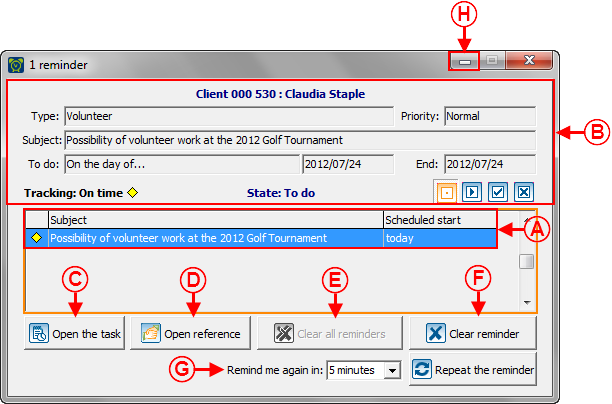
This window opens when one or more reminders have been activated in a task. For more details concerning the activation of a reminder, see this section.

Task and History Management 002.png

A: It is the list of tasks for which reminders have been activated.

NOTE: All reminders are always displayed in one window, If this window is open and that there is a new reminder, a line will be added to this list.

B: It is the subject of the task selected at A.

C: The "Button tasks and history.png Open the task" button allows you to open the task selected at A.

D: The "Client button (colour).png Open reference" button allows you to open the file of the client for whom the task selected at A has been created.

E: The "Bouton annuler.png Clear all reminders" button allows you to close the reminder window and to erase all the reminders at A.

NOTE: This function is not recommended, it is preferable to erase the reminders one by one using the button at F.

F: The "Bouton annuler.png Clear reminder" button allows you to erase the reminder window for the task selected at A. If there is only one reminder at A, the reminder window will close after clicking on this button.

G: The "Repeat button.png Repeat the reminder" button allows you to erase the reminder selected at A in order for a notification to appear again later. If there is only one reminder at A,  the reminder window will close after clicking on this button.

NOTE: Specify, using the drop-down list, in how much time the reminder must be repeated.

H: This button allows you to minimize the reminder window in order to keep the reminders in the window. This way, it is possible to view the reminders at the desired time, instead of repeating the reminders when the time at G will be up.

NOTE: When a new reminder appears in the window and that the window is minimized, it will blink in orange in the Windows menu bar.


View/Add/Edit Tasks for a Client

It is possible to view, modify or create new tasks for a client from many places in ProDon:


To add a new task that is identical for many clients at the same time, see this section.


From the Home Page

It is possible to access to the "Task and HIstory Management" from ProDon's home page. In this management, it is possible to:

  • View the list of all the existing tasks in ProDon;*View and modify an existing task;
  • Add a new task with no reference to a client, for instance, for a follow-up task for an internal activity.


To add a new task that is identical for many clients at the same time, see this section.


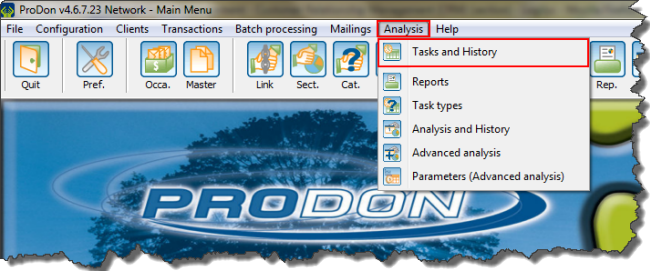
To access the "Task and History Management", from the home page, click on the "Analysis" menu, then select "Task and History button (colour).png Tasks and history".

Task and History Management 003.png

After clicking on "Task and History button (colour).png Tasks and History", see this section.


From the Shortcut Bar

It is possible to access the "Task and History Management" from the home page shortcut bar. In this management, it is possible to:

  • View the list of all the existng tasks in ProDon;*View or modify an existing task;
  • Add a new task with no reference to a client, for instance, for a follow-up task for an internal activity.


To add a new task that is identical for many clients at the same time, see this section.


Task and History Management 004.png

A: To access the "Task and History Management" from the home page shortcut bar, click on the Task button.png button. After clicking on the Task button.png button, see this section.

B: It is the summary of the incomplete tasks for the current user.

NOTE: If the Task button.png button is not visible in the shortcut bar, see the points C and D of the "Shortcut bar" section of the "Preferences" document.


From the Client Management

From the "Client Management", it is possible to:

  • View the tasks of a particular client;
  • Add, modify, complete or delete tasks for a client.

NOTE: To learn how to view the list of all the existing tasks in ProDon, see sections "From the Home Page" or "From the Shortcut Bar". To add a new task that is identical for many clients at the same time, see this section.


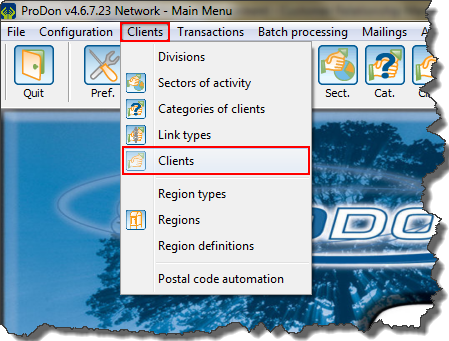
To access the "Client Management", first click on the home page "Clients" menu, then select "Client button (colour).png Clients".

Task and History Management 005.png


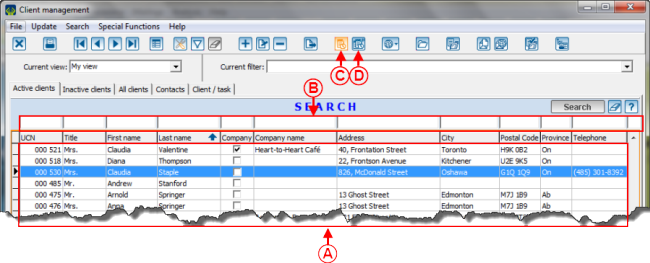
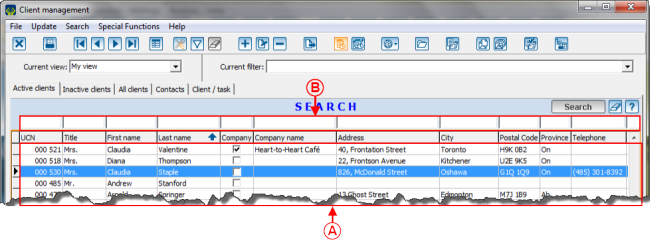
After clicking on "Client button (colour).png Clients", this window opens.

Task and History Management 006.png

A: It is the list of clients of the database.

B: It is the search bar, which allows you to search for a client of the list at A.

C: The Button tasks and history.png button allows you to access the tasks of the client selected at A. To view a client's tasks in particular, first serach for him or her using the search bar at B, then select the client at A, and click on the Button tasks and history.png button. After clicking on the Button tasks and history.png button, this window opens.

NOTE: When the button is orange, this means that there one or more current tasks for the client selected at A. If it is blue, this means that there is no current task for the cleint selected at A, however, there possibly are "incomplete" tasks that remain in this client's history.

D: The Button tasks and history.png button allows you to add a new task for all the clients of the list at A. To learn about the procedure, see this section.


After clicking on the Button tasks and history.png button from the "Client Management" or from a client file, this window opens.

Task and History Management 007.png

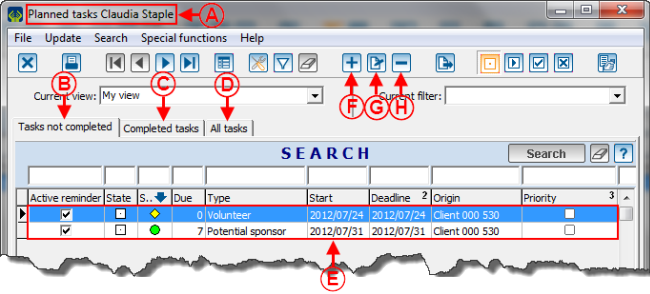
A: Indicates the name of the client for whom the tasks at E are planned.

B: The "Tasks not completed" tab allows you to see the list of all the current tasks that have been created for the client specified at A.

C: The "Completed tasks" tab allows you to see the list of all the completed tasks that have been created for the client specified at A.

D: The "All tasks" tab allows you to see the list of all the completed and not completed tasks that have been created for the client specified at A.

E: It is the list of tasks (not completed, completed or all the tasks - depending on the selected tab) for the client specified at A.

F: The Button add plus.png button allows you to add a new task to the list at E. After clicking on the Button add plus.png button, this window opens.

G: The Button Edit.png button allows you to modify a task from the list at E. To do so, select the task to be modified, then click on the Button Edit.png button. After clicking on the Button Edit.png button, this window opens.

NOTE: It is also possible to double-click on the selected line to open the task.

H: The Button Minus remove delete.png button allows you to delete a task from the list at E. To do so, select the task to be deleted, then click on the Button Minus remove delete.png button.


From a Client File

From a client file, it is possible to:

  • View the tasks of a client in particular;
  • Add, modify, complete or delete tasks for a client.


NOTE: To learn how to view the list of all the existing tasks in the database, see sections "From the Home Page" or "From the Shortcut Bar". To add a new task identical for many clients at the same time, see this section.


To access the client file, first go to the "Client Management". To do so, from the home page, click on the "Clients" menu, then select "Client button (colour).png Clients".

Task and History Management 005.png


After clicking on "Client button (colour).png Clients", this window opens.

Task and History Management 009.png

A: It is the list of clients of the database, double-click on the line of the client for whom a task must be added, viewed, modified or completed.

B: It is the search bar, which allows to search a client in the database at A.


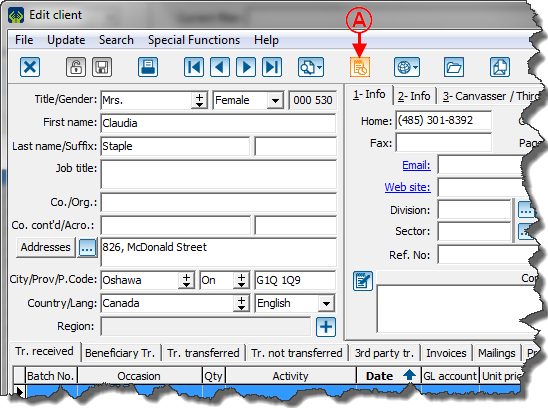
Afterdouble-clicking on the client for whom a task must be added, viewed or modified, this window opens.

Task and History Management 010.png

A: The Button tasks and history.png button allows you to access the client's tasks onscreen. After clicking on the Button tasks and history.png button, this window opens.

NOTE: When the button is orange, this means that there is one or more current tasks for the cleint onscreen. If it is blue, this means that there is no current task for this client, however, there possibly are "completed" tasks that remain in the client's history.


After clicking on the Button tasks and history.png button from the "Client Management" or from a client file, this window opens.

Task and History Management 007.png

A: Indicates the name of the client for whom the tasks at E are planned.

B: The "Tasks not completed" tab allows you to see the list of all the current tasks that have been created for the client specified at A.

C: The "Completed tasks" tab allows you to see the list of all the completed tasks that have been created for the client specified at A.

D: The "All tasks" tab allows you to see the list of all the completed and not completed tasks that have been created for the client specified at A.

E: These are the tasks that are not completed for the client specified at A.

F: The Button add plus.png button allows you to add a new task to the list at E. After clicking on the Button add plus.png button, this window opens.

G: The Button Edit.png button allows you to modify a task in the list at E. To do so, select the task to be modified, then click on the Button Edit.png button. After clicking on the Button Edit.png button, this window opens.

H: The Button Minus remove delete.png button allows you to delete a task in the list at E. To do so, select the task to be deleted, then click on the Button Minus remove delete.png button.


Task and History Management

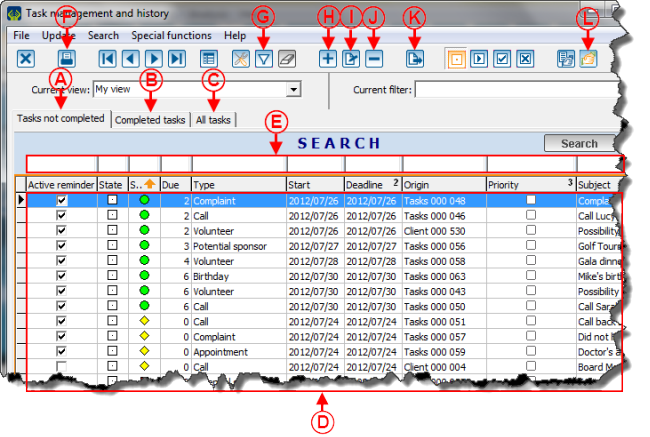
After clicking on "Task and History button (colour).png Tasks and history" from the "Analysis" menu of the home page or on the Task button.png button of the shortcut bar, this window opens.

Task and History Management 012.png

A: The "Tasks not completed" tab allows you to see the list of all the current tasks.

NOTE: If either a current view or a filter is applied, only the tasks meeting the criteria are visible.

B: The "Completed tasks" tab allows you to see the list of all the completed tasks.

NOTE: If either a current view or a filter is applied, only the tasks meeting the criteria are visible.

C: the "All tasks" tab allows you to see the list of all the completed and not completed tasks.

NOTE: If either a current view or a filter is applied, only the tasks meeting the criteria are visible.

D: It is the list of tasks for the selected tab.

E: It is the search bar, which allows to search on fields/columns of the list at D.

F: Allows you to produce reports.

NOTE: Two integrated reports are available; the "Summary list of tasks" and the "Task". Furthermore, it is possible to create custom reports.

G: Allows you to filter the tasks of the list at D. For more information concerning the filters, see the "Filter Data (Queries)" document.

H: The Button add plus.png button allows you to add a new task to the list at D.

NOTE: By adding a task from the "Task and History Management", the task will not be linked to a client. It is therefore possible to create the task for the internal follow-up. However, when the addition window opens, it is possible to click on the Button Selection 3 dots.png button, in order to add a client as a reference.

After clicking on the Button add plus.png button, this window opens.

I: The Button Edit.png button allows you to modify a task in the list at D. To do so, select the task to be modified, then click on the Button Edit.png button, After clicking on the Button Edit.png, this window opens.

NOTE: It is also possible to modify a task by double-clicking on it.

J: The Button Minus remove delete.png button allows you to delete a task in the list at D. To do so, select the task to be deleted, then click on the Button Minus remove delete.png button.

K: Allows you to export to Word, Excel or a Text file, the information at D. For more information concerning export, see the "Exporting and Merging Data" document.

L: The Client button (colour).png button allows you to open the file of the client for whom the task selected at D has been created. To do so, select the desired task, then click on the Client button (colour).png button.


Configuring / Editing a Task

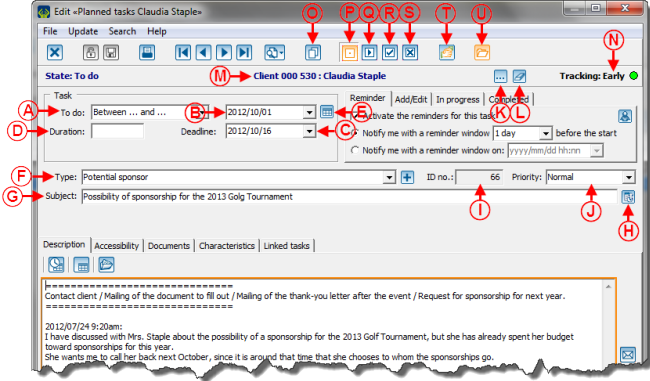
After clicking on the Button Edit.png button or on the Button add plus.png button in the viewing window of the tasks planned for a client (accessible via the "Client Management" or a client file) or in the "Task and History Management" (accessible via the home page or the shortcut bar), this window opens.

Task and History Management 013.png

A: Allows you to choose in what time interval the task should be performed.

B: Allows you to specify the start date and time of the task.

NOTE: By clicking on the drop-down arrow, a calendar appears in order to select the date. It is also possible to enter it manually.

C: Depending on the selection made at A, this field allows you to specify the deadline date and time.

NOTE: By clicking on the drop-down arrow, a calendar appears allowing you to select the date. It is also possible to enter it manually.

CAUTION: It is possible that this field might not be modifiable, depending on the choice made at A.

D: Allows you to indicate an approximate time for the completion of the task.

E: The Periodicity.png button allows you to activate a periodicity for the task or to create the same task for several dates. After clicking on this button, this window opens.

NOTE: This button is only visible when adding a new task or when opening a periodic task.

F: Allows you to choose the type of task. It is possible to choose one that has already been created by clicking on the drop-down arrow or to create a new one by clicking on the Button add plus.png button.

G: Allows you to write the subject of the task. Choose a subject meaningful enough so that the task can easily be found in a subsequent search

H: The Link task button.png button allows you to link a task to a main task. If the current task is the main task and that you need to link it to a secondary task, see this section.

I: It is the ID number "Identification number" of the task.

NOTE: This number is generated automatically and is not modifiable.

J: Allows you to specify the priority level of the task.

K: The Button Selection 3 dots.png button allows you to assign the task to a client or to modify the client who already is a reference. After selecting the client, his or her name is entered at M.

L: The Button eraser.png button allows you to erase the client specified at M. Therefore, the task will no longer be a reference for any client.

M: It is the name of the client to whom the task is linked.

N: Indicates the task status.

O: The Bouton dupliquer.png buttonallows you to duplicate the information of another task.

P: The Task to do button.png button indicates that the task is to be done.

Q: The In production button.png button indicates that the task is in production.

R: The Complete task button.png button allows you to complete the task.

NOTE: When a task is completed, it remains in the client's completed tasks history.

S: The Cancel task button.png button allows you to cancel the task.

NOTE: When a task is cancelled, it remains as history in the completed tasks of the client with the "X" code, stating that the task has been cancelled.

T: The Client button (colour).png button is visible only when a task is open from the "Task and History Management". It allows you to quickly open the client file in order to have that person's information to contact him or her.

NOTE: When you open a task from a client file, you only need to close the window to be back in the file.

U: The Bouton document.png button allows you to view the folder containing the documents linked to the task. To learn how to add documents to this folder, see the ""Documents" Tab" section.

To pursue with the configuration using different tabs of the task window, see the sections ""Reminder" Tab", ""Add/Edit" Tab", ""In Progress" Tab", ""Completed" Tab", ""Description" Tab", ""Accessibility" Tab", ""Documents" Tab", ""Characteristics" Tab" and ""Linked Tasks" Tab".


"Planning of a periodic task/Generation of a batch of tasks" Window

Te following window opens after clicking on the Periodicity.png button of this window.


"Planning of a periodic task" Tab

This tab allows you to configure a task in a periodic way.

Task and History Management 014.png

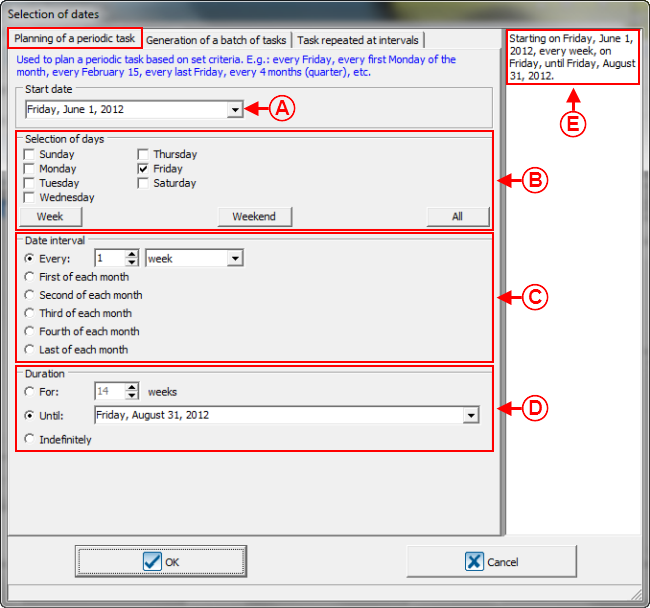
A: Allows you to specify the date of the first task.

B: Allows you to specify for which day of the week the task must be created. In this example, the task must be performed on Friday.

C: Allows you to choose the frequency with which the task has to be performed. In this example, the task must be performed every other week.

D: Allows you to choose the number of times the task has to be performed. In this example, the task has to be performed 7 times, so until August 31st. It is also possible to repeat the task indefinitely.

E: It is the detail of the task periodicity.


"Generation of a batch of tasks" Tab

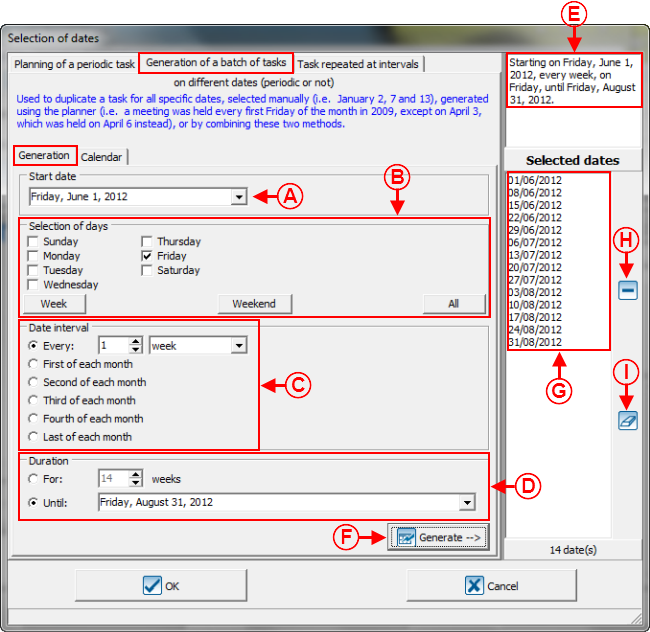
This tab allows you to generate a batch of tasks. A batch of tasks is configured in the same way as a periodic task, but may contain exceptions.

"Generation" Tab
Task and History Management 015.png

A: Allows you to specify the date of the first task.

B: Allows you to specify on which day of the week the task must be created. In this example, the task must be performed on Friday.

C: Allows you to choose the frequency at which the task must be performed. In this example, the task must be performed every other week.

D: Allows you to choose the number of times the task must be performed. In this example, the task will have to be performed 7 times, so until August 31st. It is also possible to repeat the task indefinitely.

E: It is the detail of the task periodicity.

F: The "Button Generate transfer.png Generate" button displays at G the dates meeting the criteria A, B, C and D.

G: These are the dates on which tasks will be created. It is possible to delete dates using the buttons at H and I, to add dates that meet the periodicity criteria at A, B, C and D or to add the desired dates from the "Calendar" tab.

H: The Button Minus remove delete.png button allows you to delete a date of the list at G. To do so, select the date to be deleted at G, then click on the Button Minus remove delete.png button.

I: The Button eraser.png button allows you to delete all the dates of the list at G.


"Calendar" Tab
Task and History Management 016.png

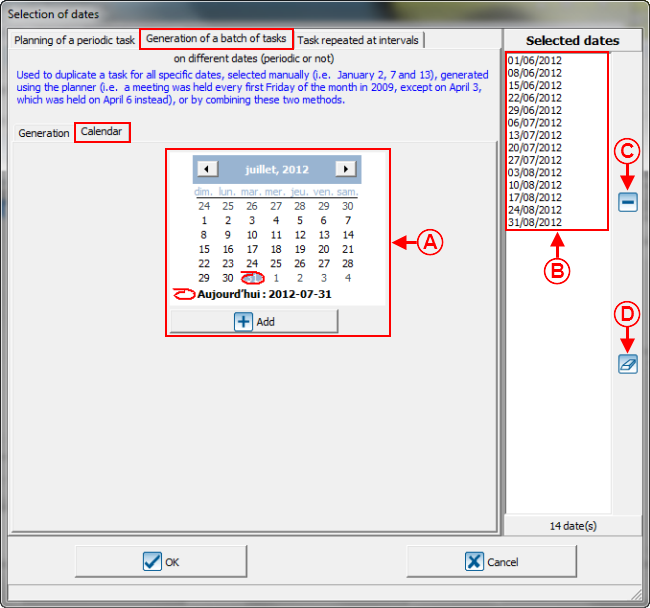
A: It is possible to add a date to the choices of the list at B in order to create a task for this date. To do so, select the date in the calendar, then click on the "Button add plus.png Add".

B: These are the dates for which the tasks will be created. It is possible to delete dates using the buttons at C and D and/or to add dates that meet the periodicity criteria at A, B, C and D of the "Generation" tab or to add the desired dates using the calendar at A.

C: The Button Minus remove delete.png button allows you to delete a date of the list at B. To do so, select the date to be deleted at B, then click on the Button Minus remove delete.png button.

D: The Button eraser.png button allows you to delete all the dates of the list at B.


  "Task repeated at intervals" Tab

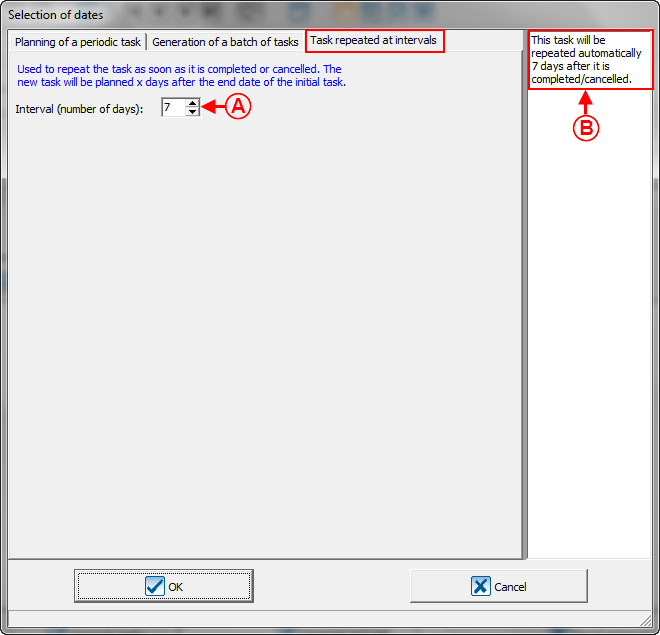
This tab allows you to repeat a task each time it is completed or cancelled.

Task and History Management 017.png

A: Select the number of interval days between the end date of a task and the start date of the other. In this example, when the task is be completed or cancelled, a new task will be created, then its starts date will be in 7 days.

B: It is the detail of the interval for the repetition of the task.


"Reminder" Tab

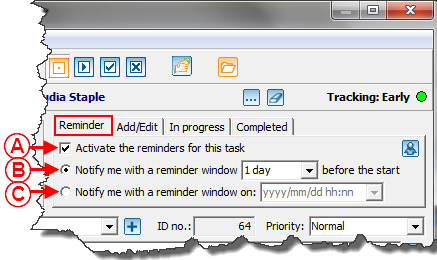
This tab allows you to plan the date and/or time when a notification must appear, in order to do a prompt follow-up.
Task and History Management 018.png

A: If this box is checked, a reminder will be activated for this task.

B: If this box is checked, it is possible to choose how much time before the beginning of the task the reminder window must appear.

C: If this box is checked, it is possible to choose the date and time when the reminder window must appear.

When a reminder is scheduled, this window opens on the date and time specified at B or C.

NOTE: To receive notifications and to see the reminder window, the software has to be open. It is therefore not necessary to be in ProDon.


"Add/ Edit" Tab

Task and History Management 019.png

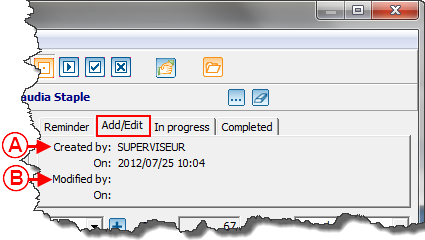
A: Indicates which ProDon user has created the task, as well as the date and time at which the task was created.

B: Indicates which ProDon user has last modified the task, as well as the date and time at which the last modification was done.


"In progress" Tab

Task and History Management 020.png

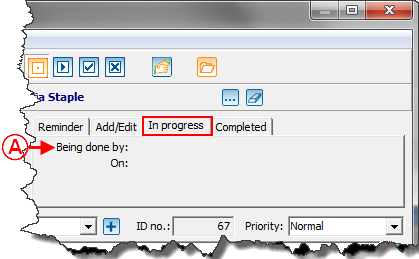
A: Indicates which ProDon user has put the task in progress, as well as the date and time when it was put in progress.


"Completed" Tab

Task and History Management 021.png

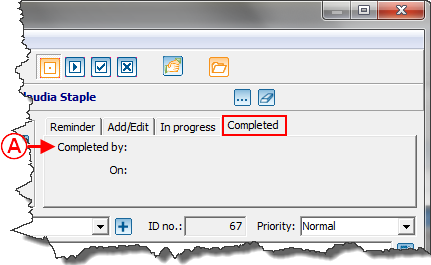
A: Indicates which ProDonuser has completed the task, as well as the date and time when the task was completed.

NOTE: When a task is "Completed", it is because the Complete task button.png button has been activated. For more information, see point R of this window.

"Description" Tab

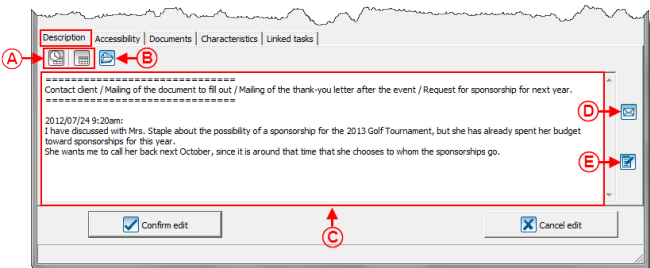
This tab allows you toenter all documentation on the follow-ups made in relation to the task.
Task and History Management 022.png

A: The Add date and time button.png button allows you to add the date, time and name of the ProDon user at C. By clicking on this button before entering follow-up notes, it is always possible to know the date and time when the follow-up was performed. The Add date button.png button allows you to add only the date and name of the ProDon user at C.

NOTE: If the "Network Module" is activated in ProDon, the name of the user will not be entered since there can only be one user.

B: The Template button.png button allows you to add a texte template at C. In this example, the text template has been added at C, at the top and it indicates the steps to follow for a sponsorship follow-up. By clicking on this button, a window opens for you to choose among the list of templates available.

To create a new text template, see point E.

C: It is the place where to enter all the follow-up notes. By using the buttons explained at A before each follow-up, the date, time and name of the user could be added.

D: The Email button.png button allows you to open the window for sending emails. The task subject is entered automatically in the email subject and the follow-up at C, will be entered automatically in the email.

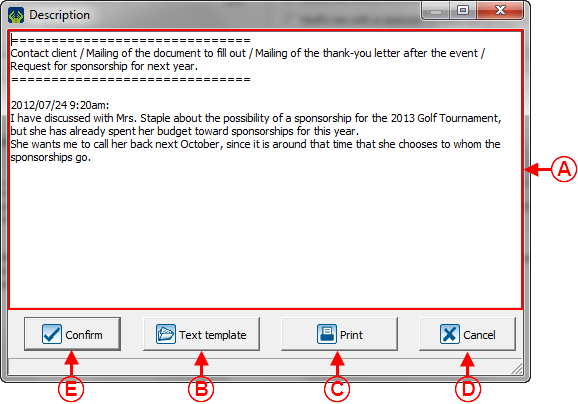
E: The Text template button.png allows you to modify the information entered at C and to create a new text template. After clicking on the Text template button.png button, this window opens.

NOTE: It is faster to write it directly at C.


After clicking on the Text template button.png button, this window opens.

Task and History Management 023.png

A: It is the follow-up to be performed for this task.<span style="color: rgb(255, 0, 0);" />

B: The " Template button.png Text template" button allows you to add, at A, an existing text template or to create a new text template. After clicking on this button, this window opens.

C: The "Button Print Report.png Print" button allows you to print the information at A.

D: The "Bouton annuler.png Cancel" button allows you to cancel the modifications that have been made.

E: After modifying, viewing the information at A or adding a text template at C, click on the "Button Check mark Confirm.png Confirm" button to confirm the modifications.


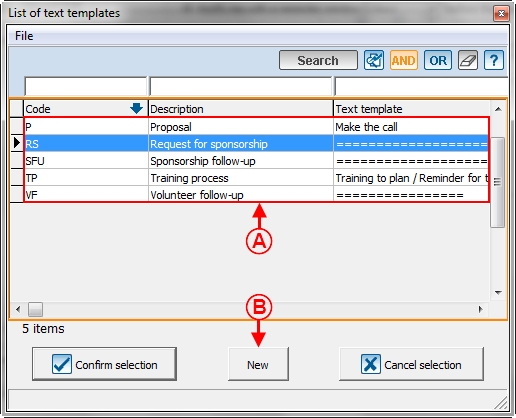
After clicking on the "Template button.png Text template", this window opens.

Task and History Management 024.png

A: These are the existing text templates.

B: The "New" button allows you to create a new text template. After clicking on this button, this window opens.


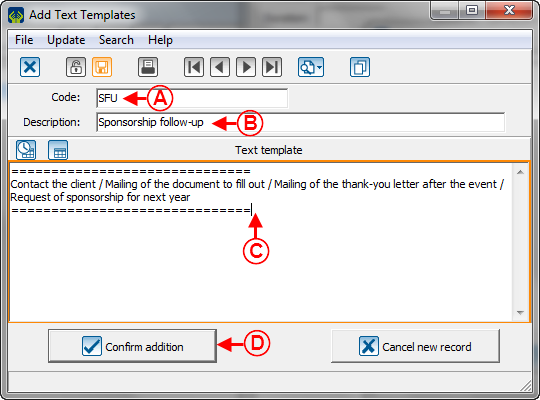
After clicking on the "New" button, this window opens.

Task and History Management 025.png

A: Allows you to specify a code for the new text template.

B: Alloes you to specify a description for the new text template.

C: Allows you to create a new text template.

D: After specifying all the necessary information at A, B and C, click on the "Button Check mark Confirm.png Confirm" button.


"Accessibility" Tab

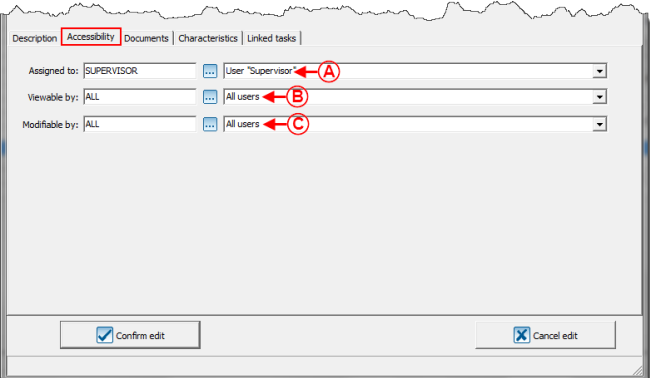
This tab allows you to determine which user(s) can see and modify the task.

Task and History Management 026.png

A: Allows you to choose to which ProDon user the task must be assigned.

B: Allows you to specify which ProDon user(s) could view the task.

NOTE: When the "Network" (multi-user) module is active, the users can be part of of a group of users.

C: Allows you to specify which ProDon user(s) could modify the task.

NOTE: When the "Network" (multi-user) is active, the users can be part of a group of users.

NOTE: To be able to use this tab, it is necessary that the "Network" (multi-user) module is active.


"Documents" Tab

Task and History Management 027.png

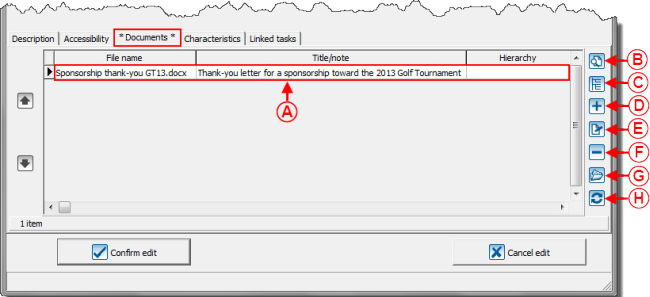
A: It is the list of all the documents attached to the task.

B: The Button Search.png button displays the search bar.

C: The Tree button.png button displays the arborescence of the folder in which the documents at A are saved.

D: The Button add plus.png button allows you to add a document to the list at A. After clicking on the Button add plus.png button, select the document that must be added to the task. After selecting the document the desired document, this window opens.

NOTE: It is also possible to select a document and to drag it into the task.

E: The Button Edit.png button allows you to modify the title of the documents at A. To do so, select the document for which the title must be modified at A, then click on the Button Edit.png button. After clicking on this button, this window opens.

F: The Button Minus remove delete.png button allows you to remove a document from the list at A. To do so, select the docuemnt to be removed at A, then click on the Button Minus remove delete.png button. After clicking on this button, this window opens.

G: The Template button.png button allows you to open adocument at A. To do so, select the document to open, then click on the Template button.png button.

NOTE: It is also possible to double-click on the line of the document to open.

H: The Repeat button.png button allows you to synchronize the documents dispalyed at A with the task folder. For more information concerning the task folder, see point U of this window. For instance, if I remove a document directly from the task folder on my computer, it will not be automatically removed at A. After clicking on the Repeat button.png button, it will disappear from the list at A.


After clicking on the Button add plus.png button, this window opens.

A: It is the initial location in the computer.

B: It is the location toward which the document will be moved or copied.

C: Allows you to copy a document from the location at A, to the location at B.

D: Allows you to move the docuemnt from the location at A, to the location at B.

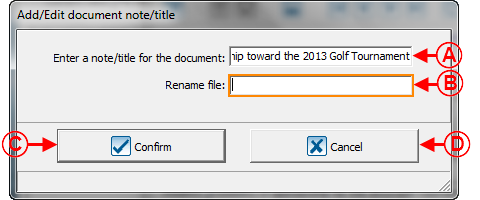
E: Allows you to name the document.

F: After specifying all the information at C, D and E, click on the "Button Check mark Confirm.png Confirm".


After clicking on the Button Edit.png button, this window opens.

Task and History Management 029.png

A: It is the current title of the document.

B: Allows you to give the document a new title.

C: To confirm the title modification, click on the "Button Check mark Confirm.png Confirm" button.

D: To cancel the title modification, click on the "Bouton annuler.png Cancel" button.


After clicking on the Button Minus remove delete.png button, this window opens.

Task and History Management 030.png


By clicking on the "Button Check mark Confirm.png Yes" button, this window opens and the document will be removed from ProDon. By clicking on the "Button cancel.png No" button, the document remains in ProDon's  the list of documents.

Task and History Management 031.png

By clicking on the "Button Check mark Confirm.png Yes" button, the document will be removed from the list of documents in ProDon and from the task folder on the computer. By clicking on the "Button cancel.png No" button, the documentwill be removed from the list of documents in ProDon; but not from the task folder of the computer,


"Characteristics" Tab

Task and History Management 032.png

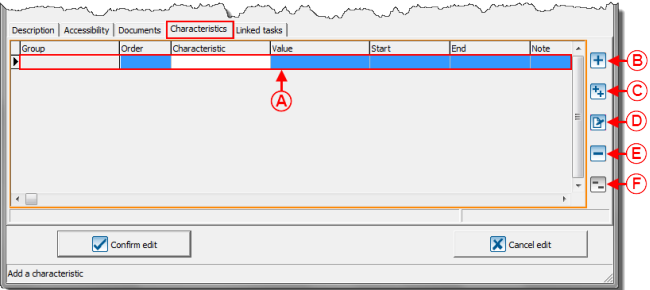
A: It is the list of characteristics for this task.

B: The Button add plus.png button allows you to add a characteristic to the list at A.

NOTE: The characteristic must has previously been created in the "Chararteristic Mangement". To learn how to create a characteristic, see the "Characteristic Management" document.

C: The Button 2 plus add group.png button allows you to add a group of characteristics to the list at A.

NOTE: The group of characteristics must have previously been created in the "Characteristic Management".

D: The Button Edit.png button allows you to modify the value of the characteristic or the group of characteristics to which the characteristic is assigned. To do so, select the characteristic to be modified at A, then click on the Button Edit.png button.

E: The Button Minus remove delete.png button allows you to delete the characteristic from the list at A. To do so, select the characteristic to delete at A, then click on the Button Minus remove delete.png button.

F: The Button 2 minus remove group.png button allows you to delete a group of characteristics from the list at A.


"Linked Tasks" Tab

Task and History Management 033.png

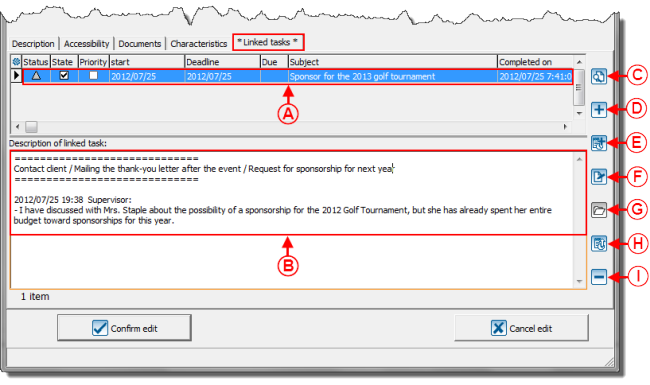
A: It is the list of tasks that are linked to the current task.

B: It is the description of the task selected at A.

C: The Button Search.png button displays the search bar.

D: The Button add plus.png button allows you to add a new task that will be linked to the current task.

E: The Linked task button.png button allows you to link an existing task in ProDon to the current task.

F: The Button Edit.png button allows you to open the file of a linked task in order to modify or to view it. To do so, select the task to be modified at A, then click on the Button Edit.png button.

G: The Bouton document.png button allows you to open the linked task folder. To do so, select the task for which the file must be viewed at A, then click on the Bouton document.png button.

H: The Link to main button.png button allows you to link the current task to an existing main task in ProDon.

I: The Button Minus remove delete.png button allows you to delete the link between both tasks.


Adding an Identical Task to Many Clients at the Same Time

To add a task that is identical for many clients at the same time, you need to go to the "Client Management".

To do so, click on the home page "Clients" menu, then select "Client button (colour).png Clients".

Task and History Management 005.png


After clicking on "Client button (colour).png Clients", this window opens.

Task and History Management 035.png

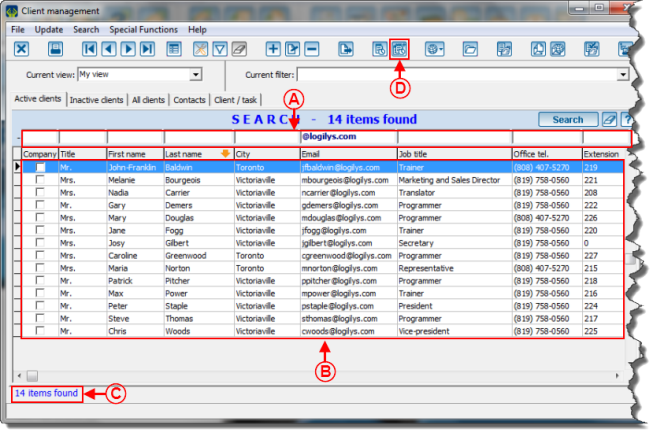
A: Search, using the search bar, all the clients for whom an identical task must be added.

NOTE: Clients can also be searched using a filter or a customized list.

B:

C: It is the number of clients for whom the task will be added.

D: After searching all the clients for whom an identical task must be created, click on the Task clock.png button.


After clicking on the Task clock.png button, this window opens.

Task and History Management 036.png

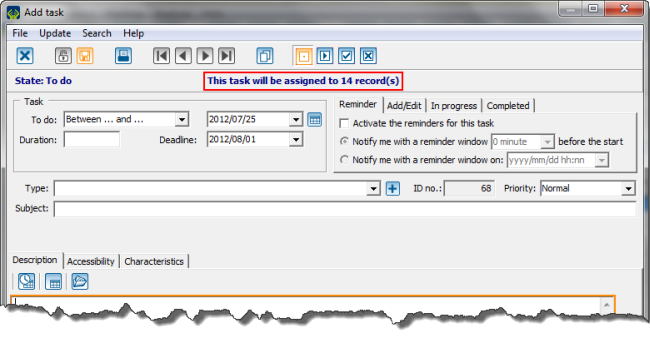
THe number of clients for whom the task will be created is entered automatically.

A task that is created for many clients and a task created for one client can be comfigured in the same way. To learn how to configure this window, as well as all the tabs, see the "Configuring / Editing a Task" section.


Document name: ProDon:Task and History Management - Customer Relationship Management (CRM)