Template:Header ProDon
Introduction
The client management contains ALL the clients of the database (volunteers, donors, suppliers, etc.).
To get to the client management, from the software home page, click on the "Clients" menu, then select " Clients".
Information on Client Management

|
|
A: Allows you to search among the active clients of the database.
|
B: Allows you to search among the inactive clients of the database.
|
|
C: Allows you to search among all the clients of the database (active clients and inactive clients).
|
D: Allows you to search by contact.
|
|
E: Allows you to choose the current view. For more information concerning the views, click here.
|
F: Allows you to choose a current filter. For more information on the filters, click here.
|
|
G: Allows you to search or delete information entered in the search bar, or to access the list of search codes available. For more information concerning the search bar, click here.
|
H: Allows you to access reports related to clients.
|
|
I: Allows you to browse through the grid.
|
J: Displays the selected client's summary of transactions. It will appear at the bottom of the window.
|
|
K: Allows you to add, modify or remove a view. For more information concerning the views, click here.
|
L: Allows you to configure a filter and to delete a filter. For more information on the filters, click here.
|
|
M: Allows you to add a client, to modify the selected client or to delete a client. CAUTION: Before adding a client, conduct a keyword search to know if the client already exists in the database. For more information concerning the search, click here.
|
N: Allows you to export the active list in Excel. For more information concerning data exportation, click here.
|
|
O: Allows you to add a task to the selected client or to all the clients of the active list. For more information concerning the tasks, click here.
|
P: Allows you to conduct an Internet search on certain pieces of information linked to a selected client.
|
|
Q: Allows you open a computer file in order to file documents (pdf, jpg, etc.) relating to clients.
|
R: Allows you to access the "Customized lists" tool. For more information concerning customized lists, click here.
|
|
S: Allows you to do client type or contact type Mass Mailing. For more information concerning Mass Mailing, click here.
|
T: These two buttons are only visible if the E-mail blast module is activated. For more information concerning E-mail Blast, click here.
|
Client File Details
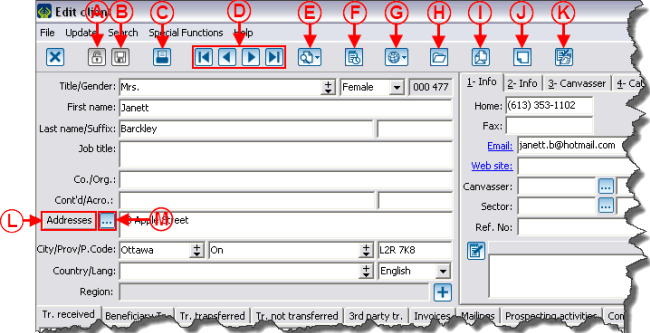
A client file is divided in two parts: The top part contains the personal information of the client and the bottom part contains tabs related to the client's transactional information, to the client's mailings and relations.
Client's Personal Information

|
|
A: Indicates whether the client file is locked or not.
|
B: Allows you to log the file. If the button is orange, it means that there is something to log in the file. If it is grey, it means that everything is logged.
|
|
C: Allows to access reports related to this client.
|
D: Allows you to browse from one file to another. The order of the files will be the same as the one in the client management grid.
|
|
E: This button contains the last ten modified client files, as well as a "Search" option, which allows you to open a new file without having to go back in the "Client management".
|
F: Allows you to add a task related to the client. For more information concerning the tasks and history, click here.
|
|
G: Allows you to conduct an Internet search on certain pieces of information related to the client.
|
H: Allows you to open a computer file in order to file documents (pdf, jpg, etc.) relating to the client.
|
|
I: Allows you to do a client type Mass Mailing. For more information concerning Mass Mailing, click here.
|
J: This button allows you to activate an alert message that will open during different interactions with the client.
|
|
K: Allows you to register the client to a distribution list of the E-mail Blast. For more information concerning E-mail Blast, click here.
|
L: Allows you to consult the client's former addresses and to plan a change of address.
|
|
M: Allows you to open the "Client's address" window containing the address fields, in order to write an address in accordance with Canada Post standards.
|
|
"1-Info" Tab
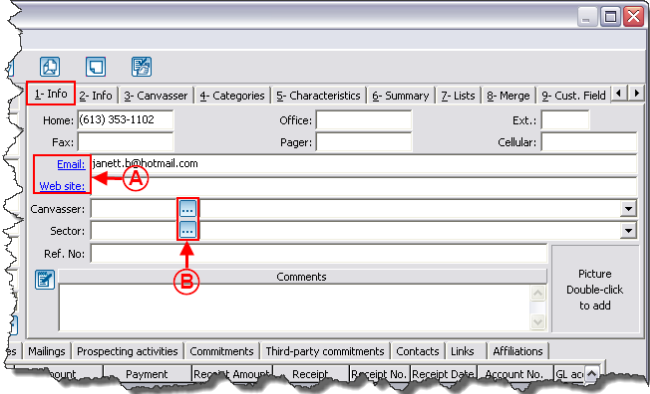
The "1-Info" tab contains all the necessary information to contact the client.

|
|
A: Allows you to open the client's website or to send an e-mail directly to the client by clicking on the links.
|
B: By clicking on the  button, a window opens allowing you to select the client's canvasser or to assign a sector of activity to the client. button, a window opens allowing you to select the client's canvasser or to assign a sector of activity to the client.
NOTE: It is also possible to use the drop-down list that gives access to the same choices. However, for the "Sector" field, by clicking on the  button, it is possible to add one. button, it is possible to add one.
|
"2-Info" Tab
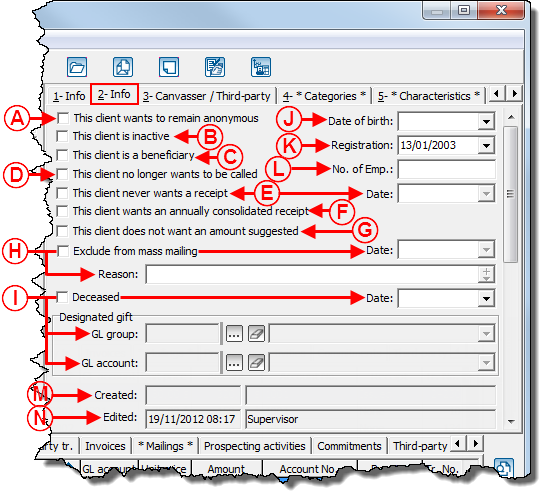
The "2-Info" tab contains the information related to the client's status.

|
|
A: If this box is checked, all of the client's following transactions will be anonymous by default.
|
B: This box allows you to activate the client. When a client is inactive, it is impossible to assign him or her any transactions.
|
|
C: This box automatically checks itself when the client receives a beneficiary type transaction.
|
D: This box is useful mainly during telemarketing campaigns (it is for informational purposes only).
|
|
E: If this box is checked, all the client's new transactions will be marked as "Without receipt". The date when the box has been checked is automatically entered in the "Date" field.
|
F: If this box is checked, all of the client's new transactions will be marked as "Annual receipt" by default.
|
|
G: This box is useful mainly during telemarketing campaigns (it is for informational purposes only).
|
H: This box allows you to specify whether the client has to be excluded from mass mailing. The date when the box has been checked is automatically entered in the "date" field and it is possible to state a reason (e.g. unsubscription).
|
|
I: This box allows you to specify if the client died. When it is checked, the boxes "Exclude from mass mailing" and "This client is inactive" are automatically checked. It is also possible to enter the date of death and a General Ledger account if the deceased person expressed the wish that the donations made in his or her memory would be awarded to a particular fund. For more details concerning In Memoriam gifts, click here.
|
J: Allows you to enter the clent's birth date.
|
|
K: Allows you to enter the date when the client was listed in the database.
|
|
"3-Canvasser" Tab
"4-Categories" Tab
"5-Characteristics" Tab
"6-Summary" Tab
"7-Lists" Tab
"8-Merge" Tab
"9-Cust. Fields" Tab
Client's Transactions, Mailings and Relations
"Tr. received" Tab
"Beneficiary Tr." Tab
"Tr. transferred" Tab
"Tr. not transferred" Tab
"3rd party tr." Tab
"Invoices" Tab
"Mailings" Tab
"Prospecting activities" Tab
"Commitments" Tab
"Third-party commitments" Tab
"Contacts" Tab
"Links" Tab
"Affiliations" Tab
Document name: ProDon:Client Management
![]() Clients".
Clients".


