ProDon:Importing Donations
Contents
[hide]Introduction
The Online Donation module allows donors to make donations directly through the Web.
In order for donors to make donations, a website must first be created and configured. The creation of the online donation website includes the configuration of the website home page as well as the creation of different Web forms. Each Web form is attached to a donation occasion, so that Internet users can subscribe online to fundraising activities of the organization, or make a donation directly through the Web.
Moreover, when an Internet user makes a donation or subscribes to an activity from a Web form, ProDon automatically adds him or her to the database during the import of the donations. The import process allows you to import into ProDon all the data of the Web form completed by donors.
Information of the Donations to Import Window
It is possible to activate the display of a window notifying you of the donations to import when opening ProDon, then you can configure the frequency at which this window should appear while using ProDon. To activate and configure the frequency at which it should be displayed, see points E and F of the "Miscellaneous" section of the "Preferences" document.
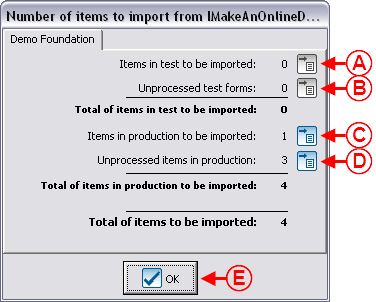
This window automatically appears if new donations have been made on the IMakeAnOnlineDonation website or if they need to be imported.
| |
|
A: The NOTE: To delay the treatment of those donations, click on the " |
B: The |
|
C: The NOTE: To delay the treatment of these donations, click on the " |
D: The |
|
E: The " |
NOTE: After clicking on the |
Importing Donations
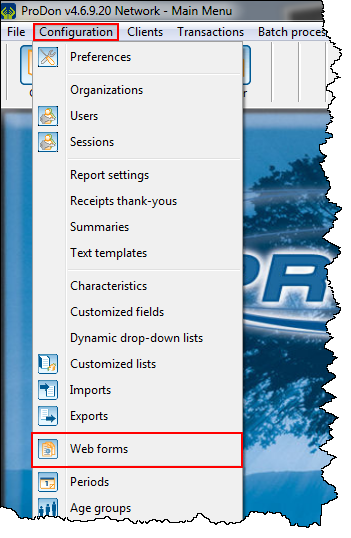
To import donations, first go to the "Web from management".
|
To do so, click on the "Configuration" menu, then select the " | |
|
 | |
|
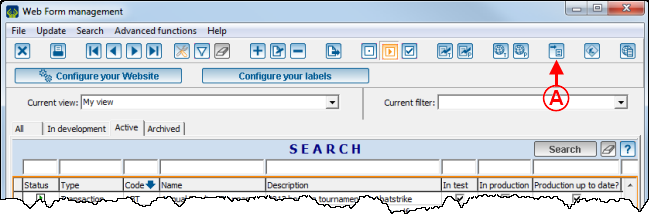
A: To import the donations made on the IMakeAnOnlineDonation website, click on the |
Selection of the Form Type to Import
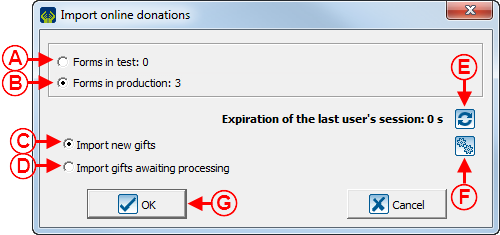
You must then choose the forms to import.
 | |
|
A: This option allows you to import the donations made on the test website. CAUTION: It is not possible to import the donations made on the test website and the ones made on the production website at the same time; only one box, either A or B, can be checked. NOTE: The "0" indicates that no new donations have been made since the last viewing of the "Import management". |
B: This option allows you to import the donations made on the production website. This option allows you to import donations made on the production website. CAUTION: It is not possible to import the donations made on the production website and the ones made on the test website at the same time. Only one box, either A or B, can be ckecked. NOTE: The "3" indicates that 3 donations have been made since the last viewing of the "Import management". |
|
C: This option alllows you to import pending donations as well as new donations made since the last viewing of the "Import management". NOTE: If the checkbox at A is checked, as well as this one, it is possible to import all the donations that have been made on the test website since the last viewing of the "Import management". If the checkbox at B is checked, as well as this one, it is possible to import all donations made on the production website since the last viewing of the "Import management". |
D: This option allows you to import the donations that have already been viewed from the "Import management". CAUTION: If new donations have been made since the last viewing of the "Import management", select option C instead. NOTE: If the checkbox at A is checked, as well as this one, it is possible to import pending donations made on the test website. If the checkbox at B is checked, as well as this one, it is possible to import pending donations made on the production website. |
|
E: Allows you to refresh the time remaining in the session of the last user who has began completing a Web form. NOTE: It is possible to import donations even if a donor is currently filling out a form. If the time is not "0", the donation entered will be imported in the next donation import. |
F: The |
|
G: After selecting the desired options, click on the " | |
|
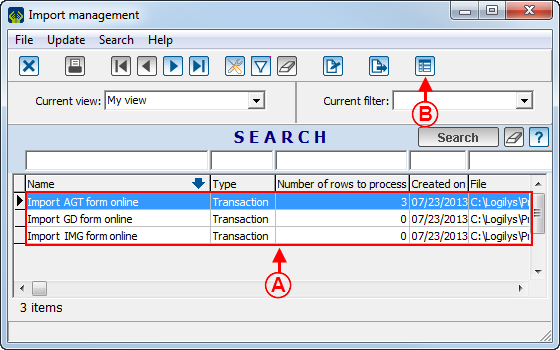
After clicking on the " | |
| |
|
A: It is the list of forms for which imports have already been made into ProDon. NOTE: The "Number of rows to process" field indicates the number of donations to import for each form. In this example, donations have been made only for the AGT form. |
B: After selecting the line of the form for which donations must be imported at A, click on the NOTE: It is not possible to import donations from different forms at a same time, only one line at the time can be processed. |
Preliminary Analysis
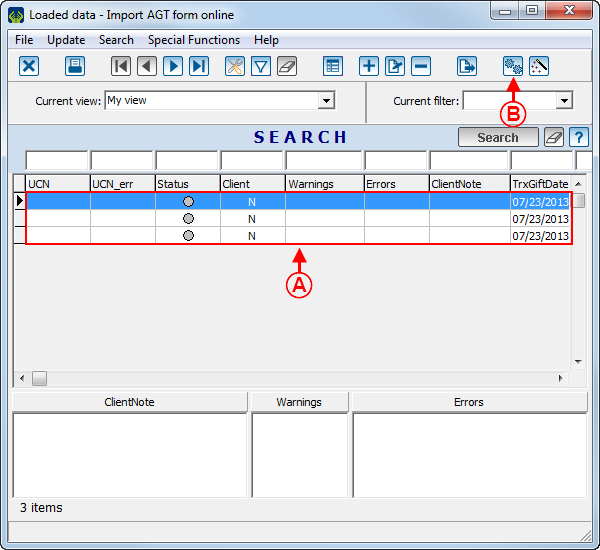
Prior to performing the import, an analysis of the forms completed on the IMakeAnOnlineDonation website must be done.
| |
|
A: It is the list of donations to import for the form selected in the previous window. |
|
|
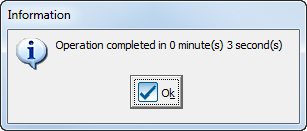
After clicking on the | |
 | |
Validation of Yellow Codes and Verification of Duplicates
|
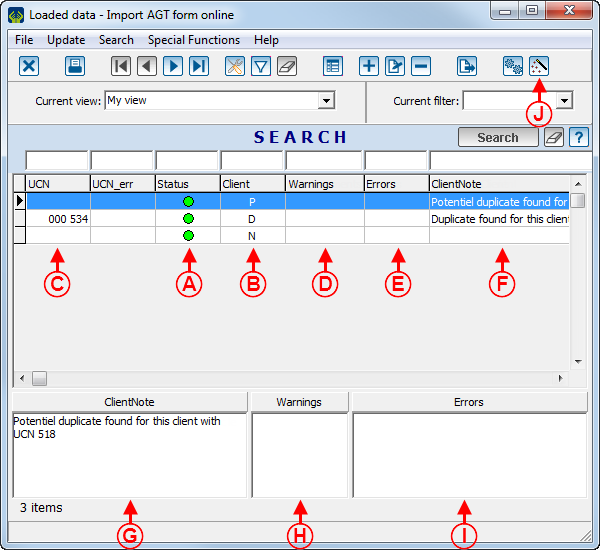
After clicking on the " | |
 | |
|
A: It is the import status of the Web form. If the status is green, this means everything is in order, the form has been filled out correctly. If the status is yellow, this means there is a warning. In that case, the warning is entered at D and H. View the warning, then correct or validate it. If the status is red, this means there is an error. In that case, the error is entered at E and I. When the status is red, contact Logilys. If the status is yellow and green, this means a warning has been validated. In that case, the warning is entered at D and H. To validate a warning, double-click on the line of the form that contains the warning, follow the instructions of points H, I and J of this section. NOTE: To see a few examples of what can create a yellow code, click here. |
B: It is the status of the client to import. If the client's status is "D", this means the client to be imported is a duplicate of a client in the database. Therefore, there will be no client file created. In that event, the client's UCN is written at C and a comment saying that a duplicate has been found for this client is written at F. If the client's status is "P", this means the client to be imported is a potential duplicate of a client in the database. It is recommended to validate whether it is a new client or a duplicate who should be merged by double-clicking on the line. In that event, a comment saying that a potential duplicate has been found is written at F. If the client's status is "N", this means a client to be imported is a new client. In that event, a new client file is created with all the information entered by the donor when he or she filled out the Web form. |
|
C: Si le donateur faisait déjà partie de la base de données, son NUC s'inscrit sous ce champ. NOTE : Un NUC s'inscrit sous ce champ lorsque la lettre « D » est inscrite en B. |
D : Lorsque le statut du formulaire Web est jaune, un avertissement s'inscrit sous ce champ. NOTE : L'avertissement de la ligne sélectionnée sera également visible en H. |
|
E : Lorsque le statut du formulaire Web est rouge, une erreur s'inscrit sous ce champ. NOTE : L'erreur de la ligne sélectionnée sera également visible en I. |
F : Lorsque le statut du client est « D » ou « P », une remarque s'inscrit sous ce champ. NOTE : La remarque de la ligne sélectionnée sera également visible en G. |
|
G : Lorsque le statut du client est « D » ou « P », une remarque s'inscrit sous ce champ. NOTE : La remarque de la ligne sélectionnée sera également visible en F. |
H : Lorsque le statut du formulaire Web est jaune, un avertissement s'inscrit sous ce champ. NOTE : L'avertissement de la ligne sélectionnée sera également visible en D. |
|
I : Lorsque le statut du formulaire Web est rouge, une erreur s'inscrit sous ce champ. NOTE : L'erreur de la ligne sélectionnée sera également visible en E. |
J : Cliquer sur le bouton File:Bouton Baguette.png pour importer les informations de dons et de clients une fois que les codes jaunes sont validés et que les doublons sont vérifiés. Après avoir cliqué sur le bouton File:Bouton Baguette.png, suivre ces instructions. |
Le statut de l'importation peut être jaune pour plusieurs raisons, voici les plus fréquentes :
- Il manque une information pour la recherche de doublons.
- La date d'expiration de la carte de crédit avec laquelle le donateur a effectué son don expirera ce mois-ci.
- La carte de crédit avec laquelle le donateur a effectué son don est expirée.
|
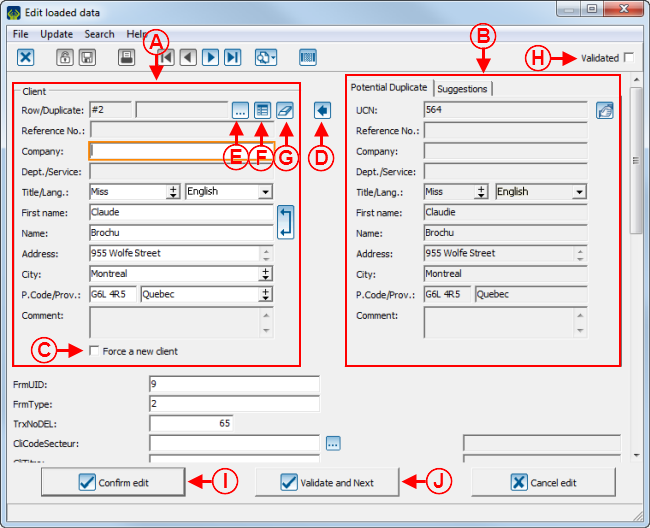
Après avoir double-cliqué sur une ligne de la fenêtre précédente, la fenêtre suivante s'ouvre. | |
 | |
|
A : Il s'agit des informations du client qui a été ouvert en double-cliquant dessus. NOTE : Les informations plus bas sont également des informations qui ont été saisies par le donateur en remplissant le formulaire Web. |
B : Il s'agit des informations du client qui est le doublon ou le doublon potentiel du client en A. L'onglet « Suggestions » suggère d'autres doublons potentiels. NOTE : Les informations plus bas sont également des informations du client qui est le doublon ou le doublon potentiel du client en A. |
|
C : En cochant cette case, un nouveau client sera créé dans ProDon. Les informations importées seront celles en A, il s'agit des informations qui ont été saisies par le donateur lorsqu'il a complété le formulaire Web. |
D : Le bouton File:Bouton flèche gauche a.png permet de fusionner le client A avec le client B. En cliquant sur ce bouton, le champ « # Ligne » en B s'inscrira automatiquement dans la boîte à côté du « #3 » en A. ProDon fusionnera les deux clients et conservera les informations en A. NOTE : Il est possible de modifier manuellement les informations en A, si désiré. |
|
E : Le bouton File:Bouton....png permet de rechercher un client dans la base de données afin de le fusionner avec le client en A. |
F : Le bouton File:Bouton groupes de formulaires.png permet de rechercher un client parmi ceux à importer afin de le fusionner avec le client en A. |
|
G : Le bouton |
H : Cette case permet de valider un code jaune. En cochant cette case, le code jaune deviendra vert et jaune et pourra être importé. |
|
I : Après avoir forcé un nouveau client en C, validé le client en H ou fusionné le client, cliquer sur le bouton « |
J : Ce bouton permet de valider le client en A, puis d'afficher le prochain client de la liste. En cliquant sur ce bouton, la case en H se cochera automatiquement pour ce client. |
Importing Donations
|
Après avoir cliqué sur le bouton File:Bouton Baguette.png, la fenêtre suivante s'ouvre. | |

| |
|
Cette fenêtre contient un message demandant si une sauvegarde de données a été effectuée avant d'effectuer l'importation. Il est important d'effectuer une sauvegarde de données avant d'importer les données puisqu'il s'agit d'une opération irréversible. Pour poursuivre le processus d'importation si une sauvegarde de données a été effectuée, cliquer sur le bouton « NOTE : Après avoir cliqué sur le bouton « |
|
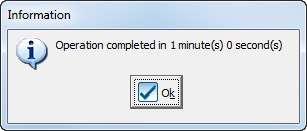
Après avoir cliqué sur le bouton « | |
| |
|
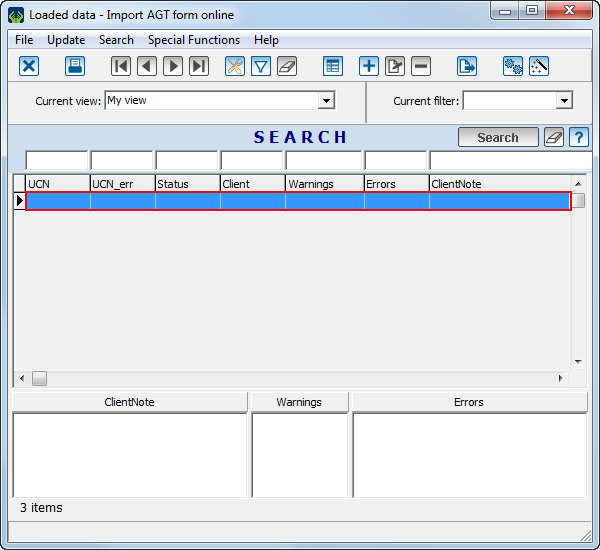
Après avoir cliqué sur « | |
| |
|
Fermer cette fenêtre pour retourner dans la « Gestion des importations ». |
Document name: ProDon:Importing Donations
