Difference between revisions of "ProDon:Default Values"
(→Configuring the Tabulation Order) (Tag: Visual edit) |
(Tag: Visual edit) |
||
| Line 15: | Line 15: | ||
<br> | <br> | ||
| − | Default values allow the user to configure data that will be filled automatically when adding clients, transactions or commitments. For example, the communication language "English" could be assigned each time a new client file is created. Another example of this would be if | + | Default values allow the user to configure data that will be filled automatically when adding clients, transactions or commitments. For example, the communication language " English " could be assigned each time a new client file is created. Another example of this would be if identical commitments are to be entered for several different clients, it is then possible to define the information that are common to all of these commitments. More specifically, if all the commitments start and end on the same dates, it is possible to ensure that '''''Prodon''''' remembers those dates, so the user would not have to enter them each time. |
<br> | <br> | ||
| − | Furthermore, it is possible to establish a tabulation order when adding | + | Furthermore, it is possible to establish a tabulation order when adding new transactions. |
== Configuring Default Values == | == Configuring Default Values == | ||
| − | A "Default values" window appears as a blank window | + | A " Default values " window appears as a blank window for the chosen type (clients, transactions, commitments). Therefore, if the " Clients " type is selected, a blank window identical to a new client window opens. |
=== Default Values for Transactions === | === Default Values for Transactions === | ||
| − | To configure the default values of a transaction addition window, | + | To configure the default values of a transaction addition window, go to " Transaction management ". |
{| cellspacing="1" cellpadding="1" border="1" class="wikitable" style="width: 444px; height: 354px;" | {| cellspacing="1" cellpadding="1" border="1" class="wikitable" style="width: 444px; height: 354px;" | ||
|- | |- | ||
| | | | ||
| − | To do so, from ''''' | + | To do so, from <nowiki/>'''''t'''''he software's home page, click on the " Transactions " menu, then select " [[File:Prodon5 Default Values Transaction Button.png]] Transactions ". |
|- | |- | ||
| Line 40: | Line 40: | ||
<br> | <br> | ||
| − | Then go to the configuration window of the default values. | + | Then go to the configuration window of the default values. |
| − | |||
| − | |||
{| cellspacing="1" cellpadding="1" border="1" class="wikitable" style="width: 347px; height: 340px;" | {| cellspacing="1" cellpadding="1" border="1" class="wikitable" style="width: 347px; height: 340px;" | ||
| Line 57: | Line 55: | ||
{| class="wikitable" width="200" cellspacing="1" cellpadding="1" border="1" | {| class="wikitable" width="200" cellspacing="1" cellpadding="1" border="1" | ||
|- | |- | ||
| − | |After clicking on "Default values F3", this window opens. | + | |After clicking on " Default values F3 ", this window opens. |
|- | |- | ||
|[[File:Prodon5 Default Values 003.png|799x799px]] | |[[File:Prodon5 Default Values 003.png|799x799px]] | ||
|- | |- | ||
| − | |<span style="color:red;">'''A:'''</span> If you select the option to ask for each transaction, it will ask if you want to make an instant payment, deferred payment or batch payment. It is the default question | + | |<span style="color:red;">'''A:'''</span> If you select the option to ask for each transaction, it will ask you if you want to make an instant payment, deferred payment or batch payment. It is the default question asked for an electronic payment type. |
|- | |- | ||
|<span style="color:red;">'''B:'''</span> The fields that are in blue are the fields available to insert default answer's when entering a new transaction. The user can decide which fields will be pre-filled. | |<span style="color:red;">'''B:'''</span> The fields that are in blue are the fields available to insert default answer's when entering a new transaction. The user can decide which fields will be pre-filled. | ||
| Line 67: | Line 65: | ||
|'''NOTE :''' '''NOTE:''' All the fields for which values have been entered here will automatically be filled in when adding transactions. However, the user can always change the values manually from the transaction entry window. For more details concerning transactions, [[ProDon:Transaction Logging|click]] [[ProDon:Transaction Logging|here]]. To define a tabulation order when entering a transaction, [[ProDon:Default Values#Configuring the Tabulation Order|click here]]. | |'''NOTE :''' '''NOTE:''' All the fields for which values have been entered here will automatically be filled in when adding transactions. However, the user can always change the values manually from the transaction entry window. For more details concerning transactions, [[ProDon:Transaction Logging|click]] [[ProDon:Transaction Logging|here]]. To define a tabulation order when entering a transaction, [[ProDon:Default Values#Configuring the Tabulation Order|click here]]. | ||
|}<br> | |}<br> | ||
| − | |||
| − | |||
=== Default Values for Clients === | === Default Values for Clients === | ||
| − | + | To configure default values for the new client window, go to " Client management ". | |
| − | To configure default values for the new client window, go to " Client management ". | ||
| − | |||
{| class="wikitable" cellspacing="1" cellpadding="1" border="1" style="width: 409px; height: 263px;" | {| class="wikitable" cellspacing="1" cellpadding="1" border="1" style="width: 409px; height: 263px;" | ||
|- | |- | ||
| | | | ||
| − | To do so, from | + | To do so, from <nowiki/>the software's home page, click on the " Clients " menu, then select " [[File:Prodon5 Default Values Bouton Clients.png]] Clients ". |
|- | |- | ||
| Line 85: | Line 79: | ||
Then go to the configuration of default values window. | Then go to the configuration of default values window. | ||
| − | |||
| − | |||
| − | |||
{| cellspacing="1" cellpadding="1" border="1" class="wikitable" style="width: 318px; height: 267px;" | {| cellspacing="1" cellpadding="1" border="1" class="wikitable" style="width: 318px; height: 267px;" | ||
|- | |- | ||
| Line 110: | Line 101: | ||
Enter the default values in the desired fields. For instance, " English " as language of communication. | Enter the default values in the desired fields. For instance, " English " as language of communication. | ||
| − | '''NOTE: '''All fields for which values have been entered here will automatically be filled in when adding clients. However, the user can always change the value manually when creating a new client. For more details concerning the addition of new clients, [[ProDon:Client Management|click here]]. | + | '''NOTE: '''All fields for which values have been entered here will automatically be filled in when adding new clients. However, the user can always change the value manually when creating a new client. For more details concerning the addition of new clients, [[ProDon:Client Management|click here]]. |
|} | |} | ||
| − | <br> | + | <br><br> |
| − | |||
| − | <br> | ||
=== Default Values for Commitments === | === Default Values for Commitments === | ||
| Line 122: | Line 111: | ||
To configure the default values for a new commitment, go to " Client management ". | To configure the default values for a new commitment, go to " Client management ". | ||
| − | '''NOTE: '''The " Prospecting and Commitments Module " must be activated | + | '''NOTE: '''The " Prospecting and Commitments Module " must be activated for the following options to be accessible.<br> |
| − | |||
| − | <br> | ||
| − | |||
{| cellspacing="1" cellpadding="1" border="1" style="width: 389px; height: 263px;" class="wikitable" | {| cellspacing="1" cellpadding="1" border="1" style="width: 389px; height: 263px;" class="wikitable" | ||
|- | |- | ||
| | | | ||
| − | To do so, from the software home page, click on the " Clients " menu, then select " [[File:Prodon5 Default Values Bouton Clients.png]] Clients ". | + | To do so, from the software's home page, click on the " Clients " menu, then select " [[File:Prodon5 Default Values Bouton Clients.png]] Clients ". |
|- | |- | ||
| Line 138: | Line 124: | ||
Then go to the default values configuration window. | Then go to the default values configuration window. | ||
| − | |||
| − | |||
| − | |||
{| cellspacing="1" cellpadding="1" border="1" style="width: 304px; height: 279px;" class="wikitable" | {| cellspacing="1" cellpadding="1" border="1" style="width: 304px; height: 279px;" class="wikitable" | ||
|- | |- | ||
| Line 163: | Line 146: | ||
Enter the default values in the desired fields. | Enter the default values in the desired fields. | ||
| − | '''NOTE: '''All fields for which values have been entered here will automatically be pre-filled when adding commitments. However, the user can always change the values manually when entering a commitment. For more details concerning commitments, [[ProDon:Prospecting and Commitments Module|click here]]. | + | '''NOTE: '''All fields for which values have been entered here will automatically be pre-filled when adding new commitments. However, the user can always change the values manually when entering a commitment. For more details concerning commitments, [[ProDon:Prospecting and Commitments Module|click here]]. |
|} | |} | ||
| Line 169: | Line 152: | ||
== Configuring the Tabulation Order == | == Configuring the Tabulation Order == | ||
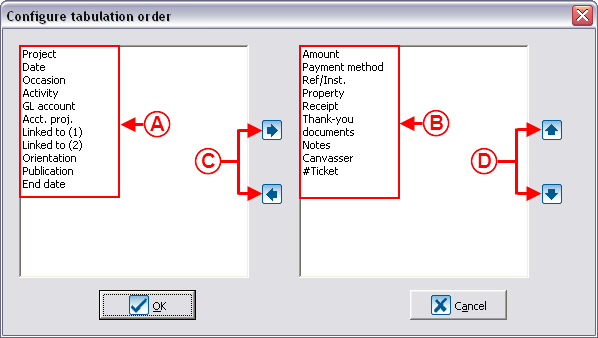
| − | It is possible to configure the tabulation order in the transaction window. This function allows to define the order in which the cursor moves from one field to the other while pressing the " TAB " key on the keyboard. By default, the cursor goes over every field. However, it is possible to have it go over only certain fields in a precise order. | + | It is possible to configure the tabulation order in the transaction window. This function allows to define the order in which the cursor moves from one field to the other while pressing the " TAB " key on the keyboard. By default, the cursor goes over every field. However, it is possible to have it go over only certain fields in a precise order. |
| − | |||
| − | |||
| − | |||
| − | |||
| + | To modify the tabulation order in the transaction window, follow the steps in the [[ProDon:Default Values#Default_Values_for_Transactions|" Default Values for Transactions "]] section.<br> | ||
{| cellspacing="1" cellpadding="1" border="1" style="width: 322px; height: 242px;" class="wikitable" | {| cellspacing="1" cellpadding="1" border="1" style="width: 322px; height: 242px;" class="wikitable" | ||
|- | |- | ||
| − | | [[ | + | | [[File:PRodon5 Default Values 010.png]] |
|- | |- | ||
| | | | ||
| − | In the "Default transaction values" window, click on the [[Image:Button 123.png]]. | + | In the " Default transaction values " window, click on the [[Image:Button 123.png]]. |
|} | |} | ||
Revision as of 09:16, 24 May 2018
| Default Values |
WARNING : This document is currently being edited/revised, it is possible that some parts are missing or obsolete.
Introduction
Default values allow the user to speed up high volume data entry.
There are three different types of default values in Prodon:
- Default values for transactions;
- Default values for clients;
- Default values for commitments (requires the " Prospecting and Commitments Module ").
Default values allow the user to configure data that will be filled automatically when adding clients, transactions or commitments. For example, the communication language " English " could be assigned each time a new client file is created. Another example of this would be if identical commitments are to be entered for several different clients, it is then possible to define the information that are common to all of these commitments. More specifically, if all the commitments start and end on the same dates, it is possible to ensure that Prodon remembers those dates, so the user would not have to enter them each time.
Furthermore, it is possible to establish a tabulation order when adding new transactions.
Configuring Default Values
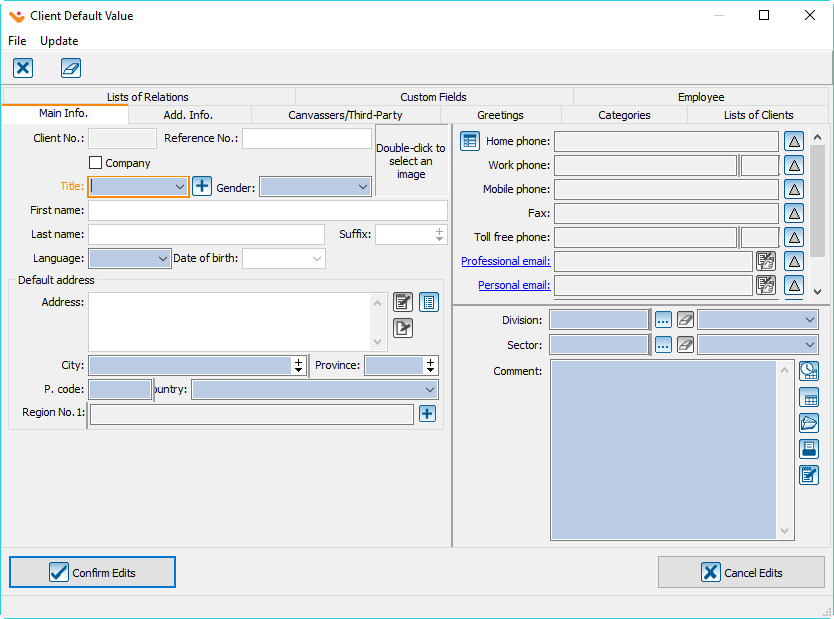
A " Default values " window appears as a blank window for the chosen type (clients, transactions, commitments). Therefore, if the " Clients " type is selected, a blank window identical to a new client window opens.
Default Values for Transactions
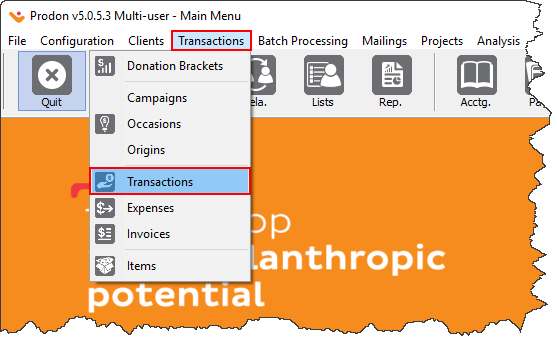
To configure the default values of a transaction addition window, go to " Transaction management ".
|
To do so, from the software's home page, click on the " Transactions " menu, then select " |
|
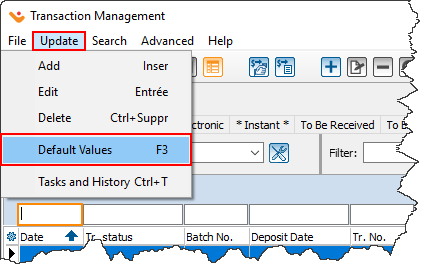
Then go to the configuration window of the default values.
|
To do so, click on the " Update " menu, then select " Default values F3 ". |
|
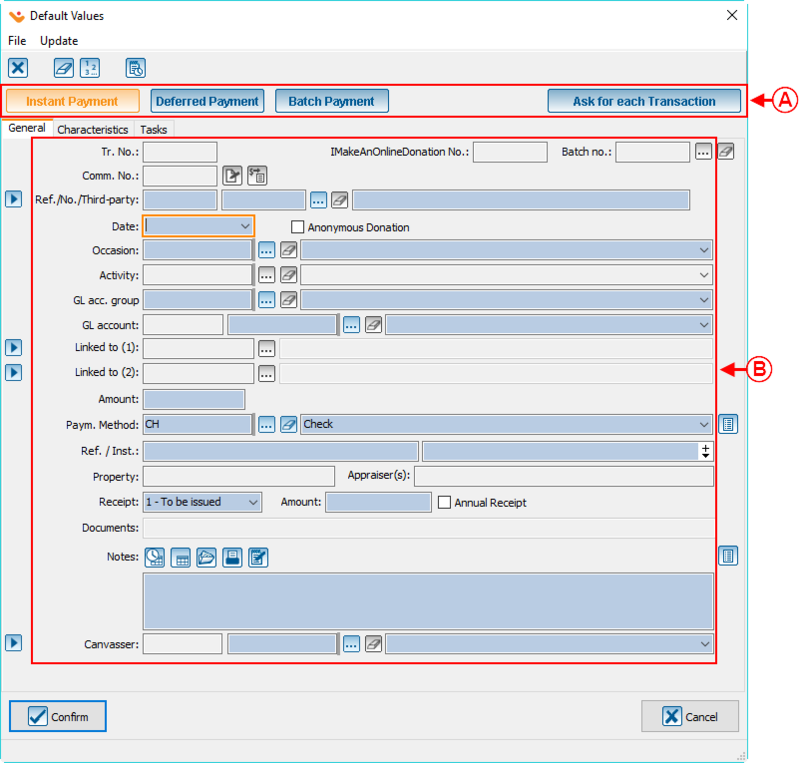
| After clicking on " Default values F3 ", this window opens. |
|
| A: If you select the option to ask for each transaction, it will ask you if you want to make an instant payment, deferred payment or batch payment. It is the default question asked for an electronic payment type. |
| B: The fields that are in blue are the fields available to insert default answer's when entering a new transaction. The user can decide which fields will be pre-filled. |
| NOTE : NOTE: All the fields for which values have been entered here will automatically be filled in when adding transactions. However, the user can always change the values manually from the transaction entry window. For more details concerning transactions, click here. To define a tabulation order when entering a transaction, click here. |
Default Values for Clients
To configure default values for the new client window, go to " Client management ".
|
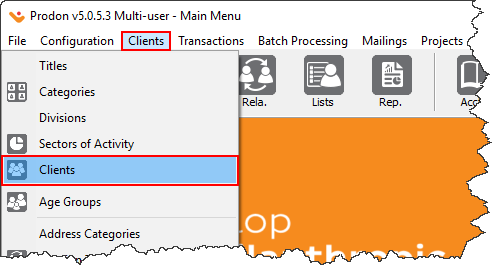
To do so, from the software's home page, click on the " Clients " menu, then select " |
|
Then go to the configuration of default values window.
|
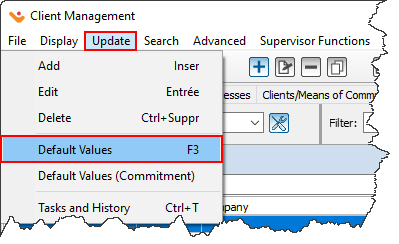
To do so, click on the " Update " menu, then select " Default values F3 ". |
 |
|
After clicking on " Default values F3 ", this window opens. |
|
|
Enter the default values in the desired fields. For instance, " English " as language of communication. NOTE: All fields for which values have been entered here will automatically be filled in when adding new clients. However, the user can always change the value manually when creating a new client. For more details concerning the addition of new clients, click here. |
Default Values for Commitments
To configure the default values for a new commitment, go to " Client management ".
NOTE: The " Prospecting and Commitments Module " must be activated for the following options to be accessible.
|
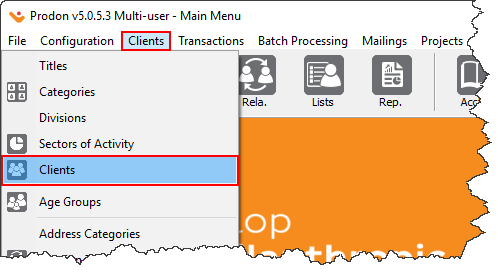
To do so, from the software's home page, click on the " Clients " menu, then select " |
|
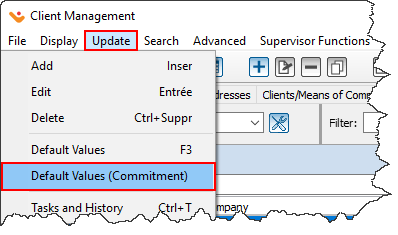
Then go to the default values configuration window.
|
To do so, click on the " Update " menu, then select " Default values (Commitment) ". |
|
|
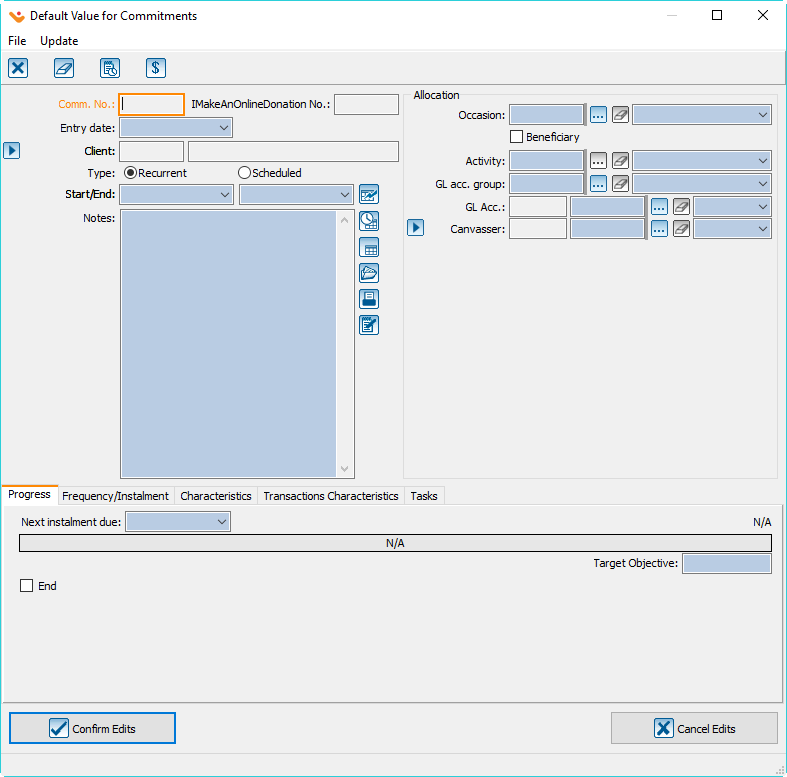
After clicking on " Default values (Commitment) ", this window opens. |
|
|
Enter the default values in the desired fields. NOTE: All fields for which values have been entered here will automatically be pre-filled when adding new commitments. However, the user can always change the values manually when entering a commitment. For more details concerning commitments, click here. |
Configuring the Tabulation Order
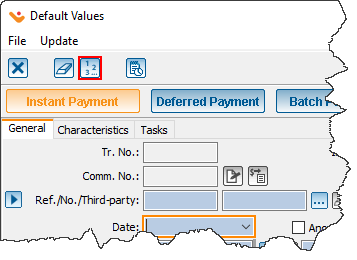
It is possible to configure the tabulation order in the transaction window. This function allows to define the order in which the cursor moves from one field to the other while pressing the " TAB " key on the keyboard. By default, the cursor goes over every field. However, it is possible to have it go over only certain fields in a precise order.
To modify the tabulation order in the transaction window, follow the steps in the " Default Values for Transactions " section.
|
|
In the " Default transaction values " window, click on the |
Document name: ProDon:Default Values
Version : 5.0.5.2
