Difference between revisions of "ProDon:Mailing History"
| Line 29: | Line 29: | ||
<br> | <br> | ||
| − | {| cellspacing="1" cellpadding="1" border="1 | + | {| cellspacing="1" cellpadding="1" border="1" style="width: 582px; height: 1291px;" class="wikitable" |
|- | |- | ||
| colspan="2" | | | colspan="2" | | ||
| Line 90: | Line 90: | ||
The mailing history can be used on an individual basis. | The mailing history can be used on an individual basis. | ||
| − | {| cellspacing="1" cellpadding="1" border="1 | + | {| cellspacing="1" cellpadding="1" border="1" style="width: 649px; height: 441px;" class="wikitable" |
|- | |- | ||
| colspan="2" | | | colspan="2" | | ||
| Line 115: | Line 115: | ||
<br> | <br> | ||
| − | {| cellspacing="1" cellpadding="1" border="1 | + | {| cellspacing="1" cellpadding="1" border="1" style="width: 528px; height: 988px;" class="wikitable" |
|- | |- | ||
| colspan="2" | | | colspan="2" | | ||
| Line 167: | Line 167: | ||
<br> | <br> | ||
| − | {| cellspacing="1" cellpadding="1" border="1" style="width: 448px; height: 564px; | + | {| cellspacing="1" cellpadding="1" border="1" class="wikitable" style="width: 448px; height: 564px;" |
|- | |- | ||
| [[Image:Mailing History 004.png]] | | [[Image:Mailing History 004.png]] | ||
| Line 235: | Line 235: | ||
|- | |- | ||
| − | | | + | | style="text-align: center;" colspan="2" | [[Image:Mailing History 008.png]]<br> |
|- | |- | ||
| width="50%" | | | width="50%" | | ||
| Line 283: | Line 283: | ||
The individual management of the mailing histories can be done in the client files.<br> | The individual management of the mailing histories can be done in the client files.<br> | ||
| − | {| cellspacing="1" cellpadding="1" border="1 | + | {| cellspacing="1" cellpadding="1" border="1" style="width: 450px; height: 466px;" class="wikitable" |
|- | |- | ||
| colspan="2" | | | colspan="2" | | ||
| Line 339: | Line 339: | ||
It is also possible to massively modify or delete mailing histories. This option is particularly useful if the mailing is not linked to transactions. | It is also possible to massively modify or delete mailing histories. This option is particularly useful if the mailing is not linked to transactions. | ||
| − | {| cellspacing="1" cellpadding="1" border="1 | + | {| cellspacing="1" cellpadding="1" border="1" style="width: 602px; height: 356px;" class="wikitable" |
|- | |- | ||
| | | | ||
| Line 352: | Line 352: | ||
<br> | <br> | ||
| − | {| cellspacing="1" cellpadding="1" border="1 | + | {| cellspacing="1" cellpadding="1" border="1" style="width: 520px; height: 602px;" class="wikitable" |
|- | |- | ||
| colspan="2" | | | colspan="2" | | ||
| Line 394: | Line 394: | ||
<br> | <br> | ||
| − | {{Footer_ProDon_Version|4.6.5. | + | {{Footer_ProDon_Version|4.6.5.9}}<br> |
Revision as of 12:31, 23 February 2016
Contents
[hide]Introduction
The "Mailing history" is a tool allowing you to keep track of the mailings sent to clients of the database.
The use of this tool allows you to:
- Document who received what and when;
- View and consult the mailing history per client from a client file;
- Quickly find the list of people who did not respond to a first invitation; to send them a reminder, second mailing, third mailing, etc.;
- Discover people's trends (the type of invitation people are interested in);
- Target and plan mailings according to the individual's preferences.
Specifically, this tool allows you to find out that a person always donates; for instance, in gastronomic activities, but never in golf tournaments; or that you have to send three notifications to get a response.
Moreover, this function allows you to assess the profitability of your actions by comparing the number of positive responses versus negative ones for all the mailings.
Configuration of Default Responses for the Mailing History
To be able to fully use the "Mailing history", you first need to configure the default responses to be entered in different situations. This configuration is mainly applied to mailing histories in relation to mail solicitation.
|
CAUTION: Usually, only the user "Supervisor" can access the "System preferences". From the software home page, click on the "Configuration" menu, then select "Preferences". The "Preferences" window opens, go to the "System preferences" tab, then select the "Mailings" tab. | |
 | |
|
NOTE: The drop-down lists of the A to F fields are dynamic, which means that it is possible to add new options to the list at all times. If an option is added in a list, it will automatically be added in the five others. Furthermore, the check boxes in H are exactly the same options as the ones of the dynamic drop-down lists. To know how the dynamic drop-down lists work, consult this procedure. For more information concerning the "Response" field that will be used in the upcoming examples, see letter A on the section "Consulting mailing histories from "Analysis and history"". | |
|
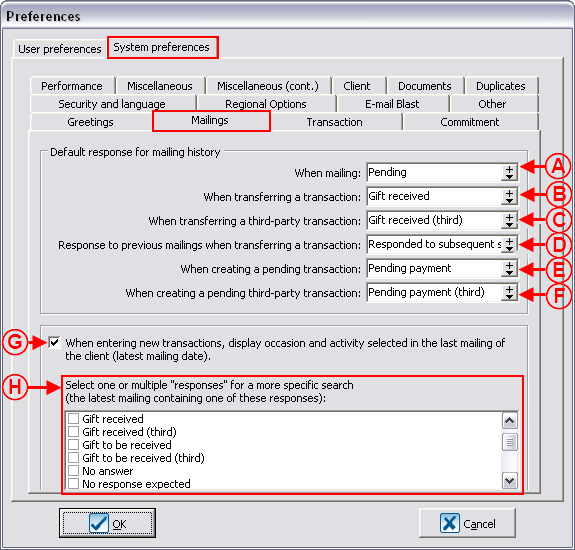
A: The comment "Pending" will automatically be entered in the "Response" field in the creation of the mailing history. |
B: The comment "Gift received" will automatically be entered in the "Response" field as soon as the transaction linked to the mailing is transferred. |
|
C: The comment "Gift received (third)" will automatically be entered in the "Response" field if the transferred transaction linked to the mailing is third. For more information concerning transactions third, click here. |
D: The comment "Responded to subsequent solicitation" is entered in the "Response" field when several solicitations have been made to the same client for the same activity of a donation occasion. For instance, at the third solicitation, the client decides to make a donation; the comment "Responded to subsequent solicitation" will be displayed in the "Response" field in the histories of the first and second mailing; then a mention of payment will be entered for the third mailing. |
|
E: The comment "Pending payment" will automatically be entered in the "Response" field if the transaction linked to the mailing is "To be received" or "To be paid". For more information concerning the transaction types, click here. |
F: The comment "Pending payment (third)" will automatically be entered in the "Response" field if the transaction linked to the mailing is third and if it is a transaction "To be recieved" or "To be paid". |
|
G: If this option is checked, the donation occasion and the activity selected in the last mailing documented in the client folder will automatically be entered during the entry of a new transaction. |
H: These options are available only if the option in G is checked and allow you to search a mailing by "Response". For instance, you want that when you enter your next transaction, the donation occasion and the activity of the last mailing having the reponse "Pending payment" are both entered automatically. |
Creating Mailing Histories
A mailing history can be created in three different ways:
- From the "Mailings" tab of a client file (for the creation of an individual mailing history);
- During the configuration of a "Mass Mailing" (for the creation of a massive mailing history);
- From the "Client management" (for an assignment of mailings to an active list).
Creating Individual Mailing Histories
The mailing history can be used on an individual basis.
|
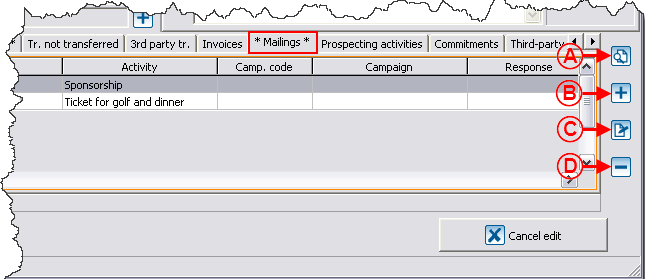
To individually add, remove or modify a mailing, open the client file, then go to the "Mailings" tab that is at the bottom of the file. | |
| |
|
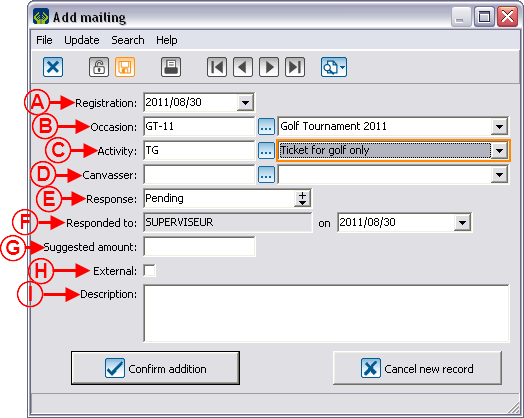
A: The |
|
|
D: The | |
Creating Mailing Histories from Mass Mailing
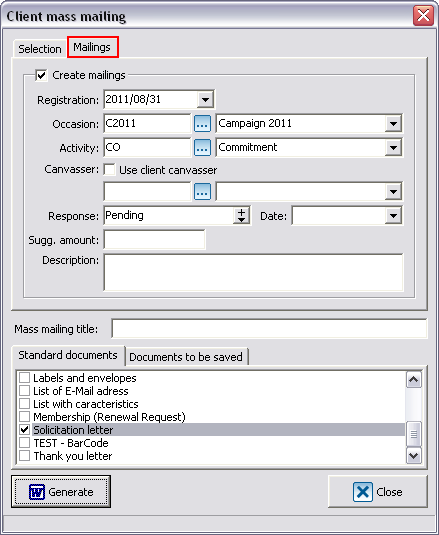
Each time a "Mass mailing" is done, it is possible to keep a history of it. To do so, you need to fill out the "Mailings" tab of the "Mass mailing" window. For more information concerning "Mass mailing", consult this procedure.
|
|
It is important to specify the elements to be entered in the "Mailing history" of the "Mailings" tab when configuring the "Mass mailing".
When the "Mailing history" is created, as soon as a transaction corresponding to the specified donation occasion is created, the response is updated according to the configuration of the mailing history. |
Mailing Assignment to an Active List
It is also possible to create a "Mailing history" for several clients at a time, but without generating "Mass mailing".
|
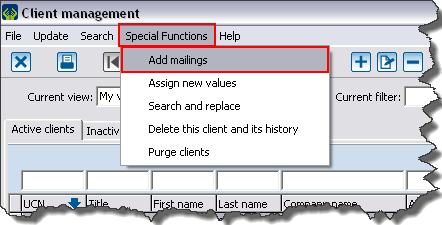
To do so, go to the "Client management", then search, using the search bar or a filter, the clients to whom this "mailing history" should be assigned. When the active list is ready, click on the "Special functions" menu, then select "Add mailings". |
 |
|
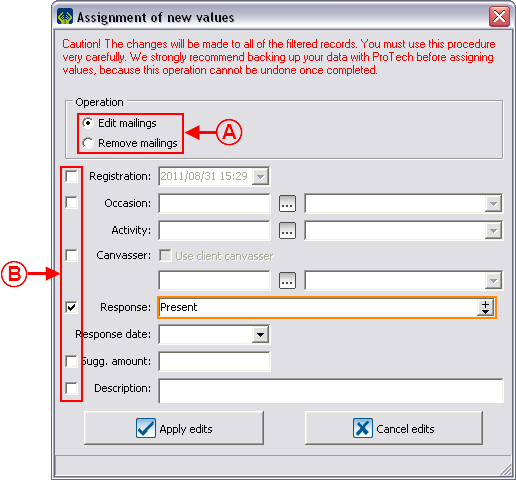
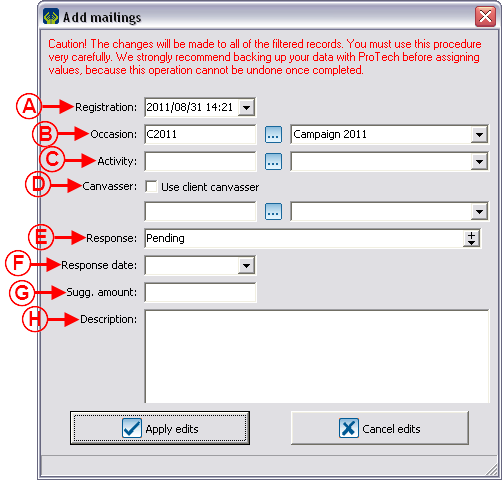
After clicking on "Add mailings", this window opens. | |
 | |
|
A: See letter A of the "Creating Individual Mailing Histories" section. |
B: See letter B of the "Creating Individual Mailing Histories" section. |
|
C: See letter C of the "Creating Individual Mailing Histories" section. |
D: See letter D of the "Creating Individual Mailing Histories" section. If the box is checked, the database will enter, in the mailing of each client, the canvasser assigned to him or her in the client file. |
|
E: See letter E of the "Creating Individual Mailing Histories" section. |
F: This field indicates the response date. This date is automatically updated when the response is modified. The date is modifiable nonetheless. |
|
G: See letter G of the "Creating Individual Mailing Histories" section. |
H: See letter I of the "Creating Individual Mailing Histories" section. |
Consulting Mailing Histories
It is possible to view the mailing histories in two ways:
- From a client file (for an individual consultation);
- From "Analysis and history" (for the massive consultation of mailing histories).
Consulting the Mailing Histories from a Client File
The individual management of the mailing histories can be done in the client files.
|
To view the elements of the "Mailing history" of a client in particular, open his or her file; then go to the "Mailings" tab that is at the bottom of the client file. | |

| |
|
B: It is the date when the "Mailing history" was modified, either because a transaction has been transferred, or because a "To be received" or "To be paid" transaction has been entered or simply because the "Mailing history" has been modified manually. The current date is automatically entered, but it is possible to modify it. For more information concerning the modification of mailing histories, click here. |
C: It is the person who modified the "Mailing history", either because he or she has transferred a transaction, or because a "To be received" or "To be paid" transaction has been entered or simply because he or she has modified the "Mailing history" manually. This field is not modifiable, the software automatically enters the name of the user who performed the modifications. For more information concerning the modification of the mailing histories, click here. |
Consulting the Mailing Histories from "Analysis and History"
"Analysis and history" allows you to view precise mailings (for example, the mailings of a donation occasion).
|
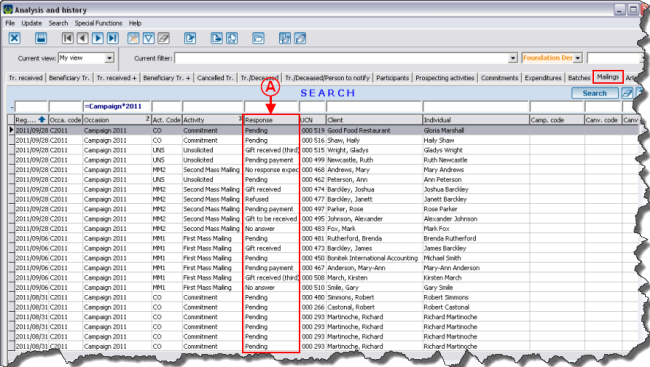
To view the "Mailing history" of all the clients of the database or of a selection of clients in particular, go to "Analysis and history"; then to the "Mailings" tab. |
|
|
A: The "Response" field indicates the status of the mailing. These responses can be modified either individually, massively, or in certain cases, automatically in the entry of a transaction. |
Modification of Mailing Histories
It is possible to modify the mailing histories from two different locations in the software:
- From a client file (for the individual modification of mailing histories);
- From "Analysis and history" (for the massive or individual modification of mailing histories).
Individual Modification of Mailing Histories
To individually modify a mailing history, follow the "Creating Individual Mailing Histories" procedure by using the ![]() button.
button.
Massive Modification of Mailing Histories
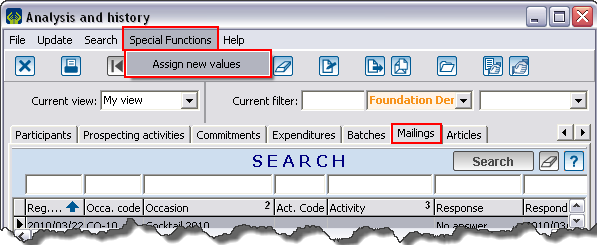
It is also possible to massively modify or delete mailing histories. This option is particularly useful if the mailing is not linked to transactions.
|
To do so, you need to go to "Analysis and history". Then search, using the search bar or a filter, the mailing histories that must be modified or deleted. When the active list is ready, click on the "Special functions" menu, then select "Assign new values". CAUTION: It is strongly recommended to save your data before a "Massive assignment". |
|
Creating a Recall List
It is also possible to create a customized list to find the clients meeting certain mailing criteria. For instance, to find all the clients who have not responded to the invitation for the Golf Tournament 2011, so that you can send them a second invitation. To know how to create a customized list on mailing criteria, click here.
Mailing Analyses
There are some reports related to the mailings:
- The "Response rate summary" report allows you to easily view the response rate to a particular mailing.
To use this report: From "Analysis and history", then go to the "Mailings" tab and click on the button that is at the top of the window.
- The "Revenue vs mailing history" report allows you to compare the revenues relevant to a mailing.
To use this report: From the software home page, click on the "Analysis" menu, then select "Reports".
- The "Return on investment" report, allows you to check whether a mailing was financially profitable or not.
To use this report: From the software home page, click on the "Analysis" menu, then select "Reports".
- The "Client with detailed history" report allows you to include the mailings.
To use this report: From the "Client management" click on the button, that is at the top of the window.
Moreover, all the mailings are in the "Mailings" tab of "Analysis and history" and from there, it is possible to export the entire mailings to Excel or to create an active list of the mailings to export.
Document name: ProDon:Mailing History
Version : 4.6.5.9
