Difference between revisions of "ProDon:Campaign Management"
| Line 54: | Line 54: | ||
|- | |- | ||
| colspan="2" | | | colspan="2" | | ||
| − | + | After clicking on the [[Image:Button add plus.png]] or [[Image:Button Edit.png]] button, the following window opens. | |
|- | |- | ||
| Line 60: | Line 60: | ||
|- | |- | ||
| width="50%" | | | width="50%" | | ||
| − | <span style="color: rgb(255, 0, 0);">'''A | + | <span style="color: rgb(255, 0, 0);">'''A:'''</span> Allows you to enter the campaign code.<br> |
| width="50%" | | | width="50%" | | ||
| − | <span style="color: rgb(255, 0, 0);">'''B | + | <span style="color: rgb(255, 0, 0);">'''B:'''</span> Allows you to name the campaign. |
|- | |- | ||
| width="50%" | | | width="50%" | | ||
| − | <span style="color: rgb(255, 0, 0);">'''C | + | <span style="color: rgb(255, 0, 0);">'''C:'''</span> It it is a beneficiary campaign, check this checkbox (only visible if the [[ProDon:Beneficiaries Module|"Beneficiaries module"]] is active in '''''ProDon'''''.) |
| width="50%" | | | width="50%" | | ||
| − | <span style="color: rgb(255, 0, 0);">'''D | + | <span style="color: rgb(255, 0, 0);">'''D:'''</span> Allows you to enter the objective of the campaign. To refresh this objective automatically so it is not the same the one at <span style="color: rgb(255, 0, 0);">'''G'''</span>, click on the [[Image:Refresh button.png]] button. |
|- | |- | ||
| width="50%" colspan="2" | | | width="50%" colspan="2" | | ||
| − | <span style="color: rgb(255, 0, 0);">'''E | + | <span style="color: rgb(255, 0, 0);">'''E: '''</span>This section allows you to select which donation occasions are part of the campaign. |
| − | + | To add a donation occasion to the list, click on the [[Image:Button add plus.png]] button, then see [[ProDon:Campaign Management#Selecting_the_Donation_Occasions_of_the_Campaign|this section]]. | |
| − | + | To remove a donation occasion from the list, select the one that must ne removed, then click on the [[Image:Button_Minus_remove_delete.png]] button. | |
|- | |- | ||
Revision as of 17:22, 18 February 2015
Contents
Introduction
Campaigns allow you to group donation occasions and set an objective for the selected donation occasions, over a given period.
The campaign management allows you to create the desired campaigns in the database.
Campaign Management
To add or modify campaigns, you must first go to the "Campaign management".
|
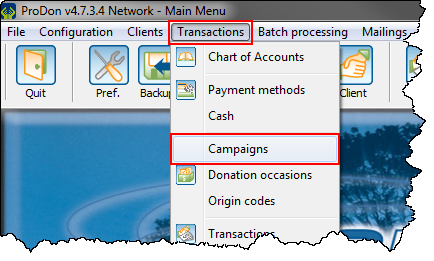
To do so, from the software's home page, click on the "Transactions" menu, then select "Campaigns". | |
|
|
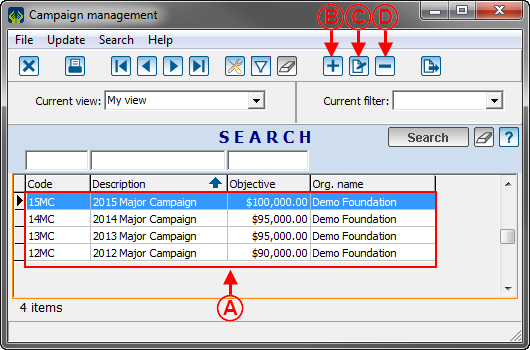
After clicking on "Campaigns", the following window opens. | |
| |
|
A: This is the list of all the existing campaigns in ProDon. |
B: The |
|
C: The |
D: The |
Adding / Editing a Campaign
|
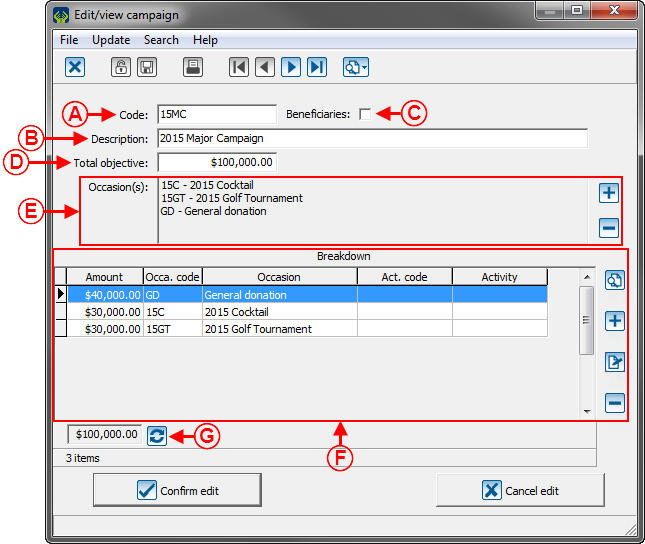
After clicking on the | |
 | |
|
A: Allows you to enter the campaign code. |
B: Allows you to name the campaign. |
|
C: It it is a beneficiary campaign, check this checkbox (only visible if the "Beneficiaries module" is active in ProDon.) |
D: Allows you to enter the objective of the campaign. To refresh this objective automatically so it is not the same the one at G, click on the |
|
E: This section allows you to select which donation occasions are part of the campaign. To add a donation occasion to the list, click on the To remove a donation occasion from the list, select the one that must ne removed, then click on the | |
|
F : Cette section permet de répartir l'objectif de la campagne à travers les différentes occasions et activités qui en font partie. Cette section est facultative. Pour ajouter un objectif pour une occasion ou pour une activité, cliquer sur Pour supprimer un des objectif de la liste, sélectionner l'objectif à supprimer, puis cliquer sur | |
|
G : Il s'agit du montant total des objectifs ajoutés en F. Le bouton File:Bouton actualiser.png permet de rafraîchir l'objectuf en D, afin qu'il soit le même que celui-ci. | |
Selecting the Donation Occasions of the Campaign
|
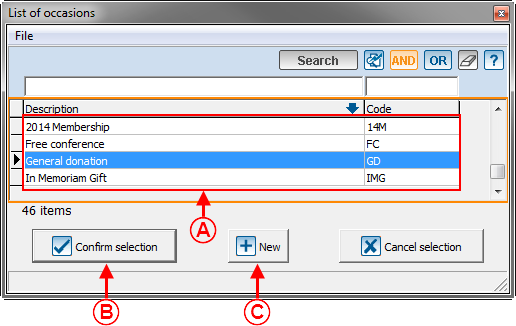
Après avoir cliqué sur le bouton | |
 | |
|
Si l'occasion de dons à ajouter à la campagne est déjà existante dans ProDon, la sélectionner en A, puis cliquer sur le bouton « Si l'occasion de dons à ajouter à la campagne n'existe pas dans ProDon, cliquer sur le bouton « Nouveau » en C, puis suivre les étapes du document « Gestion des occasions de dons », à partir de la section « Ajout/Modification d'une occasion de dons ». | |
|
NOTE : Il est également possible d'ajouter une occasion de dons à une campagne à partir de l'onglet « Autres » de la fenêtre d'ajout/modification d'une occasion de dons. |
Distribution of the Objective
Il est possible de répartir l'objectif total de la campagne par occasion de dons ou par activité.
Document name: ProDon:Campaign Management
