Difference between revisions of "ProDon:Validation and Transfer of a Transaction Batch"
| Line 31: | Line 31: | ||
|- | |- | ||
| width="50%" | | | width="50%" | | ||
| − | <span style="color: rgb(255, 0, 0);">'''C:'''</span> Click on the [[Image: | + | <span style="color: rgb(255, 0, 0);">'''C:'''</span> Click on the [[Image:Bouton reporter transaction.png]] button. |
| width="50%" | | | width="50%" | | ||
| Line 43: | Line 43: | ||
|- | |- | ||
| colspan="2" | | | colspan="2" | | ||
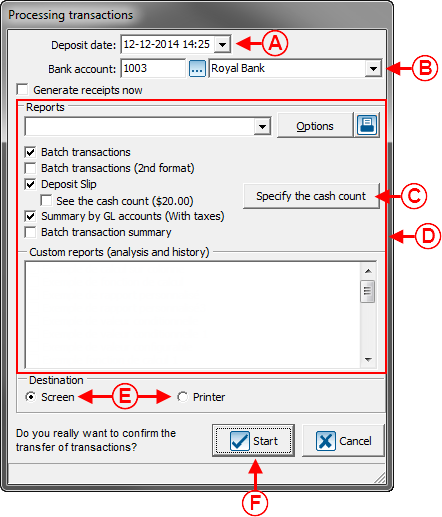
| − | After clicking on the [[Image: | + | After clicking on the [[Image:Button Transfer the transactions.png]] button, the following window opens.<br> |
|- | |- | ||
| Line 52: | Line 52: | ||
| width="50%" | | | width="50%" | | ||
| − | <span style="color: rgb(255, 0, 0);">'''B:'''</span> Click on the "[[Image: | + | <span style="color: rgb(255, 0, 0);">'''B:'''</span> Click on the "[[Image:Button Print Report.png]] Generate" button.<br> |
|} | |} | ||
| Line 61: | Line 61: | ||
|- | |- | ||
| colspan="2" | | | colspan="2" | | ||
| − | + | After clicking on the "[[Image:Button Print Report.png]] Generate" button, the following window opens.<br> | |
|- | |- | ||
| Line 67: | Line 67: | ||
|- | |- | ||
| width="50%" | | | width="50%" | | ||
| − | <span style="color: rgb(255, 0, 0);">'''A | + | <span style="color: rgb(255, 0, 0);">'''A:'''</span> Select the "Untransferred transactions" option. <br> |
| width="50%" | | | width="50%" | | ||
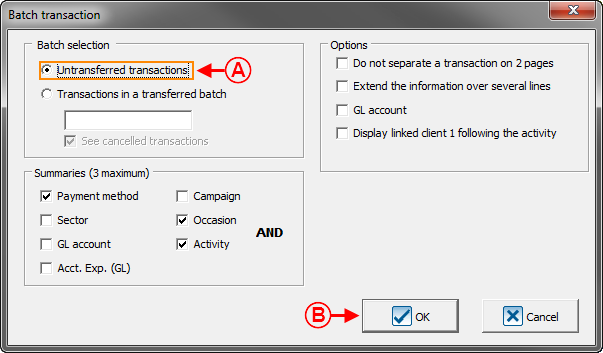
| − | <span style="color: rgb(255, 0, 0);">'''B | + | <span style="color: rgb(255, 0, 0);">'''B:'''</span> Click on the "[[Image:Button Check mark Confirm.png]] OK" button.<br> |
|} | |} | ||
| Line 79: | Line 79: | ||
|- | |- | ||
| colspan="2" | | | colspan="2" | | ||
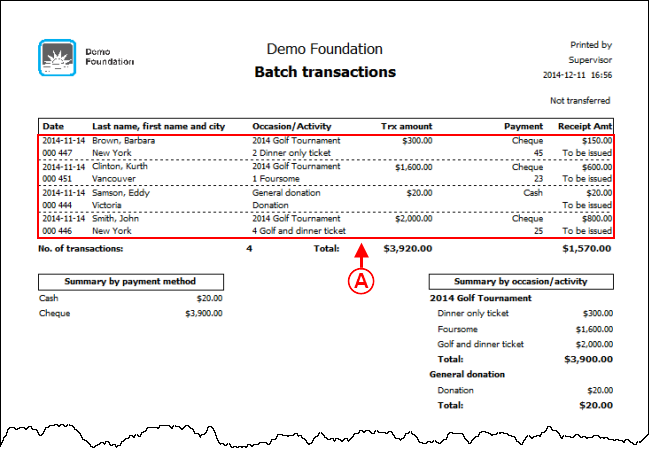
| − | + | After clicking on the "[[Image:Button Check mark Confirm.png]] OK" button, the report opens.<br> | |
|- | |- | ||
| Line 85: | Line 85: | ||
|- | |- | ||
| colspan="2" | | | colspan="2" | | ||
| − | <span style="color: rgb(255, 0, 0);">'''A | + | <span style="color: rgb(255, 0, 0);">'''A:'''</span> Validate each transaction to make sure there are no mistakes before transferring them.<br> |
|} | |} | ||
| − | + | If there are mistakes in the transactions, correct them prior to transferring the transaction batch. | |
| − | + | To correct a transaction, return to the [[ProDon:Transaction Logging#Transaction_Management|transaction management]], and double-click on the transaction to correct. <br> | |
<br> | <br> | ||
Revision as of 16:58, 18 February 2015
Introduction
Once all the transactions of a batch are entered, you must perform the transaction transfer. To learn how to enter transactions, see this document.
It is recommended to validate with a report, prior to transferring the transactions; in order to make sure there is no mistakes. To learn how to verify the batch before transferring it, click here.
Once the validation is made, the transaction transfer (deposit) can be made. To learn how to transfer transactions, click here.
Validation of the Transaction Batch
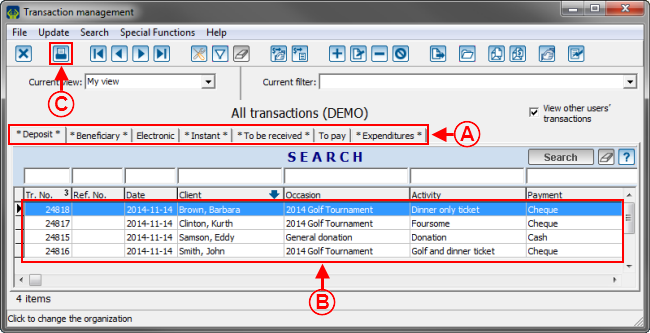
To validate a transaction batch before transferring it, go to the "Transaction management".
|
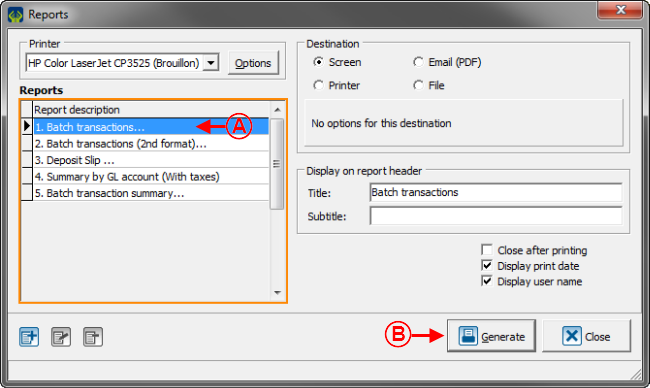
To make sure there are no mistakes in the transactions to transfer, generate a report of the transaction batch. | |
 | |
|
A: Go to the tab for which the transactions must be transferred. |
B: Conduct a search or apply a filter in order to only display the elements to transfer in the current list. |
|
NOTE: Under the "Deposit" tab, there are transactions by cheque, in cash, but also donations in goods and services. When transferring transactions by cheque or in cash, make sure the transactions of the donations in goods and services are not in the current list, and vice-versa. | |
 | |
|
A: Select the "1, Batch transactions..." report. |
|
|
After clicking on the " | |
 | |
|
A: Select the "Untransferred transactions" option. |
|
 | |
|
A: Validate each transaction to make sure there are no mistakes before transferring them. |
If there are mistakes in the transactions, correct them prior to transferring the transaction batch.
To correct a transaction, return to the transaction management, and double-click on the transaction to correct.
Transaction Transfer
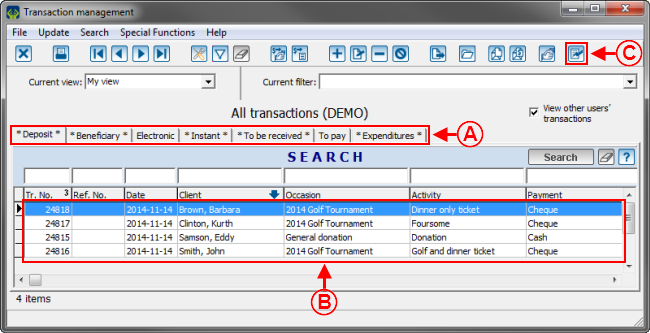
Une fois que les transactions sont vérifiées et qu'elles ne contiennent aucune erreur, reporter le lot de transactions.
 | |
|
A : Sélectionner l'onglet pour lequel des transactions doivent être reportées. |
B : Effectuer une recherche ou un filtre afin d'afficher dans la liste courante seulement les éléments à reporter. |
|
C : Cliquer sur le bouton File:Bouton Reporter Generer.png. |
NOTE : Il est impossible de reporter toutes les transactions de tous les onglets de la « Gestion des transactions » en même temps. Il faut donc reporter les transactions de chaque onglet un à la fois. |
Les transactions sont maintenant reportées, retirées de la liste courante de la gestion des transactions et transférées dans l'analyse et historique.
Après avoir reporté des transactions, ne pas oublier de générer les reçus et les documents reliés aux transactions reportées.
Pour plus de détails concernant le traitement des reçus à émettre, consulter ce document.
Pour plus de détails concernant le traitement des documents à émettre, consulter ce document.
Document name: ProDon:Validation and Transfer of a Transaction Batch
