Difference between revisions of "ProDon:Customized Lists"
| Line 21: | Line 21: | ||
<br> | <br> | ||
| − | Static lists remain the same and always contain the same clients (e.g. a list of people who received a particular letter), whereas a dynamic list is automatically modified by '''''ProDon''''' each time a client | + | Static lists remain the same and always contain the same clients (e.g. a list of people who received a particular letter), whereas a dynamic list is automatically modified by '''''ProDon''''' each time a client meets the requested criteria (e.g. all the clients who gave $1,000 or more in a lifetime). To be noted that dynamic lists are only available in the "Client management". |
<br> | <br> | ||
Revision as of 09:12, 21 August 2012
Contents
- 1 Introduction
- 2 Preparing the Active List
- 3 Creating Customized Lists
- 3.1 Static List (main window)
- 3.1.1 Customized Static List Criteria
- 3.1.1.1 All clients in the active list
- 3.1.1.2 All third-party clients of the active list
- 3.1.1.3 All clients in the active list that meet certain donation criteria
- 3.1.1.4 All clients in the active list that meet certain mailing criteria
- 3.1.1.5 All potential duplicate clients in the active list
- 3.1.1.6 All clients linked to a client in the active list that meet certain link criteria
- 3.1.1.7 Only the selected client
- 3.1.2 Static List / Adding a New List
- 3.1.3 Static List / Modifying an Existing List (Add or remove clients)
- 3.1.4 Static List / Renaming a List
- 3.1.5 Static List / Removing a List
- 3.1.1 Customized Static List Criteria
- 3.2 Dynamic List (main window)
- 3.1 Static List (main window)
- 4 Adding or Removing a Client from an Existing List (static or dynamic) from a Client File
- 5 Viewing / Filtering Customized Lists
Introduction
The customized list tool allows you to create client lists. Once created, these clients lists are saved and can be viewed again at will. They can also be combined with one another and can be modified or deleted if desired. Although it is possible to create lists somewhere else than in the "Client management", they still are client lists.
The ![]() button allows you to create a customized list and can be found in the following ProDon managements:
button allows you to create a customized list and can be found in the following ProDon managements:
- Client management
- Task and history management
- Analysis and history
- Receipts to be issued
- Documents to be issued
There are two types of customized lists: static lists and dynamic lists.
Static lists remain the same and always contain the same clients (e.g. a list of people who received a particular letter), whereas a dynamic list is automatically modified by ProDon each time a client meets the requested criteria (e.g. all the clients who gave $1,000 or more in a lifetime). To be noted that dynamic lists are only available in the "Client management".
Customized lists can be based on precise clients (e.g. all clients, potential duplicates, etc.) AND on different criteria as well. Therefore, a list is created with certain clients (or all clients) who meet certain criteria.
Preparing the Active List
As stated in the introduction, customized lists can be created from different ProDon managements. Although each management grid contains different elements (Client management = clients, Analysis and history = transactions, etc.), the outcome of a list will always be a client list.
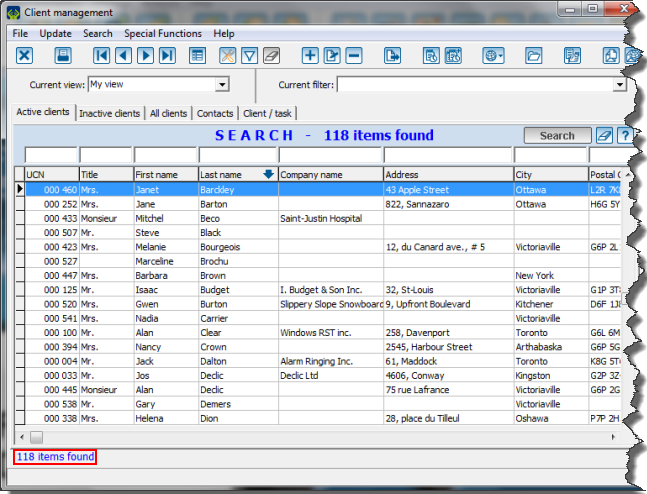
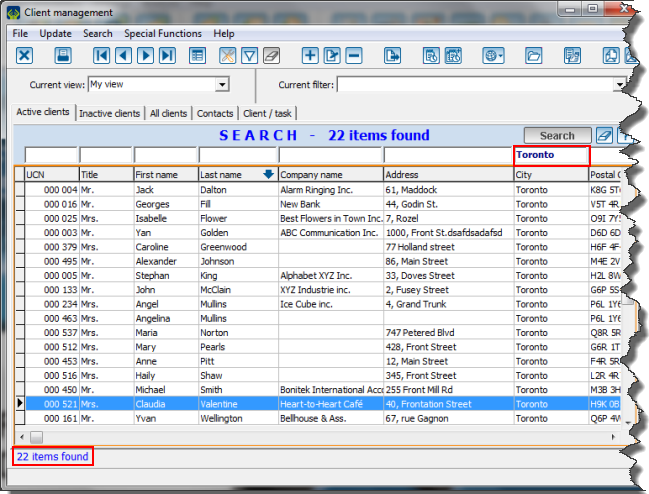
It is possible to create a customized list from all the elements of a management grid or from a created list using a search or a filter in order to isolate certain clients or a precise transaction batch, etc.
Creating Customized Lists
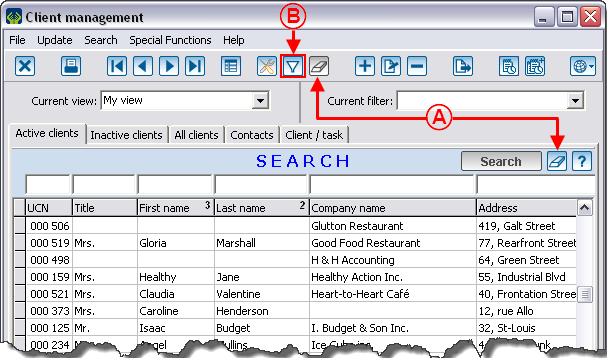
After configuring the active list in the chosen management, click on the ![]() button that is at the top of the window, in order to edit the criteria of the customized list.
button that is at the top of the window, in order to edit the criteria of the customized list.
In the "Client management", two options are available: "Static lists" and "Dynamic lists". In all other managements, only the option "Static lists" is available, so no other choices are offered.
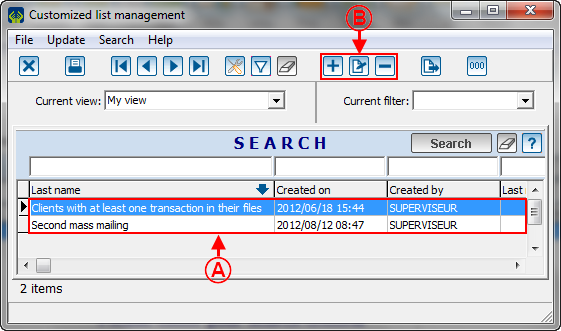
With the customized lists tool, it is possible to create, modify and remove lists. However, to be able to view them onscreen again or to combine lists together, see the "Viewing / Filtering Customized Lists" section.
Static List (main window)
Static lists remain the same and always contain the same clients. It is sometimes necessary that a list remains the same, for instance, people who received a particular letter for a specific occasion. This list has to be fixed and must not change.
|
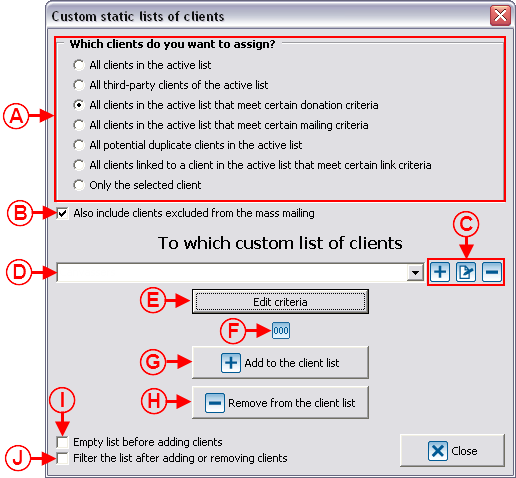
After clicking on the | |
| |
|
A: These are the choices of clients who could be assigned to a customized static list. For more details, see this section. |
B: By checking this box, the clients excluded from mass mailing who meet the selected criteria will be added to the list. |
|
C: The buttons |
D: These are the lists that have already been created. By clicking on the drop-down menu, all existing customized lists become available. To modify an existing list, select it, then follow the instructions of the "Static list/Modifying an existing list (Add or remove clients)" section. |
|
E: Allows you to edit the criteria for the customized list. The criteria to be edited will change based on the chosen criterion of the customized static list. |
F: Depending on the choice selected at A, this button will be visible or not. If it is visible, by clicking on it, the number of clients, in accordance with the chosen criteria, will be indicated. |
|
G: Always considering the criteria selected at A, this button allows you to add to an existing list the clients of the active list shown onscreen, OR allows you to add to an existing list the clients of the active list meeting the criteria edited in E, OR allows you to add to a new list the clients from the active list meeting the selected criteria. |
H: Always considering the criteria selected at A, this button allows you to remove from an existing list the clients of the active list shown onscreen, OR allows you to remove from an existing list the clients of the active list meeting the criteria edited in E. |
|
I: Allows you to empty the chosen existing list before adding the client(s) with the selected criteria. CAUTION: By clicking on G, this feature will erase the clients previously contained in this list and will modify it with the new corresponding client(s). |
J: Automatically displays onscreen the result of the modified list. NOTE: It is strongly recommended to leave this checkbox unchecked at all times not to lose the previous active list onscreen. To learn how to view or revise the customized lists onscreen, see this section. |
Customized Static List Criteria
There are seven types of customized static lists and each type contains different criteria. Here they are:
- All clients in the active list
- All third-party clients of the active list
- All clients in the active list that meet certain donation criteria
- All clients in the active list that meet certain mailing criteria
- All potential duplicate clients in the active list
- All clients linked to a client in the active list that meet certain link criteria
- Only the selected client
All clients in the active list
Allows you to include all the clients who are currently in the active list.
This type of customized list is useful if all the clients to be added or removed from a list are already isolated in the active list.
After choosing "All clients in the active list" at A, determine what must be done by following the instructions in the main window "Static list (main window)".
All third-party clients of the active list
Only available in some tabs of "Analysis and history", it allows you to extract all third-party clients registered in the transactions of the active list.
After choosing "All clients in the active list" at A, determine what must be done by following the instructions of the main window "Static list (main window)".
All clients in the active list that meet certain donation criteria
Allows you to include the clients of the active list who meet certain donation criteria.
|
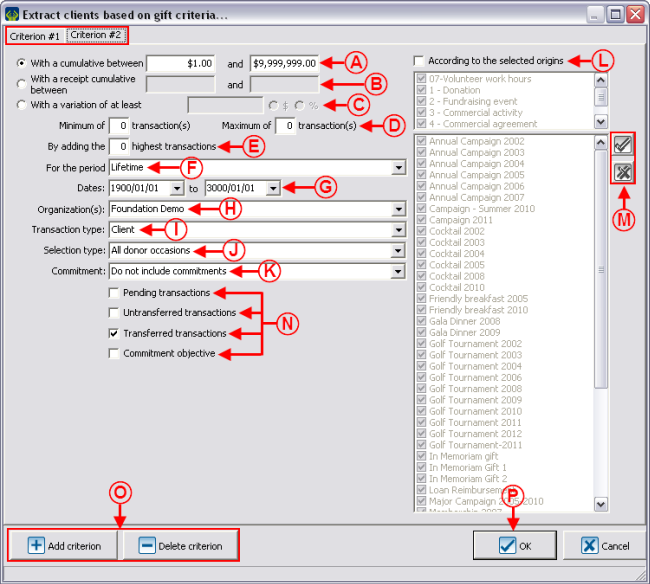
This window appears after selecting "All clients in the active list that meet certain donation criteria" at A determine what must be done at C, then click on the "Edit criteria" button at E. In this window, you must select the desired options in order to target clients in relation with a transaction history. | |
| |
|
CAUTION: Only the clients who are part of the active list created earlier and who meet all the criteria entered in this window will be found. | |
|
A: Allows you to base your search on a received amount of money. |
B: Allows you to base your search on an amount in relation with the receipts issued to the clients. |
|
C: This option is not available in the first criterion. It allows you to target a variation in relation to the previous criterion. For instance, if $50 were entered, the clients who gave $50 more or less in a donation occasion in comparison to another donation occasion or in a year in comparison to another year would have been found. |
D: Allows you to specify the number of instalments in order to reach the amount targeted at A or at B. For instance, if the amounts indicated at A had been $500 to $1,000 and that a minimum of 1 transaction and a maximum of 2 transactions would have been defined, a client who made 3 transactions of $200 could not be found. |
|
E: Allows you to base your search on the highest transactions in order to reach the amount targeted at A or at B. For instance, if the amounts indicated at A had been $500 to $1,000 and that only the 2 highest transactions of the clients would be considered, a client for whom the 2 highest transactions were $500 and $600 would not be found. |
F: Allows you to define the date interval (according to the periods created in ProDon) in which the transactions must have been made. |
|
G: Depending on the period selected in F, the dates will be modified automatically. It is also possible to define the dates manually, in that event, the F field becomes empty and ProDon will refer to the dates entered here. |
H: Allows you to choose for which organization the transactions have been made. NOTE: This option is available only if the Multi-organization Module is active. |
|
I: Allows you to select the type of transaction among three choices "Client", "Third-party client" or "Client and third-party client". |
J: Allows you to decide whether the search should be based on all the transactions or if it should be based on particular donation occasions, campaigns or activities. |
|
K: Allows you to include or not the commitments. NOTE: This option is only available when the Prospecting and Commitments Module is active. |
L: Allows you to base the search on origin codes. |
|
M: Depending on the type of selection chosen at J, the |
N: These 4 checkboxes allow you to choose the type of transactions to include in the search. |
|
O: The buttons " |
|
|
NOTE: For points D and E, the "0" indicates that the box should not be considered. Therefore, if "0" is entered at D, this field will not be considered. At E, for instance, if the minimum is "2", but there is no maximum, you must enter "0" as maximum and if the maximum is "10" but there is no minimum, you must enter "0" as minimum. | |
After clicking on "![]() OK", ProDon will go back to the main menu screen. To pursue with the customized list, see points F, G, H, I and J of the "Static List (main window)" section.
OK", ProDon will go back to the main menu screen. To pursue with the customized list, see points F, G, H, I and J of the "Static List (main window)" section.
All clients in the active list that meet certain mailing criteria
Allows you to include the clients of the active list who meet certain mailing criteria.
A list by mailing criterion mainly allows you to find all the clients who have not responded following a mailing, in order to solicit them again. This type of list is also useful to find the clients who responded positively, or to find the clients who have not received a mailing.
To use the customized list of the clients meeting certain mailing criteria, it is important that mailing histories have been adequately documented in the database. To learn how to use the mailing history, see this document.
|
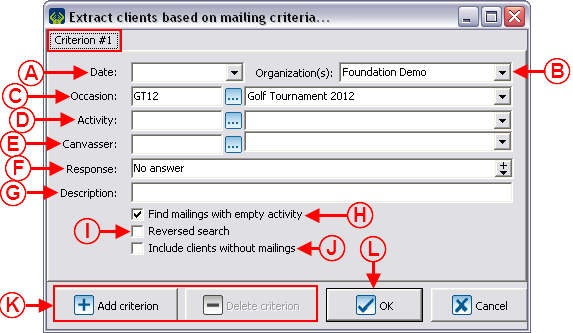
This window opens after selecting "All clients in the active list that meet certain mailing criteria" at A, determine what must be done at C, then click on the "Edit criteria" button at E. In this window, you must select the desired options in order to target clients by mailing history report. | |
| |
|
CAUTION: Only the clients who are part of the active list created earlier and meeting the criteria entered in this window will be found. | |
|
A: Enter the date when the mailing was done. If no date is to be considered for the search, simply leave this space blank. |
B: Select the organization for which the mailing was done. NOTE: This option is available only if the Multi-organization Module is active in the database. |
|
C: Select the donation occasion for which the maling was done. If no donation occasion is to be considered, simply leave this box empty. |
D: Select the activity for which the mailing was done. If no activity is to be considered for the search, simply leave this box empty. |
|
E: Enter the canvasser of the mailing, if desired. |
F: Select the "response value" of the mailing history to be considered for the search according to the configuration of default responses. In this example, "No answer" means that I want to search the clients to whom I have sent a solicitation, but from whom I did not get any response; all this with the purpose of sending a second mailing. |
|
G: Enter the description of the mailing that was sent, if desired. |
H: Allows you to search the mailings for which no activity has been specified. NOTE: If D is blank and that this box is not checked, the mailings for which no activity had been specified and the mailings for which any activity had been specified will be found. If D is blank and that this box is checked, only the mailings with no activity specified will be found. |
|
I: The reversed search allows you to find all the clients who do not meet all the entered criteria. |
J: This option allows you to include, in addition to the clients who meet the edited criteria, all the clients with no mailings documented. |
|
K: The buttons " |
|
After clicking on "![]() OK", ProDon will go back to the main menu screen. To pursue with the customized list, see points F, G, H, I and J of the "Static List (main window)" section.
OK", ProDon will go back to the main menu screen. To pursue with the customized list, see points F, G, H, I and J of the "Static List (main window)" section.
All potential duplicate clients in the active list
Allows you to find the clients who potentially appear more than once in the database of an active list.
There is a duplicate when there is more than one client file for the same client.
To learn how to use this type of customized list, see the "Searching and Eliminating Duplicates" procedure.
All clients linked to a client in the active list that meet certain link criteria
Allows you to include the clients of the active list corresponding to certain types of links/relations between client files.
A list by link/relation criteria is used to find all the clients linked to one of the clients of the active list. For example, if the active list consists of five client files of schools in which exist links to students, it would be possible to find all students from any of the five schools. Or, if the active list consists of all the students' client files of one school, in which exist the links to their parents, it would be possible to find all the students' parents of the school.
To use the type of customized list by link criterion, all the links/relations must have been documented in the database. To learn how to add contacts linked to client files, see the "Contacts and Links" document.
|
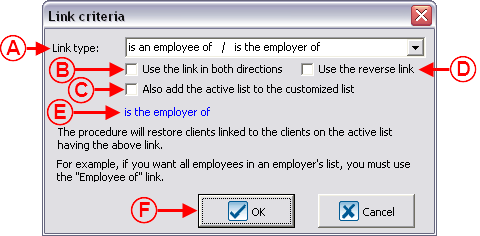
This window opens after selecting "All clients in the active list that meet certain link criteria" at A, determine what must be done at C, then click on the "Edit criteria" button at E. | |
| |
|
A: Allows you to indicate the type of link to search. |
B: Allows you to use the link in both directions. In this example, the employees or employers linked to client files of the active list would be found. |
|
C: Allows you to add to the customized list, the clients of the active list, in addition to the clients meeting the entered criteria. |
D: Allows you to use the reverse link. In this example, the employees linked to the client files of the active list would be found rather than their employers. |
|
E: Indicates the result of the search of the link that will be found. |
|
|
NOTE: The statement at E changes, if the options at B or D are checked. | |
After clicking on "![]() OK", ProDon will go back to the main screen. To continue the customized list, see points F, G, H, I and J of the "Static List (main window)" section.
OK", ProDon will go back to the main screen. To continue the customized list, see points F, G, H, I and J of the "Static List (main window)" section.
Only the selected client
Allows you to only include the client of the active list who is selected.
This type of customized list is useful if only one client has to be added or removed from an existing customized list, or if a new list to which it will be necessary to add clients one by one has to be created.
However, to add or remove clients individually, it is preferable to proceed directly from the client file.
To learn how to add or remove a client in a customized list from the client file, see this section.
Static List / Adding a New List
To create a new customized static list, go to the management proper to the type of list to be created (client management, analysis and history, etc.), then prepare the active list of the clients who must be in the new customized static list. Once the active list is created, click on the ![]() button, which is at the top of the window, then select "Static list".
button, which is at the top of the window, then select "Static list".
|
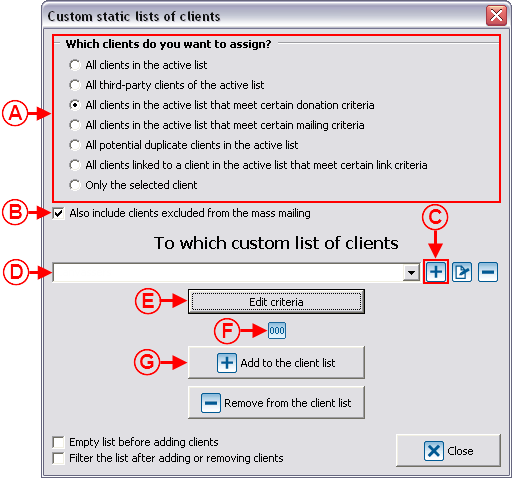
After clicking on "Static list", this window opens. | |
| |
|
A: Select the desired option. For more details, see point A of the "Static List (main window)" section. |
B: Choose to check the box or not. For more details, see point B of the "Static List (main window)" section. |
|
NOTE: A window opens, to learn how to fill it in, click here. |
D: After clicking on the " |
|
E: Click on this button to edit the criteria of the new customized list. For more details, see point E of the "Static List (main window)" section. |
F: Depending on the choice selected at A, this button will be visible or not. If it is visible, by clicking on it, the number of clients to be added to the list will be indicated. |
|
G: Once steps A, B, C, D and E are completed, click on " |
NOTE: To see the new customized list onscreen, see the "Viewing/Filtering Customized Lists" section. |
|
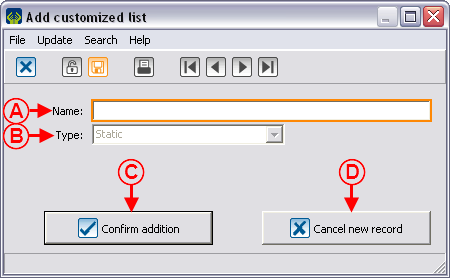
After clicking on the | |
| |
|
A: Name the new customized list. NOTE: The name given here must be meaningful since this list will be saved for future consultation. |
B: It is not possible to modify the list type from this window. |
|
D: Click on " | |
|
After clicking on " | |
Static List / Modifying an Existing List (Add or remove clients)
To modify an existing customized static list, go to the proper management (client management, analysis and history, etc.) in order to find the list to be modified, then prepare the active list of clients who have to be added or removed from the existing list. Once the active list is created, click on the ![]() button, that is at the top of the window, then select "Static list".
button, that is at the top of the window, then select "Static list".
|
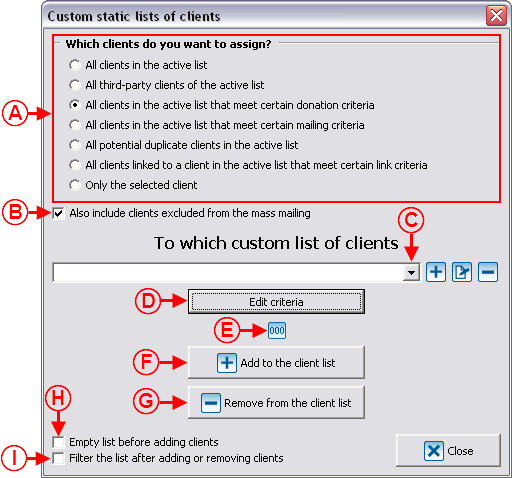
After clicking on "Static list", this window opens. | |
| |
|
A: Select the desired option. For more details, see point A of the "Static list (main window)" section. |
B: Choose to check the box or not. For more details, see point B of the "Static list (main window)" section. |
|
C: Using the drop-down list, select the customized list in which the clients should be added or removed. |
D: Click on this button to edit the criteria of the customized list chosen at C. For more details, see point E of the "Static list (main window)" section. |
|
E: Depending on the option selected at A, this button will be visible or not. If it is visible, by clicking on it, the number of clients who will be added or removed from the list will be indicated. |
F: To modify the customized list by adding clients, once steps A, B, C and D are completed, click on " CAUTION: The list will henceforth comprise the clients who were already part of the list AND the clients meeting the edited criteria.
|
|
G: To modify the customized list by removing clients, once steps A, B, C and D are completed, click on " CAUTION: The list will henceforth comprise the clients who were part of the list MINUS the clients meeting the edited criteria. |
H: Allows you to empty the existing list chosen prior to adding the client(s) with the selected criteria, or being in the active list. CAUTION: By clicking on F, this feature will erase the clients previously contained in this list and will modify it with the new corresponding client(s). |
|
I: Automatically displays onscreen the result of the modified list. NOTE: It is strongly recommended to leave this box unchecked at all times not to lose the previous active list onscreen. To learn how to consult or see the customized lists onscreen again, see this section. |
NOTE: To learn how to consult or see the customized lists onscreen again, see the "Viewing/Filtering Customized Lists". |
Static List / Renaming a List
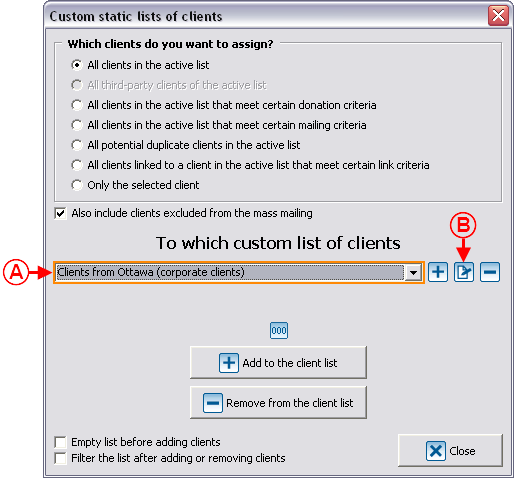
To rename a customized static list, go to the proper management (client management, analysis and history, etc.) in order to find the list to be renamed, then click on the ![]() button that is at the top of the window.
button that is at the top of the window.
 | |
|
A: Using the drop-down list, select the customized list to be renamed. |
B: After selecting the customized static list to be renamed, click on the |
 | |
|
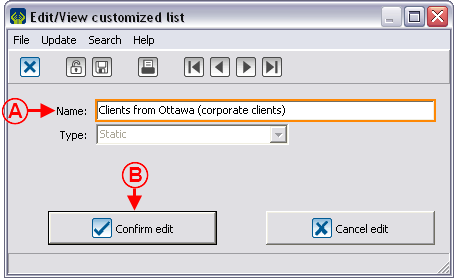
A: Enter the new name in the "Name" field. |
B: Click on the " |
Static List / Removing a List
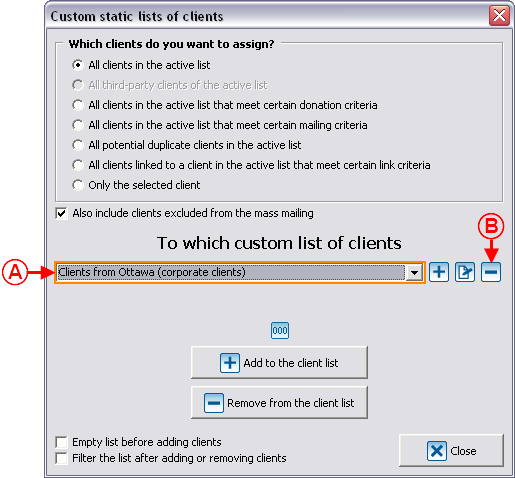
To delete a customized static list for good, go to the proper management (client management, analysis and history, etc.) in order to find the list to be removed, then click on the ![]() button that is at the top of the window.
button that is at the top of the window.
| |
|
A: Using the drop-down list, select the customized list to be deleted. |
B: After selecting the customized static list to be deleted, click on the |
|
|
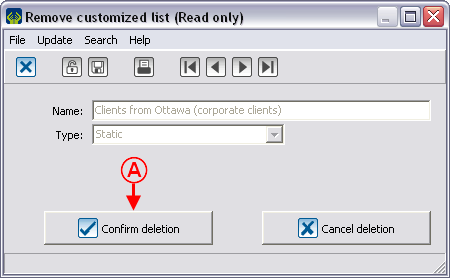
A: To delete the list that is found in the "Name" field for good, click on the " |
Dynamic List (main window)
A dynamic list, as opposed to a static list, keeps itself updated. Upon each viewing, all the clients it contains correspond exactly to the criteria specified in the creation of the list. Moreover, only the mailing or the gift criteria can be used for the dynamic lists.
NOTE: The dynamic lists are only available in the "Client management".
CAUTION: Contrary to static lists, dynamic lists are not based on the active list onscreen. The clients found during the configuration of a dynamic list are all the clients in the database meeting the edited criteria.
Dynamic List / Adding a New List
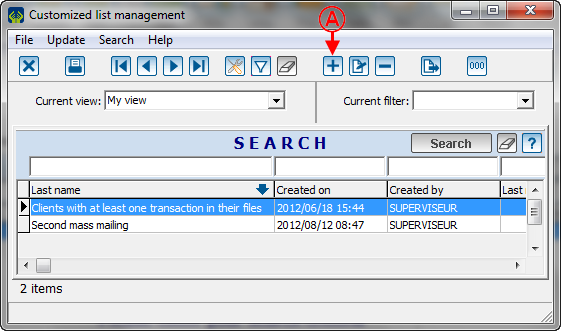
To create a new customized dynamic list , go to the "Client management", click on the ![]() button, that is at the top of the window, then select the "Dynamic list" option.
button, that is at the top of the window, then select the "Dynamic list" option.
|
After clicking on "Dynamic list", this window opens. |
|
|
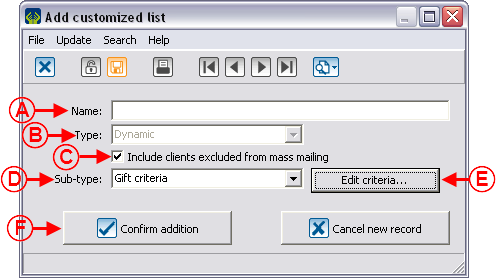
After clicking on the | |
| |
|
A: Name the new customized list. NOTE: The name given here must be meaningful since this list will be saved for future consultation. |
B: It is not possible to modify the type of list from this window. |
|
C: By checking this box, the clients excluded from mass mailing and who meet the criteria will be added to the list. |
D: Allows you to select the sub-type of customized list. NOTE: There are only two choices with regards to dynamic lists: "Gift criteria" and "Mailing criteria". |
|
E: Allows you to edit the criteria of the customized dynamic list. The criteria to be edited will change based on the chosen sub-type of customized dynamic list. |
F: By clicking on the " |
|
NOTE: To see the list onscreen, see the "Viewing/Filtering Customized Lists" section. | |
Types of Customized Dynamic Lists
There are two types of customized dynamic lists and each contains different criteria.
Here are the two types:
Gift criteria
Allow you to include all the clients of the database who meet certain gift criteria.
NOTE: Contrary to the static lists, in dynamic lists, the criteria are not based on the active list, but rather on all the clients of the database.
|
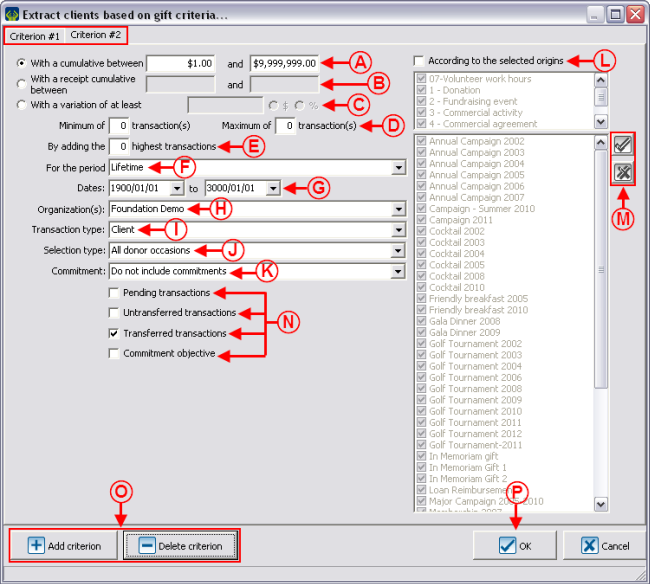
This window opens after choosing the "Gift criteria" at D, then click on the "Edit criteria" at E. In this window, you must select the desired options in order to target the clients based on their transaction history. | |
 | |
|
CAUTION: All clients of the database meeting the criteria entered in this window will be found. | |
|
A: Allows you to base a search on a received amount of money. |
B: Allows you to base the search on an amount in relation to the receipts issued to clients. |
|
C: This option is not available in the first criterion. It allows you to target a variation in relation to the previous criterion. For instance, if $50 were entered, the clients who gave $50 more or less in a donation occasion in comparison with another donation occasion or in a year compared to another year will be found. |
D: Allows you to define the number of instalments to reach the amount targeted at A and B. For instance, if the amounts indicated at A were $500 to $1,000 and a minimum of two transactions had been defined, a client who made three transactions of $200 would not be found. |
|
E: Allows you to base a search on the higest transactions to reach the amount targeted at A or B. For instance, if the amounts indicated at A had been $500 to $1,000 and that only the two highest transactions of clients would have been considered, a client for whom the two highest transactions are $500 and $600 would not be found. |
F: Allows you to define the date interval (according to periods created in ProDon) in which the transactions must have been made. |
|
G: Depending on the period selected at F, the dates will automatically be modified. It is also possible to define the dates manually, in this case, the F field becomes empty and ProDon will only consider the dates entered here. |
H: Allows you to decide for which organization the transactions must be made. NOTE: This option is available only if the Multi-organization Module is active. |
|
I: Allows you to select the type of transaction between "Client", "Third-party client" or "Client and third-party client". |
J: Allows you to decide if the search should be based on all the transactions or if it needs to be based on particular donation occasions, campaigns or activities. |
|
K: Allows you to include the commitments or not. |
L: Allows you to base a search on origin code(s). |
|
M: Depending on of the type of selection chosen at J, the buttons |
N: These four checkboxes allow you to choose the type of transactions to be included in the search. |
|
O: The buttons " |
|
|
NOTE: For points D and E, the "0" indicates that the box must be ignored. Therefore, if "0" is entered at D, this field will not be considered. At E, for example, if the minimum is "2", but there is no maximum, you have to enter a maximum of "0" and if the maximum is "10", but there is no minimum, you have to enter a minimum of "0". | |
After clicking on "![]() OK", ProDon will go back to the Customized list management screen.
OK", ProDon will go back to the Customized list management screen.
To see the dynamic list onscreen, see the "Viewing/Filtering Customized Lists" section.
Mailing criteria
Allow you to include all the clients of the database who meet certain mailing criteria.
A list by mailing criteria mainly allows you to find the clients who have not responded following a mailing, in order to solicit them again. This type of list is also useful to find the clients who have responded positively, or to find the clients who have not received the mailing.
To use the customized list of the clients meeting certain mailing criteria, it is important that the mailing histories have been documented adequately in the database. To learn how to use the mailing history, see this document.
NOTE: Contrary to the static lists, as far as the dynamic lists are concerned, the criteria are not based on the active list, but rather on all the clients of the database.
|
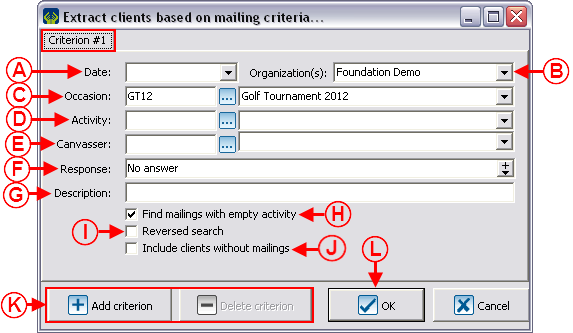
This window appears after selecting "Mailing criteria" at D, then click on the "Edit criteria" button at E. In this window, you must select the desired options in order to target the clients based on their mailing history. | |
 | |
|
CAUTION: All the clients of the database meeting the criteria entered in this window will be found. | |
|
A: Enter the date when the mailing was sent. If no date is to be considered for the search, simply leave this box empty. |
B: Select the organization for which the mailing has been sent. NOTE: This option is available only if the Multi-organization Module is active in the database. |
|
C: Select the donation occasion for which the mailing has been sent. If no donation occasion is to be considered for the search, simply leave this box empty. |
D: Select the activity for which the mailing has been sent. If no activity is to be considered for the search, simply leave this box empty. |
|
E: Enter the canvasser for the mailing, if desired. |
F: Choose the "response value" of the mailing history to be considered for the search in accordance with the configuration of the default responses. In this example, "No answer" means that I want to search the clients to whom I have sent a solicitation, but from whom I did not receive any response, so that I can send them another solicitation. |
|
G: Enter the description of the mailing that has been sent, if desired. |
H: Allows you to search the mailings for which no activity was specified. NOTE: If D is empty and that this box is not checked, the mailings for which no activity had been specified and the mailings for which any activity had been specified will be found. If D is empty and that this box is checked, only the mailings with no activity specified will be found. |
|
I: The reversed search allows you to find all the clients who do not meet all the entered criteria. |
J: This option allows you to include, in addition to the clients meeting the edited criteria, all the clients with no mailings documented. |
|
K: The buttons " |
|
After clicking on "![]() OK", ProDon will go back to the Customized list management screen.
OK", ProDon will go back to the Customized list management screen.
To see the list onscreen, see the "Viewing/Filtering Customized Lists" section.
Dynamic List / Modifying Criteria from an Existing List
To modify an existing customized dynamic list, go to the "Client management", click on the ![]() at the top of the window, then select the "Dynamic list" option.
at the top of the window, then select the "Dynamic list" option.
|
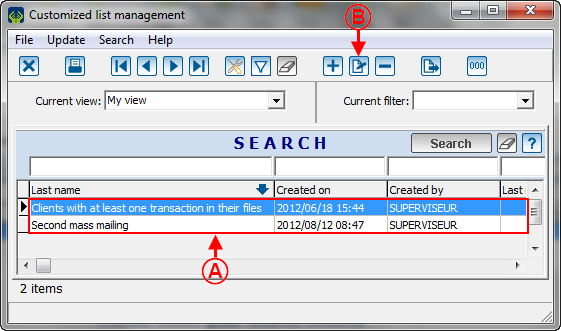
After clicking on "Dynamic lists", this window opens. | |
 | |
|
A: Select the customized list to be modified. |
B: After selecting the customized dynamic list to be modified, click on the |
| |
|
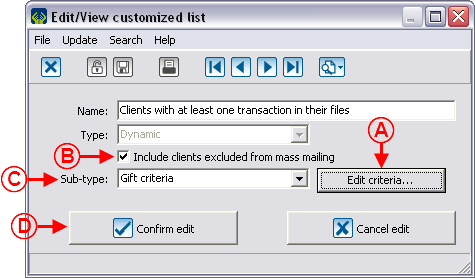
A: Click on the "Edit criteria" button to modify the gift criteria or the mailing criteria. |
B: It is possible to check or uncheck the "Include clients excluded from mass mailing" box. |
|
C: It is possible to modify the sub-type of the customized dynamic list, and the criteria at A. |
D: To save the new edited criteria, click on the " |
|
NOTE: To see the modified list onscreen, see the "Viewing/Filtering Customized Lists" section. | |
Dynamic List / Renaming a List
To rename an existing customized dynamic list, go to "Client management", click on the ![]() button at the top of the window, then click the "Dynamic lists" option.
button at the top of the window, then click the "Dynamic lists" option.
|
After clicking on "Dynamic lists", this window opens. | |

| |
|
A: Select the customized list to be renamed. |
B: After selecting the customized dynamic list to be renamed, click on the |
| |
|
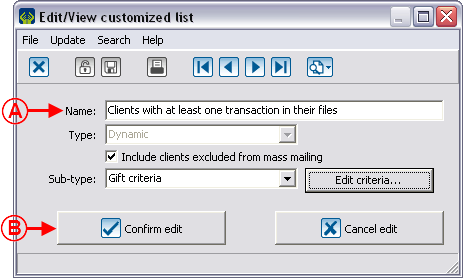
A: Enter the new name in the "Name" field. |
|
|
NOTE: To see the renamed list onscreen, see the "Viewing/Filtering Customized Lists" section. | |
Dynamic List / Removing a List
To delete a customized dynamic list for good, go to the "Client management", click on the ![]() button at the top of the window, then select the "Dynamic lists" option.
button at the top of the window, then select the "Dynamic lists" option.
|
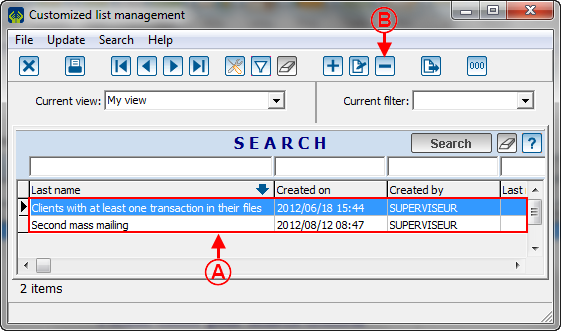
After clicking on "Dynamic lists", this window opens. | |
 | |
|
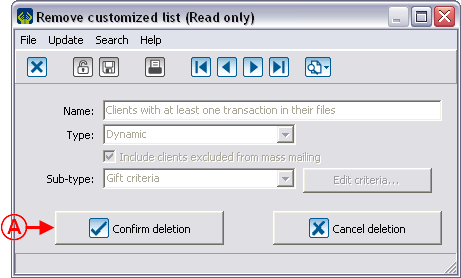
A: Select the customized list to be deleted. |
B: After selecting the customized dynamic list to be deleted, click on the |
|
|
A: To delete the list that is in the "Name" field for good, click on the " |
Adding or Removing a Client from an Existing List (static or dynamic) from a Client File
To add clients to the customized lists on a case by case basis, it is preferable and faster to do it from their client files.
Viewing / Filtering Customized Lists
To view a customized list, you must apply a filter.
First go to the proper management (client management, analysis and history, etc.) to find the list to be viewed.
|
After clicking on the | |
| |
|
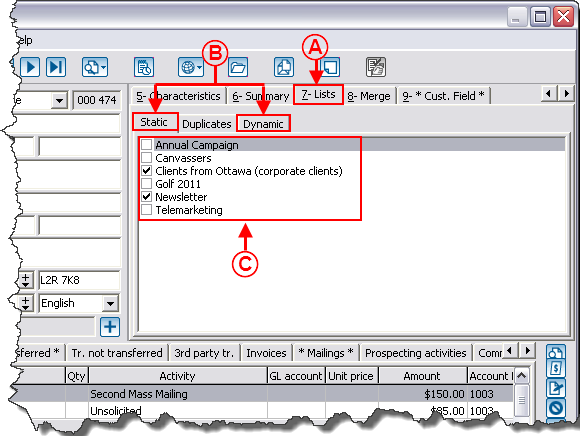
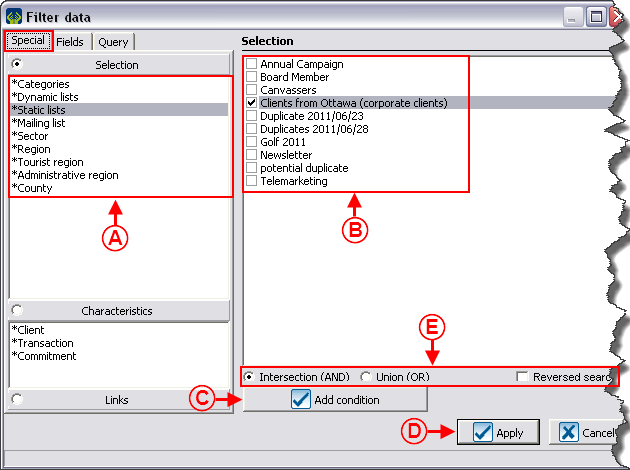
A: Select either "Dynamic lists" or "Stactic lists", in accordance with the list to be generated. |
B: Choose the static list to be generated by checking the box. |
|
E: It is possible to select many lists at B and to use the functions "Intersection (AND)", "Union (OR)" and/or "Reversed search" to combine the lists. To learn how to use these three functions, see the "Intersection (AND) / Union (OR)" section of the "Filter Data (Queries)" document. | |
CAUTION: When a customized list is generated in "Analysis and history", all the "transactions" of the clients that are included in this list are found. For instance, if you isolate the transactions of "Golf Tournament 2012" by using the "Donation occasion" column, you could find 150 transactions, but for 125 clients. When all the clients of the active list are added to the customized list, 125 clients will be added and not 150 transactions. When viewing this list in "Analysis and history", the result would not be of 150 transactions, but rather all the transactions of the 125 clients of the list. If the same list is viewed in the "Client management", 125 clients would be found.
Document name: ProDon:Customized Lists
