Difference between revisions of "Common functions:Restoring Data"
(→Restoring Data) |
|||
| Line 13: | Line 13: | ||
== Restoring Data == | == Restoring Data == | ||
| − | {| border="1" width="379 | + | {| border="1" width="379" cellspacing="1" cellpadding="1" class="wikitable" |
|- | |- | ||
| | | | ||
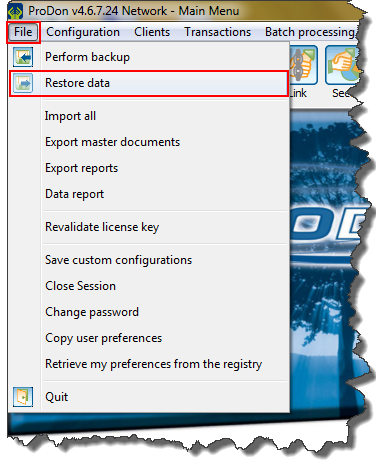
| − | From the software home page, click on the "File" menu, then on "[[Image: | + | From the software home page, click on the "File" menu, then on "[[Image:Bouton Restaurer les données.png]] Data restore". |
|- | |- | ||
| − | | [[Image: | + | | [[Image:Restoring Data 001.png]] |
|} | |} | ||
<br> | <br> | ||
| − | {| border="1" width="292 | + | {| border="1" width="292" cellspacing="1" cellpadding="1" class="wikitable" |
|- | |- | ||
| | | | ||
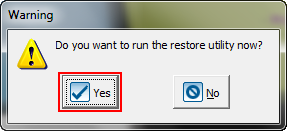
| − | After clicking on "[[Image: | + | After clicking on "[[Image:Bouton Restaurer les données.png]] Restore data", this window opens. |
|- | |- | ||
| − | | [[Image: | + | | [[Image:Restoring Data 002.png]] |
|- | |- | ||
| | | | ||
| − | Click on the "[[Image: | + | Click on the "[[Image:Button Check mark Confirm.png]] Yes" button. |
|} | |} | ||
| Line 42: | Line 42: | ||
|- | |- | ||
| colspan="2" | | | colspan="2" | | ||
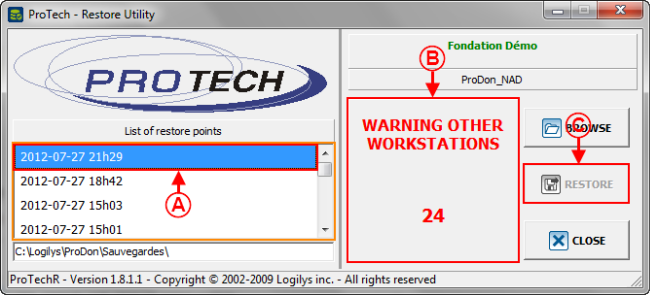
| − | After clicking on the "[[Image: | + | After clicking on the "[[Image:Button Check mark Confirm.png]] Yes" button, the restore utility opens. |
|- | |- | ||
| − | | colspan="2" | [[Image: | + | | colspan="2" | [[Image:Restoring Data 003.png]] |
|- | |- | ||
| width="50%" | | | width="50%" | | ||
| − | '''<span style="color: rgb(255, 0, 0);">A: </span>'''Choose the backup to be restored. | + | '''<span style="color: rgb(255, 0, 0);">A: </span>'''Choose the backup to be restored. |
| width="50%" | | | width="50%" | | ||
| − | '''<span style="color: rgb(255, 0, 0);">B: </span>''''''''ProTech''''' warns other users of the database that a restore will be performed and that the software will close in 30 second. The button at <span style="color: rgb(255, 0, 0);">'''C''' | + | '''<span style="color: rgb(255, 0, 0);">B: </span>''''''''ProTech'''''warns other users of the database that a restore will be performed and that the software will close in 30 second. The button at <span style="color: rgb(255, 0, 0);" />'''C'''is available when the time will be up.''' |
| − | '''NOTE: '''If the "Network" (multi-user module is activated, there will not be any warning, it will terefore be possible to restore immediately. | + | '''NOTE: '''If the "Network" (multi-user module is activated, there will not be any warning, it will terefore be possible to restore immediately. |
|- | |- | ||
| width="50%" | | | width="50%" | | ||
| − | '''<span style="color: rgb(255, 0, 0);">C: </span>'''Once the backup is chosen at <span style="color: rgb(255, 0, 0);">'''A'''</span> and that the warning time of the other workstations is up at <span style="color: rgb(255, 0, 0);">'''B'''</span>, click on the "[[Image: | + | '''<span style="color: rgb(255, 0, 0);">C: </span>'''Once the backup is chosen at <span style="color: rgb(255, 0, 0);">'''A'''</span> and that the warning time of the other workstations is up at <span style="color: rgb(255, 0, 0);">'''B'''</span>, click on the "[[Image:Bouton restaurer.png]] Restore" button. |
| width="50%" | | | width="50%" | | ||
| Line 64: | Line 64: | ||
<br> | <br> | ||
| − | {| border="1" width="495 | + | {| border="1" width="495" cellspacing="1" cellpadding="1" class="wikitable" |
|- | |- | ||
| | | | ||
| − | After clicking on the "[[Image: | + | After clicking on the "[[Image:Bouton restaurer.png]] Restore" button, this window opens. |
|- | |- | ||
| − | | [[Image: | + | | [[Image:Restoring Data 004.png]] |
|- | |- | ||
| | | | ||
| − | Click on the "[[Image: | + | Click on the "[[Image:Button Check mark Confirm.png]] Yes" button to perform a data backup before restoring. |
|} | |} | ||
| Line 82: | Line 82: | ||
|- | |- | ||
| | | | ||
| − | After clicking on the "[[Image: | + | After clicking on the "[[Image:Button Check mark Confirm.png]] Yes" button, the backup will be done automatically. |
|- | |- | ||
| Line 92: | Line 92: | ||
|- | |- | ||
| | | | ||
| + | If the "Network" (multi-user) module is activated, the warning procedure of the other workstations engages and the backup is done automatically after. | ||
| + | |||
| + | Otherwise the backup is done automatically without warning. | ||
| + | |||
| + | '''NOTE: '''These windows close automatically at the end of the backup. | ||
| + | |||
|} | |} | ||
<br> | <br> | ||
| − | {| border="1" width=" | + | {| border="1" width="392" height="213" cellspacing="1" cellpadding="1" class="wikitable" |
|- | |- | ||
| | | | ||
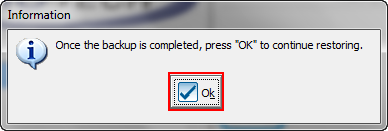
| + | Once the backup complete, this window opens. | ||
| + | |||
|- | |- | ||
| − | | | + | | [[Image:Restoring_Data_008.png]] |
|- | |- | ||
| | | | ||
| + | Click on the "[[Image:Button_Check_mark_Confirm.png]] Ok" button. | ||
| + | |||
|} | |} | ||
<br> | <br> | ||
| − | {| border="1" width=" | + | {| border="1" width="394" height="183" cellspacing="1" cellpadding="1" class="wikitable" |
|- | |- | ||
| | | | ||
| + | After clicking on the "[[Image:Button_Check_mark_Confirm.png]] Ok" button, this window opens. | ||
| + | |||
|- | |- | ||
| − | | | + | | [[Image:Restoring_Data_009.png]] |
|- | |- | ||
| | | | ||
| + | Click on the "[[Image:Button_Check_mark_Confirm.png]] Yes" button. | ||
| + | |||
|} | |} | ||
| Line 121: | Line 135: | ||
|- | |- | ||
| | | | ||
| + | After clicking on the "[[Image:Button_Check_mark_Confirm.png]] Yes" button, this window open while the restore is being done. | ||
| + | |||
|- | |- | ||
| | | | ||
|- | |- | ||
| | | | ||
| + | '''NOTE: '''This window automatically closes at the end of the restore. | ||
| + | |||
|} | |} | ||
| Line 132: | Line 150: | ||
|- | |- | ||
| | | | ||
| + | Once the restore is complete, this window opens. | ||
| + | |||
|- | |- | ||
| | | | ||
|- | |- | ||
| | | | ||
| + | Click on the "[[Image:Button_Check_mark_Confirm.png]] Ok" button. | ||
| + | |||
|} | |} | ||
| − | |||
| − | |||
{| border="1" width="50%" cellspacing="1" cellpadding="1" class="wikitable" | {| border="1" width="50%" cellspacing="1" cellpadding="1" class="wikitable" | ||
|- | |- | ||
| | | | ||
| + | |||
| + | |||
| + | |||
| + | |||
|- | |- | ||
| | | | ||
Revision as of 21:39, 27 July 2012
Template:Header Common Functions
Introduction
A data restore allows you to recover data from a previous backup.
It is important to backup data regularly in order to avoid the loss of valuable information. To learn how to perform a data backup, see this document.
NOTE: This process causes the closure of the application on all the workstations that use it.
Restoring Data
|
From the software home page, click on the "File" menu, then on " |

|

|

|
|
Click on the " |
|
Once the backup complete, this window opens. |

|

|
|
After clicking on the " |
|
NOTE: This window automatically closes at the end of the restore. |
|
Once the restore is complete, this window opens. |
|
|
Document name: Common functions:Restoring Data
