Difference between revisions of "ProDon:Master Document Management"
| Line 57: | Line 57: | ||
=== Main Screen === | === Main Screen === | ||
| − | {| | + | {| cellspacing="1" cellpadding="1" border="1" width="50%" class="wikitable" |
|- | |- | ||
| colspan="2" | [[Image:Master doc management 002.png]] | | colspan="2" | [[Image:Master doc management 002.png]] | ||
| Line 67: | Line 67: | ||
| width="50%" | | | width="50%" | | ||
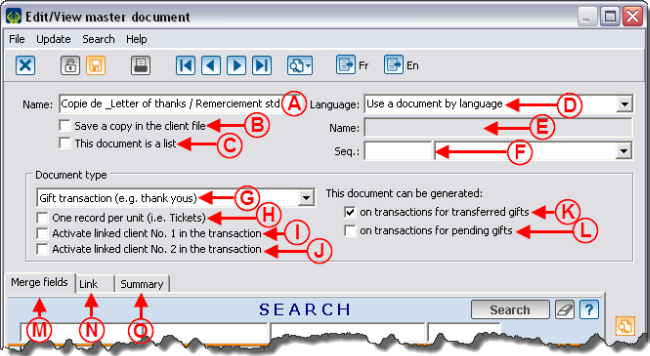
| − | '''<span style="color: rgb(255, 0, 0);">B: </span>'''If this option is activated, the document will have to be produced individually (one client at a time and not in a massive way). A material copy of the document will be saved in the client's | + | '''<span style="color: rgb(255, 0, 0);">B: </span>'''If this option is activated, the document will have to be produced individually (one client at a time and not in a massive way). A material copy of the document will be saved in the client's folder. '''Caution: '''the activation of this option is not used to plan follow-ups concerning a document. For reply statistics or to make a recall (2nd mailing), consult the "Mailing history" document. |
|- | |- | ||
| width="50%" | | | width="50%" | | ||
| − | '''<span style="color: rgb(255, 0, 0);">C: </span>'''Allows you to enter or not a section break between each element to merge. | + | '''<span style="color: rgb(255, 0, 0);">C: </span>'''Allows you to enter or not a section break between each element to merge. This way, you can create a list in one document, instead of creating one document for each client. |
<br> | <br> | ||
| width="50%" | | | width="50%" | | ||
| − | '''<span style="color: rgb(255, 0, 0);">D: </span>'''There are two options in this drop-down list: "Use a document no matter what language", which allows you to produce a single document and "Use a document by language", which allows you to produce | + | '''<span style="color: rgb(255, 0, 0);">D: </span>'''There are two options in this drop-down list: "Use a document no matter what language", which allows you to produce a single document and "Use a document by language", which allows you to produce a document, one for each language configured in the software (English, French ...). |
|- | |- | ||
| Line 85: | Line 85: | ||
| width="50%" | | | width="50%" | | ||
| − | '''<span style="color: rgb(255, 0, 0);">F: </span>'''Activates a merge field related to a sequential number. | + | '''<span style="color: rgb(255, 0, 0);">F: </span>'''Activates a merge field related to a sequential number. To use this option, you first have to create a "Sequence group" using the home page "Mailings" menu, then "Sequence groups". |
| + | |||
| + | '''NOTE: '''It is impossible to generate the same number twice (e.g. if it is necessary to reprint a document, it will not have its original number, it will follow the sequence instead). | ||
|- | |- | ||
| Line 96: | Line 98: | ||
|- | |- | ||
| width="50%" | | | width="50%" | | ||
| − | '''<span style="color: rgb(255, 0, 0);">I </span>'''and '''<span style="color: rgb(128, 0, 0);"><span style="color: rgb(255, 0, 0);">J: </span></span>'''Make available merge fields based on the clients | + | '''<span style="color: rgb(255, 0, 0);">I </span>'''and '''<span style="color: rgb(128, 0, 0);"><span style="color: rgb(255, 0, 0);">J: </span></span>'''Make available merge fields based on the linked clients (third party) of transactions. |
| width="50%" | | | width="50%" | | ||
| Line 125: | Line 127: | ||
<br> | <br> | ||
| − | {| cellspacing="1" cellpadding="1" border="1" style="width: 724px; height: 194px; | + | {| cellspacing="1" cellpadding="1" border="1" class="wikitable" style="width: 724px; height: 194px;" |
|- | |- | ||
! width="20%" scope="col" | | ! width="20%" scope="col" | | ||
| Line 164: | Line 166: | ||
| width="40%" | | | width="40%" | | ||
| − | Only present in "Analysis & History" | + | Only present in the "Commitment" tab of "Analysis & History".<br> |
|- | |- | ||
| Line 171: | Line 173: | ||
| width="40%" | | | width="40%" | | ||
| − | Information fields | + | Information fields relating to a deceased person and to the family to advise. |
'''NOTE:''' The fields relative to a deceased person start with "DEC_" and the fields regarding the family to advise start with "FAM_". | '''NOTE:''' The fields relative to a deceased person start with "DEC_" and the fields regarding the family to advise start with "FAM_". | ||
Revision as of 11:19, 29 August 2011
Contents
[hide]Introduction
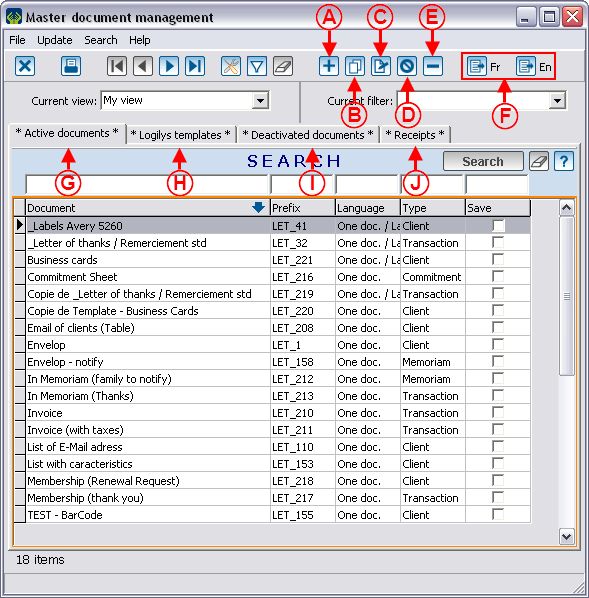
The creation of the software master documents is integrated to Microsoft Word. The merge fields are selected from the software and are automatically sent to Word for document preparation purposes. The master document management allows you to create, modify, activate or deactivate the master documents.
Presentation of the Management Screen
From the software home page, click on the "Mailings" menu, then select "![]() Master documents".
Master documents".
Document Configuration
By clicking on the ![]() ,
, ![]() or
or ![]() button in the "Master document management" window, the "Edit/View master document" window opens to enable you to configure the document.
button in the "Master document management" window, the "Edit/View master document" window opens to enable you to configure the document.
Main Screen
Document Types (Complementary to step G)
The document type has a direct impact on the merge fields available and on the places where the different master documents are available. Each document type is linked to a precise type of mass mailing. For instance, the documents of "Client" type can only be used in the "Client" type mass mailing. Therefore, it is possible to use the "Client" type document where the "Client" type mass mailing is present.
Here is the list of the document types, the fields that will be available in Word during the merge, as well as the location where you can find them in the software.
|
Document type |
Available merge fields by document type |
Location of use by document type |
|---|---|---|
|
Fields of the "Client management". |
Virtually present in all the managements of the software. | |
|
Fields of the "Transaction management" and of the "Client management". |
Present in the "Transaction management" and in "Analysis & History". | |
|
Fields in the "Commitments" tab of "Analysis & History" and fields of the "Client management". |
Only present in the "Commitment" tab of "Analysis & History". | |
|
Information fields relating to a deceased person and to the family to advise. NOTE: The fields relative to a deceased person start with "DEC_" and the fields regarding the family to advise start with "FAM_". |
Only present in the In Memoriam Gifts process. | |
|
Fields of the "Client management". NOTE: The fields relative to a contact start with "CON_" and the fields relative to a client start with "CLI_". |
Present in the "Client management". | |
|
Fields of the "Batch processing: Receipts". |
Present in the "Batch processing: Receipts" and in the transaction during the reissuing of a receipt. |
"Merge Fields" Tab
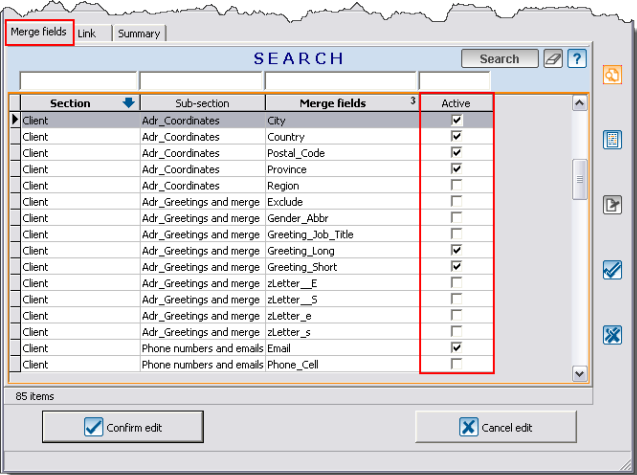
This tab allows you to determine the merge fields that will be available in the production of the master document in Word.
"Link" Tab
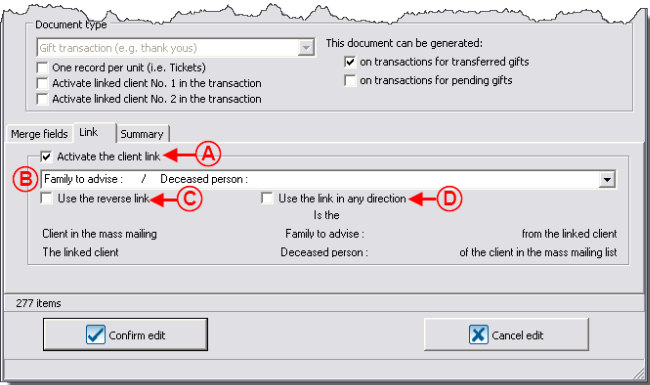
This tab makes available merge fields based on a link between two clients' files.
"Summary" Tab
This tab allows you to add summaries to a document. Click here for more details concerning the summaries.
|
|
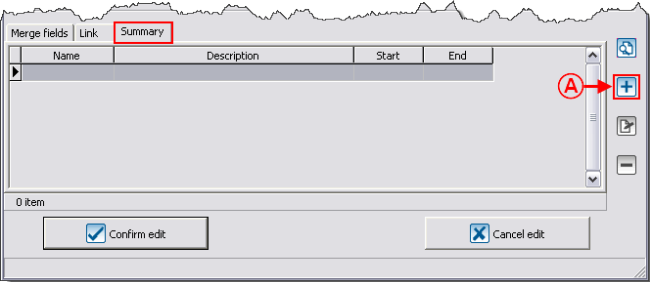
A: To add a summary to a master document, open the "Edit/View master document" window, in the bottom of the window, go in the "Summary" tab, then click on the |
| |
|
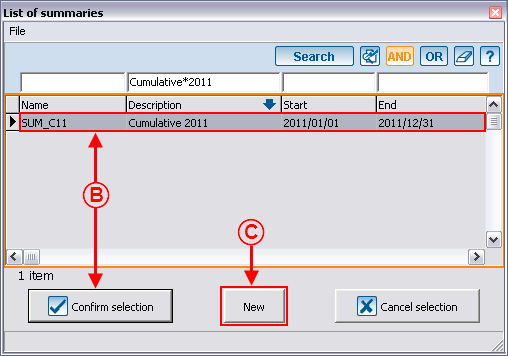
B: Allows you to choose a previously created summary. To do so, select the right summary, then click on " |
C: The "New" button allows you to create a new summary. |
|
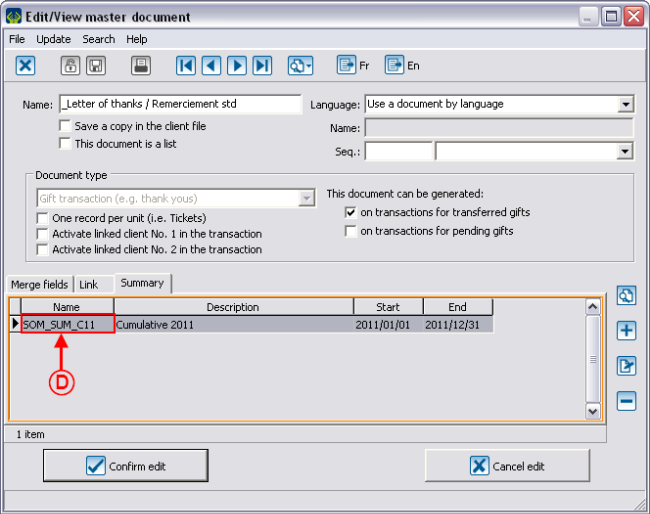
The chosen summary will then be found in the "Summary" tab of the "Edit/View master document" window. |
|
|
D: In the master document, the merge field will bear the name indicated in the "Name" column. |
For more information concerning summaries, click here.
Producing a Document
To produce a master document in Word, click on the ![]() button. This button is available in the "Edit/View master document" or directly in the "Master document management" window.
button. This button is available in the "Edit/View master document" or directly in the "Master document management" window.
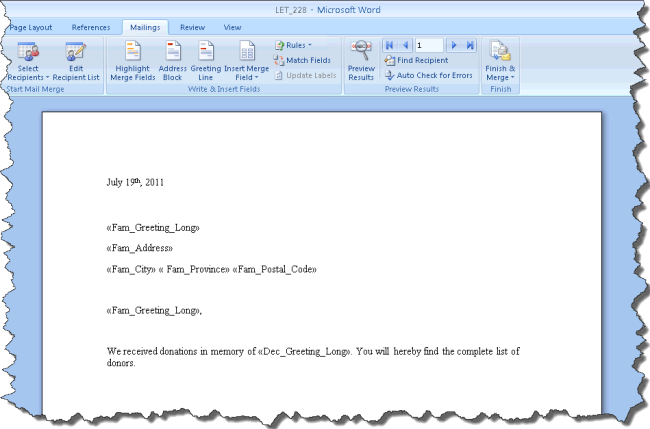
The list of the merge fields available in Word depends on the fields that were chosen during the master document configuration.
|
Here is an example of master document. |
|
When the document is complete, save it using the "Save" function. ProDon has already given a name to your document and knows where to record it on the hard drive. Therefore, you should not use the "Save as" function.
For the master document use, see the "Mass mailing" procedure.
Document name: ProDon:Master Document Management
