Difference between revisions of "ProDon:Custom Reports"
| Line 88: | Line 88: | ||
=== Configuration of the Visual Options === | === Configuration of the Visual Options === | ||
| − | {| cellspacing="1" cellpadding="1" border="1" style="width: 506px; height: 440px; | + | {| cellspacing="1" cellpadding="1" border="1" class="wikitable" style="width: 506px; height: 440px;" |
|- | |- | ||
| colspan="2" | | | colspan="2" | | ||
| Line 125: | Line 125: | ||
<br> | <br> | ||
| − | {| | + | {| cellspacing="1" cellpadding="1" border="1" class="wikitable" style="width: 476px; height: 682px;" |
|- | |- | ||
| − | | colspan="2" | | + | | colspan="2" | [[Image:Custom_Reports_004.png]] |
|- | |- | ||
| width="50%" | | | width="50%" | | ||
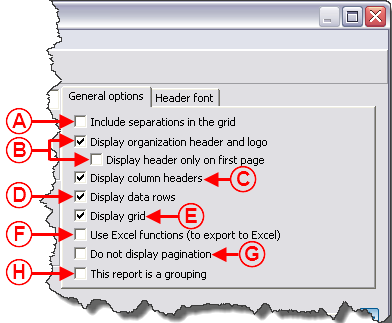
| + | '''<span style="color: rgb(255, 0, 0);">A: </span>'''Allows you to include separations in the grid. To view an example of separation above the grid, see letter '''<span style="color: rgb(255, 0, 0);">B</span>'''. To view an example of separation in the grid, see letter '''<span style="color: rgb(255, 0, 0);">G</span>'''. | ||
| + | |||
| width="50%" | | | width="50%" | | ||
| + | '''<span style="color: rgb(255, 0, 0);">B: </span>'''Displays the header and the logo of the organization on the first page only or on all the pages of the report. To view an example of header, see letter '''<span style="color: rgb(255, 0, 0);">A</span>'''. | ||
| + | |||
|- | |- | ||
| width="50%" | | | width="50%" | | ||
| + | '''<span style="color: rgb(255, 0, 0);">C: </span>'''Displays the header of the columns. To view an example of column header, see letter '''<span style="color: rgb(255, 0, 0);">C</span>'''. | ||
| + | |||
| width="50%" | | | width="50%" | | ||
| + | '''<span style="color: rgb(255, 0, 0);">D: </span>'''Displays the data lines. To view an example of data lines, see letter '''<span style="color: rgb(255, 0, 0);">D</span>'''<span style="color: rgb(255, 0, 0);">.</span><span style="color: rgb(255, 0, 0);" /> | ||
| + | |||
|- | |- | ||
| width="50%" | | | width="50%" | | ||
| + | '''<span style="color: rgb(255, 0, 0);">E: </span>'''Displays the grid. To view an example of report with a grid, see letter '''<span style="color: rgb(255, 0, 0);">E</span>'''. To view an example of report without a grid, see letter '''<span style="color: rgb(255, 0, 0);">J</span>'''. | ||
| + | |||
| width="50%" | | | width="50%" | | ||
| + | '''<span style="color: rgb(255, 0, 0);">F: </span>'''Uncheck this box if '''''Excel''''' sends an error message during the exportation. | ||
| + | |||
|- | |- | ||
| width="50%" | | | width="50%" | | ||
| + | '''<span style="color: rgb(255, 0, 0);">G: </span>'''If the box is checked, the pagination will be on the report. If the box is not checked, the pagination will not be displayed. | ||
| + | |||
| width="50%" | | | width="50%" | | ||
| + | '''<span style="color: rgb(255, 0, 0);">H: <span style="color: rgb(255, 0, 0);" /></span>'''Activates the grouping option on the report. To view an example of report without the grouping option, see letter '''<span style="color: rgb(255, 0, 0);">F</span>'''. To view an example of report with the grouping function, see letter '''<span style="color: rgb(255, 0, 0);">H</span>'''. For more information concerning the grouping option, click here. | ||
| + | |||
|} | |} | ||
Revision as of 16:34, 17 August 2011
Contents
[hide]- 1 Introduction
- 2 Managing the Reports Available
- 3 Creation of a Custom Report
Introduction
The custom reports tool allows you to create reports from a search conducted previously.
Firstly, it is important to know that:
- It is possible to create a custom report from all the management grids in which the report icon
 is active (blue).
 - A report is always attached to a precise management grid. For instance, if it is created in the "Transaction management", it doesn't appear in the "Client management".
- The fields available for the creation of a report are the same as the ones in the corresponding management grid (columns).
- It is possible to include summaries to the reports only from the "Client management" and "Analysis & History".
- Each management grid contains files (e.g. the client file in the "Client management" grid) and it is possible to generate an existing report from each of these files. However, it is not possible to create a new one.
Managing the Reports Available
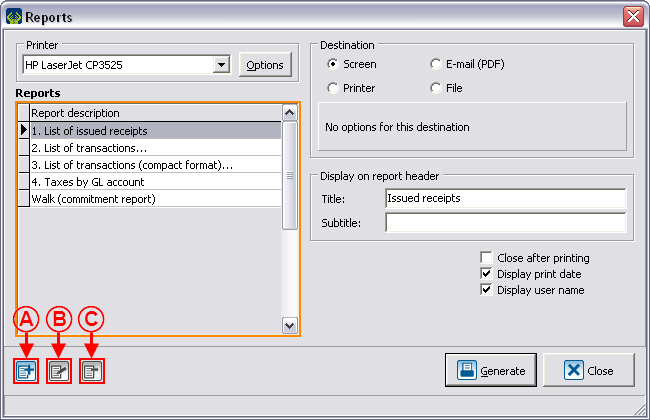
First of all, go in the management proper to the type of report you want to create, modify or delete.
|
This window opens. | |

| |
|
NOTE: The reports provided by Logilys are not modifiable nor deletable. | |
Creation of a Custom Report
Go to the management proper to the type of report you want to create.
Conduct a search by criterion using the search bar, so that the management grid corresponds to what should be found on the report.
Once the management grid corresponds to what should be found on the report, click on the ![]() button.
button.
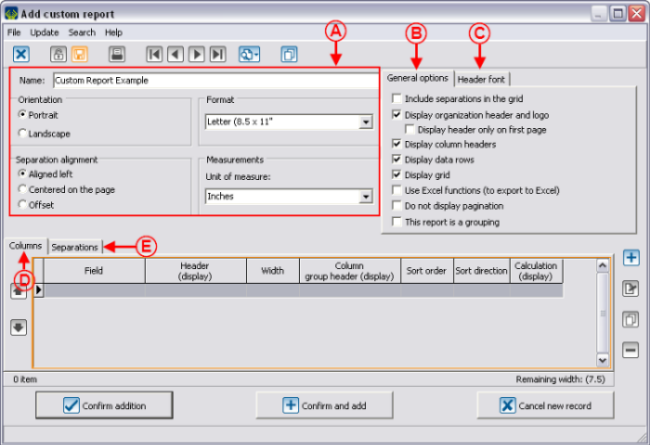
To create a new report, click on the ![]() button.
button.
Configuration of the Visual Options
Examples of Visual Options
First Example
Second Example
Third Example
Adding Columns to the Report
Information on the Column
Display
Example of Display
Calculation on Column
Example of Calculation on Column
Adding Separations to the Report
Examples of Separations
Configurable Value
Example of Configurable Value
Conditional Value
Example of Report with a Conditional Value
Calculation Function
Example of the "Calculation Function" Field
Using the Option "This report is a grouping"
Example of an Onscreen Search
Result of the Onscreen Search
Document name: ProDon:Custom Reports


