Difference between revisions of "ProDon:Integrating a Word Document in the Database"
| Line 51: | Line 51: | ||
== Getting the location of a master document == | == Getting the location of a master document == | ||
| − | {| cellspacing="1" cellpadding="1" border="1 | + | {| cellspacing="1" cellpadding="1" border="1" style="width: 265px; height: 297px;" class="wikitable" |
|- | |- | ||
| colspan="2" | [[Image:Int. Word doc. in database 003.png]] | | colspan="2" | [[Image:Int. Word doc. in database 003.png]] | ||
|- | |- | ||
| width="50%" | | | width="50%" | | ||
| − | '''<span style="color: rgb(255, 0, 0);">A: </span>'''<span style="color: rgb(255, 0, 0);"><span style="color: rgb(0, 0, 0);">Right-click on the software shortcut that is on the desktop.</span></span> | + | '''<span style="color: rgb(255, 0, 0);">A: </span>'''<span style="color: rgb(255, 0, 0);"><span style="color: rgb(0, 0, 0);">Right-click on the software shortcut that is on the desktop.</span></span> |
| width="50%" | | | width="50%" | | ||
| Line 65: | Line 65: | ||
<br> | <br> | ||
| − | {| cellspacing="1" cellpadding="1" border="1 | + | {| cellspacing="1" cellpadding="1" border="1" style="width: 375px; height: 575px;" class="wikitable" |
|- | |- | ||
| colspan="2" | | | colspan="2" | | ||
| Line 74: | Line 74: | ||
|- | |- | ||
| | | | ||
| − | '''<span style="color: rgb(255, 0, 0);">C: </span>'''<span style="color: rgb(255, 0, 0);"><span style="color: rgb(0, 0, 0);">Select and copy the path inscribed next to "Start in".</span></span><span style="color: rgb(255 | + | '''<span style="color: rgb(255, 0, 0);">C: </span>'''<span style="color: rgb(255, 0, 0);"><span style="color: rgb(0, 0, 0);">Select and copy the path inscribed next to "Start in".</span></span><span style="color: rgb(255, 0, 0);" /> |
| | | | ||
Revision as of 12:46, 19 July 2011
Contents
Introduction
It is possible to integrate an existing Worddocument as master document in the software.
Creating a master document in the database
From the softwrae home page, click on the "Mailings" menu, then select "![]() Master documents".
Master documents".
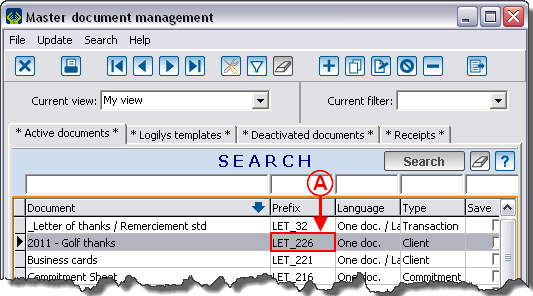
The "Master docuemnt management" window will open, click on ![]() .
.
|
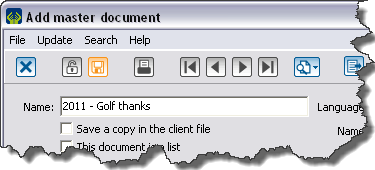
The "Add master document" window opens. |

|
|
To configure a master document, follow the instructions in the section "Master document configuration", of the "Master document management" procedure. |
When the master document is configured, click on "![]() Confirm addition".
Confirm addition".
After taking note of the Word document's name, close the software.
Getting the location of a master document

| |
|
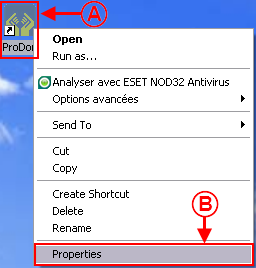
A: Right-click on the software shortcut that is on the desktop. |
B: In the menu, click on "Properties". |
|
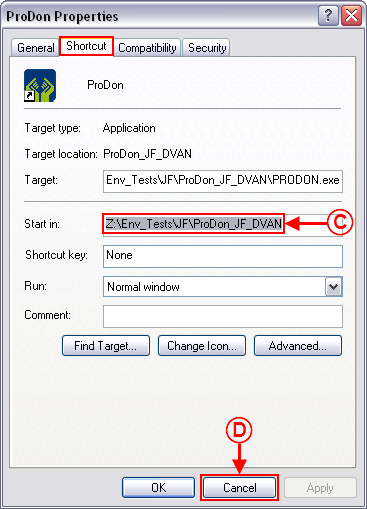
This window will open. | |

| |
|
C: Select and copy the path inscribed next to "Start in".<span style="color: rgb(255, 0, 0);" /> |
D: After copying the path, click on the "Cancel" button. |
Saving a Word document as master document
Close the Word document.
Opening the master document from the software
When the fields are inserted and the document is complete, save it using the "Save" function. The database will always keep the same document name and the same location. NEVER USE THE "Save as..." FUNCTION.
Document name: ProDon:Integrating a Word Document in the Database
