Difference between revisions of "ProDon:Master Document Management"
| Line 245: | Line 245: | ||
=== "Summary" tab === | === "Summary" tab === | ||
| + | |||
| + | This tab allows you to add summaries to a document. Click here for more details concerning the summaries. | ||
{| width="200" cellspacing="1" cellpadding="1" border="1" class="wikitable" | {| width="200" cellspacing="1" cellpadding="1" border="1" class="wikitable" | ||
|- | |- | ||
| − | | | + | | [[Image:Master_doc_management_005.png]] |
|- | |- | ||
| | | | ||
| + | '''<span style="color: rgb(255, 0, 0);">A: </span>'''To add a summary to a master document, open the "Edit/View master document" window, at the bottom of the window, go in the "Summary" tab, then click on the [[Image:Button_add_plus.png]] button. | ||
| + | |||
|} | |} | ||
| Line 260: | Line 264: | ||
|- | |- | ||
| width="50%" | | | width="50%" | | ||
| + | '''<span style="color: rgb(255, 0, 0);">B: </span>'''Allows you to choose a summary previously created. To do so, select the right summary, then click on "[[Image:Button_Check_mark_Confirm.png]] Confirm the selection". | ||
| + | |||
| width="50%" | | | width="50%" | | ||
| + | '''<span style="color: rgb(255, 0, 0);">C: </span>'''The "New" button allows you to create a new summary. | ||
| + | |||
|} | |} | ||
| Line 268: | Line 276: | ||
|- | |- | ||
| | | | ||
| + | The chosen summary will then be found in the "Summary" tab of the "Edit/View master document" window. | ||
| + | |||
|- | |- | ||
| | | | ||
|- | |- | ||
| | | | ||
| + | '''<span style="color: rgb(255, 0, 0);">D: </span>'''In the master document, the merge field will have the name indicated in the "Name" column. | ||
| + | |||
|} | |} | ||
Revision as of 10:38, 14 July 2011
Contents
[hide]Introduction
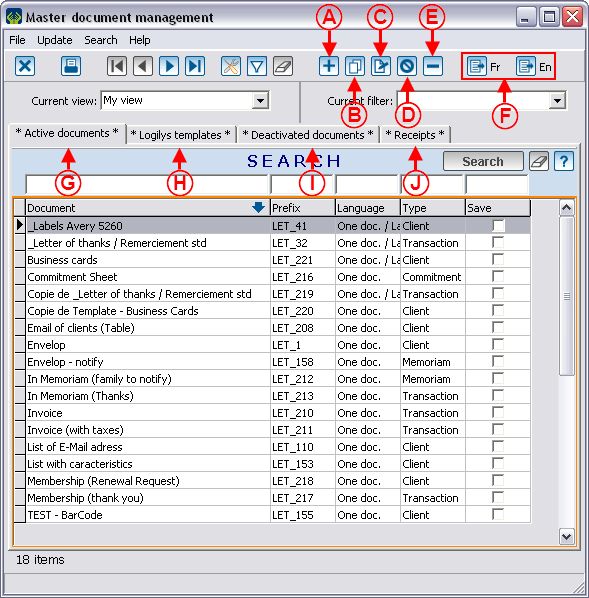
The creation of the software master documents is integrated by Microsoft Word. The merge fields are selected from the software and are automatically sent to Word to prepare the document. The master document management allows you to create, modify, activate or deactivate the master documents.
Presentation of the management screen
Configuration of a document
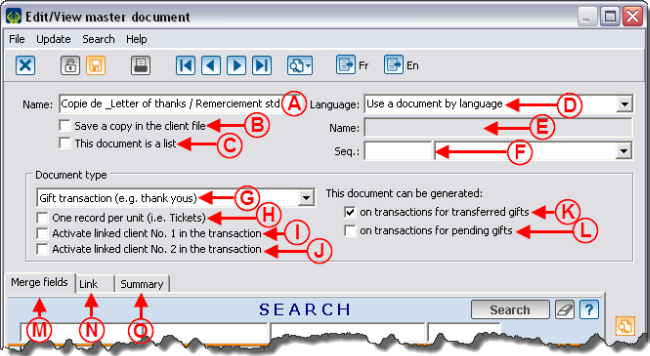
By clicking on the ![]() ,
, ![]() or
or ![]() buttons in the "Master document management" window, the "Edit/View master document" window opens in so that you can configure the document.
buttons in the "Master document management" window, the "Edit/View master document" window opens in so that you can configure the document.
Main screen
Types of documents (Complementary to step G)
THe type of document has a direct impact on the merge fields available and on the paces where they are available the different master documents. Each document type is linked to a precise type of mass mailing. For instance, the documents of "Client" type can only be used in the "Client" type mass mailing. Therefore, it is possible to use the "Client" type document where the "Client" type mass mailing is present.
Here is the list of the types of documents, the fields that will be available in Wordduring the merge, as well as the location where you can find them in the software.
|
Type of document |
Available merge fields by type of document |
Location of use by type of document |
|---|---|---|
|
Fields of the "Client management". |
Virtually present in all the managements of the software. | |
|
Fields of the "Transaction management" and of the "Client management". |
Present in the "Transaction management" and in "Analysis & History". | |
|
Fields in the "Commitments" tab of "Analysis & History" and fields of the "Client management". |
Only present in "Analysis & History" and in the "Commitments" tab. | |
|
Information fields relative to a deceased and to the family to notify. NOTE: The fields relative to a deceased person start with "DEC_" and the fields regarding the family to notify start with "FAM_". |
Only present during the In memoriam gifts process. | |
|
Fields of the "Client mangement". NOTE: The fields relative to a contact start with "CON_" and the fields relative to a client start with "CLI_". |
Present in the "Client management". | |
|
Fields of the "Batch processing: Receipts". |
Present in the "Batch processing: Receipts" and in the transaction during the reissuing of a receipt. |
"Merge fields" tab
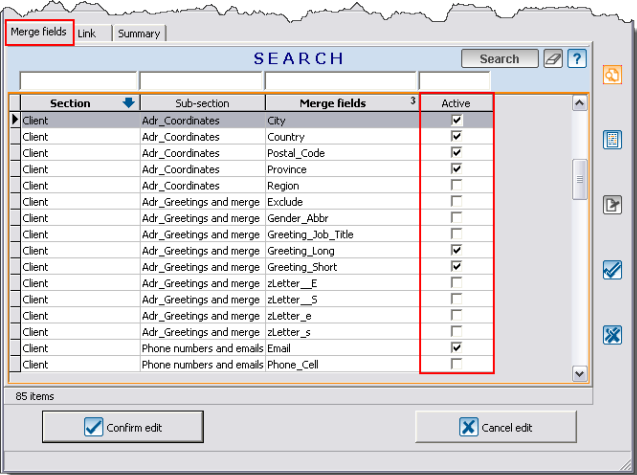
This tab allows you to determine the merge fields that will be available during the production of the master document in Word.
"Link" tab
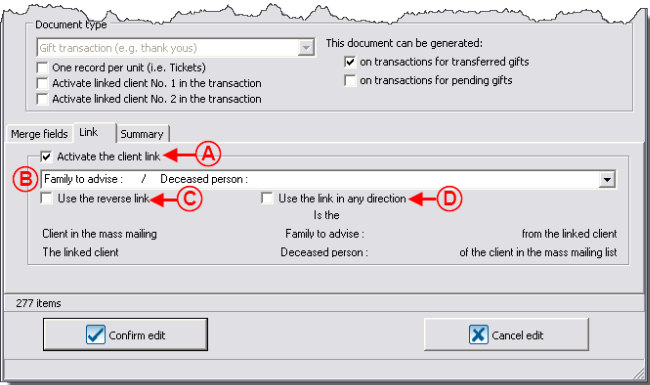
This tab makes available merge fields based on a link between two clients' files.
"Summary" tab
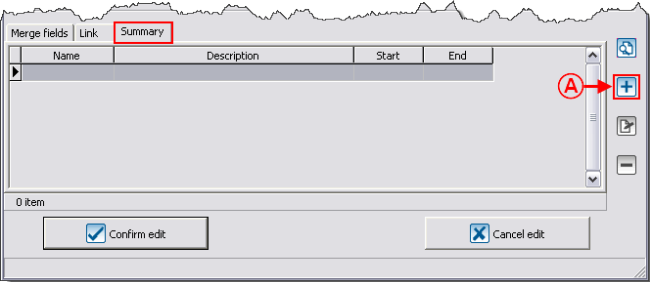
This tab allows you to add summaries to a document. Click here for more details concerning the summaries.
|
|
A: To add a summary to a master document, open the "Edit/View master document" window, at the bottom of the window, go in the "Summary" tab, then click on the |
|
B: Allows you to choose a summary previously created. To do so, select the right summary, then click on " |
C: The "New" button allows you to create a new summary. |
|
The chosen summary will then be found in the "Summary" tab of the "Edit/View master document" window. |
|
D: In the master document, the merge field will have the name indicated in the "Name" column. |
For more information concerning summaries, click here.
Edit a document
