|
|
| Line 27: |
Line 27: |
| | == In a ''Word'' merge file == | | == In a ''Word'' merge file == |
| | | | |
| − | This merge feature in '''''Word''''' is useful in the software sections where it is not possible to create a master document (e.g. in the Participants tab of Analysis & History). When creating a merge document, the fields available onscreen in the software will then become available in '''''Word'''''. | + | This merge feature in '''''Word''''' is useful in the software sections where it is not possible to create a master document (e.g. in the Participants tab of Analysis & History). When creating a merge document, the fields available onscreen in the software will then become available in '''''Word'''''.<br> |
| | | | |
| − | <br>
| + | {| cellspacing="1" cellpadding="1" border="1" class="wikitable" style="width: 454px; height: 452px;" |
| − | | |
| − | {| cellspacing="1" cellpadding="1" border="1" style="width: 454px; height: 452px;" class="wikitable" | |
| | |- | | |- |
| | | colspan="2" | [[Image:Export and merge data 002.png]] | | | colspan="2" | [[Image:Export and merge data 002.png]] |
| Line 60: |
Line 58: |
| | === Edit a merge file === | | === Edit a merge file === |
| | | | |
| − | {| cellspacing="1" cellpadding="1" border="1" class="wikitable" style="width: 439px; height: 390px;" | + | {| cellspacing="1" cellpadding="1" border="1" style="width: 439px; height: 390px;" class="wikitable" |
| | |- | | |- |
| | | colspan="2" | After clicking on the "Merge document management" button, this window opens. | | | colspan="2" | After clicking on the "Merge document management" button, this window opens. |
Revision as of 10:24, 12 July 2011
Template:Header ProDon
Introduction
The data export/merge consists in exporting data from ProDon to Word, Excel or Text files in order to process or organize data based on different needs (e.g. special reports, lists for verification purposes, etc.). This function is available in many of the software managements (e.g. Client management, Donation occasion management, Analysis & History, etc.). The data can be exported in full or following the result of a search.
IMPORTANT: The modifications made in the merge files are not applied in ProDon.
Export/Merge
From a management screen, search the data to export, and click on the " Export and merge" button.
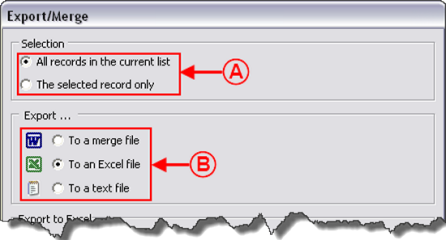
| This window opens.
|
|
|
A: Choose the selection of data to export or merge.
|
B: Choose to which type of file (Word, Excel or Text) the data will be exported or merged.
|
In a Word merge file
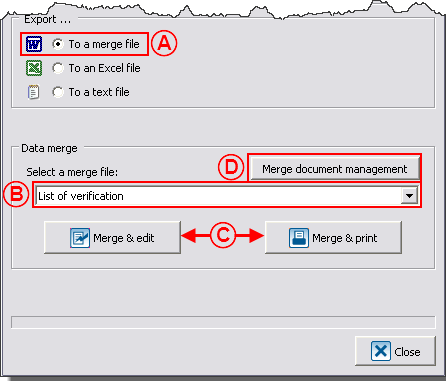
This merge feature in Word is useful in the software sections where it is not possible to create a master document (e.g. in the Participants tab of Analysis & History). When creating a merge document, the fields available onscreen in the software will then become available in Word.
|
|
A: Choose to export data in a Word merge file.
|
B: If the merge file has already been created, select it using the drop-down arrow.
|
|
C: After selecting the right merge document, click on "Merge & edit" or on "Merge & print".
|
D: To add or modify a merge document, click on the "Merge document management" button.
|
|
NOTE: The .Merge & edit" button allows you to consult the merged documents prior to printing, whereas the "Merge & print" button prints the merged documents directly.
|
Edit a merge file
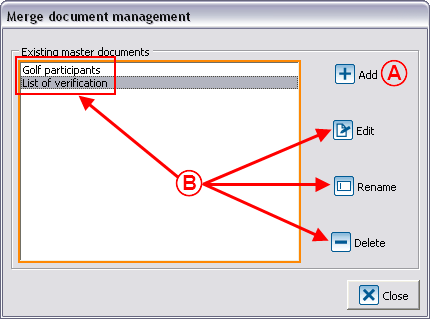
| After clicking on the "Merge document management" button, this window opens.
|
|
|
A: To create a new merge document, click on " Add". Add".
|
B: To edit a master document, select the document to be modified, then click on the appropriate button.
|
|
NOTE: The merge fields related to that part of the software will automatically be exported in Word to create the document.
|
In an Excel file
|
|
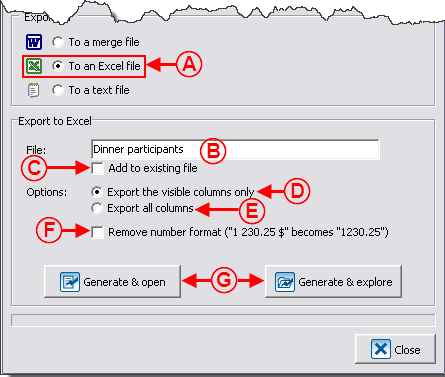
A: Choose to export data in an Excelfile.
|
B: The software names the Excel file by default. However, it is possible to manually rename it, as in this example.
|
|
C: To export or add data in an existing file, you have to name the file in step B in the same way as a source file. To see the name of the previously created file, click on "Generate & explore".
|
D: This box allows you to export only the columns visible in the configured view.
|
|
E: This box allows you to export all the available columns for that part of the software.
|
F: This function allows you to transform every field format into "standard" format so that it is ignored during the data exportation.
|
|
G: After choosing all the wanted options, click on "Generate & open" or on "Generate & explore".
|
NOTE: The "Generate & open" button generates the merge document onscreen, whereas the "Generate & explore" button generates the file without opening it. The latter option is useful when there are many merge documents to generate and that there is no need to open them all.
|
In a Text file
|
|
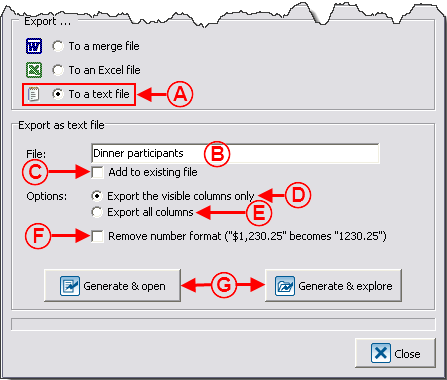
A: Choose to export data in a Text file.
|
B: The software names the Text file by default. However, it is possible to manually rename it, as in this example.
|
|
C: To export or add data in an existing file, you have to name the file in step B in the same way as a source file. To see the name of the previously created file, click on "Generate & explore".
|
D: This box allows you to see only the columns visible in the configured view.
|
|
E: This box allows you to export all the available columns for that part of the software.
|
F: This function allows you to transform every field format into "standard" format so that it is ignored during the data exportation.
|
|
G: After choosing all the wanted options, click on "Generate & open" or on "Generate & explore".
|
NOTE: The "Generate & open" button generates the merge document onscreen, whereas the "Generate & explore" button generates the file without opening it. The latter option is useful when there are many merge documents to generate and that there is no need to open them all.
|
Document name: Common functions:Exporting and Merging Data
![]() Export and merge" button.
Export and merge" button.


