Difference between revisions of "ProDon:Electronic Transaction Module - PaySafe"
| Line 410: | Line 410: | ||
=== "Accepted" Tab === | === "Accepted" Tab === | ||
| − | + | The "Accepted" tab contains all the transactions that were verified by Optimal and were accepted. | |
| − | + | As any other transaction in '''''ProDon''''' (cheque, cash, in-kind gift, etc.), these transactions must be transferred. | |
{| width="200" cellspacing="1" cellpadding="1" border="1" class="wikitable" | {| width="200" cellspacing="1" cellpadding="1" border="1" class="wikitable" | ||
| Line 419: | Line 419: | ||
|- | |- | ||
| colspan="2" | | | colspan="2" | | ||
| − | + | To perform a transaction transfer, click on the [[Image:Transfer transactions.png]] button. To learn how to complete a transaction transfer, see the [["Transaction transfer"]] section of the [[ProDon:Transaction Logging|"Transaction Logging"]] document.<br> | |
|} | |} | ||
| − | <br> | + | <br> |
=== "Denied" Tab === | === "Denied" Tab === | ||
Revision as of 08:01, 27 July 2014
Contents
[hide]Introduction
The "Electronic Transaction" module allows you to save, cumulate and process transactions paid with credit cards or bank transfers.
Electronic payments can be validated in 2 ways, on every transaction (instant) or in batch (at the desired time).
If the electronic payments are validated in batches, the transactions will be kept in ProDon, until the moment when the batch is sent to Optimal, which will perform verifications on it the night following the transfer.
The electronic payment entry is always done in Optimal's interface and all the information is stored is a secure vault at Optimal. No credit card or CVV number (see Lexicon for definition) will be kept in ProDon.
After entering the payment information on the Optimal interface, a token is returned into ProDon. This token is a unique reference number that is assigned to the credit card information and this token can be kept in ProDon, in order to reuse the payment information for future transactions.
Adding/Editing/Viewing Electronic Transactions
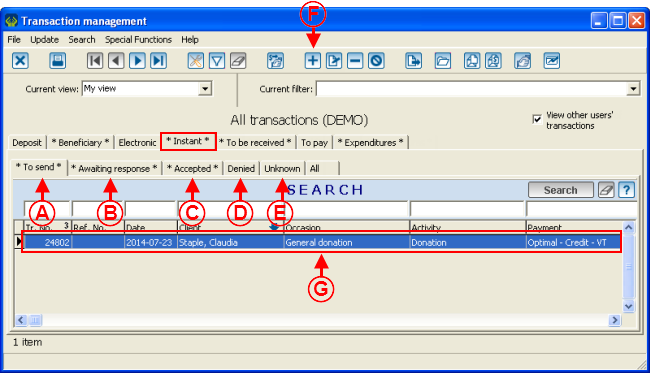
To view the electronic transactions in treatment, go to the "Instant" tab of the "Transaction management".
 | |
|
A: The "To send" tab contains all the transactions to be sent to Optimal. To learn how to process the transactions of this tab, view this section. |
B: The "Awaiting response" tab contains all the transactions that were sent to Optimal for the treatment in batch. To learn how to process the transactions of this tab, view this section. |
|
C: The "Accepted" tab contains all the transactions that were processed by Optimal and that were accepted, you must then transfer them. To learn how to process the transactions of this tab, view this section. |
D: The "Denied" tab contains all the transactions tha were processed by Optimal that were declined. To learn how to process the transactions of this tab, view this section. |
|
E: The "Unknown" tab contains the transactions for which there was a problem during the treatment. If a transaction is found in this tab, contact the technical support at Logilys. |
F: Click on the |
|
G: To view or modify a transaction, double-click on the right transaction. After double-clicking on a transaction, this window opens. |
|
Entering Electronic Transactions
 | |
|
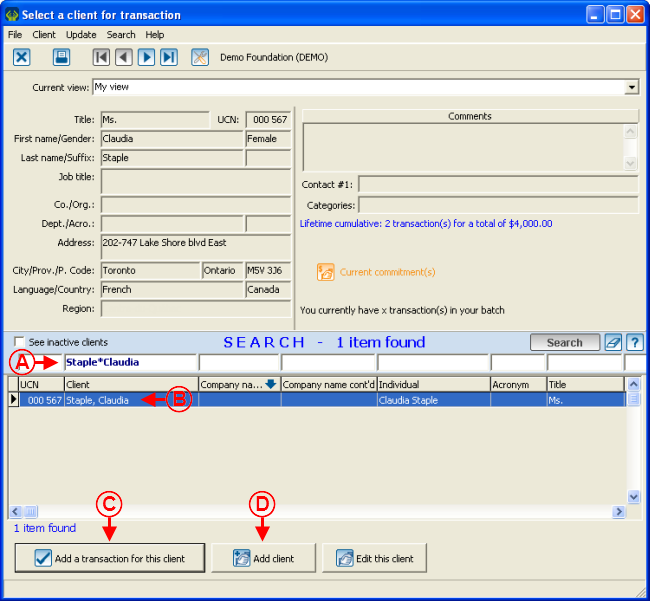
A: Search the client for whom an electronic transaction must be added. |
B: Select the desired client. If the client does not exist in ProDon, see point D. |
|
C: After selecting the desired client at B, click on the " |
D: If the client does not exist in the database, click on the " |
|
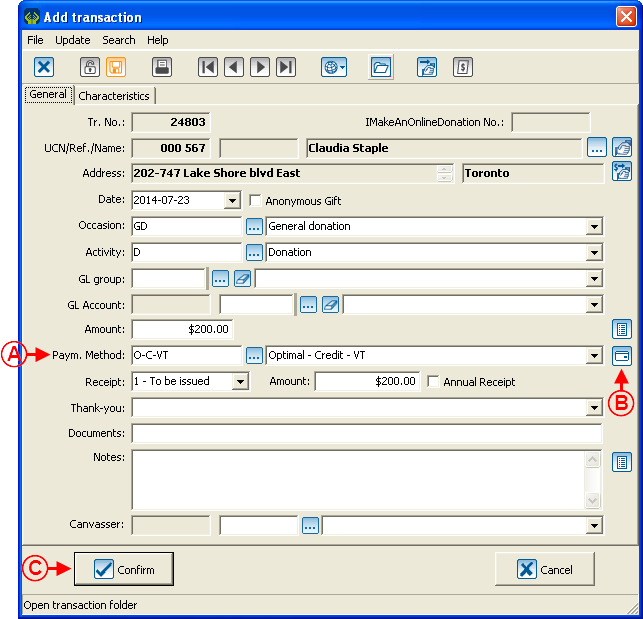
After double-clicking on a transaction to modify it or after adding a new transaction, the following window opens. NOTE: To learn how to fill out the fields of the transaction, see the "Adding a Transaction" of the "Transaction Logging" document. | |
 | |
|
A: Select an Optimal instant payment method. After selecting an Optimal payment method, a window asking to save is displayed. After clicking on "yes" to save, this window opens. NOTE: When a donation is paid with a credit card from another country, it is required to specify the CVV. However, the CVV payment method is not available here, but it will be be possible to specify it in the Optimal payment zone.. |
B: By adding a transaction, the When modifying a transaction, the |
|
C: After entering all the transaction information, click on the " |
|
Choosing the Electronic Payment Method
|
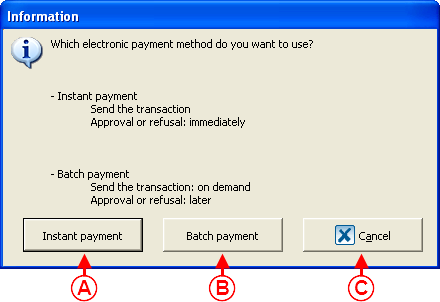
After selecting an Optimal instant payment method or clicking on the | |
 | |
|
A: By selecting the "Instant payment" option, the transaction is verified immediately and is found under the "Accepted" or "Denied" tabs of the "Transaction management". CAUTION: In the case of a bank transfer, it is possible that the transaction is accepted, because all the banking information is valid. However, it can be declined a few days later on NetBanx, because of insufficient funds. |
B: By selecting the "Batch payment" option, the transaction will be found under the "To send" tab of the "Transaction management", in order to process it later on in a batch. |
|
C: By clicking on the " |
|
Choosing the Registered Token
It is possible the following window opens after clicking on the "Instant payment" or "Batch payment" button. If it is indeed the case, follow these instructions.
If the window that is displayed, after clicking on the "Instant payment" or "Batch payment" button, is not the following, view this section.
|
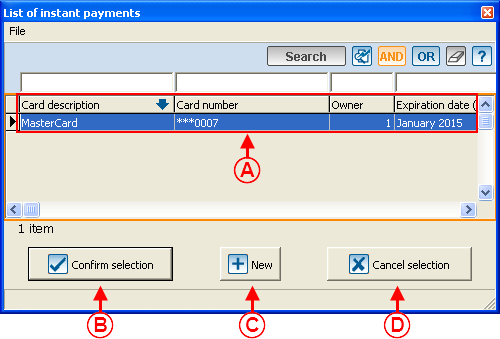
If a token had already been registered in the client file when entering a prior transaction, the following window opens after clicking on the | |
 | |
|
A: Select the right token in the list. |
B: After selecting the right token, click on the " |
|
C: If the tokens at A do not correspond to the payment method to be used, click on the " |
D: The " |
Entering Payment Information
If a token had already been created in a prior transaction, view this section.
|
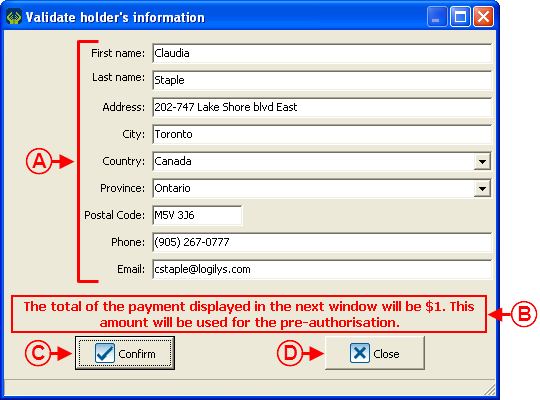
After clicking on the "Instant payment" or "Batch payment" button of this window, the following window opens. The information of the client making the transaction should appear automatically. | |
 | |
|
A: This information must be entered, except for the phone number and the email address. |
B: This statement only appears if the "Batch payment" option was chosen in the previous window. In that event, the amount of the transaction will not be withdrawn right away and only a few pieces of information will be validated. To learn more about payments in log, click here. |
|
C: After entering all the information at A, click on the " |
D: By clicking on the " |
|
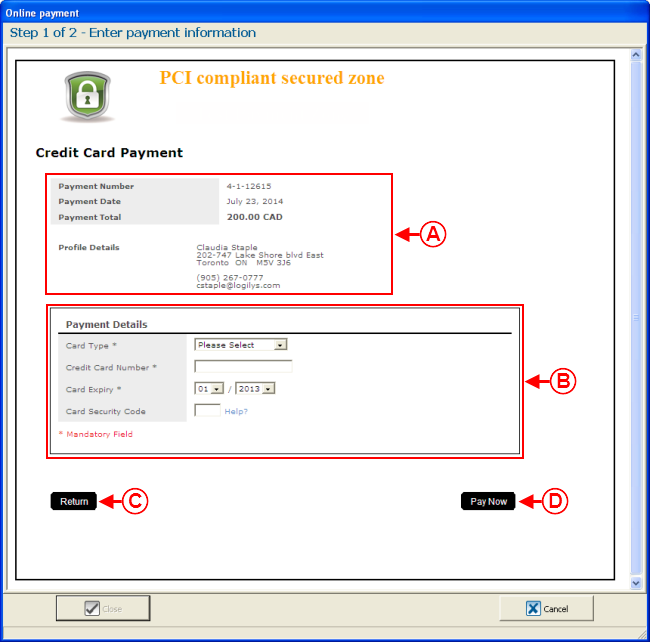
After clicking on the " | |
 | |
|
A: Verify the information of the transaction. |
B: Enter the payment information. |
|
C: By clicking on the "Return" button, this window opens and the operation is cancelled. |
D: By clicking on the "Pay now" button, the transaction is verified. If the transaction is accepted, this window opens. If the transaction is declined, this window opens. |
|
NOTE: If the entered transaction is in batch, the amount at A will be $1. This amount is actually an authentification that allows for the validation of the card. This amount is not debited, it is only borrowed for more or less 24 hours. | |
Confirming the Transaction Processing
Following the transaction entry, the transaction can be accepted or denied. Here are the instructions to follow in both cases.
Transaction Accepted
|
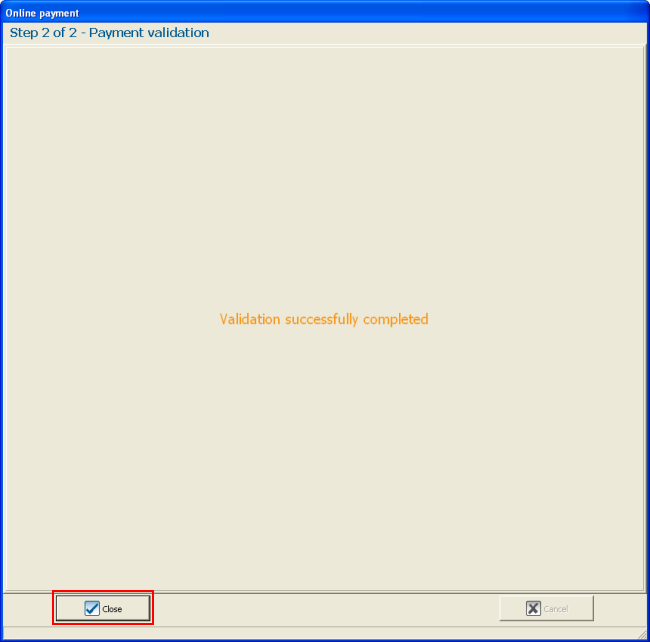
If the transaction is accepted, the following window opens. | |
 | |
|
Click on the " |
|
After clicking on the " | |
 | |
|
This window allows you to decide whether or not the token of the payment information should be kept in ProDon for future use. By clicking on the " By clicking on the " To learn how to view the payment information in a transaction file, see this section. NOTE: It is not recommended to keep a token only for commitments or if the donor is a regular one. Since the probabilty is that if a donor does not make donations frequently; therefore, his or her credit card will be expired or invalid for a future transaction. |
Transaction Denied
|
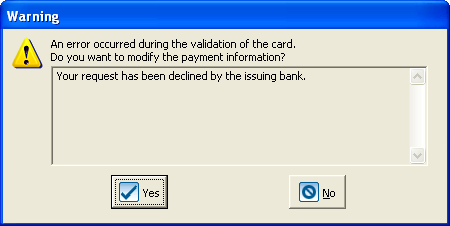
If the transaction is declined, a window similar to the folllwing one opens. | |
 | |
|
The " The " NOTE: It is advisable to choose the " |
Cancelling a Transaction
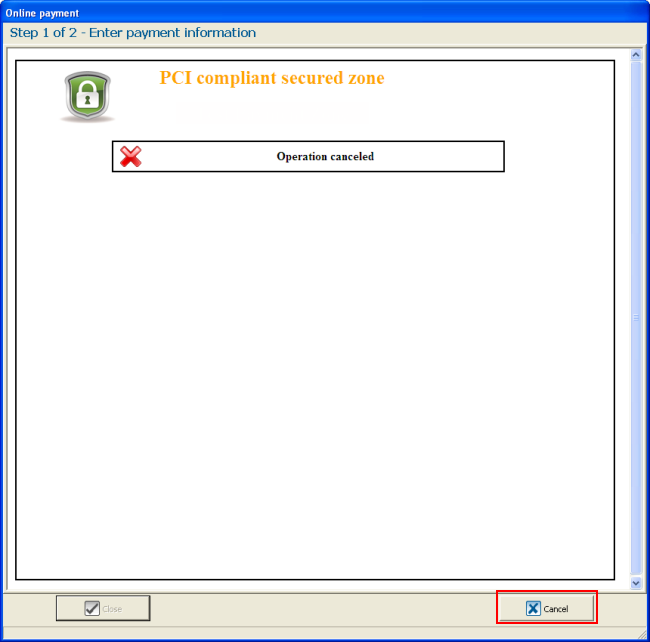
|
After clicking on the "Return" button of this window, the following window opens. | |
 | |
|
Click on the " |
Processing of Instant Transactions
"To send" Tab
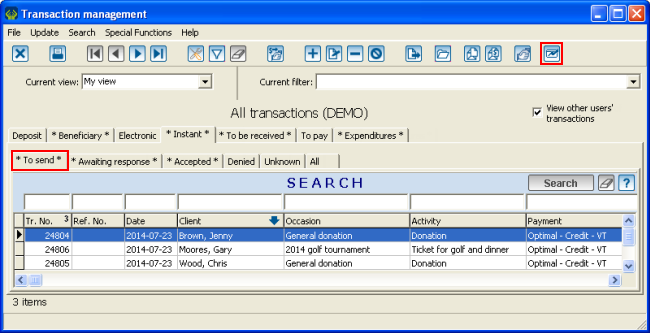
If the payment method chosen in this window were "Batch payment", the transaction would be found under the "To send" tab.
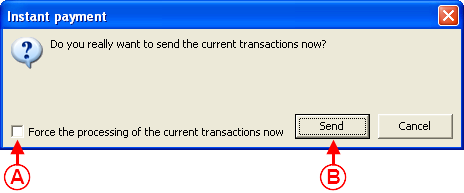
This tab contains all the transactions to be sent to Optimal. Therefore, you need to send the transactions to Optimal, which will verify them the night following the transfer.
 | |
|
Click on the "Send" button at B, to send the transactions to Optimal. If the checkbox at A is not checked, the transactions will be found in the "Awaiting response" tab, so that can be processed later. If the checkbox at A is checked, the transactions are verified immediately and are found under the "Accepted" or "Denied". NOTE: The checkbox at A is only available for users who have the access to force the immediate treatment. It is not recommended to check this checkbox, because if there are a lot of transactions to process, this operation can take a few minutes. It is therefore advisable to send them under the "Awaiting response" tab, so that Optimal processes them in batches, the night following the transfer. |
"Awaiting Response" Tab
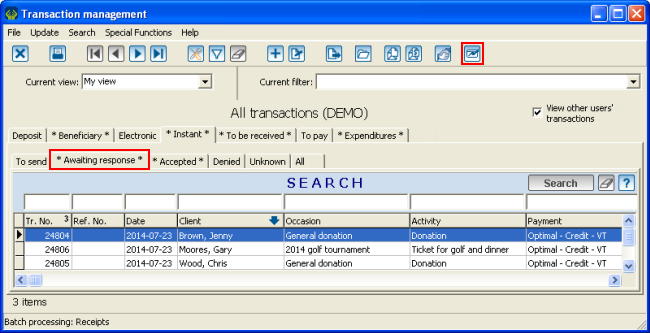
The "Awaiting response" tab contains all the transactions that have a date prior to the current date and all the transactions that were sent to Optimal to be processed in batch.
Optimal usually processes those transactions at 3:00pm and 11:30pm every day.
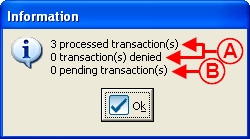
In order to know the status of the transaction (accepted or denied), you must validate the status of the transactions.
 | |
|
A: The accepted or denied transactions have been verified by Optimal. They will then be found under the "Accepted" or "Denied" tab. | |
|
B: The pending transactions have been verified by Optimal. They will be found under the "Awaiting response" tab. NOTE: The transactions remain pending if they were sent on the same day or if the date of the transaction is later than the current date. |
"Accepted" Tab
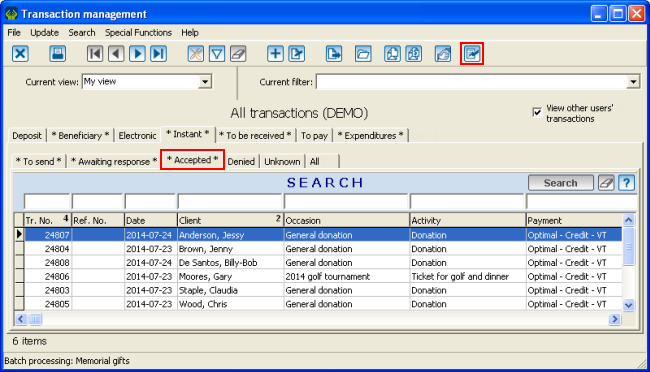
The "Accepted" tab contains all the transactions that were verified by Optimal and were accepted.
As any other transaction in ProDon (cheque, cash, in-kind gift, etc.), these transactions must be transferred.
 | |
|
To perform a transaction transfer, click on the |
"Denied" Tab
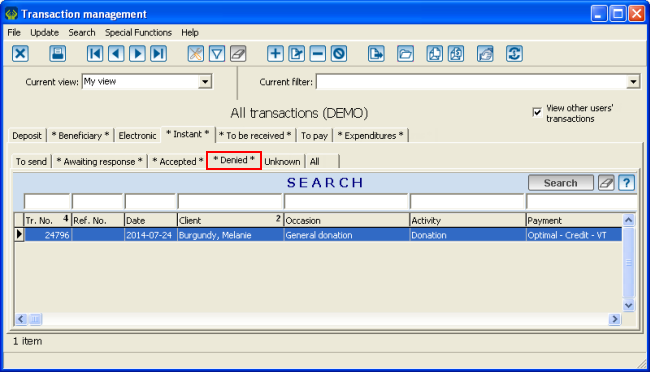
L'onglet « Refusée » contient toutes les transactions vérifiées par Optimal qui ont été refusées.
Chaque transaction refusée contient un code d'erreur. Pour voir ce code d'erreur, afficher le champ « Message français (Pai.Instant.) » dans la vue.
Dans certaines situations, il faudra communiquer avec le donateur afin qu'il vérifie auprès de sa banque émettrice pourquoi la transaction n'a pas passé et dans d'autres situations, l'organisme pourrait avoir à contacter Optimal.
 | |
|
Pour ouvrir la transaction rejetée à traiter, double-cliquer sur la bonne transaction. Consulter la section « Traitement des rejets » pour savoir comment traiter les transactions refusées. |
Processing the Rejects
Il existe 2 façons de traiter une transaction refusée :
Dans le cas, par exemple, d'une erreur dans la saisie du numéro de carte de crédit ou dans les coordonnées du donateur, il sera nécessaire de vider les informations du paiement et de les saisir à nouveau (après avoir revalidé les informations de paiement auprès du donateur). Pour savoir comment traiter ce type de rejet, cliquer ici.
Dans d'autres cas, (par exemple des fonds insuffisants ou un refus de la banque émettrice), il faudra simplement envoyer le paiement instantané à nouveau après s'être assuré, au près du donateur, qu'il veut bien que la transaction soit passée à nouveau. Pour savoir comment traiter ce type de rejet, cliquer ici.
Emptying the Payment Information and Entering it Again
Si le rejet nécessite de vider les informations du paiement et de les saisir à nouveau, suivre les indications suivantes.
Sinon, cliquer ici.
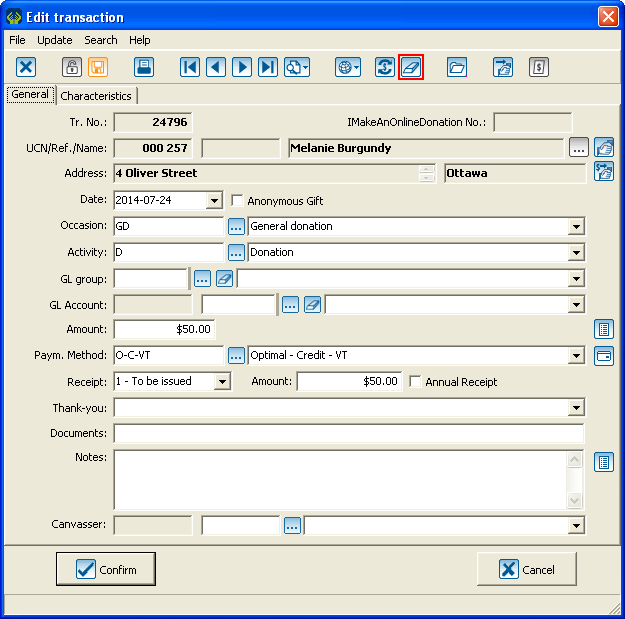
| Après avoir double-cliqué sur la transaction refusée, la fenêtre suivante s'ouvre. | |
 | |
|
Pour saisir les bonnes informations de paiement, cliquer sur le bouton |
Sending the Instant Payment Again
Si le rejet nécessite seulement d'envoyer les informations de paiement à nouveau, suivre les indications suivantes.
Sinon, cliquer ici.
Les informations de paiement peuvent être envoyées à nouveau à partir de 2 endroits :
Referral of the Payment Information from the "Denied" Tab of the Transaction Management
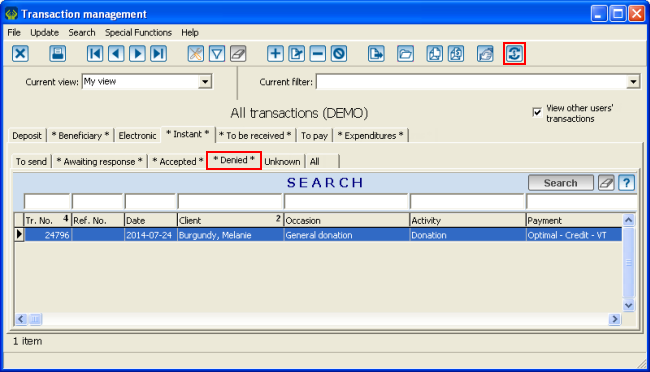
À partir de l'onglet « Refusée » de la gestion des transactions, il est possible d'envoyer tous les paiements en même temps ou un à la fois.
 | |
|
Pour revalider un ou plusieurs paiements instantanés, filtrer le ou les paiements à envoyer et cliquer sur le bouton |
|
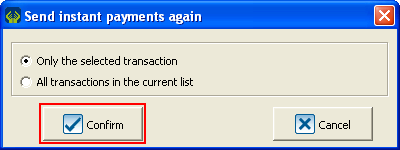
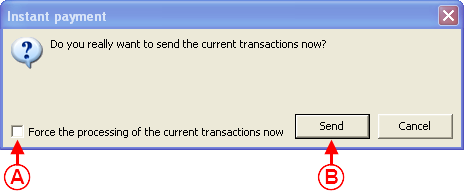
Après avoir cliqué sur le bouton « | |
 | |
|
Cliquer sur le bouton « Envoyer » en B, afin d'envoyer les transactions à Optimal. Si la case en A n'est pas cochée, les transactions se retrouveront dans l'onglet « En attente de réponse », afin qu'elles soient traitées plus tard. Si la case en A est cochée, les transactions seront vérifiées immédiatement et se retrouveront dans les onglets « Acceptée » ou « Refusée ». NOTE : La case à cocher en A n'est disponible que pour les utilisateur qui ont l'accès de forcer le traitement immédiat. Il n'est pas conseillé de cocher cette case, car s'il y a beaucoup de transactions à traiter, cette opération peut prendre plusieurs minutes. Il est donc préférable de les envoyer dans l'onglet « En attente de réponse », afin qu'Optimal les traite en lot, la nuit suivant l'envoi. |
Referral of the Payment Information from the Transaction Edit File
|
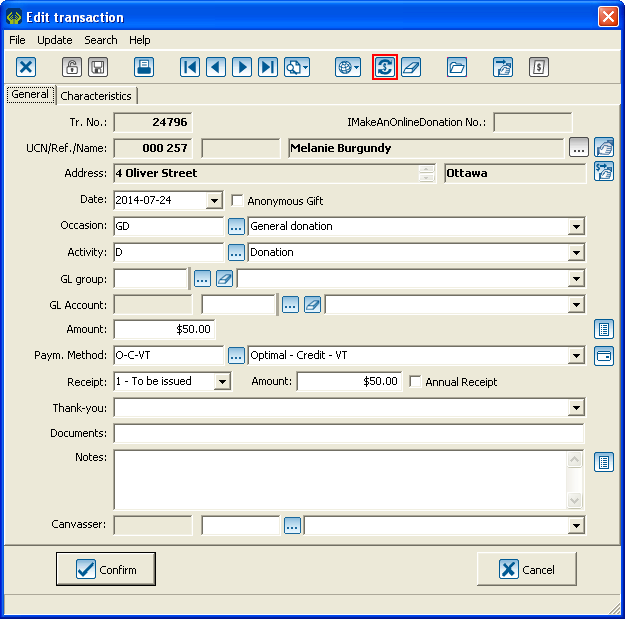
Après avoir double-cliqué sur la transaction refusée, la fenêtre suivante s'ouvre. | |
 | |
|
Pour revalider les informations de paiement, cliquer sur le bouton |
Viewing the Tokens
La saisie des informations de paiement électronique est toujours effectuée dans l'interface d'Optimal et toutes ces informations sont stockées dans une voute sécurisée chez Optimal. Aucun numéro de carte de crédit ou de CVV (voir le lexique pour définition) n’est conservé dans ProDon. Après la saisie des informations de paiement sur l'interface Optimal, un jeton est retourné dans ProDon. Ce jeton est un numéro de référence unique assigné aux informations de la carte et c'est ce jeton qui peut être conservé dans ProDon, afin de réutiliser les informations de paiement pour des transactions ultérieures.
Il est possible de consulter ces jetons à partir de 2 endroits dans ProDon :
In the Transaction File
|
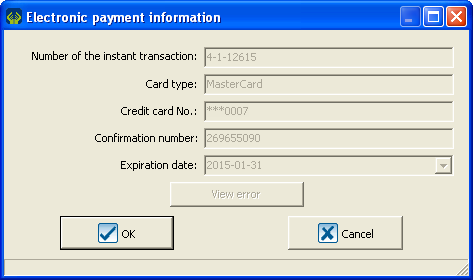
Le jeton de la fiche de la transaction se consulte en cliquant sur le bouton | |
 |
In the Client File
|
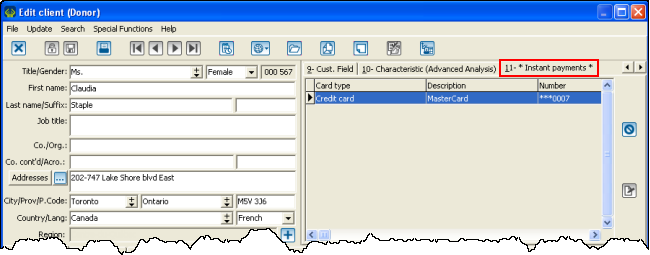
Les jetons de la fiche du client se consultent dans l'onglet « 11 - Paiements instantanés ». | |
 | |
|
NOTE : Pour que les jetons soient conservés dans la fiche client, il faut avoir répondu « Oui » à cette question. |
Document name: ProDon:Electronic Transaction Module - PaySafe
