Difference between revisions of "ProDon:Expenditure Transaction Logging"
| Line 9: | Line 9: | ||
To add an expenditure transaction, first go to the "Transaction Management". | To add an expenditure transaction, first go to the "Transaction Management". | ||
| − | {| cellspacing="1" cellpadding="1" border="1" style="width: 418px; height: 445px; | + | {| cellspacing="1" cellpadding="1" border="1" class="wikitable" style="width: 418px; height: 445px;" |
|- | |- | ||
| | | | ||
| Line 20: | Line 20: | ||
<br> | <br> | ||
| − | {| cellspacing="1" cellpadding="1" border="1" style="width: 552px; height: 424px; | + | {| cellspacing="1" cellpadding="1" border="1" class="wikitable" style="width: 552px; height: 424px;" |
|- | |- | ||
| | | | ||
| Line 35: | Line 35: | ||
<br> | <br> | ||
| − | {| cellspacing="1" cellpadding="1" border="1 | + | {| cellspacing="1" cellpadding="1" border="1" style="width: 610px; height: 734px;" class="wikitable" |
|- | |- | ||
| colspan="2" | | | colspan="2" | | ||
| − | After clicking on the [[Image: | + | After clicking on the [[Image:Button add plus.png]] button, this window opens. |
|- | |- | ||
| − | | colspan="2" | [[Image: | + | | colspan="2" | [[Image:Expenditure Transaction Logging 003.png]]<br> |
|- | |- | ||
| width="50%" | | | width="50%" | | ||
| − | '''<span style="color: rgb(255, 0, 0);">A: </span>'''Enter the transaction date. The current date is automatically entered by default. | + | '''<span style="color: rgb(255, 0, 0);">A: </span>'''Enter the transaction date. The current date is automatically entered by default. |
| width="50%" | | | width="50%" | | ||
| − | '''<span style="color: rgb(255, 0, 0);">B: </span>'''By clicking on the [[Image: | + | '''<span style="color: rgb(255, 0, 0);">B: </span>'''By clicking on the [[Image:Button Selection 3 dots.png]] button, select the donation occasion for which the transaction must be performed. |
|- | |- | ||
| width="50%" | | | width="50%" | | ||
| − | '''<span style="color: rgb(255, 0, 0);">C: </span>'''Select the expenditure by clicking on the [[Image: | + | '''<span style="color: rgb(255, 0, 0);">C: </span>'''Select the expenditure by clicking on the [[Image:Button Selection 3 dots.png|20x20px]] button. The expenditure options have previously been added when [[ProDon:Donation_Occasion_Management|creating the donation occasion]]. |
| width="50%" | | | width="50%" | | ||
| − | '''<span style="color: rgb(255, 0, 0);">D: </span>'''Enter, if necessary, the activity for which the expenditure has been done. | + | '''<span style="color: rgb(255, 0, 0);">D: </span>'''Enter, if necessary, the activity for which the expenditure has been done. |
|- | |- | ||
| width="50%" | | | width="50%" | | ||
| − | '''<span style="color: rgb(255, 0, 0);">E: </span>'''Enter the General Ledger code that must be assigned to the transaction. | + | '''<span style="color: rgb(255, 0, 0);">E: </span>'''Enter the General Ledger code that must be assigned to the transaction. |
| width="50%" | | | width="50%" | | ||
| − | '''<span style="color: rgb(255, 0, 0);">F: </span>'''Select the tax(es) that will be applied to the paid item or service. | + | '''<span style="color: rgb(255, 0, 0);">F: </span>'''Select the tax(es) that will be applied to the paid item or service. |
|- | |- | ||
| width="50%" | | | width="50%" | | ||
| − | '''<span style="color: rgb(255, 0, 0);">G: </span>'''Enter the amount of the transaction in the first box, the 3 other boxes will be filled in automatically. | + | '''<span style="color: rgb(255, 0, 0);">G: </span>'''Enter the amount of the transaction in the first box, the 3 other boxes will be filled in automatically. |
| width="50%" | | | width="50%" | | ||
| − | '''<span style="color: rgb(255, 0, 0);">H: </span>'''If no tax is applied to the transaction, check this box. | + | '''<span style="color: rgb(255, 0, 0);">H: </span>'''If no tax is applied to the transaction, check this box. |
|- | |- | ||
| width="50%" | | | width="50%" | | ||
| − | '''<span style="color: rgb(255, 0, 0);">I: </span>'''If the tax(es) amount must be calculated manually, check this box. It will then be possible to modify the boxes in <span style="color: rgb(255, 0, 0);">'''G'''</span>. | + | '''<span style="color: rgb(255, 0, 0);">I: </span>'''If the tax(es) amount must be calculated manually, check this box. It will then be possible to modify the boxes in <span style="color: rgb(255, 0, 0);">'''G'''</span>. |
| width="50%" | | | width="50%" | | ||
| − | '''<span style="color: rgb(255, 0, 0);">J: </span>'''If an item is bought and that an inventory management is used in '''''ProDon''''', select the item purchased. | + | '''<span style="color: rgb(255, 0, 0);">J: </span>'''If an item is bought and that an inventory management is used in '''''ProDon''''', select the item purchased. |
|- | |- | ||
| width="50%" | | | width="50%" | | ||
| − | '''<span style="color: rgb(255, 0, 0);">K: </span>'''Enter the number of purchased items. | + | '''<span style="color: rgb(255, 0, 0);">K: </span>'''Enter the number of purchased items. |
| width="50%" | | | width="50%" | | ||
| − | '''<span style="color: rgb(255, 0, 0);">L: </span>'''Enter the supplier for the purchased item. | + | '''<span style="color: rgb(255, 0, 0);">L: </span>'''Enter the supplier for the purchased item. |
|- | |- | ||
| width="50%" | | | width="50%" | | ||
| − | '''<span style="color: rgb(255, 0, 0);">M: </span>'''Allows you to write down a note relative to the transaction. | + | '''<span style="color: rgb(255, 0, 0);">M: </span>'''Allows you to write down a note relative to the transaction. |
| width="50%" | | | width="50%" | | ||
| − | '''<span style="color: rgb(255, 0, 0);">N: </span>'''By clicking on "[[Image: | + | '''<span style="color: rgb(255, 0, 0);">N: </span>'''By clicking on "[[Image:Button Check mark Confirm.png]] Confirm addition", the transaction will be registered and '''''ProDon''''' will go back to the transactions screen. |
|} | |} | ||
Revision as of 14:27, 14 February 2012
Contents
Introduction
ProDon allows you to log expenditure transactions linked to donation occasions that have previously been defined in the "Adding/Editing an Expenditure Activity" section of the "Donation Occasion Management" document.
Adding an Expenditure Transaction
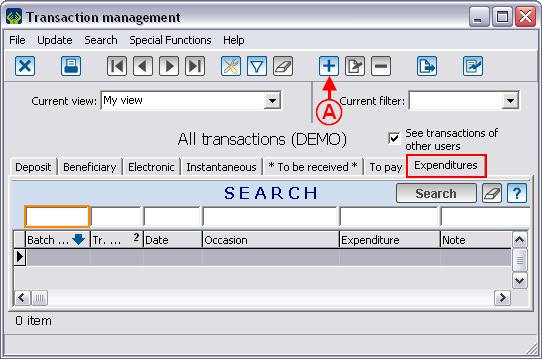
To add an expenditure transaction, first go to the "Transaction Management".
|
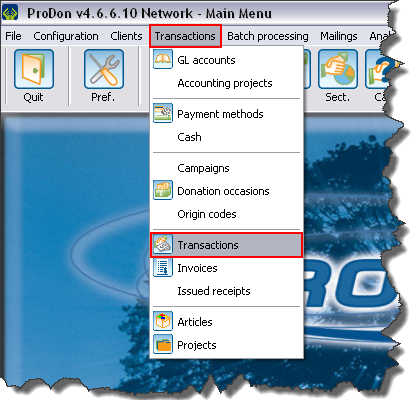
To do so, from the software home page, click on the "Transactions" menu, then select " |
 |
 | |
|
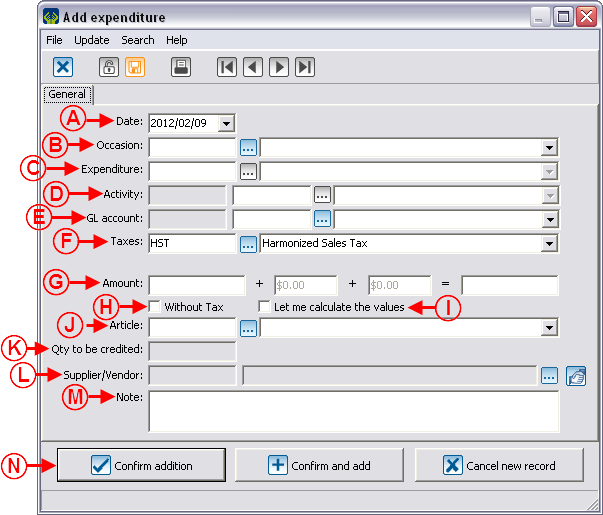
A: Enter the transaction date. The current date is automatically entered by default. |
B: By clicking on the |
|
C: Select the expenditure by clicking on the |
D: Enter, if necessary, the activity for which the expenditure has been done. |
|
E: Enter the General Ledger code that must be assigned to the transaction. |
F: Select the tax(es) that will be applied to the paid item or service. |
|
G: Enter the amount of the transaction in the first box, the 3 other boxes will be filled in automatically. |
H: If no tax is applied to the transaction, check this box. |
|
I: If the tax(es) amount must be calculated manually, check this box. It will then be possible to modify the boxes in G. |
J: If an item is bought and that an inventory management is used in ProDon, select the item purchased. |
|
K: Enter the number of purchased items. |
L: Enter the supplier for the purchased item. |
|
M: Allows you to write down a note relative to the transaction. |
N: By clicking on " |
Verification and Transfer of Expenditure Transactions
Prior to transferring the transactions from the "Transaction management", it is preferable to make a verification using a report, to make sure that there is no mistake.
Verification of the Expenditure Transaction Batch
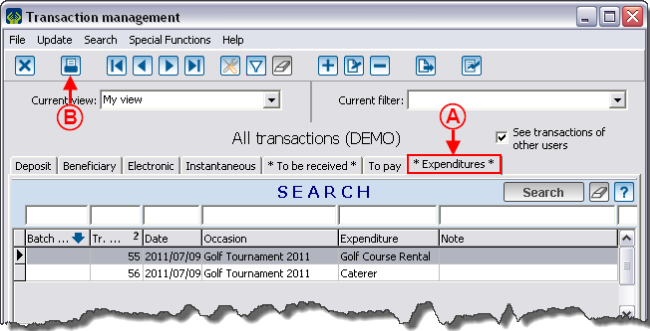
To verify a transaction batch before transferring it, go to the "Transaction management", then in the "Expenditures" tab.
|
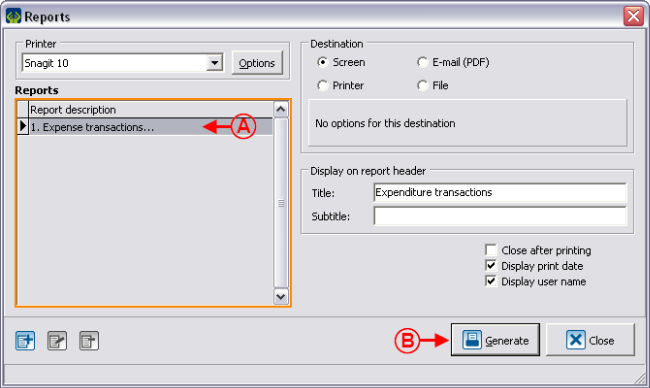
In order to make sure that there is no mistake in the transactions to be transferred, generate the transaction batch report. | |
 | |
|
A: Go to the "Expenditures" tab. |
|
 | |
|
A: Select the "1. Expense transactions..." report. |
|
|
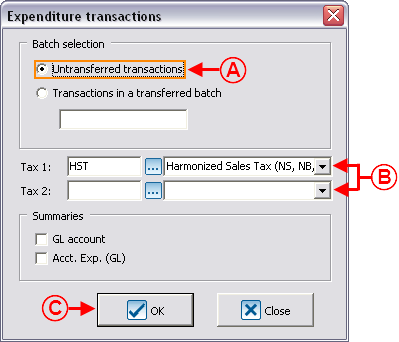
After clicking on the " | |
 | |
|
A: Select the "Untransferred transactions" option. |
B: Choose the tax(es) to be entered on the report. |
| | |
 |
|
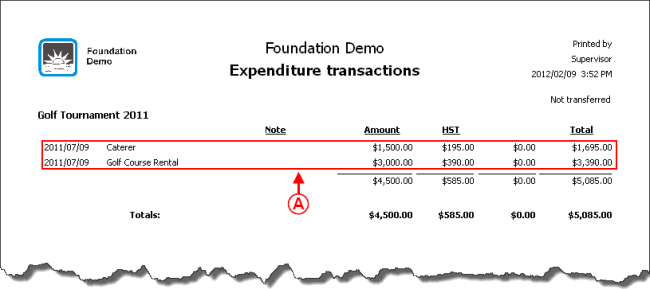
A: Check each transaction to make sure that there is no mistake befor transferring it. |
If there is one or more mistakes in the transactions, correct them before transferring the transaction batch. To correct a transaction, go back to the "transaction management", then double-click on the transaction to be corrected.
Transfer of Expenditure Transactions
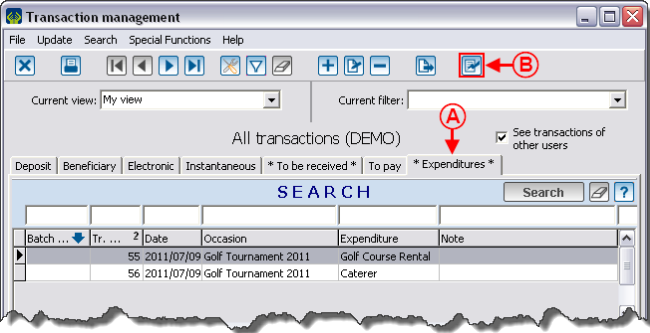
Once the transactions are verified and they contain
| |
|
A: Select the "Expenditures" tab. |
|
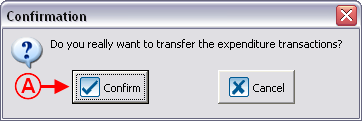
|
|
A: Click on the " |
The transactions are transferred and are no longer visible in the current list of the "Transaction management". They will be accessible from "Analysis and History", in the "Expenditures" tab.
Document name: ProDon:Expenditure Transaction Logging
