Difference between revisions of "ProDon:Campaign Management"
(→Distribution of the Objective ) (Tag: Visual edit) |
(→Adding / Editing a Campaign) (Tag: Visual edit) |
||
| (4 intermediate revisions by 2 users not shown) | |||
| Line 1: | Line 1: | ||
{{Header_TOC}} | {{Header_TOC}} | ||
| − | <br | + | <br> |
== Introduction == | == Introduction == | ||
| Line 7: | Line 7: | ||
Campaigns allow you to group donation occasions and set an objective for the selected donation occasions, over a given period of time. | Campaigns allow you to group donation occasions and set an objective for the selected donation occasions, over a given period of time. | ||
| − | The | + | The " Campaign Management " allows you to create the desired campaigns for the database. |
<br> | <br> | ||
| Line 31: | Line 31: | ||
|- | |- | ||
| − | | colspan="2" | | + | | colspan="2" | [[File:Prodon5 Campaign Management 002.png|553x553px]] |
| + | |- | ||
| + | |<span style="color: rgb(255, 0, 0);">'''A:'''</span> The [[Image:Button add plus.png]] button allows you to create a new campaign. To learn how to fill out the addition or modification window of a campaign, [[ProDon:Campaign Management#Adding_.2F_Editing_a_Campaign|click here]]. | ||
| + | |<span style="color: rgb(255, 0, 0);">'''B:'''</span> The [[Image:Button Edit.png]] button allows you to modify a campaign from the list in <span style="color: rgb(255, 0, 0);">'''D'''</span>. To do so, select the campaign to modify, then click on the [[Image:Button Edit.png]] button. To learn how to fill out the addition or modification window of a campaign, [[ProDon:Campaign Management#Adding_.2F_Editing_a_Campaign|click here]]. | ||
|- | |- | ||
| width="50%" | | | width="50%" | | ||
| − | <span style="color: rgb(255, 0, 0);">''' | + | <span style="color: rgb(255, 0, 0);">'''C:'''</span> The [[Image:Button Minus remove delete.png]] button allows you to delete a campaign from the list in <span style="color: rgb(255, 0, 0);">'''D'''</span>. To do so, select the campaign to delete, then click on the [[Image:Button Minus remove delete.png]] button. |
| width="50%" | | | width="50%" | | ||
| − | <span style="color: rgb(255, 0, 0);">''' | + | <span style="color: rgb(255, 0, 0);">'''D:'''</span> This is the list of all the existing campaigns in '''''Prodon'''''. |
| − | |||
| − | |||
| − | |||
| − | |||
| − | |||
| − | |||
| − | |||
|} | |} | ||
| Line 58: | Line 54: | ||
|- | |- | ||
| − | | colspan="2" | [[File:Prodon5 Campaign Management 003.png|frameless| | + | | colspan="2" | [[File:Prodon5 Campaign Management 003.png|frameless|641x641px]] |
|- | |- | ||
| width="50%" | | | width="50%" | | ||
| Line 64: | Line 60: | ||
| width="50%" | | | width="50%" | | ||
| − | <span style="color: rgb(255, 0, 0);">'''B:'''</span> | + | <span style="color: rgb(255, 0, 0);">'''B:'''</span> If it is a beneficiary campaign, check this checkbox (only visible if the [[ProDon:Beneficiaries Module|" Beneficiaries Module "]] is active in '''''Prodon'''''.) |
| − | |||
|- | |- | ||
| − | | | + | |<span style="color: rgb(255, 0, 0);">'''C:'''</span> Allows you to name the campaign. |
| − | <span style="color: rgb(255, 0, 0);">'''C:'''</span> | + | |<span style="color: rgb(255, 0, 0);">'''D:'''</span> Allows you to enter the objective for the campaign. To refresh this objective automatically so that it becomes the same as the one in box <span style="color: rgb(255, 0, 0);">'''G'''</span>, click on the [[Image:Refresh button.png]] button. |
| − | |||
| − | |||
| − | <span style="color: rgb(255, 0, 0);">'''D:'''</span> Allows you to enter the objective for the campaign. To refresh this objective automatically so that it becomes the same as the one in box <span style="color: rgb(255, 0, 0);">'''G'''</span>, click on the [[Image:Refresh button.png]] button. | ||
| − | |||
|- | |- | ||
| width="50%" | | | width="50%" | | ||
<span style="color: rgb(255, 0, 0);">'''E: '''</span>This section allows you to select which donation occasions should be part of the campaign. | <span style="color: rgb(255, 0, 0);">'''E: '''</span>This section allows you to select which donation occasions should be part of the campaign. | ||
| − | To add a donation occasion to the list, click on the [[Image:Button add plus.png]] button, then see [[ProDon:Campaign Management# | + | To add a donation occasion to the list, click on the [[Image:Button add plus.png]] button, then see [[ProDon:Campaign Management#Selecting the Donation Occasions for the Campaign|this section]]. |
| − | To delete a donation occasion from the list, select the one that | + | To delete a donation occasion from the list, select the one that you want to delete, then click on the [[Image:Button Minus remove delete.png]] button. |
|<span style="color: rgb(255, 0, 0);">'''F:'''</span> This section allows you to distribute the objective of the campaign through the different donation occasions and activities that are part of the campaign. This section is optional. | |<span style="color: rgb(255, 0, 0);">'''F:'''</span> This section allows you to distribute the objective of the campaign through the different donation occasions and activities that are part of the campaign. This section is optional. | ||
To add an objectve for a donation occasion or for an activity, click on [[Image:Button add plus.png]]; then see [[ProDon:Campaign Management#Distribution_of_the_Objective.C2.A0|this section]]. | To add an objectve for a donation occasion or for an activity, click on [[Image:Button add plus.png]]; then see [[ProDon:Campaign Management#Distribution_of_the_Objective.C2.A0|this section]]. | ||
| Line 89: | Line 80: | ||
<span style="color: rgb(255, 0, 0);">'''G:'''</span> This is the total amount of the objectives added in <span style="color: rgb(255, 0, 0);">'''F'''</span>. The [[Image:Refresh button.png]] button allows you to refresh the objective in box <span style="color: rgb(255, 0, 0);">'''D'''</span>, so it is the same as this one. | <span style="color: rgb(255, 0, 0);">'''G:'''</span> This is the total amount of the objectives added in <span style="color: rgb(255, 0, 0);">'''F'''</span>. The [[Image:Refresh button.png]] button allows you to refresh the objective in box <span style="color: rgb(255, 0, 0);">'''D'''</span>, so it is the same as this one. | ||
| + | |} | ||
| + | |||
| + | ==== Selecting the Donation Occasions for the Campaign ==== | ||
| + | |||
| + | {| class="wikitable" width="200" cellspacing="1" cellpadding="1" border="1" | ||
| + | |- | ||
| + | | colspan="2" | | ||
| + | After clicking on the [[Image:Button add plus.png]] button to add a donation occasion to the campaign, the following window opens up. | ||
| + | |||
| + | |- | ||
| + | | colspan="2" | [[File:Prodon5 Campaign Management 004.png]] | ||
| + | |- | ||
| + | |<span style="color: rgb(255, 0, 0);">'''A:'''</span> This is a list of all the occasions already in the database. | ||
| + | |<span style="color: rgb(255, 0, 0);">'''B:'''</span> Once an occasion is selected you can confirm your selection by pressing this button. | ||
| + | |- | ||
| + | |<span style="color: rgb(255, 0, 0);">'''C:'''</span> This allows you to add an new occasion if the one you are looking for does not exist. | ||
| + | |'''NOTE:''' It is also possible to add a | ||
| + | donation occasion to a campaign from | ||
| + | |||
| + | the [[ProDon:Donation Occasion Management#.22Other.22_Tab|" Other "]] tab of the [[ProDon:Donation Occasion Management#Adding_.2F_Editing_a_Donation_Occasion|<nowiki>'' addition/modification window of a donation occasion ''</nowiki>]]. | ||
|} | |} | ||
| Line 101: | Line 112: | ||
|- | |- | ||
| − | | colspan="2" | [[File:Prodon5 Campaign Management | + | | colspan="2" | [[File:Prodon5 Campaign Management 005.png|380x380px]] |
|- | |- | ||
| width="50%" | | | width="50%" | | ||
| Line 118: | Line 129: | ||
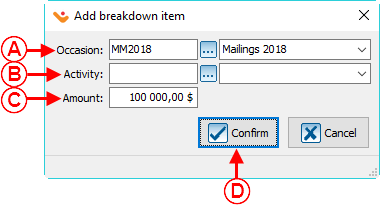
<span style="color: rgb(255, 0, 0);">'''D:'''</span> Once the donation occasion and/or activty and the amount are specified, click on the "[[Image:Button Check mark Confirm.png]] Confirm" button. | <span style="color: rgb(255, 0, 0);">'''D:'''</span> Once the donation occasion and/or activty and the amount are specified, click on the "[[Image:Button Check mark Confirm.png]] Confirm" button. | ||
| − | |||
| − | |||
| − | |||
| − | |||
| − | |||
| − | |||
| − | |||
| − | |||
| − | |||
| − | |||
| − | |||
| − | |||
| − | |||
| − | |||
| − | |||
| − | |||
| − | |||
| − | |||
| − | |||
| − | |||
|} | |} | ||
Latest revision as of 14:31, 10 August 2018
| Campaign Management |
Introduction
Campaigns allow you to group donation occasions and set an objective for the selected donation occasions, over a given period of time.
The " Campaign Management " allows you to create the desired campaigns for the database.
Campaign Management
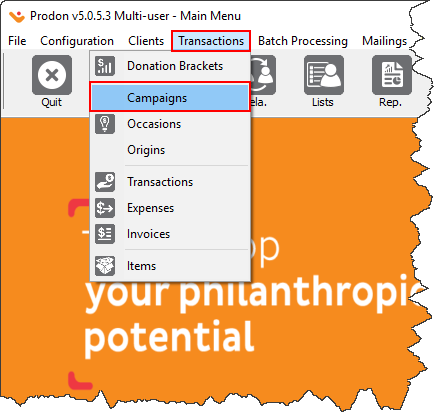
To add or modify campaigns, you must first go to " Campaign management ".
|
To do so, from the software's home page, click on the " Transactions " menu and then select " Campaigns ". | |
|
|
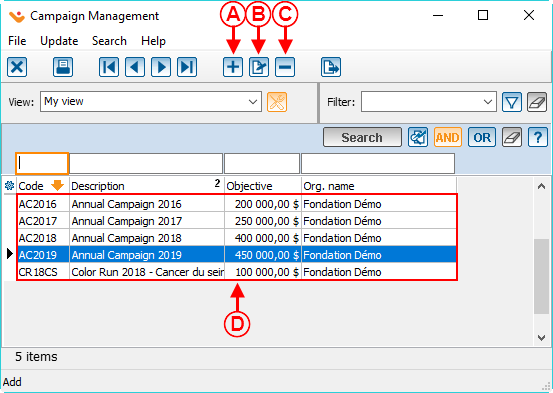
After clicking on " Campaigns ", the following window opens up. | |
| |
| A: The |
B: The |
|
C: The |
D: This is the list of all the existing campaigns in Prodon. |
Adding / Editing a Campaign
|
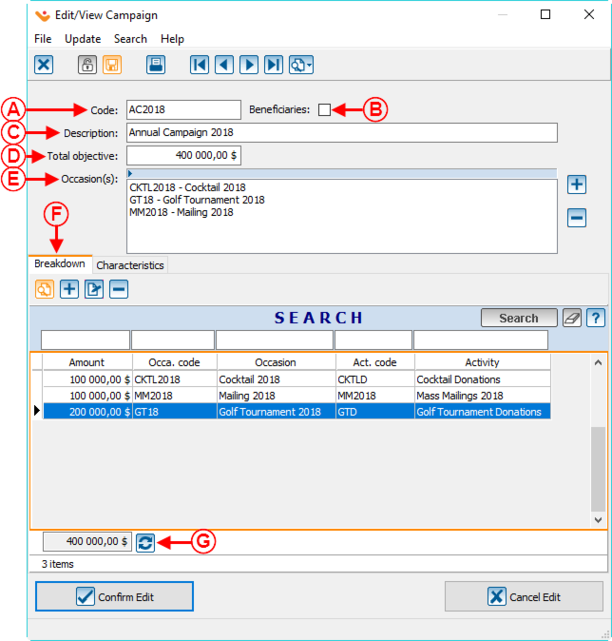
After clicking on the | |
| |
|
A: Allows you to enter a code for the campaign. |
B: If it is a beneficiary campaign, check this checkbox (only visible if the " Beneficiaries Module " is active in Prodon.) |
| C: Allows you to name the campaign. | D: Allows you to enter the objective for the campaign. To refresh this objective automatically so that it becomes the same as the one in box G, click on the |
|
E: This section allows you to select which donation occasions should be part of the campaign. To add a donation occasion to the list, click on the To delete a donation occasion from the list, select the one that you want to delete, then click on the |
F: This section allows you to distribute the objective of the campaign through the different donation occasions and activities that are part of the campaign. This section is optional.
To add an objectve for a donation occasion or for an activity, click on To delete one of the objectives from the list, select the objective to delete; then click on |
|
G: This is the total amount of the objectives added in F. The | |
Selecting the Donation Occasions for the Campaign
|
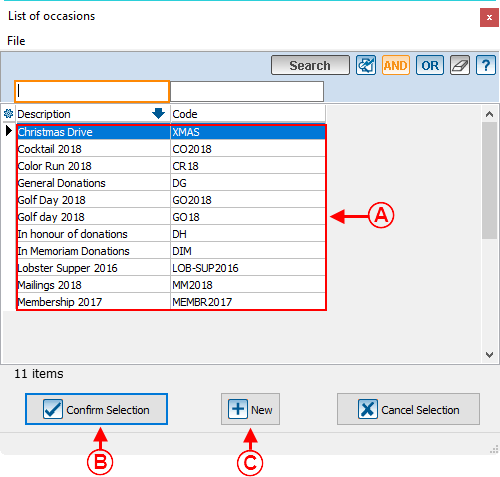
After clicking on the | |
| |
| A: This is a list of all the occasions already in the database. | B: Once an occasion is selected you can confirm your selection by pressing this button. |
| C: This allows you to add an new occasion if the one you are looking for does not exist. | NOTE: It is also possible to add a
donation occasion to a campaign from the " Other " tab of the '' addition/modification window of a donation occasion ''. |
Distribution of the Objective
It is possible to distribute the total objective of the campaign per donation occasion or activity.
Document name: ProDon:Campaign Management
Version : 5.0.5
