Difference between revisions of "ProDon:User Management"
Jguillemette (talk | contribs) |
Jguillemette (talk | contribs) |
||
| (18 intermediate revisions by the same user not shown) | |||
| Line 3: | Line 3: | ||
<br> | <br> | ||
== Introduction == | == Introduction == | ||
| − | The user management is a very important part of ProDon to be able to create new users, create user groups, manage | + | The user management is a very important part of ProDon to be able to create new users, to create user groups, to manage users' rights and accesses, and to edit users. |
| − | + | == Add a user == | |
| − | |||
| − | == Add a user | ||
To add a user, click on the "Configuration" menu and then select the "Users" option. | To add a user, click on the "Configuration" menu and then select the "Users" option. | ||
| − | |||
{| class="wikitable" | {| class="wikitable" | ||
| − | |[[ | + | |[[File:ProDon5_User_Management_001.png]] |
|} | |} | ||
<br> | <br> | ||
| Line 18: | Line 15: | ||
{| width="200" cellspacing="1" cellpadding="1" border="1" class="wikitable" | {| width="200" cellspacing="1" cellpadding="1" border="1" class="wikitable" | ||
|- | |- | ||
| − | | colspan="2" | [[ | + | | colspan="2" | [[File:ProDon5_User_Management_002.png]]<br> |
|- | |- | ||
| width="50%" | | | width="50%" | | ||
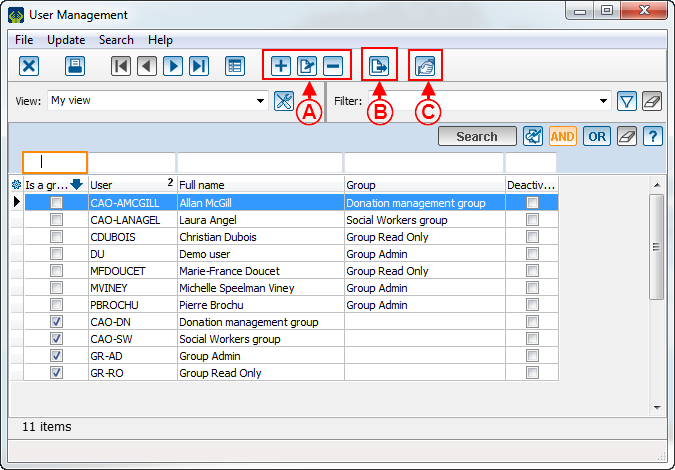
| − | <span style="color: rgb(255, 0, 0);">'''A:'''</span> | + | <span style="color: rgb(255, 0, 0);">'''A:'''</span> These three buttons are used to add [[Image:Bouton Ajouter.png]], edit [[File:Button_Edit.png]] or delete [[File:Button_Minus_remove_delete.png]] a user. |
| − | |||
| − | |||
| | | | ||
<span style="color: rgb(255, 0, 0);">'''B:'''</span> The exportation and merge button allowing to export and merge items of the list. | <span style="color: rgb(255, 0, 0);">'''B:'''</span> The exportation and merge button allowing to export and merge items of the list. | ||
| − | |||
|- | |- | ||
| colspan="2" | | | colspan="2" | | ||
| − | <span style="color: rgb(255, 0, 0);">'''C:'''</span> Configuration allowing to | + | <span style="color: rgb(255, 0, 0);">'''C:'''</span> Configuration allowing to choose to which organization the user is linked. This button is only available if there is the Multi-organization Module. |
| − | |||
| − | |||
|} | |} | ||
| Line 39: | Line 31: | ||
<br> | <br> | ||
| − | == New user configuration | + | == New user configuration == |
{| width="200" cellspacing="1" cellpadding="1" border="1" class="wikitable" | {| width="200" cellspacing="1" cellpadding="1" border="1" class="wikitable" | ||
|- | |- | ||
| − | | colspan="2" | After clicking on [[]], this window will open: | + | | colspan="2" | After clicking on [[File:Button_add_plus.png]], this window will open: |
| − | |||
|- | |- | ||
| − | | colspan="2" | [[ | + | | colspan="2" | [[File:ProDon5_User_Management_003.png]]<br> |
|- | |- | ||
| width="50%" | | | width="50%" | | ||
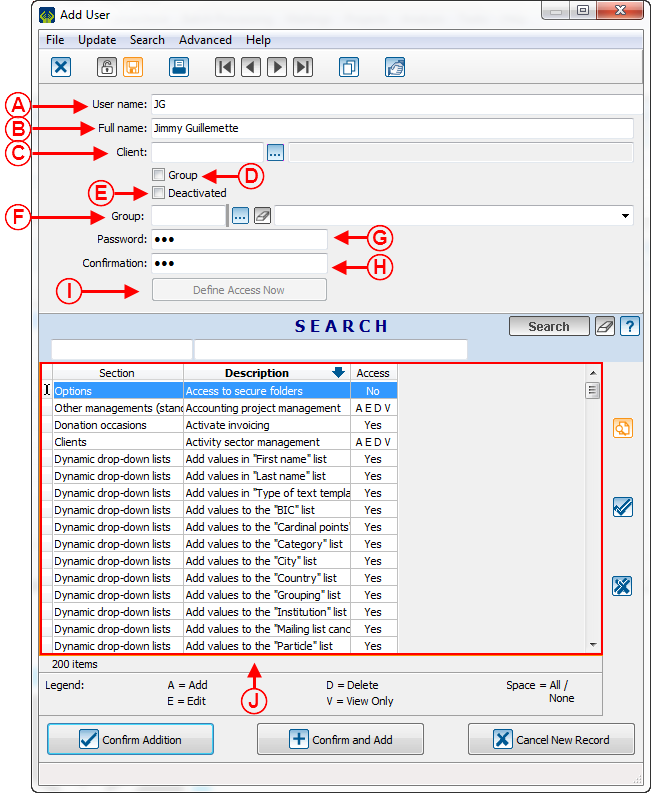
| − | <span style="color: rgb(255, 0, 0);">'''A: '''</span> User name that will be used | + | <span style="color: rgb(255, 0, 0);">'''A: '''</span> User name that will be used to log into the software. |
| − | |||
| | | | ||
<span style="color: rgb(255, 0, 0);">'''B:'''</span> User's full name. | <span style="color: rgb(255, 0, 0);">'''B:'''</span> User's full name. | ||
| − | |||
|- | |- | ||
| | | | ||
| − | <span style="color: rgb(255, 0, 0);">'''C:'''</span> | + | <span style="color: rgb(255, 0, 0);">'''C:'''</span> This allows a user to be linked to their client file. The user is not forced to link a user to a client. |
| − | |||
| | | | ||
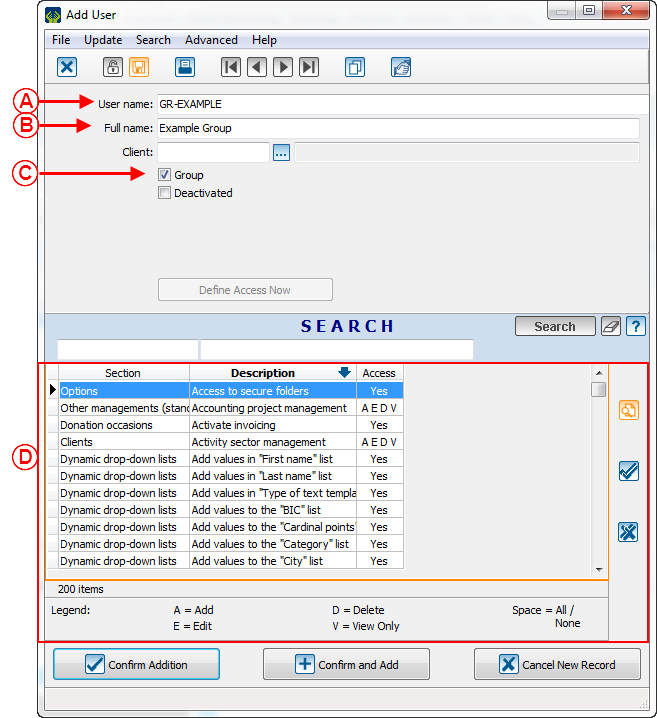
| − | <span style="color: rgb(255, 0, 0);">'''D:'''</span> This option allows | + | <span style="color: rgb(255, 0, 0);">'''D:'''</span> This option allows a group to be created. Set the accesses of the group first. Then, assign members to it by creating new users and by assigning the group to the option in <span style="color: rgb(255, 0, 0);">'''F'''</span>. |
| − | |||
| − | |||
|- | |- | ||
| | | | ||
| − | <span style="color: rgb(255, 0, 0);">'''E:'''</span> This option allows | + | <span style="color: rgb(255, 0, 0);">'''E:'''</span> This option allows a user to be deactivated. Ideally, never delete a user, because everything the user has done into the software is linked to this user. It is important to keep track of everything that has been done in ProDon. |
| − | |||
| − | |||
| − | |||
| | | | ||
| − | <span style="color: rgb(255, 0, 0);">'''F:'''</span> This option allows | + | <span style="color: rgb(255, 0, 0);">'''F:'''</span> This option allows the selection of the group which will set the user's accesses. It is not required to link a user to a group, but to save some work, it is recommended to create groups and class users according to their accesses. |
| − | |||
| − | |||
|- | |- | ||
| | | | ||
| − | <span style="color: rgb(255, 0, 0);">'''G:'''</span> Password choice | + | <span style="color: rgb(255, 0, 0);">'''G:'''</span> Password choice. |
| | | | ||
| − | <span style="color: rgb(255, 0, 0);">'''H:'''</span> Password confirmation | + | <span style="color: rgb(255, 0, 0);">'''H:'''</span> Password confirmation. |
|- | |- | ||
| | | | ||
| − | <span style="color: rgb(255, 0, 0);">'''I:'''</span> | + | <span style="color: rgb(255, 0, 0);">'''I:'''</span> This option allows the selection of the user accesses. |
| − | |||
| − | |||
| | | | ||
| − | <span style="color: rgb(255, 0, 0);">'''J:'''</span> | + | <span style="color: rgb(255, 0, 0);">'''J:'''</span> This window displays the accesses, their descriptions and the section in which they are. |
| − | |||
| − | |||
| − | |||
|} | |} | ||
<br> | <br> | ||
| − | == Edit accesses, deactivate and rename a user | + | == Edit accesses, deactivate and rename a user == |
| − | + | It is possible to edit, deactivate or rename a user. To do so, click on the edit button or double-click on the user. | |
| − | + | {| width="200" cellspacing="1" cellpadding="1" border="1" class="wikitable" | |
| + | | colspan="2" | After clicking on [[File:Button_Edit.png]], this window will open: | ||
| − | |||
| − | |||
|- | |- | ||
| − | | colspan="2" | [[ | + | | colspan="2" | [[File:ProDon5_User_Management_004.png]]<br> |
|- | |- | ||
| width="50%" | | | width="50%" | | ||
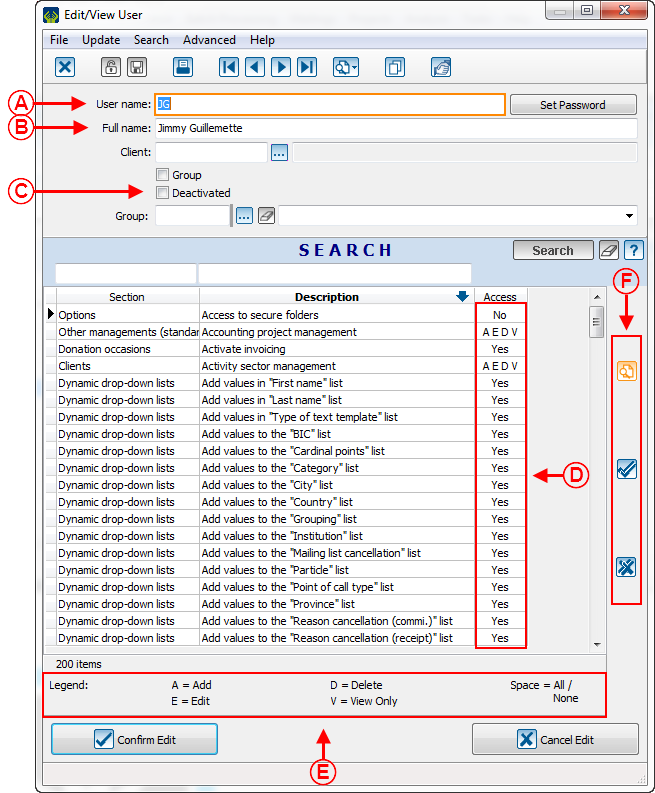
| − | <span style="color: rgb(255, 0, 0);">'''A: '''</span> In this section, | + | <span style="color: rgb(255, 0, 0);">'''A: '''</span> In this section, the user name can be edited. |
| − | |||
| − | |||
| | | | ||
| − | <span style="color: rgb(255, 0, 0);">'''B:'''</span> To rename a user, | + | <span style="color: rgb(255, 0, 0);">'''B:'''</span> To rename a user, enter the new information in this box. |
| − | + | <span style="color: rgb(255, 0, 0);">'''CAUTION:'''</span> Be extremely cautious, the name will be edited EVERYWHERE in ProDon. So, it is strongly advised against renaming a user to give it the name of a new user. For example, the user "Jimmy" is renamed into "Bobby". If "Jimmy" has created 1000 clients, now, it will be written into the software that "Bobby" has created those clients. So, for not losing tracks, the best idea is to deactivate the first user and create a new one. | |
| − | |||
| − | |||
| − | |||
|- | |- | ||
| | | | ||
<span style="color: rgb(255, 0, 0);">'''C:'''</span> For deactivating a user, click on this box. | <span style="color: rgb(255, 0, 0);">'''C:'''</span> For deactivating a user, click on this box. | ||
| − | |||
| − | |||
| | | | ||
| − | <span style="color: rgb(255, 0, 0);">'''D:'''</span> To edit the accesses and securities of a user, | + | <span style="color: rgb(255, 0, 0);">'''D:'''</span> To edit the accesses and securities of a user, select the security. There are 2 types of access rights: AEDV and Yes/No. The Yes/No access type can be changed by pushing the space bar on the keyboard. |
| − | |||
| − | |||
|- | |- | ||
| − | | <span style="color: rgb(255, 0, 0);">'''E:'''</span> Here is the description of the AEDV accesses. To give or remove an access, | + | | <span style="color: rgb(255, 0, 0);">'''E:'''</span> Here is the description of the AEDV accesses. To give or remove an access, push the letter in question on the keyboard. For example, to give the "Add" access, push the letter "A" and to give the "Edit" access, push the letter "E", etc. To give all the accesses, push the space bar on the keyboard. |
| − | |||
| | | | ||
| − | <span style="color: rgb(255, 0, 0);">'''F:'''</span> | + | <span style="color: rgb(255, 0, 0);">'''F:'''</span> The [[File:Button_funky_check_mark.png]] button allows all of them to be activated and the [[File:Button funky x.png]] button allows all of them to be removed. |
|} | |} | ||
| − | === | + | === Rename Example === |
| − | + | This is an example of what happens in the software when renaming a user. | |
{| width="200" cellspacing="1" cellpadding="1" border="1" class="wikitable" | {| width="200" cellspacing="1" cellpadding="1" border="1" class="wikitable" | ||
| − | | | + | | In this example, see that the user "Jimmy Guillemette" has created the client "Bobby Bob". |
| + | |||
|- | |- | ||
| − | |[[ | + | |[[File:ProDon5_User_Management_007.png]] |
|- | |- | ||
| − | | | + | | Then, "Jimmy" announce that he has changed his last name. He has become "Jimmy Burns", so go to "Edit / View a user". |
|- | |- | ||
| − | |[[ | + | |[[File:ProDon5_User_Management_008.png]] |
|- | |- | ||
| − | | | + | | When back to see who created the client "Bobby Bob", the name of the person who created it has been edited. |
| + | |||
|- | |- | ||
| − | |[[ | + | |[[File:ProDon5_User_Management_009.png]] |
|- | |- | ||
| − | | | + | | This is why a renaming must not be taken lightly, because it will destroy important information. |
|} | |} | ||
| − | |||
<br> | <br> | ||
| − | == | + | == Create an access group == |
| − | + | It is very useful to create access group, because this will help avoiding to do this each time a user is to be add. | |
{| width="200" cellspacing="1" cellpadding="1" border="1" class="wikitable" | {| width="200" cellspacing="1" cellpadding="1" border="1" class="wikitable" | ||
| − | | colspan="2" | | + | | colspan="2" | In the first window, click on the [[File:Button_add_plus.png]] button, this window will open: |
| + | |||
|- | |- | ||
| − | | colspan="2" | [[ | + | | colspan="2" | [[File:ProDon5_User_Management_005.png]]<br> |
|- | |- | ||
| width="50%" | | | width="50%" | | ||
| − | <span style="color: rgb(255, 0, 0);">'''A | + | <span style="color: rgb(255, 0, 0);">'''A: '''</span> In this section, name the group. |
| | | | ||
| − | <span style="color: rgb(255, 0, 0);">'''B | + | <span style="color: rgb(255, 0, 0);">'''B:'''</span> In this box, enter the name of the group. |
|- | |- | ||
| | | | ||
| − | <span style="color: rgb(255, 0, 0);">'''C | + | <span style="color: rgb(255, 0, 0);">'''C:'''</span> To create a group, this box must me checked. |
| | | | ||
| − | <span style="color: rgb(255, 0, 0);">'''D | + | <span style="color: rgb(255, 0, 0);">'''D:'''</span> Here, select accesses and securities for the group. |
| + | |||
|} | |} | ||
| − | + | Then, to assign a user to a group, go into a user file, in the group box and select the group in question. | |
| − | |||
{| width="200" cellspacing="1" cellpadding="1" border="1" class="wikitable" | {| width="200" cellspacing="1" cellpadding="1" border="1" class="wikitable" | ||
| − | |[[ | + | |[[File:ProDon5_User_Management_006.png]]<br> |
|} | |} | ||
| + | |||
| + | |||
{{Footer_ProDon_Version|5.0.3.1}}<br> | {{Footer_ProDon_Version|5.0.3.1}}<br> | ||
Latest revision as of 12:54, 24 February 2017
| User Management |
Introduction
The user management is a very important part of ProDon to be able to create new users, to create user groups, to manage users' rights and accesses, and to edit users.
Add a user
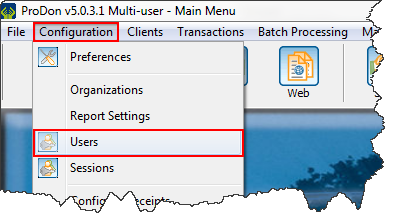
To add a user, click on the "Configuration" menu and then select the "Users" option.
|
New user configuration
Edit accesses, deactivate and rename a user
It is possible to edit, deactivate or rename a user. To do so, click on the edit button or double-click on the user.
Rename Example
This is an example of what happens in the software when renaming a user.
Create an access group
It is very useful to create access group, because this will help avoiding to do this each time a user is to be add.
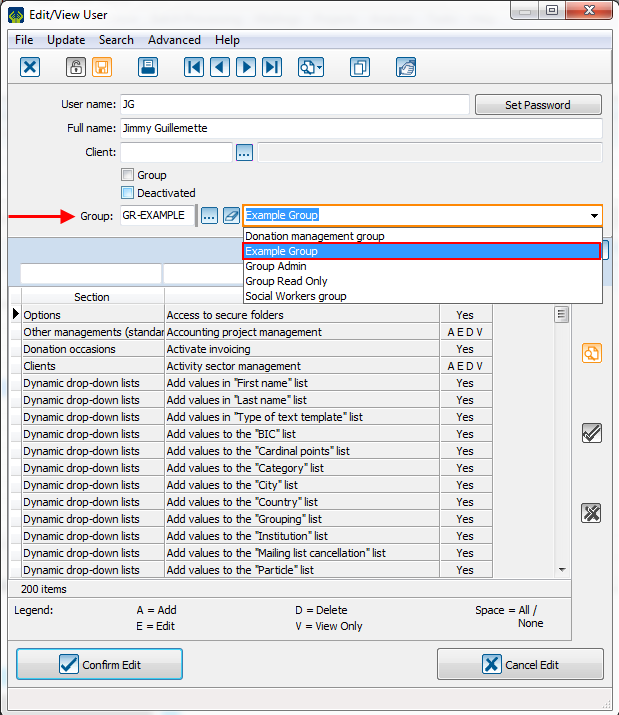
Then, to assign a user to a group, go into a user file, in the group box and select the group in question.
 |
Document name: ProDon:User Management
Version : 5.0.3.1
