Difference between revisions of "ProDon:Beneficiaries Module"
(→Origin) (Tag: Visual edit) |
Jguillemette (talk | contribs) |
||
| (80 intermediate revisions by 4 users not shown) | |||
| Line 1: | Line 1: | ||
{{Header_TOC}}<br> | {{Header_TOC}}<br> | ||
| + | |||
== Introduction<br> == | == Introduction<br> == | ||
| − | The | + | The beneficiaries module helps you track and process your issued donations' information.It offers the same management operations as '''ProDon''' for all the donations your company has issued. This module integrates into '''ProDon''' in a transparent way. The operations that '''ProDon''' lets you do with cash inflow, the Beneficiary Module enables you to do so with cash outflow. |
== Origin == | == Origin == | ||
| − | To structure issued transactions, we recommend you to create an origin | + | To structure issued transactions, we recommend you to create an origin just for beneficiary activities: |
{| width="200" cellspacing="1" cellpadding="1" border="1" class="wikitable" | {| width="200" cellspacing="1" cellpadding="1" border="1" class="wikitable" | ||
|- | |- | ||
| − | |[[File:ProDon5 Beneficiary | + | |[[File:ProDon5 Beneficiary.png|574x574px]]<br> |
|- | |- | ||
| − | | | + | |First, you must go to the origin management menu. In the main menu, click on "Transactions" and "Origin". |
| + | In the window which opens, click on [[File:Button add plus.png|frameless]] to add an origin. | ||
|} | |} | ||
| − | + | {| width="200" cellspacing="1" cellpadding="1" border="1" class="wikitable" | |
| − | |||
| − | |||
| − | {| cellspacing="1" cellpadding="1" border="1" class="wikitable | ||
|- | |- | ||
| − | | | + | |[[File:ProDon5 Beneficiary Module 002.png|thumb|650x650px]] |
|- | |- | ||
| − | | Name | + | |
| + | |Name it according to your management needs. | ||
|} | |} | ||
| Line 34: | Line 34: | ||
| Here is an example: | | Here is an example: | ||
|- | |- | ||
| − | | [[ | + | |[[File:ProDon5 Beneficiary Module 003.png|none|thumb|580x580px]] |
|} | |} | ||
== Beneficiary Occasion == | == Beneficiary Occasion == | ||
| − | First, open [[ProDon: | + | First, open [[ProDon:Donation Occasion Management|donation occasion management]] and click on [[Image:Bouton Ajouter.png]] to add a beneficiary occasion.<br> |
A beneficiary occasion has approximately the same structure as a standard occasion. | A beneficiary occasion has approximately the same structure as a standard occasion. | ||
{| width="200" cellspacing="1" cellpadding="1" border="1" class="wikitable" | {| width="200" cellspacing="1" cellpadding="1" border="1" class="wikitable" | ||
|- | |- | ||
| − | | colspan="2" | [[ | + | | colspan="2" | [[File:ProDon004.png|800x800px]]<br> |
| + | |- | ||
| + | | width="50%" |<span style="color: rgb(255, 0, 0);">'''A'''</span>: You must check the box "Beneficiaries". <br> | ||
| + | |<span style="color: rgb(255, 0, 0);">'''B'''</span>: You can create "Fixed unit price" activities so that you will be able to issue a fixed amount for an activity.<br> | ||
|- | |- | ||
| − | + | | <span style="color: rgb(255, 0, 0);">'''C'''</span>: You can create activities which type is "standard", so you will be able to choose the amount to be issued during the transaction.<br> | |
| − | + | | <span style="color: rgb(255, 0, 0);">'''D'''</span>: There is no receipt for beneficiary activities. | |
| − | |||
| − | |||
| − | | <span style="color: rgb(255, 0, 0);">'''D'''</span>: There is no receipt for beneficiary | ||
|} | |} | ||
| Line 59: | Line 59: | ||
There are two types of beneficiary activities: fixed and variable amount. | There are two types of beneficiary activities: fixed and variable amount. | ||
| − | To create | + | To create an activity with fixed amount: |
{| width="200" cellspacing="1" cellpadding="1" border="1" class="wikitable" | {| width="200" cellspacing="1" cellpadding="1" border="1" class="wikitable" | ||
|- | |- | ||
| − | | colspan="2" | [[ | + | | colspan="2" |[[File:ProDon5 Beneficiary Module 005.png|none|thumb|800x800px]] |
|- | |- | ||
| width="50%" | <span style="color: rgb(255, 0, 0);">'''A'''</span>: Enter the code and the description of your activity. | | width="50%" | <span style="color: rgb(255, 0, 0);">'''A'''</span>: Enter the code and the description of your activity. | ||
| − | | <span style="color: rgb(255, 0, 0);">'''B'''</span>: Select the type " | + | | <span style="color: rgb(255, 0, 0);">'''B'''</span>: Select the type "Sale price" and enter the amount.<br> |
|- | |- | ||
| − | | <span style="color: rgb(255, 0, 0);">'''C'''</span>: | + | | <span style="color: rgb(255, 0, 0);">'''C'''</span>: Enter the origin of your activity. |
| <br> | | <br> | ||
| − | |} | + | |} |
To create an activity with a variable amount: | To create an activity with a variable amount: | ||
| − | {| | + | {| class="wikitable" border="1" cellpadding="1" cellspacing="1" width="200" |
|- | |- | ||
| − | | colspan="2" | [[ | + | | colspan="2" |[[File:ProDon5 Beneficiary Module 006.png|thumb|800x800px]]<br> |
|- | |- | ||
| − | | width="50%" | <span style="color: rgb(255, 0, 0);">'''A'''</span>: Enter your activity code and description<br> | + | | width="50%" | <span style="color: rgb(255, 0, 0);">'''A'''</span>: Enter your activity code and description.<br> |
| <span style="color: rgb(255, 0, 0);">'''B'''</span>: Select "Standard" type. | | <span style="color: rgb(255, 0, 0);">'''B'''</span>: Select "Standard" type. | ||
|- | |- | ||
| − | | <span style="color: rgb(255, 0, 0);">'''C'''</span>: | + | | <span style="color: rgb(255, 0, 0);">'''C'''</span>: Enter the origin of your activity.<br> |
| <br> | | <br> | ||
|} | |} | ||
| − | <br> | + | <br> |
== Beneficiary Transactions == | == Beneficiary Transactions == | ||
| Line 92: | Line 92: | ||
{| width="200" cellspacing="1" cellpadding="1" border="1" class="wikitable" | {| width="200" cellspacing="1" cellpadding="1" border="1" class="wikitable" | ||
|- | |- | ||
| − | | colspan="2" | [[ | + | | colspan="2" |[[File:ProDon5 Beneficiary Module 007.png|thumb|800x800px]]<br> |
|- | |- | ||
| width="50%" | <span style="color: rgb(255, 0, 0);">'''A'''</span>: Click on the tab "''Beneficiary"''.<br> | | width="50%" | <span style="color: rgb(255, 0, 0);">'''A'''</span>: Click on the tab "''Beneficiary"''.<br> | ||
| Line 102: | Line 102: | ||
{| width="200" cellspacing="1" cellpadding="1" border="1" class="wikitable" | {| width="200" cellspacing="1" cellpadding="1" border="1" class="wikitable" | ||
|- | |- | ||
| − | | [[ | + | |[[File:ProDon5 Beneficiary Module 008.png|675x675px]]<br> |
|- | |- | ||
| − | | In the window where you add transaction, you just have to fill the | + | | In the window where you add transaction, you just have to fill the fields in the same way you fill standard transaction fields. |
|} | |} | ||
| Line 111: | Line 111: | ||
{| width="200" cellspacing="1" cellpadding="1" border="1" class="wikitable" | {| width="200" cellspacing="1" cellpadding="1" border="1" class="wikitable" | ||
|- | |- | ||
| − | | [[ | + | |[[File:ProDon5 Beneficiary Module 009.png|thumb|500x500px]]<br> |
|- | |- | ||
| '''Note''': You will only have access to "beneficiary" occasions.<br> | | '''Note''': You will only have access to "beneficiary" occasions.<br> | ||
| Line 120: | Line 120: | ||
{| width="200" cellspacing="1" cellpadding="1" border="1" class="wikitable" | {| width="200" cellspacing="1" cellpadding="1" border="1" class="wikitable" | ||
|- | |- | ||
| − | | [[ | + | |[[File:ProDon5 Beneficiary Module 010.png|thumb|800x800px]]<br> |
|- | |- | ||
| − | | You can create pending transactions. To do so, select an appropriate payment method as "File | + | | You can create pending transactions. To do so, select an appropriate payment method as "File in Committee Evaluation" and the transaction will be in the "To Be Paid" tab.<br> |
|} | |} | ||
<br> | <br> | ||
| − | Once your "Batch" is completed, you can report it [[Image:Bouton Rapport imprimer.png]] just as a donation transaction batch. <br> | + | Once your "Batch" is completed, you can report it with [[Image:Bouton Rapport imprimer.png]] just as a donation transaction batch. <br> |
== Beneficiary Reports == | == Beneficiary Reports == | ||
| − | === | + | === Beneficiary Results === |
| + | |||
From the main menu, choose " Analysis", and "Reports": | From the main menu, choose " Analysis", and "Reports": | ||
{| class="wikitable" | {| class="wikitable" | ||
| − | ![[ | + | ![[File:ProDon5 Beneficiary Module 011.png|thumb|789x789px]] |
|- | |- | ||
| Then, select the report " 1. Donation Occasion Results... ". | | Then, select the report " 1. Donation Occasion Results... ". | ||
| Line 140: | Line 141: | ||
|} | |} | ||
| − | Select "Beneficiary occasions", then you can select beneficiary occasions that you specifically need for your | + | Select "Beneficiary occasions", then you can select the beneficiary occasions that you specifically need for your result: |
{| class="wikitable" | {| class="wikitable" | ||
| − | ![[ | + | ![[File:ProDon5 Beneficiary Module 012.png|thumb|510x510px]] |
|- | |- | ||
| Name it, according to your management needs, then click on "Ok". | | Name it, according to your management needs, then click on "Ok". | ||
|} | |} | ||
{| class="wikitable" | {| class="wikitable" | ||
| − | |[[ | + | |[[File:ProDon5 Beneficiary Module 013.png|thumb|875x875px]] |
|- | |- | ||
| A record will be created according to the selected parameters. | | A record will be created according to the selected parameters. | ||
| Line 156: | Line 157: | ||
In "''Analysis and History"'' you will see "Beneficiary" tab. Click on [[Image:Bouton Rapport imprimer.png]] in that management: | In "''Analysis and History"'' you will see "Beneficiary" tab. Click on [[Image:Bouton Rapport imprimer.png]] in that management: | ||
{| class="wikitable" | {| class="wikitable" | ||
| − | ![[ | + | ![[File:ProDon5 Beneficiary Module 014.png|none|thumb|740x740px]] |
|- | |- | ||
| Select the report "3. List of transactions (Compact format): | | Select the report "3. List of transactions (Compact format): | ||
|} | |} | ||
{| class="wikitable" | {| class="wikitable" | ||
| − | ![[ | + | ![[File:ProDon5 Beneficiary Module 015.png|thumb|630x630px]] |
|- | |- | ||
| Select the report 3. List of transactions (Compact Format) | | Select the report 3. List of transactions (Compact Format) | ||
| Line 167: | Line 168: | ||
{| class="wikitable" | {| class="wikitable" | ||
| − | ![[ | + | ![[File:ProDon5 Beneficiary Module 016.png|379x379px]] |
|- | |- | ||
| Check the summary options and the options that you will need in your report and then click on "Ok". | | Check the summary options and the options that you will need in your report and then click on "Ok". | ||
| Line 173: | Line 174: | ||
{| class="wikitable" | {| class="wikitable" | ||
| − | ![[ | + | ![[File:ProDon5 Beneficiary Module 017.png|thumb|815x815px]] |
|- | |- | ||
| A beneficiary transaction list will be generated according to the parameters that you will select. | | A beneficiary transaction list will be generated according to the parameters that you will select. | ||
| − | |||
| − | |||
| − | {{ | + | |
| + | |} | ||
| + | <br> | ||
| + | |||
| + | {{Footer_ProDon_Version|5.0.2.11}}<br> | ||
Latest revision as of 15:11, 14 November 2016
| Beneficiaries Module |
Introduction
The beneficiaries module helps you track and process your issued donations' information.It offers the same management operations as ProDon for all the donations your company has issued. This module integrates into ProDon in a transparent way. The operations that ProDon lets you do with cash inflow, the Beneficiary Module enables you to do so with cash outflow.
Origin
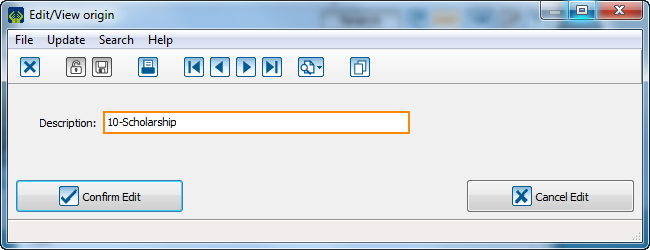
To structure issued transactions, we recommend you to create an origin just for beneficiary activities:
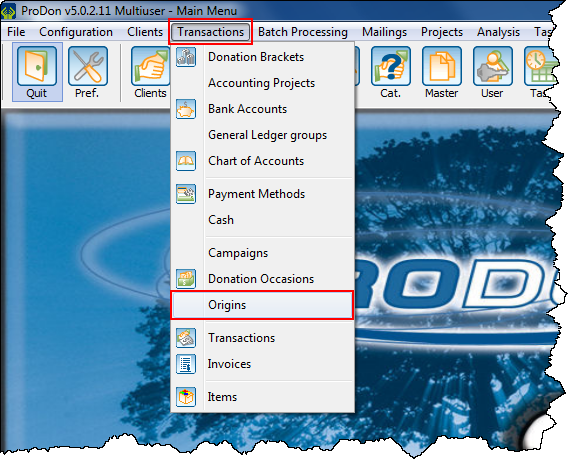 |
| First, you must go to the origin management menu. In the main menu, click on "Transactions" and "Origin". |
| Name it according to your management needs. |
Payment Methods
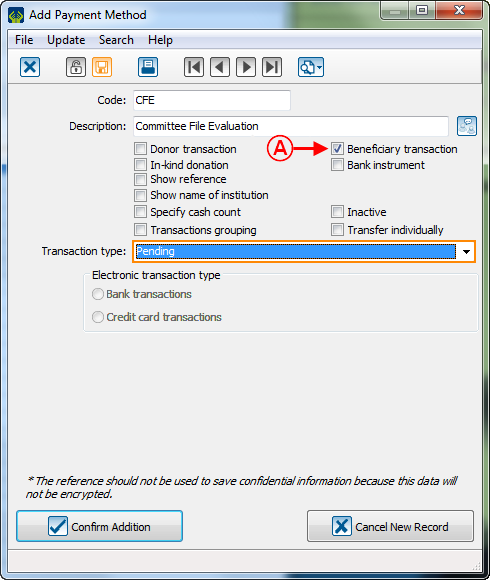
It is possible to create specific payment methods for beneficiary transaction management.
| Here is an example: |
Beneficiary Occasion
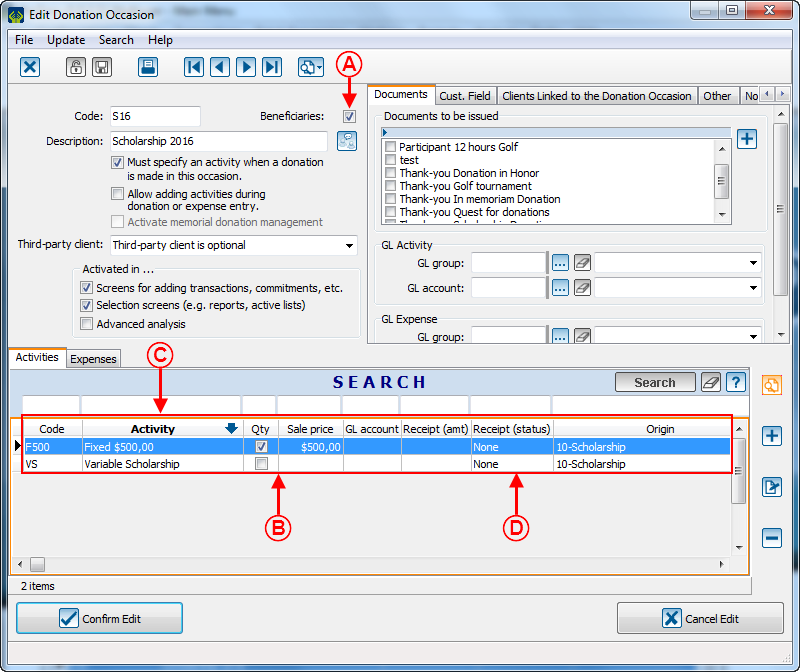
First, open donation occasion management and click on ![]() to add a beneficiary occasion.
to add a beneficiary occasion.
A beneficiary occasion has approximately the same structure as a standard occasion.
Beneficiary Activities
There are two types of beneficiary activities: fixed and variable amount.
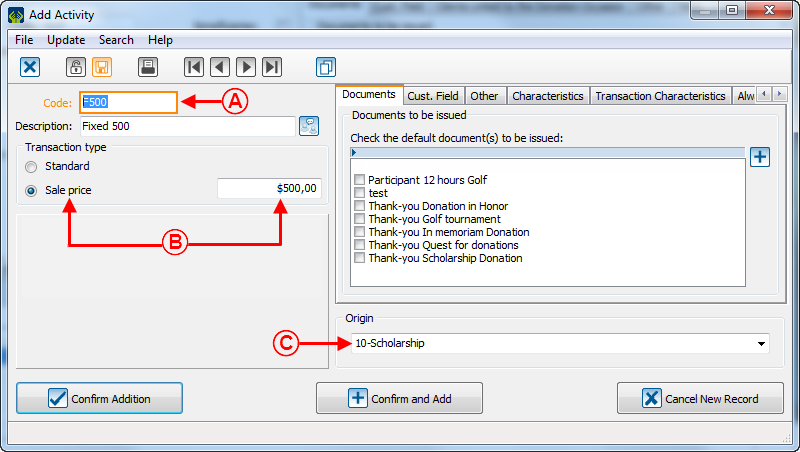
To create an activity with fixed amount:
| A: Enter the code and the description of your activity. | B: Select the type "Sale price" and enter the amount. |
| C: Enter the origin of your activity. | |
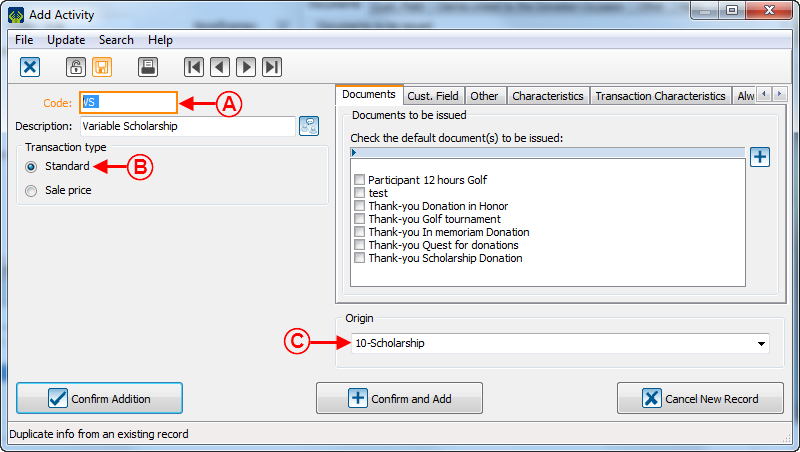
To create an activity with a variable amount:
| A: Enter your activity code and description. |
B: Select "Standard" type. |
| C: Enter the origin of your activity. |
|
Beneficiary Transactions
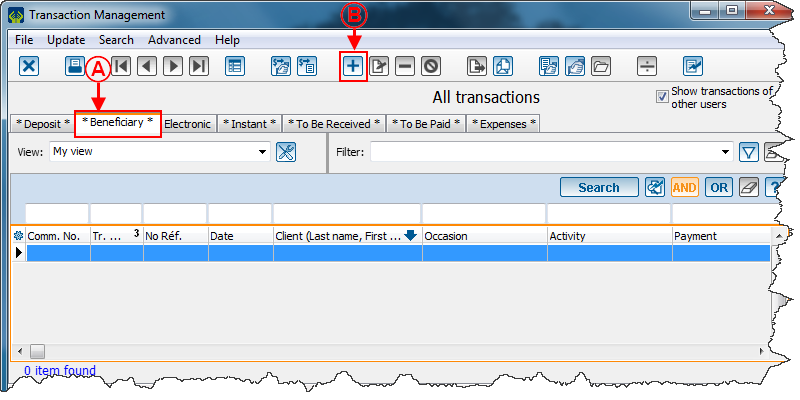
To add a beneficiary type transaction, you must first go in transaction management.
| A: Click on the tab "Beneficiary". |
B: Click on |
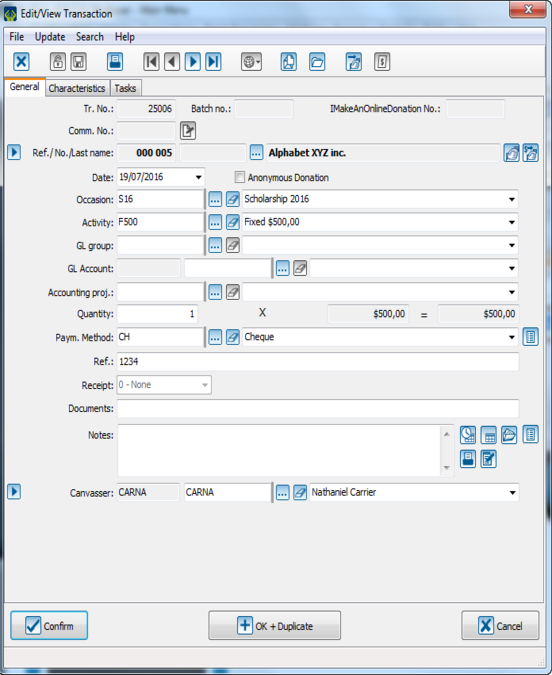 |
| In the window where you add transaction, you just have to fill the fields in the same way you fill standard transaction fields. |
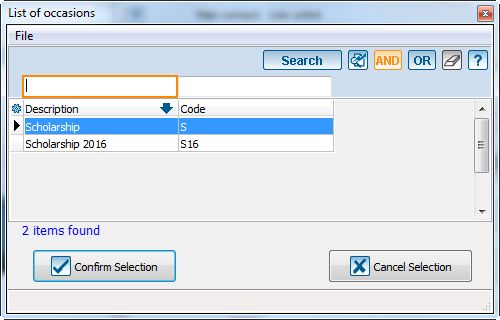
| Note: You will only have access to "beneficiary" occasions. |
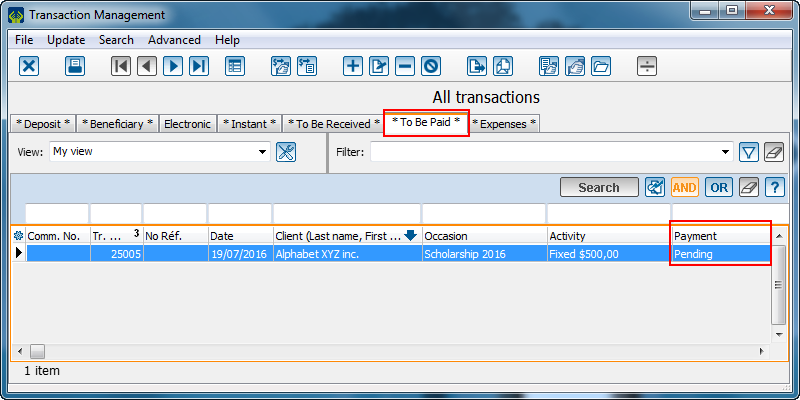
| You can create pending transactions. To do so, select an appropriate payment method as "File in Committee Evaluation" and the transaction will be in the "To Be Paid" tab. |
Once your "Batch" is completed, you can report it with ![]() just as a donation transaction batch.
just as a donation transaction batch.
Beneficiary Reports
Beneficiary Results
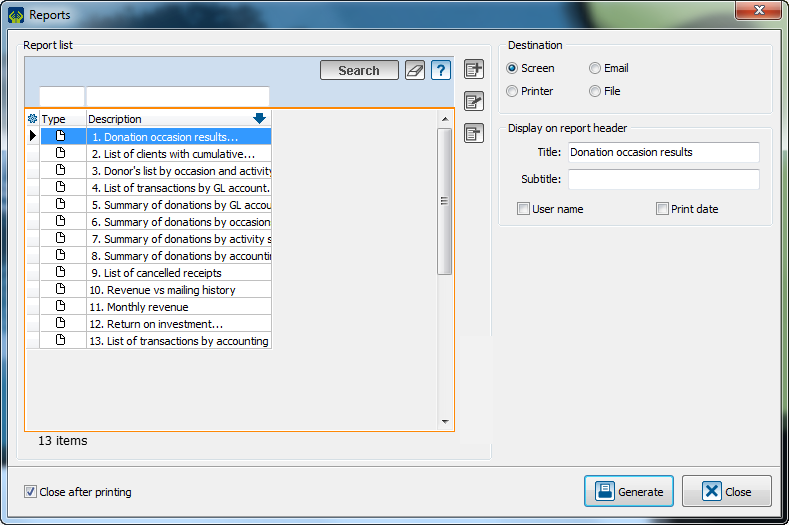
From the main menu, choose " Analysis", and "Reports":
| Then, select the report " 1. Donation Occasion Results... ". |
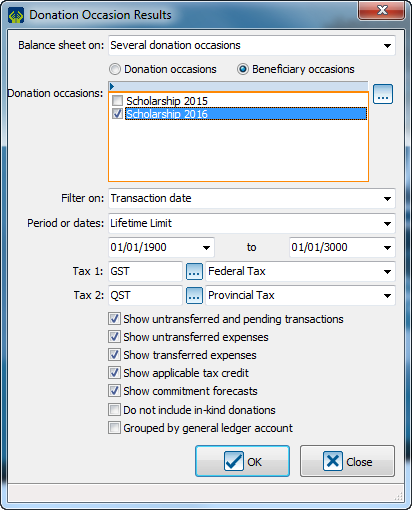
Select "Beneficiary occasions", then you can select the beneficiary occasions that you specifically need for your result:
| Name it, according to your management needs, then click on "Ok". |
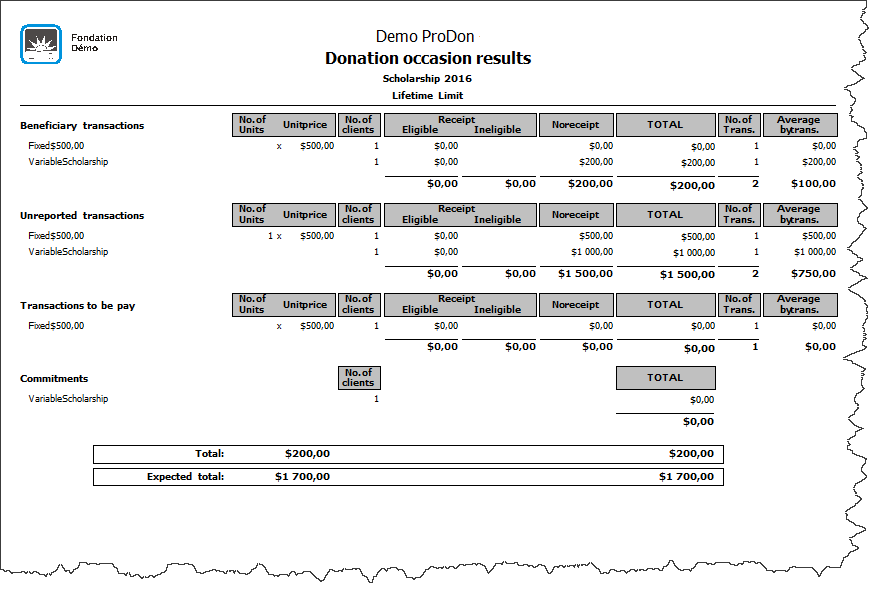
| A record will be created according to the selected parameters. |
Transaction List
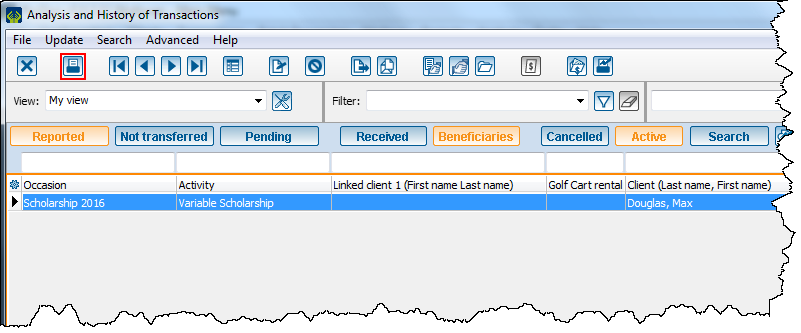
In "Analysis and History" you will see "Beneficiary" tab. Click on ![]() in that management:
in that management:
| Select the report "3. List of transactions (Compact format): |
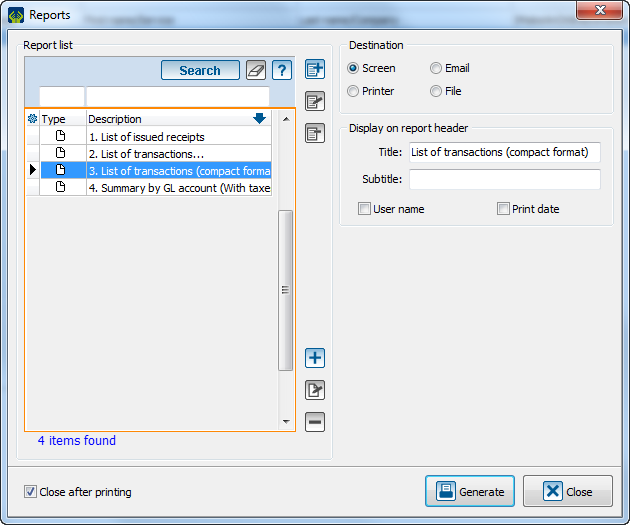
| Select the report 3. List of transactions (Compact Format) |
|
|---|
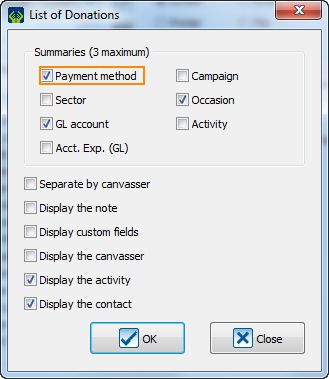
| Check the summary options and the options that you will need in your report and then click on "Ok". |
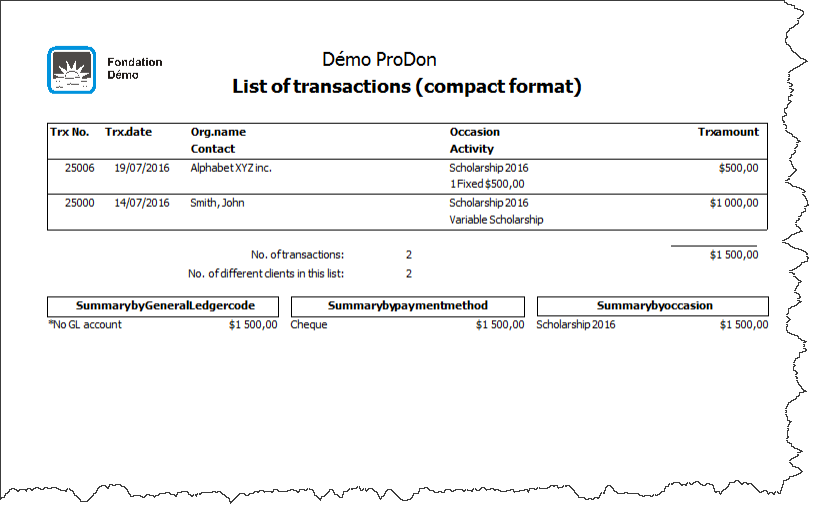
| A beneficiary transaction list will be generated according to the parameters that you will select.
|
Document name: ProDon:Beneficiaries Module
Version : 5.0.2.11
