Difference between revisions of "ProDon:Period Management"
(Tag: Visual edit) |
|||
| (103 intermediate revisions by 5 users not shown) | |||
| Line 1: | Line 1: | ||
| − | + | {{Header_TOC}}<br> | |
| − | + | '''<u>CAUTION</u>''' : This document is for '''VERSION''' '''5''' of '''''Prodon'''''. To go to the document for version 4, [[Common functions:Period Management (version 4)|click here]]. <br><br><br> | |
| + | == Introduction == | ||
| − | + | Period management is a way to configure a period of time (e.g. the fiscal year or a trimester of an organization). When the periods are configured, it is possible to see the summaries for each period in the " Client " files as well as in " Analysis & History ". Furthermore, these summaries can be used to produce reports and customized lists in relation to these specific periods. | |
| − | Period | + | == Creating a Period == |
| − | === Add | + | {| class="wikitable" |
| + | |- | ||
| + | |From the main page of the software, first click on " Configuration ", " Accounting " and then on " [[Image:Bouton période.png]] Periods ". | ||
| + | |- | ||
| + | |[[File:Prodon5 Period Management 001.png|553x553px]] | ||
| + | |} | ||
| + | |||
| + | {| class="wikitable" cellspacing="1" cellpadding="1" border="1" style="width: 524px; height: 449px;" | ||
| + | | colspan="2" |The period management window opens up, it is now possible to: | ||
| + | |- | ||
| + | | colspan="2" | [[File:Prodon5 Period Management 002.png|frameless|655x655px]] | ||
| + | |- | ||
| + | | width="50%" | | ||
| + | <span style="color: rgb(255, 0, 0);">'''A: '''</span>Add, Edit/View or Remove periods. | ||
| + | |||
| + | | width="50%" | | ||
| + | <span style="color: rgb(255, 0, 0);">'''B:'''</span><span style="color: rgb(255, 0, 0);"></span>View the list of existing periods. | ||
| + | |||
| + | |} | ||
| + | |||
| + | <br> | ||
| − | + | {| class="wikitable" cellspacing="1" cellpadding="1" border="1" style="width: 407px; height: 531px;" | |
| + | |- | ||
| + | | colspan="2" | | ||
| + | By clicking on the [[Image:Button add plus.png]] button, the following window opens up; | ||
| + | |||
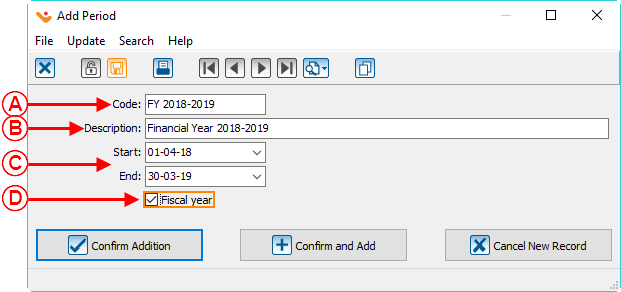
| + | This is an example when adding a new fiscal year. | ||
| + | |||
| + | |- | ||
| + | | colspan="2" | [[File:Prodon5 Period Management 003.png]] | ||
| + | |- | ||
| + | | width="50%" | | ||
| + | <span style="color: rgb(255, 0, 0);">'''A:'''</span> Allows you to assign an abbreviated code name to the period. | ||
| + | |||
| + | | width="50%" | | ||
| + | <span style="color: rgb(255, 0, 0);">'''B: '''</span>Allows you to assign a complete name to the period. | ||
| + | |- | ||
| + | |<span style="color: rgb(255, 0, 0);">'''C:'''</span> Is the interval covered by the period. The " Start " field allows you to enter the start date of the period and the " End " field allows you to enter the end date of the period. | ||
| + | |<span style="color: rgb(255, 0, 0);">'''D: '''</span>Two periods having the " Fiscal year " box checked can not overlap. The second Fiscal year will absolutely have to start after the end of the first one. | ||
| + | |} | ||
<br> | <br> | ||
| − | + | {| width="200" cellspacing="1" cellpadding="1" border="1" class="wikitable" | |
| + | |- | ||
| + | | | ||
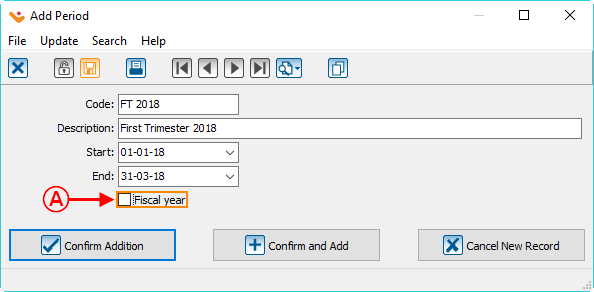
| + | This is an example when adding a trimester. | ||
| + | |||
| + | |- | ||
| + | | [[File:Prodon5 Period Management 004.png]] | ||
| + | |- | ||
| + | | | ||
| + | <span style="color: rgb(255, 0, 0);">'''A: '''</span>Even if the dates of the trimester overlap the dates of the fiscal year, it is still possible to add this new period since the " Fiscal year " box is not checked. | ||
| + | |||
| + | |} | ||
| + | |||
| + | <br> | ||
| − | {| width=" | + | {| width="200" cellspacing="1" cellpadding="1" border="1" class="wikitable" |
|- | |- | ||
| − | | | + | | [[File:Prodon5 Period Management 005.png]] |
|- | |- | ||
| − | |||
| | | | ||
| − | + | Here is the error message that appears when the dates of a new period overlap the dates of an fiscal year. | |
|} | |} | ||
| − | + | == View the Summaries by Period == | |
| − | === | + | === In a Client File === |
| + | {| cellspacing="1" cellpadding="1" border="1" class="wikitable" style="width: 533px; height: 339px;" | ||
| + | |- | ||
| + | | colspan="2" | [[File:Prodon5 Period Management 006.png|frameless|1228x1228px]] | ||
| + | |- | ||
| + | | width="50%" | | ||
| + | <span style="color: rgb(255, 0, 0);">'''A: '''</span>Go in the " Summary " tab of any client file. | ||
| + | | width="50%" | | ||
| + | <span style="color: rgb(255, 0, 0);">'''B:'''</span> This is the lifetime total of all of the client's transactions. | ||
| + | |||
| + | |- | ||
| + | | colspan="2" width="50%" | | ||
| + | <span style="color: rgb(255, 0, 0);">'''C:'''</span> View the client's transactions cumulative for each period. | ||
| + | |} | ||
| + | |||
| + | === In "Analysis & History" === | ||
| + | |||
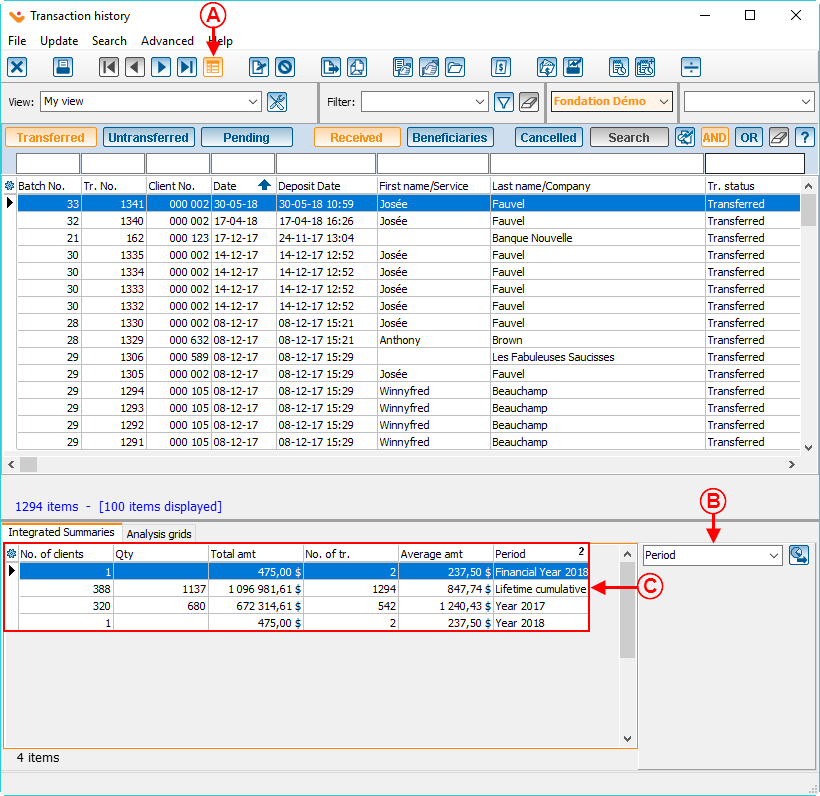
| + | It is also possible to view a summary by period in " Analysis & History ".<br> | ||
| + | |||
| + | {| class="wikitable" cellspacing="1" cellpadding="1" border="1" style="width: 532px; height: 327px;" | ||
| + | |- | ||
| + | | colspan="2" | [[File:Prodon5 Period Management 007.png|820x820px]] | ||
| + | |- | ||
| + | | width="50%" | | ||
| + | <span style="color: rgb(255, 0, 0);">'''A:'''</span> To display the analysis summaries, click on " [[Image:Bouton afficher sommaire analyse.png]] " to display/hide analysis summaries. | ||
| + | |||
| + | | width="50%" | | ||
| + | <span style="color: rgb(255, 0, 0);">'''B: '''</span>To display the analysis summaries by period, select " Period " in the drop-down list. | ||
| + | |||
| + | |- | ||
| + | | colspan="2" width="50%" | | ||
| + | <span style="color: rgb(255, 0, 0);">'''C:'''</span> View the list of summaries by period. | ||
| + | |} | ||
| + | |||
| + | == Use of a Period<br> == | ||
| + | |||
| + | === In a Report<br> === | ||
| + | |||
| + | The created periods will also be available when you produce reports. | ||
| + | |||
| + | {| width="50%" cellspacing="1" cellpadding="1" border="1" class="wikitable" | ||
| + | |- | ||
| + | | colspan="2" | [[File:Prodon5 Period Management 008.png|725x725px]] | ||
| + | |- | ||
| + | | width="50%" | | ||
| + | <span style="color: rgb(255, 0, 0);">'''A:'''</span> Select the report to be issued (e.g. a donation occasion results). | ||
| + | |||
| + | | width="50%" | | ||
| + | <span style="color: rgb(255, 0, 0);">'''B: '''</span>Click on " [[File:Button Print Report.png]] Generate ". | ||
| + | |||
| + | |} | ||
| + | |||
| + | <br> | ||
| + | |||
| + | {| cellspacing="1" cellpadding="1" border="1" style="width: 392px; height: 519px;" class="wikitable" | ||
| + | |- | ||
| + | | colspan="2" | [[File:Prodon5 Period Management 009.png]] | ||
| + | |- | ||
| + | | width="50%" | | ||
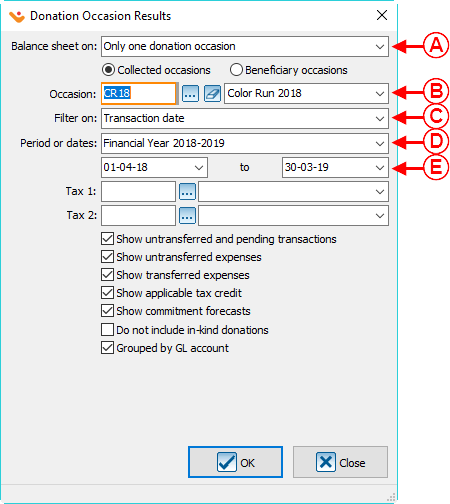
| + | <span style="color: rgb(255, 0, 0);">'''A:'''</span> Choose if you want to filter on only one occasion or on all of the occasions. | ||
| + | |||
| + | | width="50%" | | ||
| + | <span style="color: rgb(255, 0, 0);">'''B:'''</span> Choose the wanted donation occasion. | ||
| + | |||
| + | |- | ||
| + | | width="50%" | | ||
| + | <span style="color: rgb(255, 0, 0);">'''C:'''</span> Filter on the transaction date. | ||
| + | |||
| + | | width="50%" | | ||
| + | <span style="color: rgb(255, 0, 0);">'''D:'''</span> Choose a period from the drop-down menu. | ||
| + | |- | ||
| + | | colspan="2" |<span style="color: rgb(255, 0, 0);">'''E:'''</span> The start and end dates corresponding to the chosen period are automatically entered in the appropriate boxes. | ||
| + | |} | ||
| + | |||
| + | === In a Customized List === | ||
| + | |||
| + | The periods can also be used in the [[ProDon:Customized Lists|" Customized Lists "]] by donations criteria (dynamic and static lists). | ||
| + | |||
| + | {| class="wikitable" | ||
| + | ![[File:Prodon5 Period Management 010.png|533x533px]] | ||
| + | |} | ||
| + | <br> | ||
| + | |||
| + | <br> | ||
| − | {{ | + | {{Footer_ProDon_Version|5.0.5}}<br> |
Latest revision as of 15:49, 24 July 2018
| Period Management |
CAUTION : This document is for VERSION 5 of Prodon. To go to the document for version 4, click here.
Introduction
Period management is a way to configure a period of time (e.g. the fiscal year or a trimester of an organization). When the periods are configured, it is possible to see the summaries for each period in the " Client " files as well as in " Analysis & History ". Furthermore, these summaries can be used to produce reports and customized lists in relation to these specific periods.
Creating a Period
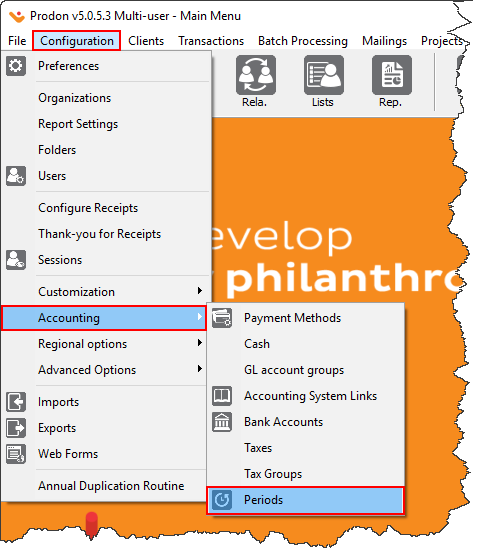
| From the main page of the software, first click on " Configuration ", " Accounting " and then on " |
|
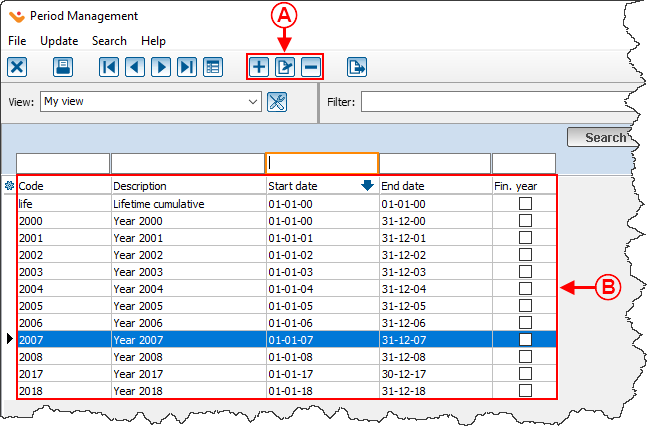
| The period management window opens up, it is now possible to: | |
| |
|
A: Add, Edit/View or Remove periods. |
B:View the list of existing periods. |
|
|
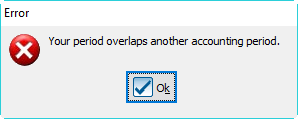
Here is the error message that appears when the dates of a new period overlap the dates of an fiscal year. |
View the Summaries by Period
In a Client File

| |
|
A: Go in the " Summary " tab of any client file. |
B: This is the lifetime total of all of the client's transactions. |
|
C: View the client's transactions cumulative for each period. | |
In "Analysis & History"
It is also possible to view a summary by period in " Analysis & History ".
Use of a Period
In a Report
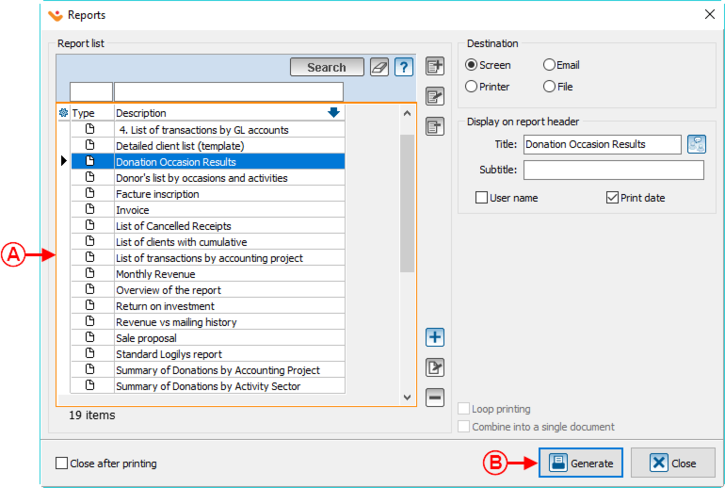
The created periods will also be available when you produce reports.
| |
|
A: Select the report to be issued (e.g. a donation occasion results). |
|
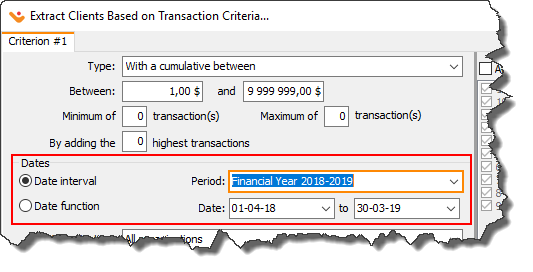
In a Customized List
The periods can also be used in the " Customized Lists " by donations criteria (dynamic and static lists).
|
|---|
Document name: ProDon:Period Management
Version : 5.0.5
