Difference between revisions of "ProDon:Preparing the Master Document"
Jguillemette (talk | contribs) (→Tags) |
|||
| (55 intermediate revisions by 4 users not shown) | |||
| Line 1: | Line 1: | ||
| − | {{ | + | {{Header_TOC}}<br> |
== Introduction == | == Introduction == | ||
| Line 25: | Line 25: | ||
There are two types of master documents: customized master documents and general master documents. A general master document is a document that does not contain any merge fields. A customized master document is a document that contains merge fields, in order to customize the E-mail Blast for each recipient. | There are two types of master documents: customized master documents and general master documents. A general master document is a document that does not contain any merge fields. A customized master document is a document that contains merge fields, in order to customize the E-mail Blast for each recipient. | ||
| − | The preparation of the master document implies either updating the existing master document, or creating a new | + | The preparation of the master document implies either updating the existing master document, or creating a new one. |
| − | '''CAUTION: '''A master document designed for a mass mailing cannot be used for an E-mail Blast and vice-versa, since a document designed for an E-mail Blast must | + | '''CAUTION: '''A master document designed for a mass mailing cannot be used for an E-mail Blast and vice-versa, since a document designed for an E-mail Blast must follow many [[ProDon:Preparing the Master Document#Formatting_Rules|formatting rules]]. |
To update an old master document or to create a new master document, go to the "Master document management". | To update an old master document or to create a new master document, go to the "Master document management". | ||
| − | {| cellspacing="1" cellpadding="1" border="1 | + | {| width="200" cellspacing="1" cellpadding="1" border="1" class="wikitable" |
|- | |- | ||
| colspan="2" | | | colspan="2" | | ||
| Line 40: | Line 40: | ||
|} | |} | ||
| − | {| cellspacing="1" cellpadding="1" border="1 | + | <br> |
| + | |||
| + | {| width="200" cellspacing="1" cellpadding="1" border="1" class="wikitable" | ||
|- | |- | ||
| colspan="2" | | | colspan="2" | | ||
| Line 46: | Line 48: | ||
|- | |- | ||
| − | | colspan="2" | {{Anchor|| | + | | colspan="2" | {{Anchor||MasterDocumentManagement}}[[Image:Preparing the Master Document 002.png]] |
|- | |- | ||
| width="50%" | | | width="50%" | | ||
| Line 59: | Line 61: | ||
| | | | ||
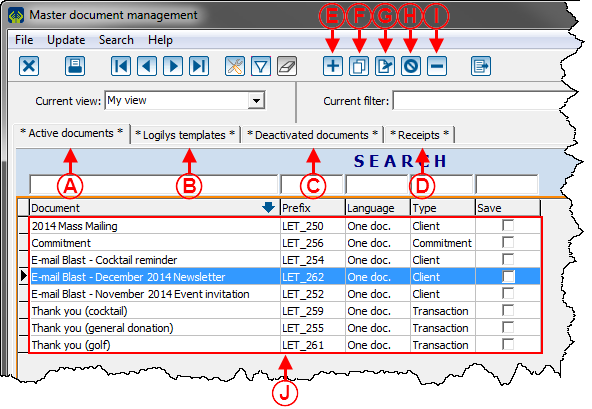
| − | <span style="color: rgb(255, 0, 0);">'''D:'''</span> | + | <span style="color: rgb(255, 0, 0);">'''D:'''</span> The "Receipts" type document cannot be used for an E-mail Blast.<br> |
| − | |||
| − | |||
|- | |- | ||
| Line 75: | Line 75: | ||
| | | | ||
| − | <span style="color: rgb(255, 0, 0);">'''H:'''</span> The [[Image: | + | <span style="color: rgb(255, 0, 0);">'''H:'''</span> The [[Image:Button cancel.png]] button allows you activate and deactivate a master document in order to take it from the "Active documents" tab at <span style="color: rgb(255, 0, 0);">'''A'''</span>, to the "Deactivate documents" tab at <span style="color: rgb(255, 0, 0);">'''C'''</span>, or vice-versa. To do so, select the document at <span style="color: rgb(255, 0, 0);">'''J'''</span>, then click on the [[Image:Button cancel.png]] button. |
|- | |- | ||
| | | | ||
| − | <span style="color: rgb(255, 0, 0);">'''I:'''</span> The [[Image: | + | <span style="color: rgb(255, 0, 0);">'''I:'''</span> The [[Image:Button Minus remove delete.png]] button allows you to delete a master document. To do so, select the document to delete at <span style="color: rgb(255, 0, 0);">'''J'''</span>, then click on the [[Image:Button Minus remove delete.png]] button. |
| − | '''NOTE:''' This operation is not recommended, it is advisable to deactivate a master document rather than deleting it. See point <span style="color: rgb(255, 0, 0);">'''H'''</span> to learn how to deactivate a document. <br> | + | '''NOTE:''' This operation is not recommended, it is advisable to deactivate a master document rather than deleting it. See '''point''' <span style="color: rgb(255, 0, 0);">'''H'''</span> to learn how to deactivate a document. <br> |
| | | | ||
| Line 92: | Line 92: | ||
=== Adding, Modifying or Duplicating the E-mail Blast Master Document<br> === | === Adding, Modifying or Duplicating the E-mail Blast Master Document<br> === | ||
| − | {| cellspacing="1" cellpadding="1" border="1 | + | {| width="200" cellspacing="1" cellpadding="1" border="1" class="wikitable" |
|- | |- | ||
| colspan="2" | | | colspan="2" | | ||
| − | + | After clicking on the [[Image:Button add plus.png]], [[Image:Button Edit.png]] or [[Image:Bouton dupliquer.png]] button of [[#MasterDocumentManagement|this window]], the following window opens. | |
|- | |- | ||
| Line 101: | Line 101: | ||
|- | |- | ||
| width="50%" | | | width="50%" | | ||
| − | <span style="color: rgb(255, 0, 0);">'''A | + | <span style="color: rgb(255, 0, 0);">'''A:'''</span> Name the master document. |
| − | '''NOTE | + | '''NOTE:''' It is recommended to enter "E-mails Blast" in the name of the master document in order to easily find the master document intended for the E-mail Blast. |
| width="50%" | | | width="50%" | | ||
| − | <span style="color: rgb(255, 0, 0);">'''B | + | <span style="color: rgb(255, 0, 0);">'''B:'''</span> Always select option "Use a document no matter what language" because option "A document per language" does not work for E-mail Blast master documents. Therefore, you must always create a master document for each language in which the document will be sent. |
|- | |- | ||
| | | | ||
| − | <span style="color: rgb(255, 0, 0);">'''C | + | <span style="color: rgb(255, 0, 0);">'''C: '''</span>The [[Image:Bouton Ouvrir Editeur.png]] button allows you to open the document in the editor. After clicking on that button, '''''Word''''' opens. To learn how to create the master document in '''''Word''''', see [[ProDon:Preparing the Master Document#Editing_the_Master_Document|this section]]. |
| | | | ||
| − | <span style="color: rgb(255, 0, 0);">'''D | + | <span style="color: rgb(255, 0, 0);">'''D:'''</span> Select the type of document "Client (e.g. mailing, mass mailing, labels)". All other types of documents do not work for the E-mails Blast. |
|- | |- | ||
| | | | ||
| − | <span style="color: rgb(255, 0, 0);">'''E | + | <span style="color: rgb(255, 0, 0);">'''E:'''</span> These fields cannot be used in E-mail Blast master documents. |
| | | | ||
| − | <span style="color: rgb(255, 0, 0);">'''F | + | <span style="color: rgb(255, 0, 0);">'''F:'''</span> This tab allows you to choose the merge fields that will be available when creating the master document in '''''Word'''''. |
|- | |- | ||
| | | | ||
| − | <span style="color: rgb(255, 0, 0);">'''G | + | <span style="color: rgb(255, 0, 0);">'''G:'''</span> Select the merge fields that should be on the master document. To do so, select the field, then press the space bar of the keyboard. <br> '''NOTE:''' The fields must be checked in the master document '''AND''' in the distribution list. If they are not checked in both places, they will not be merged in the mailing. |
| | | | ||
| − | <span style="color: rgb(255, 0, 0);">'''H | + | <span style="color: rgb(255, 0, 0);">'''H:'''</span> These tabs cannot be used in an E-mail Blast master document. <br> |
<br> | <br> | ||
| Line 133: | Line 133: | ||
|- | |- | ||
| | | | ||
| − | <span style="color: rgb(255, 0, 0);">'''I | + | <span style="color: rgb(255, 0, 0);">'''I:'''</span> The [[Image:Button Search.png]] button allows you to display or not the [[Common functions:Search Bar|search bar]]. |
| | | | ||
| − | <span style="color: rgb(255, 0, 0);">'''J | + | <span style="color: rgb(255, 0, 0);">'''J:'''</span> The [[Image:Button Edit.png]] button allows you to modify configurable fields. |
|- | |- | ||
| | | | ||
| − | <span style="color: rgb(255, 0, 0);">'''K | + | <span style="color: rgb(255, 0, 0);">'''K:'''</span> The [[Image:Detect field button.png]] button chek all the fields that have been inserted in the master document. |
| | | | ||
| − | <span style="color: rgb(255, 0, 0);">'''L | + | <span style="color: rgb(255, 0, 0);">'''L:'''</span> The [[Image:Button funky check mark.png]] button allows you to check all the merge fields at <span style="color: rgb(255, 0, 0);">'''G'''</span>. |
|- | |- | ||
| | | | ||
| − | <span style="color: rgb(255, 0, 0);">'''M | + | <span style="color: rgb(255, 0, 0);">'''M:'''</span> The [[Image:Button funky x.png]] button allows you to uncheck all the merge fields at <span style="color: rgb(255, 0, 0);">'''G'''</span>. |
| | | | ||
| − | <span style="color: rgb(255, 0, 0);">'''N | + | <span style="color: rgb(255, 0, 0);">'''N:'''</span> After entering all the desired information, click on the "[[Image:Button Check mark Confirm.png]] Confirm edit" button. |
|- | |- | ||
| | | | ||
| − | <span style="color: rgb(255, 0, 0);">'''O | + | <span style="color: rgb(255, 0, 0);">'''O:'''</span> To cancel the modification or the creation of the master document, click on the "[[Image:Bouton annuler.png]] Cancel edit" button. |
| <br> | | <br> | ||
|- | |- | ||
| colspan="2" | | | colspan="2" | | ||
| − | ''' | + | '''CAUTION:''' It is important to only check, at <span style="color: rgb(255, 0, 0);">'''G'''</span>, the merge fields necessary for the customization of the E-mail Blast, since the fields that were activated here cannot be deactivated once the mailing is made. For each mailing, all the fields checked will therefore have to be synchronized one by one with the fields included in the distribution list, which will significantly increase the amount of time necessary for the E-mail Blast mailing. To deactivate fields on the mailing server website of the E-mail Blast, contact '''''Logilys'''''.<br> |
| − | '''NOTE | + | '''NOTE:''' It is mandatory to check at least one field at <span style="color: rgb(255, 0, 0);">'''G'''</span>, so when writing a general type E-mail Blast, you must check at least one field here and not check anything in the distribution list. When producing general type E-mail Blasts, it is recommended to always check the same merge fields in each master document (e.g. "Title").<br> |
|} | |} | ||
| Line 167: | Line 167: | ||
<br> | <br> | ||
| − | + | == Editing the Master Document == | |
| − | + | After clicking on the [[Image:Bouton Ouvrir Editeur.png]] button of [[ProDon:Preparing the Master Document#Adding.2C_Modifying_or_Duplicating_the_E-mail_Blast_Master_Document|this window]], '''''Word''''' opens in order to create the master document. | |
| − | <br> | + | Always use the "Save" button and not "Save as". '''''ProDon''''' saves the document in a particular location and you must not modify its location. |
| + | <br><br> | ||
| − | + | === Formatting Rules === | |
| + | Since the document will be converted in an HTML page from '''''Word''''', there are several rules to follow when creating a master document, in order for the layout to be suitable for the E-mail Blast and alike as possible when receiving the E-mail Blast on '''''Outlook, Hotmail, Gmail''''', etc. | ||
| + | <br><br> | ||
| + | '''Table''' | ||
| + | * The document must be wrtiten in a table. To view an example of master document in a table, see '''point A''' of the "Examples of Layouts" section. | ||
| + | * Never fraction the cells, create a table with many columns right from the start. | ||
| + | * If the width of the cells has to be modified, resize them by using the table properties and not by simply sliding a line of the table from left to right. | ||
| + | <br> | ||
| + | '''Image''' | ||
| + | * Use only JPG format images. Do not use any image in bitmap (.bmp) or animated gif (.gif) format, because these formats are not optimized for the Web. | ||
| + | * Only one image can be inserted per cell and do not write any text with an image. To view an example of image in a cell, see '''point B''' of the "Examples of Layouts" section''.'' | ||
| + | * Try to always import an image with the right size (do not crop or resize it once in the '''''Word''''' document) because it will be pixelated. | ||
| + | * If an image is used as header or footer banner, make sure it is exactly the same width as the table by resizing it with the image properties. | ||
| + | * The maximum size of an image is 450 pixels wide by 1110 pixels high. | ||
| + | <br> | ||
| + | '''Text''' | ||
| + | * Use only one type of font (colour, size, font, etc) per cell. | ||
| + | * The use of rules in '''''Word''''' (e.g. if... therefore... otherwise) does not work. | ||
| + | * Do not use any text box. | ||
| + | * Be careful with the use of special characters, some do not work (e.g. special bullets). If this type of character is used, make sure to test the email well, prior to sending the real mailing. | ||
| + | * Use carriage returns (<SHIFT> + <ENTER>), because certain people configure their default emails in double-space and by using carriage returns, you want to avoid that the E-mail Blast is double-spaced, regardless of the configuration of the recipient. | ||
| + | * When adding hyperlinks in an email, do not write the Internet address, use a link like "Click here" instead. To view examples of hyperlinks, see '''point C''' of the "Examples of Layouts" section. | ||
| − | + | <br> | |
| + | === '''Tags''' === | ||
| + | A tag is a special code allowing a fonctionaliy in your E-mail Blast. | ||
| − | + | The Antispam Law requires the sender to display it’s postal address and to offer the option to unsubscribe from a list. If a required tag is missing in the master document, it will automatically be added by '''''ProDon''''' at the end of the E-mail Blast. | |
| − | |||
| − | |||
| − | |||
| − | |||
| − | |||
| − | |||
| − | |||
| − | |||
| − | |||
| − | |||
| − | |||
| − | |||
| − | |||
| − | |||
| − | |||
| − | |||
| − | |||
| − | |||
| − | |||
| − | |||
| − | |||
| − | <br> | + | '''The following tags are configured by adding a hyperlink to a selected text.''' |
| + | * To learn how to add a hyperlink to a '''''Word''''' document, see the "Adding Hyperlinks" section. | ||
| + | * To view examples of hyperlinks, see '''point C''' of the "Examples of Layouts" section. | ||
| + | {| class="wikitable" | ||
| + | |[FORWARD] | ||
| + | |To encourage people to transfer the email to someone else. | ||
| + | | | ||
| + | |- | ||
| + | |[SHOWEMAIL] | ||
| + | |To inform people that it is possible to view the email with an Internet navigator. | ||
| + | | | ||
| + | |- | ||
| + | |[UNSUBSCRIBE] | ||
| + | |To offer people the option to unsubscribe. | ||
| + | |Required | ||
| + | |- | ||
| + | |[GLOBAL_UNSUBSCRIBE] | ||
| + | |To offer people the option to unsubscribe from all distribution lists (no longer receive E-mail Blasts from the organization). | ||
| + | | | ||
| + | |- | ||
| + | |[SHARE] | ||
| + | |To offer people to generate a URL address to share the E-mail Blast on '''''Facebook, Twitter,''''' etc, | ||
| + | | | ||
| + | |} | ||
| + | '''The following tags are specific for additional ProDon modules (version 5 only) and configured by adding a hyperlink to a selected text.''' | ||
| + | {| class="wikitable" | ||
| + | |[LINK_WEB_FORM] | ||
| + | |To open a web form and automaticly adding the recepient's personal informations to it. | ||
| + | |OnlineDonation module | ||
| + | |- | ||
| + | |[RECEIPTS] | ||
| + | |To give a recepient access to it's E-Receipt. | ||
| + | |E-Receipt module | ||
| + | |}'''The following tag is configured by entering it as text directly in the master document.''' | ||
| + | {| class="wikitable" | ||
| + | |[CLIENTS.ADDRESS] | ||
| + | |To display the address of the organization, write in text in the master document | ||
| + | |Required | ||
| + | |} | ||
| + | <br> | ||
| − | + | === Examples of Layouts === | |
| − | {| cellspacing="1" cellpadding="1" border="1 | + | {| width="200" cellspacing="1" cellpadding="1" border="1" class="wikitable" |
|- | |- | ||
| colspan="2" | | | colspan="2" | | ||
| − | + | After clicking on the [[Image:Bouton Ouvrir Editeur.png]] button, '''''Word''''' opens to create the master document.<br> | |
| − | '''NOTE | + | '''NOTE:''' Follow all [[ProDon:Preparing the Master Document#Adding_Hyperlinks|formatting rules]].<br> |
|- | |- | ||
| − | | colspan="2" | | + | | colspan="2" | [[Image:Preparing the Master Document 004.png]] |
|- | |- | ||
| width="50%" | | | width="50%" | | ||
| − | <span style="color: rgb(255, 0, 0);">'''A | + | <span style="color: rgb(255, 0, 0);">'''A:'''</span> It is very important to create the master document in a table.<br> |
| − | ''' | + | '''CAUTION:''' When creating the table, insert enough columns so you do not have to add some later on. Also avoid to resize the columns of the table by moving a line of the table with the mouse, go to the table properties instead. <br> |
| − | '''NOTE | + | '''NOTE:''' It is possible to make the lines of the table invisible, so they do not appear on the email. |
| width="50%" | | | width="50%" | | ||
| − | <span style="color: rgb(255, 0, 0);">'''B | + | <span style="color: rgb(255, 0, 0);">'''B:'''</span> Never add more than one image per cell. If the image takes more than one cell, merge the cells before inserting the image. In this example, 4 cells have been merged so the image can take the full width of the table and the height was adjusted automatically. |
| − | '''NOTE | + | '''NOTE:''' The image must have the right dimension before being inserted in the table, you must not resize it. |
|- | |- | ||
| | | | ||
| − | <span style="color: rgb(255, 0, 0);">'''C | + | <span style="color: rgb(255, 0, 0);">'''C:'''</span> These are three hyperlinks. To learn how to add hyperlinks, see [[ProDon:Preparing the Master Document#Adding_Hyperlinks|this section]]. |
| | | | ||
| − | '''NOTE | + | '''NOTE:''' To learn how to add merge fields to the document, see the [[ProDon:Preparing the Master Document#Adding_Hyperlinks|"Creating a Document"]] section of the [[ProDon:Master Document Management|"Master Document Management"]] document. |
|} | |} | ||
| − | + | Once the master document is created, close '''''Word'''''. <br> | |
| − | '''NOTE | + | '''NOTE:''' See the [[ProDon:Preparing the Master Document#Formatting_Rules|"Formatting Rules"]] section to learn how to save the document. |
| − | + | After closing '''''Word''''', go back in '''''ProDon''''', [[ProDon:Preparing the Master Document#Adding.2C_Modifying_or_Duplicating_the_E-mail_Blast_Master_Document|this window]] should still be open. If all the necessary information has been specified, click on the "[[Image:Button Check mark Confirm.png]] Confirm edit" button. | |
<br> | <br> | ||
| − | + | === Adding Hyperlinks === | |
| − | {| cellspacing="1" cellpadding="1" border="1 | + | {| width="200" cellspacing="1" cellpadding="1" border="1" class="wikitable" |
|- | |- | ||
| colspan="2" | [[Image:Preparing the Master Document 005.png]] | | colspan="2" | [[Image:Preparing the Master Document 005.png]] | ||
|- | |- | ||
| width="50%" | | | width="50%" | | ||
| − | <span style="color: rgb(255, 0, 0);">'''A | + | <span style="color: rgb(255, 0, 0);">'''A:'''</span> To add a hyperlink, select the text in which the link must be added, then right-click. |
| width="50%" | | | width="50%" | | ||
| − | <span style="color: rgb(255, 0, 0);">'''B | + | <span style="color: rgb(255, 0, 0);">'''B:'''</span> After right-clicking on the text selected at <span style="color: rgb(255, 0, 0);">'''A'''</span>, this menu opens, click on "Hyperlink...". |
|} | |} | ||
| Line 259: | Line 301: | ||
<br> | <br> | ||
| − | {| cellspacing="1" cellpadding="1" border="1 | + | {| width="200" cellspacing="1" cellpadding="1" border="1" class="wikitable" |
|- | |- | ||
| colspan="2" | | | colspan="2" | | ||
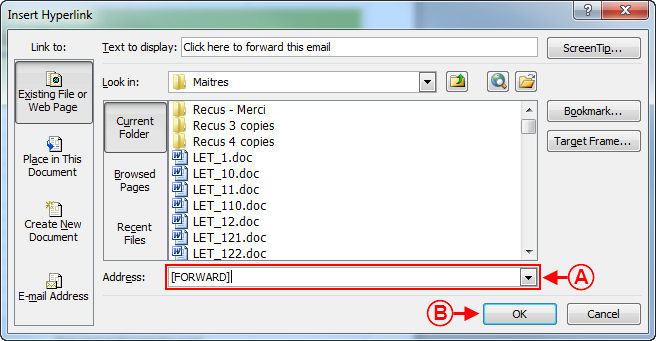
| − | + | After clicking on "Hyperlink..." this window opens. | |
|- | |- | ||
| Line 268: | Line 310: | ||
|- | |- | ||
| width="50%" | | | width="50%" | | ||
| − | <span style="color: rgb(255, 0, 0);">'''A | + | <span style="color: rgb(255, 0, 0);">'''A:'''</span> Enter the address to which the hyperlink must lead. The hyperlink of this example is used to forward the email to someone else. |
| width="50%" | | | width="50%" | | ||
| − | <span style="color: rgb(255, 0, 0);">'''B | + | <span style="color: rgb(255, 0, 0);">'''B:'''</span> After entering the address to which the hyperlink must lead, click on the "OK" button. |
|} | |} | ||
| Line 277: | Line 319: | ||
<br> | <br> | ||
| − | + | {{Footer_ProDon_Version|4.6.7.19}}<br> | |
Latest revision as of 15:37, 9 May 2017
| Preparing the Master Document |
Introduction
The E-mail Blast module allows you to send emails massively and compile statistics for each mailing made (number of emails sent, opened, rejected, etc.), in order to assess the effectiveness of the mailings. A reject management is also integrated to avoid any problem with spam. To learn how to view mailing statistics, see this document.
Moreover, Internet users can subscribe to distribution lists to receive information emails of interest to them, from the organization website. Following their subscription, they receive an automatic confirmation email specifically designed for that purpose.
Sending an E-mail Blast can be summed up in three steps: You must first prepare the master document, then prepare the distribution list and finally send the E-mail Blast.
This document focuses on the preparation of the master document. To learn how to prepare a distribution list, see this document. To learn how to send an E-mail Blast, see this document.
Preparing the E-mail Blast Master Document
You must prepare the master document prior to sending the E-mail Blast.
There are two types of master documents: customized master documents and general master documents. A general master document is a document that does not contain any merge fields. A customized master document is a document that contains merge fields, in order to customize the E-mail Blast for each recipient.
The preparation of the master document implies either updating the existing master document, or creating a new one.
CAUTION: A master document designed for a mass mailing cannot be used for an E-mail Blast and vice-versa, since a document designed for an E-mail Blast must follow many formatting rules.
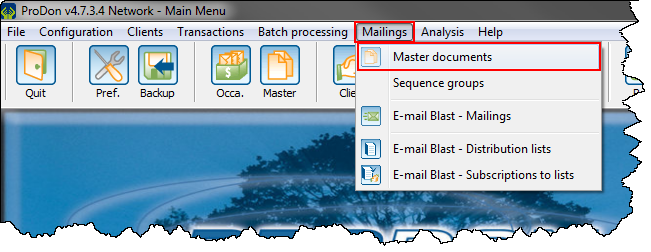
To update an old master document or to create a new master document, go to the "Master document management".
|
To do so, click on the "Mailings" menu, then select " | |
|
Adding, Modifying or Duplicating the E-mail Blast Master Document
|
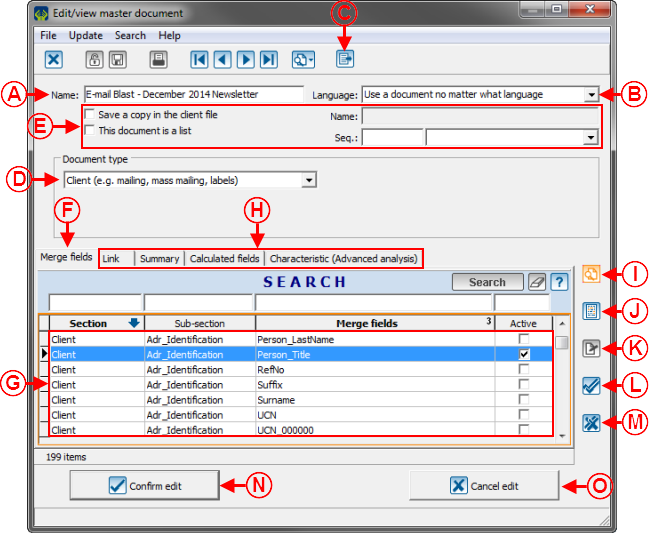
After clicking on the | |
| |
|
A: Name the master document. NOTE: It is recommended to enter "E-mails Blast" in the name of the master document in order to easily find the master document intended for the E-mail Blast. |
B: Always select option "Use a document no matter what language" because option "A document per language" does not work for E-mail Blast master documents. Therefore, you must always create a master document for each language in which the document will be sent. |
|
C: The |
D: Select the type of document "Client (e.g. mailing, mass mailing, labels)". All other types of documents do not work for the E-mails Blast. |
|
E: These fields cannot be used in E-mail Blast master documents. |
F: This tab allows you to choose the merge fields that will be available when creating the master document in Word. |
|
G: Select the merge fields that should be on the master document. To do so, select the field, then press the space bar of the keyboard. |
H: These tabs cannot be used in an E-mail Blast master document.
|
|
I: The |
|
|
K: The |
L: The |
|
M: The |
N: After entering all the desired information, click on the " |
|
O: To cancel the modification or the creation of the master document, click on the " |
|
|
CAUTION: It is important to only check, at G, the merge fields necessary for the customization of the E-mail Blast, since the fields that were activated here cannot be deactivated once the mailing is made. For each mailing, all the fields checked will therefore have to be synchronized one by one with the fields included in the distribution list, which will significantly increase the amount of time necessary for the E-mail Blast mailing. To deactivate fields on the mailing server website of the E-mail Blast, contact Logilys. NOTE: It is mandatory to check at least one field at G, so when writing a general type E-mail Blast, you must check at least one field here and not check anything in the distribution list. When producing general type E-mail Blasts, it is recommended to always check the same merge fields in each master document (e.g. "Title"). | |
Editing the Master Document
After clicking on the ![]() button of this window, Word opens in order to create the master document.
button of this window, Word opens in order to create the master document.
Always use the "Save" button and not "Save as". ProDon saves the document in a particular location and you must not modify its location.
Formatting Rules
Since the document will be converted in an HTML page from Word, there are several rules to follow when creating a master document, in order for the layout to be suitable for the E-mail Blast and alike as possible when receiving the E-mail Blast on Outlook, Hotmail, Gmail, etc.
Table
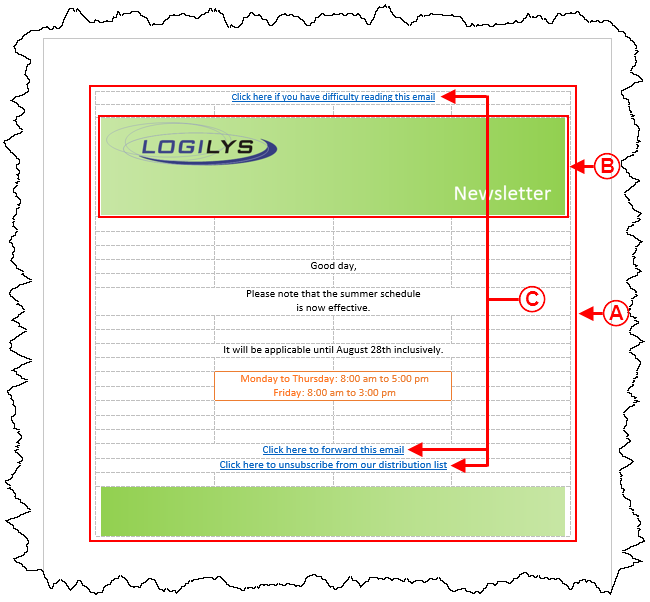
- The document must be wrtiten in a table. To view an example of master document in a table, see point A of the "Examples of Layouts" section.
- Never fraction the cells, create a table with many columns right from the start.
- If the width of the cells has to be modified, resize them by using the table properties and not by simply sliding a line of the table from left to right.
Image
- Use only JPG format images. Do not use any image in bitmap (.bmp) or animated gif (.gif) format, because these formats are not optimized for the Web.
- Only one image can be inserted per cell and do not write any text with an image. To view an example of image in a cell, see point B of the "Examples of Layouts" section.
- Try to always import an image with the right size (do not crop or resize it once in the Word document) because it will be pixelated.
- If an image is used as header or footer banner, make sure it is exactly the same width as the table by resizing it with the image properties.
- The maximum size of an image is 450 pixels wide by 1110 pixels high.
Text
- Use only one type of font (colour, size, font, etc) per cell.
- The use of rules in Word (e.g. if... therefore... otherwise) does not work.
- Do not use any text box.
- Be careful with the use of special characters, some do not work (e.g. special bullets). If this type of character is used, make sure to test the email well, prior to sending the real mailing.
- Use carriage returns (<SHIFT> + <ENTER>), because certain people configure their default emails in double-space and by using carriage returns, you want to avoid that the E-mail Blast is double-spaced, regardless of the configuration of the recipient.
- When adding hyperlinks in an email, do not write the Internet address, use a link like "Click here" instead. To view examples of hyperlinks, see point C of the "Examples of Layouts" section.
Tags
A tag is a special code allowing a fonctionaliy in your E-mail Blast.
The Antispam Law requires the sender to display it’s postal address and to offer the option to unsubscribe from a list. If a required tag is missing in the master document, it will automatically be added by ProDon at the end of the E-mail Blast.
The following tags are configured by adding a hyperlink to a selected text.
- To learn how to add a hyperlink to a Word document, see the "Adding Hyperlinks" section.
- To view examples of hyperlinks, see point C of the "Examples of Layouts" section.
| [FORWARD] | To encourage people to transfer the email to someone else. | |
| [SHOWEMAIL] | To inform people that it is possible to view the email with an Internet navigator. | |
| [UNSUBSCRIBE] | To offer people the option to unsubscribe. | Required |
| [GLOBAL_UNSUBSCRIBE] | To offer people the option to unsubscribe from all distribution lists (no longer receive E-mail Blasts from the organization). | |
| [SHARE] | To offer people to generate a URL address to share the E-mail Blast on Facebook, Twitter, etc, |
The following tags are specific for additional ProDon modules (version 5 only) and configured by adding a hyperlink to a selected text.
| [LINK_WEB_FORM] | To open a web form and automaticly adding the recepient's personal informations to it. | OnlineDonation module |
| [RECEIPTS] | To give a recepient access to it's E-Receipt. | E-Receipt module |
| [CLIENTS.ADDRESS] | To display the address of the organization, write in text in the master document | Required |
Examples of Layouts
|
After clicking on the NOTE: Follow all formatting rules. | |
| |
|
A: It is very important to create the master document in a table. CAUTION: When creating the table, insert enough columns so you do not have to add some later on. Also avoid to resize the columns of the table by moving a line of the table with the mouse, go to the table properties instead. NOTE: It is possible to make the lines of the table invisible, so they do not appear on the email. |
B: Never add more than one image per cell. If the image takes more than one cell, merge the cells before inserting the image. In this example, 4 cells have been merged so the image can take the full width of the table and the height was adjusted automatically. NOTE: The image must have the right dimension before being inserted in the table, you must not resize it. |
|
C: These are three hyperlinks. To learn how to add hyperlinks, see this section. |
NOTE: To learn how to add merge fields to the document, see the "Creating a Document" section of the "Master Document Management" document. |
Once the master document is created, close Word.
NOTE: See the "Formatting Rules" section to learn how to save the document.
After closing Word, go back in ProDon, this window should still be open. If all the necessary information has been specified, click on the "![]() Confirm edit" button.
Confirm edit" button.
Adding Hyperlinks
| |
|
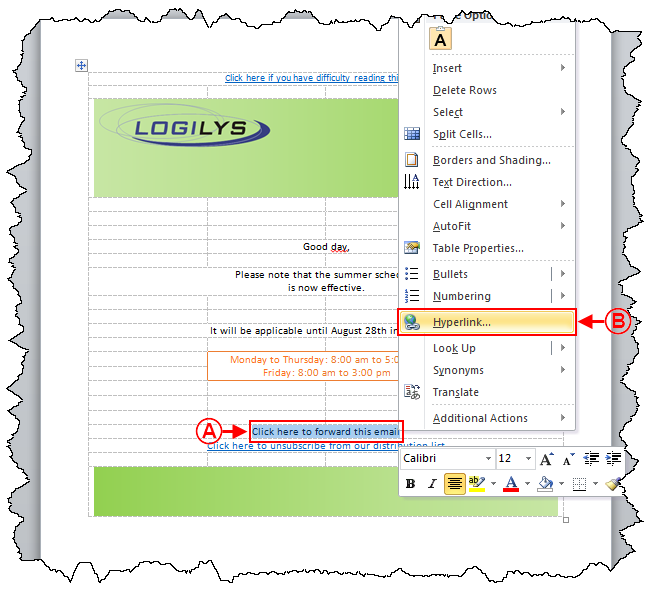
A: To add a hyperlink, select the text in which the link must be added, then right-click. |
B: After right-clicking on the text selected at A, this menu opens, click on "Hyperlink...". |
Document name: ProDon:Preparing the Master Document
Version : 4.6.7.19
