Difference between revisions of "ProDon:Entry of Volunteer Hours"
| (37 intermediate revisions by 3 users not shown) | |||
| Line 1: | Line 1: | ||
| − | {{ | + | {{Header_TOC}}<br> |
| + | |||
| + | '''<u>CAUTION</u>''' : This document is for '''VERSION''' '''5''' of '''''Prodon'''''. To go to the document for version 4, [[ProDon:Entry_of_Volunteer_Hours (Version 4)|click here]]. | ||
| + | |||
| + | <br><span style="color: rgb(255, 0, 0);">'''WARNING : This document is currently being edited/revised, it is possible that some parts are missing or obsolete.'''</span> | ||
| + | |||
| + | |||
== Introduction == | == Introduction == | ||
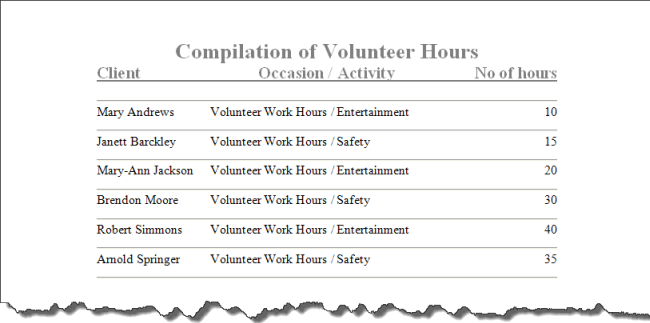
| − | The compilation of time banks is used to count the number of volunteer hours worked for the organization, by keeping track of the volunteers' names and the number of hours each of them have worked. Following the compilation of the hours, it is possible to produce a report of the hours worked. | + | The compilation of time banks is used to count the number of volunteer hours worked for the organization, by keeping track of the volunteers' names and the number of hours each of them have worked. Following the compilation of the hours, it is possible to produce a report of the hours worked. |
== Implementation of the Structure == | == Implementation of the Structure == | ||
| − | Prior to compiling the volunteer hours, the structure has to be implemented. That is, creating a General Ledger account, a payment method, an origin code, a donation occasion and activities specific to the compilation of the time bank; then creating a master document for the report. | + | Prior to compiling the volunteer hours, the structure has to be implemented. That is, creating a General Ledger account, a payment method, an origin code, a donation occasion and activities specific to the compilation of the time bank; then creating a master document for the report. |
| − | |||
| + | <br> | ||
=== Adding the General Ledger Account === | === Adding the General Ledger Account === | ||
| Line 15: | Line 21: | ||
Go to "General Ledger account management". To do so, from the software home page, click on the "Transactions" menu, then select "[[Image:Button General Ledger.png]] GL accounts". | Go to "General Ledger account management". To do so, from the software home page, click on the "Transactions" menu, then select "[[Image:Button General Ledger.png]] GL accounts". | ||
| − | {| cellspacing="1" cellpadding="1" border="1" style="width: 546px; height: 502px; | + | {| cellspacing="1" cellpadding="1" border="1" class="wikitable" style="width: 546px; height: 502px;" |
|- | |- | ||
| colspan="2" | | | colspan="2" | | ||
| Line 21: | Line 27: | ||
|- | |- | ||
| − | | colspan="2" | [[Image:Entry Volunteer Hours 001.png]] | + | | colspan="2" | [[Image:Entry Volunteer Hours 001.png]]<br> |
|- | |- | ||
| width="50%" | | | width="50%" | | ||
| − | '''<span style="color: rgb(255, 0, 0);">A: </span>'''Enter "N/A" in the "Account" field. | + | '''<span style="color: rgb(255, 0, 0);">A: </span>'''Enter "N/A" in the "Account" field. |
| width="50%" | | | width="50%" | | ||
| − | '''<span style="color: rgb(255, 0, 0);">B: </span>'''Enter "N/A" in the "Accounting | + | '''<span style="color: rgb(255, 0, 0);">B: </span>'''Enter "N/A" in the "Accounting data export" field if the [[ProDon:Accounting Integration Module|"Accounting Integration Module"]] is active. |
|- | |- | ||
| width="50%" | | | width="50%" | | ||
| − | '''<span style="color: rgb(255, 0, 0);">C: </span>'''Enter "Non applicable" in the "Description" field. | + | '''<span style="color: rgb(255, 0, 0);">C: </span>'''Enter "Non applicable" in the "Description" field. |
| width="50%" | | | width="50%" | | ||
| − | '''<span style="color: rgb(255, 0, 0);">D: </span>'''Leave the "Taxes" field empty. | + | '''<span style="color: rgb(255, 0, 0);">D: </span>'''Leave the "Taxes" field empty. |
|- | |- | ||
| width="50%" | | | width="50%" | | ||
| − | '''<span style="color: rgb(255, 0, 0);">E: </span>'''Uncheck all boxes. | + | '''<span style="color: rgb(255, 0, 0);">E: </span>'''Uncheck all boxes. |
| − | | width="50%" | | + | | width="50%" | |
|} | |} | ||
<br> | <br> | ||
| − | For more information concerning the addition of a General Ledger code, consult this procedure.<br> | + | For more information concerning the addition of a General Ledger code, consult [[ProDon:Chart of Account Management|this procedure]].<br> |
=== Adding the Payment Method === | === Adding the Payment Method === | ||
| − | Go to the "Payment methods management". To do so, from the software home page, click on the "Transactions" menu, then select "[[Image: | + | Go to the "Payment methods management". To do so, from the software home page, click on the "Transactions" menu, then select "[[Image:Button payment methods.png]] Payment methods". |
| − | {| | + | {| cellspacing="1" cellpadding="1" border="1" class="wikitable" style="width: 596px; height: 684px;" |
|- | |- | ||
| colspan="2" | | | colspan="2" | | ||
| − | Click on the [[Image: | + | Click on the [[Image:Button add plus.png]] button to add the following payment method. |
|- | |- | ||
| − | | colspan="2" | | + | | colspan="2" | [[Image:Entry Volunteer Hours 002.png]] |
|- | |- | ||
| width="50%" | | | width="50%" | | ||
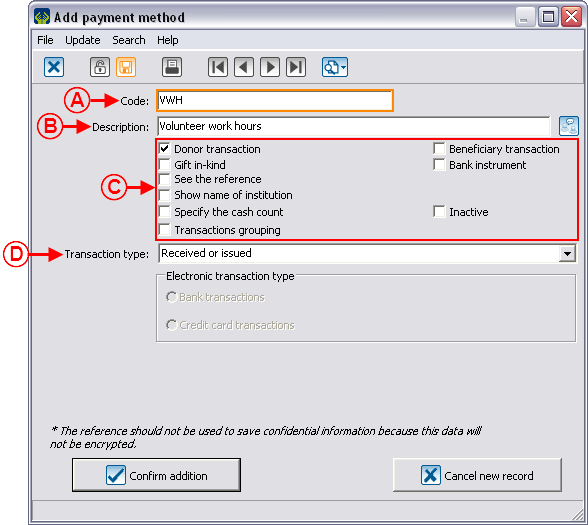
| − | '''<span style="color: rgb(255, 0, 0);">A: </span>'''Enter "VWH" (stands for volunteer work hours) in the "Code" field. | + | '''<span style="color: rgb(255, 0, 0);">A: </span>'''Enter "VWH" (stands for volunteer work hours) in the "Code" field. |
| width="50%" | | | width="50%" | | ||
| − | '''<span style="color: rgb(255, 0, 0);">B: </span>'''Enter "Volunteer work hours" in the "Description" field. | + | '''<span style="color: rgb(255, 0, 0);">B: </span>'''Enter "Volunteer work hours" in the "Description" field. |
|- | |- | ||
| width="50%" | | | width="50%" | | ||
| − | '''<span style="color: rgb(255, 0, 0);">C: </span>'''Check the "Donor transaction" box and uncheck all other boxes. | + | '''<span style="color: rgb(255, 0, 0);">C: </span>'''Check the "Donor transaction" box and uncheck all other boxes. |
| width="50%" | | | width="50%" | | ||
| − | '''<span style="color: rgb(255, 0, 0);">D: </span>'''Choose the type of transaction "Received or | + | '''<span style="color: rgb(255, 0, 0);">D: </span>'''Choose the type of transaction "Received or issued". |
|} | |} | ||
| Line 76: | Line 82: | ||
<br> | <br> | ||
| − | For more information concerning the addition of a payment method, consult this procedure. | + | For more information concerning the addition of a payment method, consult [[ProDon:Payment Method Management|this procedure]]. |
=== Adding the Origin Code === | === Adding the Origin Code === | ||
| − | Go to the "Origin codes management". To do so, from the software, click on the "Transactions" menu, then select "Origin codes". | + | Go to the "Origin codes management". To do so, from the software home page, click on the "Transactions" menu, then select "Origin codes". |
| − | {| | + | {| cellspacing="1" cellpadding="1" border="1" style="width: 660px; height: 327px;" class="wikitable" |
|- | |- | ||
| | | | ||
| − | Click on the [[Image: | + | Click on the [[Image:Button add plus.png]] button to add the following origin code. |
|- | |- | ||
| − | | | + | | [[Image:Entry Volunteer Hours 003.png]] |
|- | |- | ||
| | | | ||
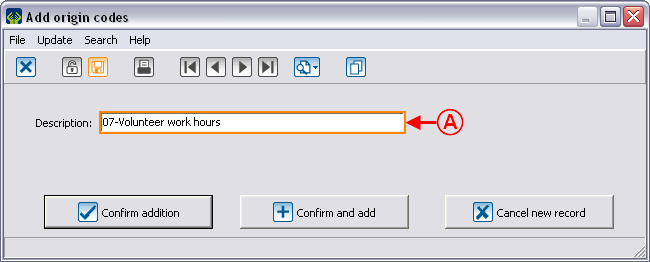
| + | '''<span style="color: rgb(255, 0, 0);">A: </span>'''Enter "Volunteer work hours" in the "Description" field. "07" in this example represents the origin number following the last entered number, simply so that the descriptions are classified according to the number and not to the alphabetical order. However, this is not compulsory. | ||
| + | |||
|} | |} | ||
<br> | <br> | ||
| − | <br> | + | For more information concerning the addition of an origin code, consult [[ProDon:Origin Code Management|this procedure]].<br> |
=== Adding the Donation Occasion === | === Adding the Donation Occasion === | ||
| − | {| cellspacing="1" cellpadding="1" border="1" | + | Go to the "Donation occasions management". To do so, from the software home page, click on the "Transactions" menu, then select "[[Image:Bouton Occasion de dons.png]] Donation occasions". |
| + | |||
| + | {| cellspacing="1" cellpadding="1" border="1" style="width: 445px; height: 469px;" class="wikitable" | ||
|- | |- | ||
| colspan="2" | | | colspan="2" | | ||
| + | Click on the [[Image:Button add plus.png]] button to add the following donation occasion. | ||
| + | |||
|- | |- | ||
| − | | colspan="2" | | + | | colspan="2" | [[Image:Entry Volunteer Hours 004.png]] |
|- | |- | ||
| width="50%" | | | width="50%" | | ||
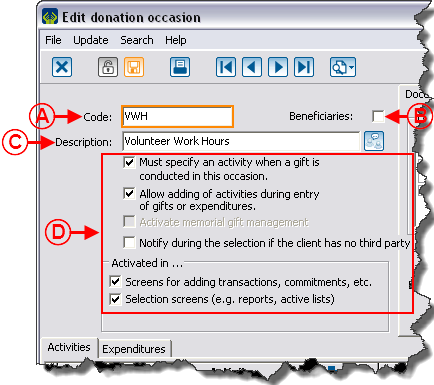
| + | '''<span style="color: rgb(255, 0, 0);">A: </span>'''Enter "VWH" (stands for volunteer work hours) in the "Code" field. | ||
| + | |||
| width="50%" | | | width="50%" | | ||
| + | '''<span style="color: rgb(255, 0, 0);">B: </span>'''Uncheck the "Beneficiaries" box. | ||
| + | |||
|- | |- | ||
| width="50%" | | | width="50%" | | ||
| + | '''<span style="color: rgb(255, 0, 0);">C: </span>'''Enter "Volunteer Work Hours" in the "Description" field. | ||
| + | |||
| width="50%" | | | width="50%" | | ||
| + | '''<span style="color: rgb(255, 0, 0);">D: </span>'''Check the boxes as presented in the example. | ||
| + | |||
|} | |} | ||
<br> | <br> | ||
| + | |||
| + | For more information concerning the addition of a donation occasion, consult [[ProDon:Donation Occasion Management|this procedure]]. | ||
=== Adding the Donation Occasion Activities === | === Adding the Donation Occasion Activities === | ||
| − | {| cellspacing="1" cellpadding="1" border="1 | + | From the "Volunteer work hours" "Edit donation occasion" window, add the activities by clicking on the [[Image:Button add plus.png]] button on the right side of the window. <br> |
| + | |||
| + | {| width="50%" cellspacing="1" cellpadding="1" border="1" class="wikitable" | ||
|- | |- | ||
| colspan="2" | | | colspan="2" | | ||
| + | All activities of the donation occasion must have the following options. | ||
| + | |||
|- | |- | ||
| − | | colspan="2" | | + | | colspan="2" | [[Image:Entry Volunteer Hours 005.png]] |
|- | |- | ||
| width="50%" | | | width="50%" | | ||
| + | '''<span style="color: rgb(255, 0, 0);">A: </span>'''Enter the code of the wanted activity in the "Code" field. | ||
| + | |||
| width="50%" | | | width="50%" | | ||
| + | '''<span style="color: rgb(255, 0, 0);">B: </span>'''Enter the description of the wanted activity in the "Description" field. | ||
| + | |||
|- | |- | ||
| width="50%" | | | width="50%" | | ||
| + | '''<span style="color: rgb(255, 0, 0);">C: </span>'''For the "Transaction type" field, select "Sale price", then enter the "$0.00" price. | ||
| + | |||
| width="50%" | | | width="50%" | | ||
| + | '''<span style="color: rgb(255, 0, 0);">D: </span>'''For the "Receipt" field, select "None". | ||
| + | |||
|- | |- | ||
| width="50%" | | | width="50%" | | ||
| + | '''<span style="color: rgb(255, 0, 0);">E: </span>'''For the "GL account" field, choose the "Non applicable" account [[ProDon:Entry of Volunteer Hours#Adding_the_General_Ledger_Account|created earlier]]. Also check the "Force this GL account" box, then uncheck the "Compulsory GL account in the transactions and commitments" box. | ||
| + | |||
| width="50%" | | | width="50%" | | ||
| + | '''<span style="color: rgb(255, 0, 0);">F: </span>'''For the "Payment" field, select the "Volunteer work hours" payment method [[ProDon:Entry of Volunteer Hours#Adding_the_Payment_Method|created earlier]]. Also check the "Force this payment method" box, then uncheck all other boxes of the section. | ||
| + | |||
|- | |- | ||
| width="50%" | | | width="50%" | | ||
| + | '''<span style="color: rgb(255, 0, 0);">G: </span>'''Do not enter anything in the "Interval for the entry of transactions" section. | ||
| + | |||
| width="50%" | | | width="50%" | | ||
| + | '''<span style="color: rgb(255, 0, 0);">H: </span>'''For the "Origin" field, select the "07-Volunteer work hours" origin code [[ProDon:Entry of Volunteer Hours#Adding_the_Origin_Code|created earlier]]. | ||
| + | |||
|} | |} | ||
<br> | <br> | ||
| − | === Creating the Master Document for the Report === | + | For more information concerning the addition of an activity, consult [[ProDon:Donation Occasion Management#Adding_.2F_Editing_a_Revenue_Activity|this procedure]]. |
| + | |||
| + | === Creating the Master Document for the Report === | ||
| + | |||
| + | Go to the "Master document management". To do so, from the software home page, click on the "Mailings" menu, then select "[[Image:Bouton document maître.png]] Master documents". | ||
| − | + | Go in the "Logilys templates" tab, select the "Template - Report / Volunteer hours" document, then duplicate the document.<br> | |
| − | + | To learn how to duplicate a Logilys document template, consult the [[ProDon:Duplicating a Master Document#Duplicating_a_Logilys_Template|"Duplicate a Logilys Template"]] section of the [[ProDon:Duplicating a Master Document#Duplicating_a_Master_Document|"Duplicate a Master Document"]] procedure. | |
| + | '''NOTE: '''It is possible to create documents specific to your needs, however the following examples are linked to the "Template - Report / Volunteer hours" document that has been renamed as "Volunteer Work Hours Report". | ||
| + | == Using the Structure == | ||
| − | {| cellspacing="1" cellpadding="1" border="1" | + | === Adding Time === |
| + | |||
| + | Go to the "Transaction management". To do so, from the software home page, click on the "Transactions" menu, then select "[[Image:Bouton transactions.png]] Transactions". | ||
| + | |||
| + | {| cellspacing="1" cellpadding="1" border="1" style="width: 653px; height: 670px;" class="wikitable" | ||
|- | |- | ||
| colspan="2" | | | colspan="2" | | ||
| + | Add transactions as presented in the following example. | ||
| + | |||
|- | |- | ||
| − | | colspan="2" | | + | | colspan="2" | [[Image:Entry Volunteer Hours 006.png]] |
|- | |- | ||
| width="50%" | | | width="50%" | | ||
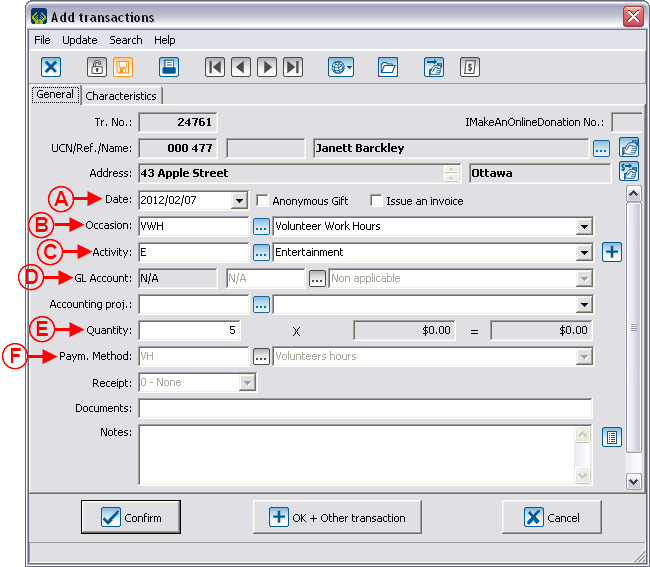
| + | '''<span style="color: rgb(255, 0, 0);">A: </span>'''Enter the date when the volunteer work has been done. The current date is entered by default. | ||
| + | |||
| width="50%" | | | width="50%" | | ||
| + | '''<span style="color: rgb(255, 0, 0);">B: </span>'''Select the "Volunteer Work Hours" occasion. | ||
| + | |||
|- | |- | ||
| width="50%" | | | width="50%" | | ||
| + | '''<span style="color: rgb(255, 0, 0);">C: </span>'''Select the activity for which the volunteer work has been done. | ||
| + | |||
| width="50%" | | | width="50%" | | ||
| + | '''<span style="color: rgb(255, 0, 0);">D: </span>'''The "Non applicable" General Ledger account is entered automatically and it is not possible to modify it. | ||
| + | |||
|- | |- | ||
| width="50%" | | | width="50%" | | ||
| + | '''<span style="color: rgb(255, 0, 0);">E:</span>''' Enter the number of hours worked in the "Quantity" field. | ||
| + | |||
| width="50%" | | | width="50%" | | ||
| + | '''<span style="color: rgb(255, 0, 0);">F: </span>'''The "Volunteer hours" payment method is entered automatically and it is not possible to modify it. | ||
| + | |||
|} | |} | ||
| + | <br> For more information concerning the addition of a transaction, consult [[ProDon:Transaction Logging|this procedure]]. | ||
| + | |||
| + | === Filtering the Clients who did Volunteer Hours === | ||
| + | Go to "Analysis and History". To do so, from the software home page, click on the "Analysis" menu, then select "[[Image:Button analysis and history.png]] Analysis and History". | ||
| − | + | Once in "Analysis and History", make sure that all transactions are displayed (that there is no filter applied). | |
| + | Then click on the [[Image:Button Filter.png]] button, in order to filter the volunteer work hours and select "Add filter" to be able to reuse the filter subsequently. | ||
| + | After clicking on "Add filter", a window allowing to name the filter opens. Name the filter as "Volunteer work time bank". | ||
| − | {| cellspacing="1" cellpadding="1" border="1" | + | {| cellspacing="1" cellpadding="1" border="1" class="wikitable" style="width: 646px; height: 603px;" |
|- | |- | ||
| colspan="2" | | | colspan="2" | | ||
| + | After naming the filter, the "Filter data" window opens. Go to the "Fields" tab. | ||
| + | |||
|- | |- | ||
| − | | colspan="2" | | + | | colspan="2" | [[Image:Entry Volunteer Hours 007.png]] |
|- | |- | ||
| width="50%" | | | width="50%" | | ||
| + | '''<span style="color: rgb(255, 0, 0);">A: </span>'''Select the "Occasion" field. | ||
| + | |||
| width="50%" | | | width="50%" | | ||
| + | '''<span style="color: rgb(255, 0, 0);">B: </span>'''Select the "List of choices" operation. | ||
| + | |||
|- | |- | ||
| width="50%" | | | width="50%" | | ||
| + | '''<span style="color: rgb(255, 0, 0);">C: </span>'''Select the "Volunteer Work Hours" value. | ||
| + | |||
| width="50%" | | | width="50%" | | ||
| + | '''<span style="color: rgb(255, 0, 0);">D: </span>'''Click on the "[[Image:Button Check mark Confirm.png]] Add condition" button. | ||
| + | |||
|- | |- | ||
| width="50%" | | | width="50%" | | ||
| − | | width="50%" | | + | '''<span style="color: rgb(255, 0, 0);">E: </span>'''Click on the" [[Image:Button Check mark Confirm.png]] Apply" button. |
| + | |||
| + | | width="50%" | | ||
|} | |} | ||
| + | For more information concerning filters, consult [[Common functions:Filter Data (Queries)|this procedure]]. | ||
| + | === Printing the Report === | ||
| − | + | In "Analysis and History", once the filter is applied and the active list contains only the volunteer work hours, perform a transaction type mass mailing by clicking on the [[Image:Button Mailmerge Transaction.png]] button. | |
| − | |||
| − | |||
| − | {| cellspacing="1" cellpadding="1" border="1" | + | {| cellspacing="1" cellpadding="1" border="1" class="wikitable" style="width: 448px; height: 714px;" |
|- | |- | ||
| colspan="2" | | | colspan="2" | | ||
| + | After clicking on the [[Image:Button Mailmerge Transaction.png]] button, this window opens. | ||
| + | |||
|- | |- | ||
| − | | colspan="2" | | + | | colspan="2" | [[Image:Entry Volunteer Hours 008.png]] |
|- | |- | ||
| width="50%" | | | width="50%" | | ||
| + | '''<span style="color: rgb(255, 0, 0);">A: </span>'''Select the "All transactions in the current list" option. | ||
| + | |||
| width="50%" | | | width="50%" | | ||
| + | '''<span style="color: rgb(255, 0, 0);">B: </span>'''Check the "Also include clients excluded from the mass mailing" box. | ||
| + | |||
|- | |- | ||
| width="50%" | | | width="50%" | | ||
| + | '''<span style="color: rgb(255, 0, 0);">C: </span>'''Check the "Volunteer Work Hours Report" document or under its new name if it has been renamed when duplicating the document. | ||
| + | |||
| + | '''NOTE: '''If the document is not available, see the [[ProDon:Entry of Volunteer Hours#Creating_the_Master_Document_for_the_Report|"Creating the Master Document for the Report"]] section. | ||
| + | |||
| width="50%" | | | width="50%" | | ||
| + | '''<span style="color: rgb(255, 0, 0);">D: </span>'''Click on "[[Image:Button Word.png]] Generate". | ||
| + | |||
|} | |} | ||
| + | <br> | ||
| + | For more information concerning mass mailing, consult [[ProDon:Mass Mailing#Transaction_Mass_Mailing|this procedure]]. | ||
| − | ==== Example of Report ==== | + | ==== Example of Report ==== |
| − | |||
| − | |||
| + | [[Image:Entry Volunteer Hours 009.png]] | ||
| + | <br> | ||
| − | {{ | + | {{Footer_ProDon_Version|4.6.6.5}}<br> |
Latest revision as of 14:46, 17 May 2019
| Entry of Volunteer Hours |
CAUTION : This document is for VERSION 5 of Prodon. To go to the document for version 4, click here.
WARNING : This document is currently being edited/revised, it is possible that some parts are missing or obsolete.
Introduction
The compilation of time banks is used to count the number of volunteer hours worked for the organization, by keeping track of the volunteers' names and the number of hours each of them have worked. Following the compilation of the hours, it is possible to produce a report of the hours worked.
Implementation of the Structure
Prior to compiling the volunteer hours, the structure has to be implemented. That is, creating a General Ledger account, a payment method, an origin code, a donation occasion and activities specific to the compilation of the time bank; then creating a master document for the report.
Adding the General Ledger Account
Go to "General Ledger account management". To do so, from the software home page, click on the "Transactions" menu, then select "![]() GL accounts".
GL accounts".
|
Click on the | |
 | |
|
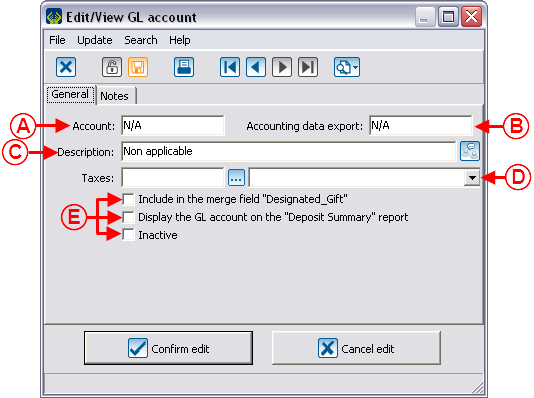
A: Enter "N/A" in the "Account" field. |
B: Enter "N/A" in the "Accounting data export" field if the "Accounting Integration Module" is active. |
|
C: Enter "Non applicable" in the "Description" field. |
D: Leave the "Taxes" field empty. |
|
E: Uncheck all boxes. |
|
For more information concerning the addition of a General Ledger code, consult this procedure.
Adding the Payment Method
Go to the "Payment methods management". To do so, from the software home page, click on the "Transactions" menu, then select "![]() Payment methods".
Payment methods".
For more information concerning the addition of a payment method, consult this procedure.
Adding the Origin Code
Go to the "Origin codes management". To do so, from the software home page, click on the "Transactions" menu, then select "Origin codes".
For more information concerning the addition of an origin code, consult this procedure.
Adding the Donation Occasion
Go to the "Donation occasions management". To do so, from the software home page, click on the "Transactions" menu, then select "![]() Donation occasions".
Donation occasions".
For more information concerning the addition of a donation occasion, consult this procedure.
Adding the Donation Occasion Activities
From the "Volunteer work hours" "Edit donation occasion" window, add the activities by clicking on the ![]() button on the right side of the window.
button on the right side of the window.
|
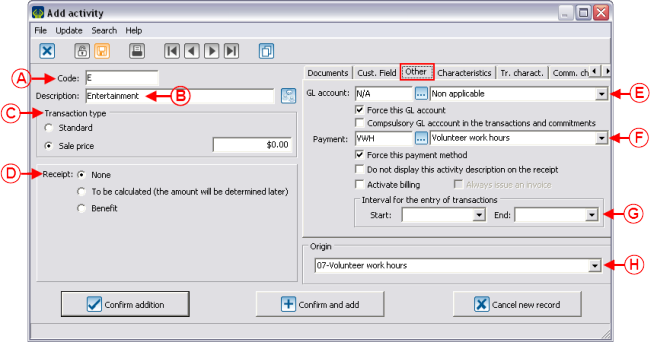
All activities of the donation occasion must have the following options. | |
| |
|
A: Enter the code of the wanted activity in the "Code" field. |
B: Enter the description of the wanted activity in the "Description" field. |
|
C: For the "Transaction type" field, select "Sale price", then enter the "$0.00" price. |
D: For the "Receipt" field, select "None". |
|
E: For the "GL account" field, choose the "Non applicable" account created earlier. Also check the "Force this GL account" box, then uncheck the "Compulsory GL account in the transactions and commitments" box. |
F: For the "Payment" field, select the "Volunteer work hours" payment method created earlier. Also check the "Force this payment method" box, then uncheck all other boxes of the section. |
|
G: Do not enter anything in the "Interval for the entry of transactions" section. |
H: For the "Origin" field, select the "07-Volunteer work hours" origin code created earlier. |
For more information concerning the addition of an activity, consult this procedure.
Creating the Master Document for the Report
Go to the "Master document management". To do so, from the software home page, click on the "Mailings" menu, then select "![]() Master documents".
Master documents".
Go in the "Logilys templates" tab, select the "Template - Report / Volunteer hours" document, then duplicate the document.
To learn how to duplicate a Logilys document template, consult the "Duplicate a Logilys Template" section of the "Duplicate a Master Document" procedure.
NOTE: It is possible to create documents specific to your needs, however the following examples are linked to the "Template - Report / Volunteer hours" document that has been renamed as "Volunteer Work Hours Report".
Using the Structure
Adding Time
Go to the "Transaction management". To do so, from the software home page, click on the "Transactions" menu, then select "![]() Transactions".
Transactions".
For more information concerning the addition of a transaction, consult this procedure.
Filtering the Clients who did Volunteer Hours
Go to "Analysis and History". To do so, from the software home page, click on the "Analysis" menu, then select "![]() Analysis and History".
Analysis and History".
Once in "Analysis and History", make sure that all transactions are displayed (that there is no filter applied).
Then click on the ![]() button, in order to filter the volunteer work hours and select "Add filter" to be able to reuse the filter subsequently.
button, in order to filter the volunteer work hours and select "Add filter" to be able to reuse the filter subsequently.
After clicking on "Add filter", a window allowing to name the filter opens. Name the filter as "Volunteer work time bank".
|
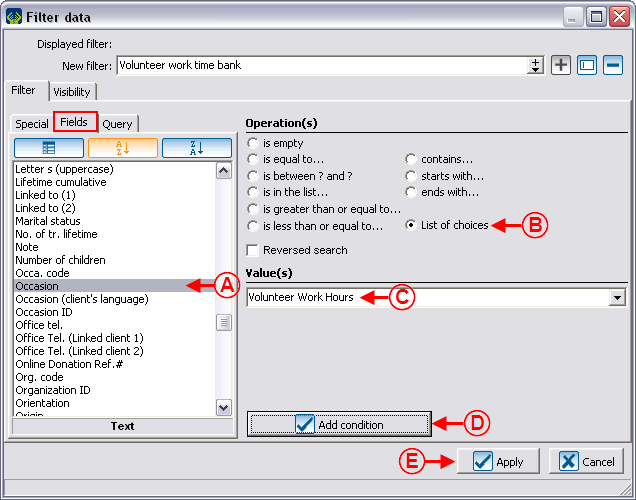
After naming the filter, the "Filter data" window opens. Go to the "Fields" tab. | |
| |
|
A: Select the "Occasion" field. |
B: Select the "List of choices" operation. |
|
C: Select the "Volunteer Work Hours" value. |
|
For more information concerning filters, consult this procedure.
Printing the Report
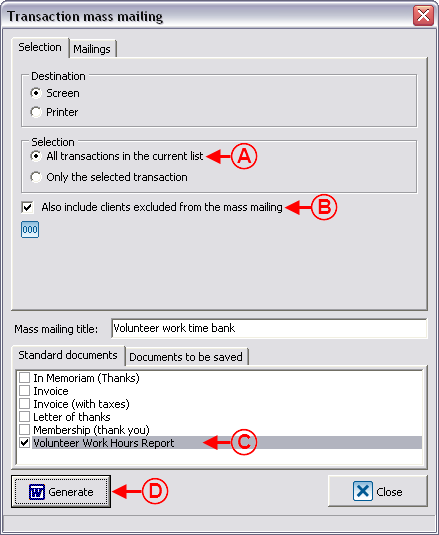
In "Analysis and History", once the filter is applied and the active list contains only the volunteer work hours, perform a transaction type mass mailing by clicking on the ![]() button.
button.
| |
|
A: Select the "All transactions in the current list" option. |
B: Check the "Also include clients excluded from the mass mailing" box. |
|
C: Check the "Volunteer Work Hours Report" document or under its new name if it has been renamed when duplicating the document. NOTE: If the document is not available, see the "Creating the Master Document for the Report" section. |
|
For more information concerning mass mailing, consult this procedure.
Example of Report
Document name: ProDon:Entry of Volunteer Hours
Version : 4.6.6.5
