Difference between revisions of "ProDon:Importation Modules"
Pgillespie (talk | contribs) |
|||
| (36 intermediate revisions by 5 users not shown) | |||
| Line 1: | Line 1: | ||
| − | {{ | + | {{Header_TOC}}<br> |
== General Explanations<br> == | == General Explanations<br> == | ||
| − | + | The modules are all grouped in a single location. You can analyze your data '''before''' confirming the import to detect any errors that might have slipped into the data. Because the modules are independent, you will only be able to access features offered by the module(s) that you own. <br><br>Importing is generally performed from an '''''Excel''''' file saved in .CSV format. Because this file type uses a semicolon (;) as a delimiter, you must ensure that the data does not contain semicolons. Import of .TXT files is also supported, but if you use this file type you will need to indicate both the delimiter that separates data entries as well as the text qualifier that indicates the beginning and end of an entry. | |
<br> | <br> | ||
| Line 21: | Line 21: | ||
The required fields for each type of import are indicated above the corresponding list in the field list.<br> | The required fields for each type of import are indicated above the corresponding list in the field list.<br> | ||
| − | == List of | + | == List of Fields that are Shared by all Modules == |
Shared fields are used mainly to link a file that you wish to import to your database. If both fields contain data, the UCN will take precedence. | Shared fields are used mainly to link a file that you wish to import to your database. If both fields contain data, the UCN will take precedence. | ||
| Line 34: | Line 34: | ||
! width="90" scope="col" | Specific Properties | ! width="90" scope="col" | Specific Properties | ||
|- | |- | ||
| − | | UCN | + | | UCN |
| − | | | + | | ClientNo |
| − | | | + | | CliNo |
| Existing client number | | Existing client number | ||
| style="text-align: center;" | 7 | | style="text-align: center;" | 7 | ||
| align="center" | <br> | | align="center" | <br> | ||
|- | |- | ||
| − | | ReferenceNo | + | | ReferenceNo |
| − | | Ref. | + | | Ref. |
| − | | RefNo | + | | RefNo |
| <br> | | <br> | ||
| style="text-align: center;" | 25 | | style="text-align: center;" | 25 | ||
| Line 51: | Line 51: | ||
<br> | <br> | ||
| − | == | + | == Client import and update module == |
| − | + | This module meets a wide range of needs. It is mainly used to create or correct extensive numbers of clients in your database. It is frequently used in conjunction with the transaction and commitment import modules (see the corresponding sections for more information). | |
<br> | <br> | ||
| − | ==== | + | ==== Required fields for creating a new client ==== |
| − | + | CliName '''OR''' CliCompany | |
'''AND''' | '''AND''' | ||
| Line 69: | Line 69: | ||
==== Required fields for detecting duplicates ==== | ==== Required fields for detecting duplicates ==== | ||
| − | (CliFirstName AND CliName) '''OR''' CliCompany | + | (CliFirstName AND CliName) '''OR''' CliCompany |
'''AND''' | '''AND''' | ||
| − | CliAddress | + | CliAddress |
'''AND''' | '''AND''' | ||
| − | CliPostalCode | + | CliPostalCode |
<br> | <br> | ||
| Line 83: | Line 83: | ||
==== Required fields for creating contacts <br> ==== | ==== Required fields for creating contacts <br> ==== | ||
| − | ConOperation | + | ConOperation |
'''AND''' | '''AND''' | ||
| − | ConLink | + | ConLink |
<br> | <br> | ||
| Line 93: | Line 93: | ||
=== Required fields for creating links === | === Required fields for creating links === | ||
| − | UCN2 '''OR''' ReferenceNo2 | + | UCN2 '''OR''' ReferenceNo2 |
'''AND''' | '''AND''' | ||
| Line 101: | Line 101: | ||
'''AND''' | '''AND''' | ||
| − | Link | + | Link |
'''<br>''' | '''<br>''' | ||
| − | You can view the complete list of [[ProDon:Client importation module# | + | You can view the complete list of [[ProDon:Client importation module#List_of_client_fields|client]], [[ProDon:Client importation module#List_of_contact_fields|contact]] and [[ProDon:Client importation module#List_of_link_fields|link]] fields, as well as their specific properties.<br> |
== Transaction import module == | == Transaction import module == | ||
| − | + | When used by itself, the transaction import module allows you to create transactions for clients that already exist in '''''ProDon''''' and '''requires''' that you use the UCN or ReferenceNo field in order to link each client to the corresponding transaction being created. If you have the client import module, you can replace the UCN or ReferenceNo field with a series of client fields. This will enable the system to retrieve a given client if it already exists or to create the client if it does not already exist.<br><br>Receipts can only be imported into transactions that already exist in '''''ProDon'''''. Caution: '''if you import a receipt into a transaction that already has one, the import will overwrite the existing receipt.<br> ''' | |
| − | ==== | + | ==== Required fields for creating transactions<br> ==== |
| − | ( | + | (UCN or ReferenceNo) '''OR''' (((CliFirstName and CliName) or CliCompany) '''AND''' (CliAddress and CliPostalCode))<br>'''AND'''<br>TrxOccasionCode<br>'''AND'''<br>TrxActivityCode (if marked as required in the selected occasion)<br>'''AND'''<br>TrxGLCode (if marked as required in the activity '''AND''' no account is selected in the activity) <br>'''AND'''<br>TrxGiftAmount '''OR '''TrxQuantity<br>'''AND'''<br>TrxPaymentMethod '''AND ''' related fields if payment is electronic (card number, account number, RIB key, etc.)<br>'''AND'''<br>TrxCharacteristicLabel if characteristics are required for the transactions<br> |
| − | ==== | + | ==== Required fields for creating receipts ==== |
| − | + | RecTrxNo | |
| − | ''' | + | '''AND''' |
| − | + | RecReceiptNo | |
<br> | <br> | ||
| − | + | You can view the complete list of [[ProDon:Transaction importation module#List_of_Transaction_Fields|transaction]] and [[ProDon:Transaction importation module#List_of_receipt_fields|receipt]] fields, as well as their specific properties. | |
| − | == | + | == Commitment import module == |
| − | + | When used by itself, the commitment import module allows you to create commitments for clients that already exist in ProDon and requires that you use the UCN or ReferenceNo field in order to link each client to the corresponding commitment being created. If you have the client import module, you can replace the UCN or ReferenceNo field with a series of client fields. This will enable the system to retrieve a given client if it already exists or to create the client if it does not already exist..<br> | |
<br> | <br> | ||
| − | ==== | + | ==== Required fields for creating an "Objective"-type commitment<br> ==== |
| − | ( | + | (UCN or ReferenceNo) '''OR''' (((CliFirstName and CliName) OR CliCompany) '''AND ''' (CliAddress and CliPostalCode)<br>'''AND'''<br>CommType<br>'''AND'''<br>CommCharacteristicLabel if characteristics are required for commitments<br><br> |
| − | ==== | + | ==== Required fields for creating an "Automatic"-type commitment<br> ==== |
| − | ( | + | (UCN or ReferenceNo) '''OR''' (((CliFirstName and CliName) OR CliCompany) '''AND''' (CliAddress and CliPostalCode))<br>'''AND'''<br>CommOccasion<br>'''AND'''<br>CommActivity (if marked as required in the selected occasion)<br>'''AND'''<br>CommCodeGL (if marked as required in the activity AND no account is selected in the activity)<br>'''AND'''<br>CommPaymentMethod<br>'''AND'''<br>CommCharacteristicLabel if characteristics are required for commitments |
<br> | <br> | ||
| − | + | You can view the complete list of [[ProDon:Commitment Importation module|commitment]] fields, as well as their specific properties. | |
| − | == Configuration | + | == Import Configuration and Process == |
| − | + | This section presents the different import configuration screens as well as a general overview of the steps in the import process. | |
| − | + | To enter import management, select the ''Configuration'' menu and then ''Import''. | |
<br> | <br> | ||
| Line 157: | Line 157: | ||
| [[Image:ProDon Importation modules 001.png]] | | [[Image:ProDon Importation modules 001.png]] | ||
|- | |- | ||
| − | | | + | | Click [[Image:Button add plus.png]] to create a new import template. |
|} | |} | ||
| Line 166: | Line 166: | ||
| colspan="2" | [[Image:ProDon Importation modules 002.png]] | | colspan="2" | [[Image:ProDon Importation modules 002.png]] | ||
|- | |- | ||
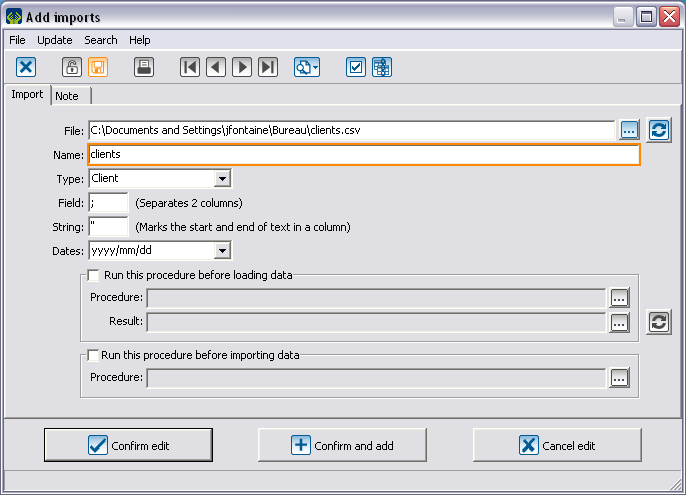
| − | | colspan="2" | | + | | colspan="2" | All fields are required except for the checkboxes and the note. |
|- | |- | ||
| − | | width="50%" | | + | | width="50%" | Click [[Image:Button Selection 3 dots.png]] to specify the location of your source file. |
| − | | | + | | The system names your import template after your source file. |
|- | |- | ||
| − | | | + | | The available types depend on the modules that you own. Select the type of import that you wish to perform. |
| − | | | + | | This field indicates the column separator used in the '''''Excel''''' file. |
|- | |- | ||
| − | | | + | | This field indicates the text qualifier used in the '''''Excel''''' file. |
| − | | | + | | The date format specified here must be used globally for all dates in the '''''Excel''''' file. |
|} | |} | ||
<br> | <br> | ||
| − | + | When you click [[Image:Button checkbox checked crossed.png]], you will access one or more option dialog boxes (depending on which modules are active and the type of import that you have selected).<br> | |
{| width="200" cellspacing="1" cellpadding="1" border="1" class="wikitable" | {| width="200" cellspacing="1" cellpadding="1" border="1" class="wikitable" | ||
| Line 186: | Line 186: | ||
| [[Image:ProDon Importation modules 003.png]]<br> | | [[Image:ProDon Importation modules 003.png]]<br> | ||
|- | |- | ||
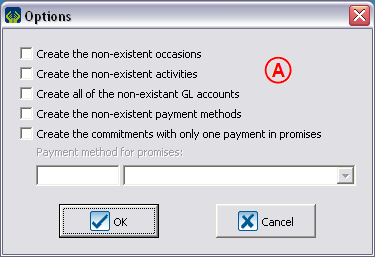
| − | | <span style="color: rgb(255, 0, 0);">'''A'''</span> | + | | <span style="color: rgb(255, 0, 0);">'''A'''</span>: The commitment options enable you to specify which items you wish and do not wish to create. The two last options enable you to create pending transactions rather than commitments if only one payment is involved, and also to specify the payment method to be used.<br> |
|} | |} | ||
| Line 195: | Line 195: | ||
| [[Image:ProDon Importation modules 004.png]]<br> | | [[Image:ProDon Importation modules 004.png]]<br> | ||
|- | |- | ||
| − | | <span style="color: rgb(255, 0, 0);">'''B'''</span> | + | | <span style="color: rgb(255, 0, 0);">'''B'''</span>: The transaction options enable you to force the creation of certain items.<br> |
|} | |} | ||
| Line 204: | Line 204: | ||
| colspan="2" | [[Image:ProDon Importation modules 005.png]]<br> | | colspan="2" | [[Image:ProDon Importation modules 005.png]]<br> | ||
|- | |- | ||
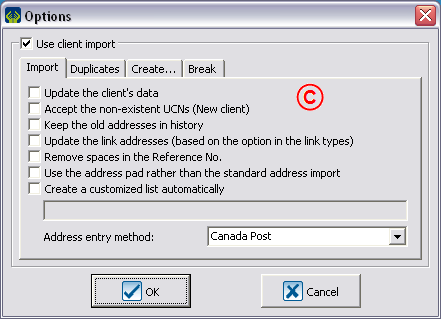
| − | | colspan="2" | <span style="color: rgb(255, 0, 0);">'''C'''</span> | + | | colspan="2" | <span style="color: rgb(255, 0, 0);">'''C'''</span>: The client options include several tabs.<br> |
|- | |- | ||
| − | | width="50%" | | + | | width="50%" | The ''Import'' tab enables you to specify which processes will be performed by the module.<br> |
| − | | | + | | The ''Duplicates '' tab enables you to add detection of additional duplicates to the base detection.<br> |
|- | |- | ||
| − | | | + | | The ''Create'' tab enables you to force the creation of certain items.<br> |
| − | | | + | | The Case tab enables you to harmonize the use of capital letters. The first letter of nearly all words will be capitalized and the others will be lower-case.<br> |
|} | |} | ||
<br> | <br> | ||
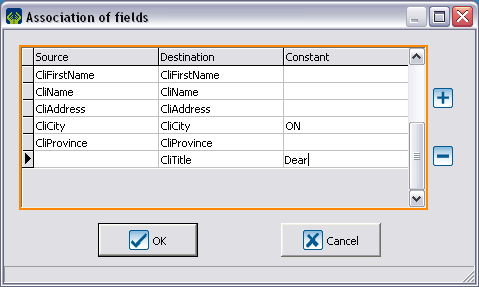
| − | + | When you click [[Image:Button Association.png]] (in the Add imports window), a window opens in which you can map the fields in the Excel file to the fields in the database. This feature is useful if it is not possible to change the column headers in the source file or if you want to detect possible nomenclature errors.<br> | |
{| width="200" cellspacing="1" cellpadding="1" border="1" class="wikitable" | {| width="200" cellspacing="1" cellpadding="1" border="1" class="wikitable" | ||
| Line 221: | Line 221: | ||
| colspan="2" | [[Image:ProDon Importation modules 006.png]]<br> | | colspan="2" | [[Image:ProDon Importation modules 006.png]]<br> | ||
|- | |- | ||
| − | | colspan="2" | | + | | colspan="2" | This window enables you to map the columns in your spreadsheet file to the corresponding fields in the '''''ProDon''''' file.<br> |
|- | |- | ||
| − | | width="50%" | | + | | width="50%" | The « Source » column designates the column headers in the '''''Excel''''' file.<br> |
| − | | | + | | The « Destination » column designates the fields in '''''ProDon'''''.<br> |
|- | |- | ||
| − | | | + | | The « Constante » column enables you to specify the value to be used when a given spreadsheet row is empty.<br> |
| − | | | + | | The [[Image:Button add plus.png]] button allows you to add destination fields even if the spreadsheet contains no corresponding columns and to specify the value to import into '''''ProDon'''''.<br> |
|- | |- | ||
| − | | colspan="2" | | + | | colspan="2" | The column containing the characteristic value must be mapped to the destination field "CharacteristicLabel." The note and the start and end dates must be mapped to the destination field "Attached to CharacteristicLabel." |
|} | |} | ||
<br> | <br> | ||
| − | {| cellspacing="1" cellpadding="1" border="1" style="width: 457px; height: 400px; | + | {| cellspacing="1" cellpadding="1" border="1" class="wikitable" style="width: 457px; height: 400px;" |
|- | |- | ||
| − | | style="text-align: center; | + | | colspan="2" style="text-align: center;" | [[Image:ProDon Importation modules 007.png]]<br> |
|- | |- | ||
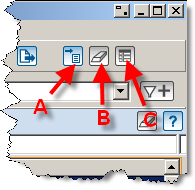
| − | | width="50%" | <span style="color: rgb(255, 0, 0);">'''A'''</span> | + | | width="50%" | <span style="color: rgb(255, 0, 0);">'''A'''</span>: Click this button to load the data from your '''''Excel''''' file in a temp table in '''''ProDon'''''. This button activates buttons <span style="color: rgb(255, 0, 0);">'''B'''</span> and <span style="color: rgb(255, 0, 0);">'''C'''</span>.<br> |
|- | |- | ||
| − | | <span style="color: rgb(255, 0, 0);">'''B'''</span> | + | | <span style="color: rgb(255, 0, 0);">'''B'''</span>: Click this button to delete an erroneous or completed import.<br> |
|- | |- | ||
| − | | <span style="color: rgb(255, 0, 0);">'''C'''</span> | + | | <span style="color: rgb(255, 0, 0);">'''C'''</span>: Click this button to display the list of imported data. This feature allows you to analyze the data to see if you are satisfied with the import. <br> |
|} | |} | ||
<br> | <br> | ||
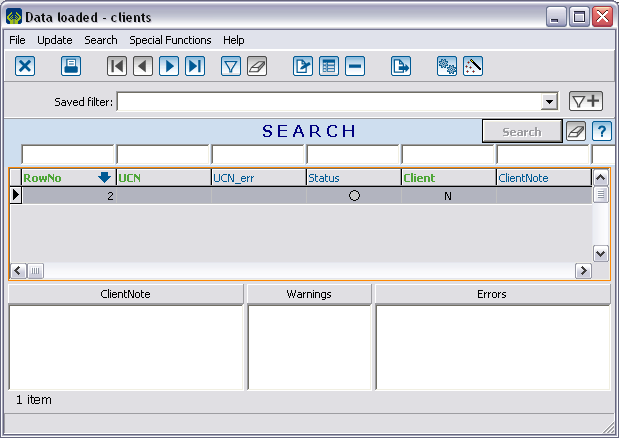
| − | + | Clicking [[Image:Button Summary detail.png]] causes the following window to open.<br> | |
{| width="200" cellspacing="1" cellpadding="1" border="1" class="wikitable" | {| width="200" cellspacing="1" cellpadding="1" border="1" class="wikitable" | ||
| Line 253: | Line 253: | ||
| colspan="2" | [[Image:ProDon Importation modules 008.png]]<br> | | colspan="2" | [[Image:ProDon Importation modules 008.png]]<br> | ||
|- | |- | ||
| − | | | + | | This window allows you to view each column for each client that will be imported.<br> |
|- | |- | ||
| − | | | + | | Clicking [[Image:Button Gears.png]] launches a preliminary analysis. This step allows you to verify the integrity of your data.<br> |
|- | |- | ||
| − | | '''''ProDon''''' | + | | '''''ProDon''''' compares the data to be imported with the contents of your current database.<br> |
|} | |} | ||
| Line 266: | Line 266: | ||
| [[Image:ProDon Importation modules 009.png]]<br> | | [[Image:ProDon Importation modules 009.png]]<br> | ||
|- | |- | ||
| − | | | + | | Notes will be shown into the appropriate boxes if potential duplicates, errors or other warnings are encountered.<br> |
|} | |} | ||
<br> | <br> | ||
| − | + | Color coding allows you to quickly identify problematic clients.<br> | |
| − | {| width="372" cellspacing="1" cellpadding="1" border="1" | + | {| width="372" cellspacing="1" cellpadding="1" border="1" class="wikitable" style="" |
|- | |- | ||
| − | ! scope="col" | | + | ! scope="col" | Status |
! width="400" scope="col" | Description | ! width="400" scope="col" | Description | ||
|- | |- | ||
| rowspan="4" | [[Image:ProDon Importation modules 010.png|128x91px]]<br> | | rowspan="4" | [[Image:ProDon Importation modules 010.png|128x91px]]<br> | ||
| − | | | + | | There is an error for this client. |
|- | |- | ||
| − | | | + | | Everything is OK. |
|- | |- | ||
| − | | | + | | There is a warning. |
|- | |- | ||
| − | | | + | | There is a validated warning. |
|} | |} | ||
| Line 292: | Line 292: | ||
<br> | <br> | ||
| − | + | If you double-click a row, the following window opens. | |
{| width="200" cellspacing="1" cellpadding="1" border="1" class="wikitable" | {| width="200" cellspacing="1" cellpadding="1" border="1" class="wikitable" | ||
| Line 298: | Line 298: | ||
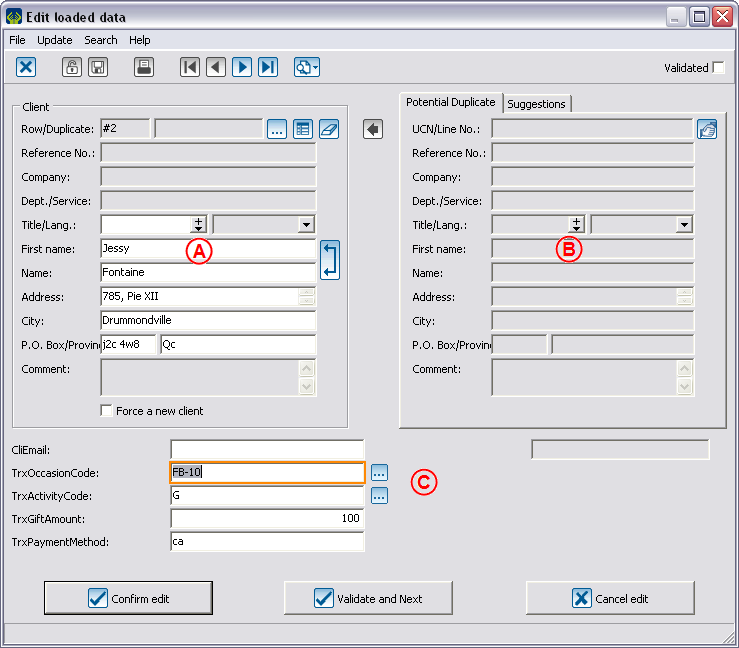
| colspan="2" | [[Image:ProDon Importation modules 011.png]] | | colspan="2" | [[Image:ProDon Importation modules 011.png]] | ||
|- | |- | ||
| − | | width="50%" | <span style="color: rgb(255, 0, 0);">'''A | + | | width="50%" | <span style="color: rgb(255, 0, 0);">'''A'''</span>: A summary of the client record. The buttons to the right of "UCN/ Line no." allow you to manually assign a duplicate to a record. |
| − | | <span style="color: rgb(255, 0, 0);">'''B'''</span> | + | | <span style="color: rgb(255, 0, 0);">'''B'''</span>: If there is a potential duplicate, a summary of the other record is presented here. |
|- | |- | ||
| − | | <span style="color: rgb(255, 0, 0);">'''C'''</span> | + | | <span style="color: rgb(255, 0, 0);">'''C'''</span>: A list of all other fields as well as the information they contain. |
| <br> | | <br> | ||
|} | |} | ||
| Line 307: | Line 307: | ||
<br> | <br> | ||
| − | + | Clicking [[Image:Button magic wand.png]] (in the loaded data window) begins the process of importing the data into your current database. '''<span style="color: rgb(255, 0, 0);">CAUTION: THIS PROCEDURE IS IRREVERSIBLE.</span>''' | |
| − | |||
| − | |||
| − | |||
| − | |||
| − | |||
| − | |||
| − | + | == Utilities available upon request == | |
| − | |||
| − | |||
| − | |||
| − | |||
| − | |||
| − | |||
| − | |||
| − | |||
| − | |||
| − | |||
| − | |||
| − | |||
| − | |||
| − | |||
| − | |||
| − | |||
| − | |||
| − | |||
| − | |||
| − | |||
| − | |||
| − | |||
| − | + | *[[ProDon:Automatic import utility|Automatic import utility]]: the automatic import utility is a console program that is called from a scheduled Windows task to perform automatic importations. | |
| + | *FTP download utility: allows the downloading of files from an FTP server (for example, to perform automatic importations). | ||
<br> | <br> | ||
| − | + | {{Footer_ProDon_Version|4.6.3.25}}<br> | |
Latest revision as of 08:44, 5 May 2016
| Importation Modules |
General Explanations
The modules are all grouped in a single location. You can analyze your data before confirming the import to detect any errors that might have slipped into the data. Because the modules are independent, you will only be able to access features offered by the module(s) that you own.
Importing is generally performed from an Excel file saved in .CSV format. Because this file type uses a semicolon (;) as a delimiter, you must ensure that the data does not contain semicolons. Import of .TXT files is also supported, but if you use this file type you will need to indicate both the delimiter that separates data entries as well as the text qualifier that indicates the beginning and end of an entry.
The first row in the file contains column headers. To facilitate the process, the headers should match the labels or abbreviations used in the relevant sections.
Labels are not case-sensitive and do not take accented characters into account, except for the cedilla (ç).
The contents of the Specific Properties column are clickable and point toward an explanation.
The required fields for each type of import are indicated above the corresponding list in the field list.
Shared fields are used mainly to link a file that you wish to import to your database. If both fields contain data, the UCN will take precedence.
| Full Label | Abbreviation 1 | Abbreviation 2 | Possible Values | Maximum Length | Specific Properties |
|---|---|---|---|---|---|
| UCN | ClientNo | CliNo | Existing client number | 7 | |
| ReferenceNo | Ref. | RefNo | |
25 | |
Client import and update module
This module meets a wide range of needs. It is mainly used to create or correct extensive numbers of clients in your database. It is frequently used in conjunction with the transaction and commitment import modules (see the corresponding sections for more information).
Required fields for creating a new client
CliName OR CliCompany
AND
CliCharacteristicLabel (if characteristics are required for clients in ProDon)
Required fields for detecting duplicates
(CliFirstName AND CliName) OR CliCompany
AND
CliAddress
AND
CliPostalCode
Required fields for creating contacts
ConOperation
AND
ConLink
Required fields for creating links
UCN2 OR ReferenceNo2
AND
LinkOperation
AND
Link
You can view the complete list of client, contact and link fields, as well as their specific properties.
Transaction import module
When used by itself, the transaction import module allows you to create transactions for clients that already exist in ProDon and requires that you use the UCN or ReferenceNo field in order to link each client to the corresponding transaction being created. If you have the client import module, you can replace the UCN or ReferenceNo field with a series of client fields. This will enable the system to retrieve a given client if it already exists or to create the client if it does not already exist.
Receipts can only be imported into transactions that already exist in ProDon. Caution: if you import a receipt into a transaction that already has one, the import will overwrite the existing receipt.
Required fields for creating transactions
(UCN or ReferenceNo) OR (((CliFirstName and CliName) or CliCompany) AND (CliAddress and CliPostalCode))
AND
TrxOccasionCode
AND
TrxActivityCode (if marked as required in the selected occasion)
AND
TrxGLCode (if marked as required in the activity AND no account is selected in the activity)
AND
TrxGiftAmount OR TrxQuantity
AND
TrxPaymentMethod AND related fields if payment is electronic (card number, account number, RIB key, etc.)
AND
TrxCharacteristicLabel if characteristics are required for the transactions
Required fields for creating receipts
RecTrxNo
AND
RecReceiptNo
You can view the complete list of transaction and receipt fields, as well as their specific properties.
Commitment import module
When used by itself, the commitment import module allows you to create commitments for clients that already exist in ProDon and requires that you use the UCN or ReferenceNo field in order to link each client to the corresponding commitment being created. If you have the client import module, you can replace the UCN or ReferenceNo field with a series of client fields. This will enable the system to retrieve a given client if it already exists or to create the client if it does not already exist..
Required fields for creating an "Objective"-type commitment
(UCN or ReferenceNo) OR (((CliFirstName and CliName) OR CliCompany) AND (CliAddress and CliPostalCode)
AND
CommType
AND
CommCharacteristicLabel if characteristics are required for commitments
Required fields for creating an "Automatic"-type commitment
(UCN or ReferenceNo) OR (((CliFirstName and CliName) OR CliCompany) AND (CliAddress and CliPostalCode))
AND
CommOccasion
AND
CommActivity (if marked as required in the selected occasion)
AND
CommCodeGL (if marked as required in the activity AND no account is selected in the activity)
AND
CommPaymentMethod
AND
CommCharacteristicLabel if characteristics are required for commitments
You can view the complete list of commitment fields, as well as their specific properties.
Import Configuration and Process
This section presents the different import configuration screens as well as a general overview of the steps in the import process.
To enter import management, select the Configuration menu and then Import.
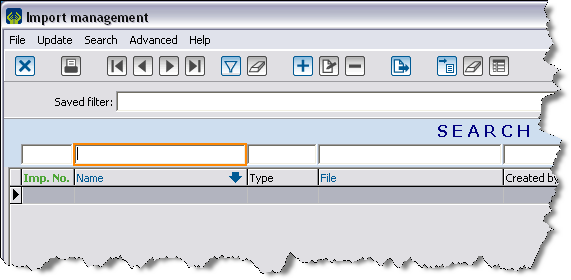
|
| Click |
When you click ![]() , you will access one or more option dialog boxes (depending on which modules are active and the type of import that you have selected).
, you will access one or more option dialog boxes (depending on which modules are active and the type of import that you have selected).
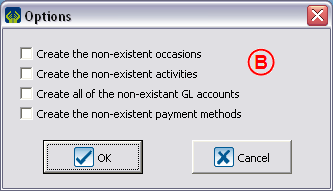 |
| B: The transaction options enable you to force the creation of certain items. |
When you click ![]() (in the Add imports window), a window opens in which you can map the fields in the Excel file to the fields in the database. This feature is useful if it is not possible to change the column headers in the source file or if you want to detect possible nomenclature errors.
(in the Add imports window), a window opens in which you can map the fields in the Excel file to the fields in the database. This feature is useful if it is not possible to change the column headers in the source file or if you want to detect possible nomenclature errors.
Clicking ![]() causes the following window to open.
causes the following window to open.
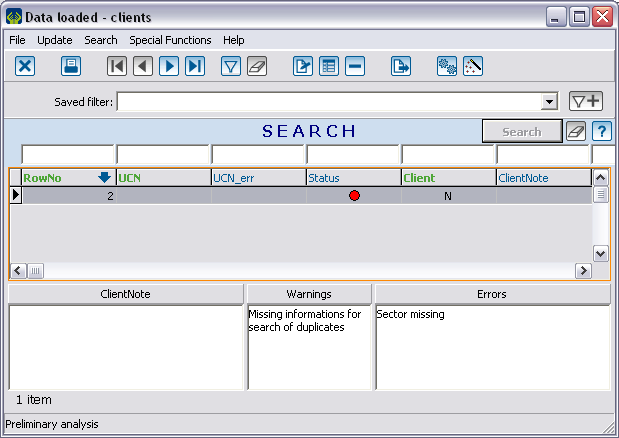 |
| Notes will be shown into the appropriate boxes if potential duplicates, errors or other warnings are encountered. |
Color coding allows you to quickly identify problematic clients.
| Status | Description |
|---|---|
 |
There is an error for this client. |
| Everything is OK. | |
| There is a warning. | |
| There is a validated warning. |
If you double-click a row, the following window opens.
Clicking ![]() (in the loaded data window) begins the process of importing the data into your current database. CAUTION: THIS PROCEDURE IS IRREVERSIBLE.
(in the loaded data window) begins the process of importing the data into your current database. CAUTION: THIS PROCEDURE IS IRREVERSIBLE.
Utilities available upon request
- Automatic import utility: the automatic import utility is a console program that is called from a scheduled Windows task to perform automatic importations.
- FTP download utility: allows the downloading of files from an FTP server (for example, to perform automatic importations).
Document name: ProDon:Importation Modules
Version : 4.6.3.25
