Difference between revisions of "ProDon:Labels or Envelopes Word 2002-2003"
| (28 intermediate revisions by 3 users not shown) | |||
| Line 1: | Line 1: | ||
| − | {{ | + | {{Header_TOC}}<br> |
== Introduction<br> == | == Introduction<br> == | ||
| − | This procedure explains the steps to create a labels or envelopes master document. | + | This procedure explains the steps to create a "labels" or "envelopes" master document. |
| − | <br> | + | <br> |
| − | == Master | + | == Master Document Configuration<br> == |
| − | From the software home page, click on the "Mailings" menu, then select "Master documents". | + | From the software home page, click on the "Mailings" menu, then select "Master documents". |
| − | In the "Master document management" window, click on [[Image: | + | In the "Master document management" window, click on [[Image:Button add plus.png]] button. |
| − | + | Name the document. | |
| − | + | Choose the "Client" document type, select the language and choose the wanted merge fields. | |
| − | + | When the master document is configured, click on the [[Image:Bouton Ouvrir Editeur.png]] button, then open the document in the editor. | |
| − | + | '''NOTE:''' If the option "Use a document by language" was chosen, a button for each language is available. | |
| + | For more information concerning the master document configuration, consult the section [[ProDon:Master Document Management#Main_Screen|master document configuration]] of the "Master document management" procedure. | ||
| + | <br> | ||
| − | <br> | + | <br> |
| − | == | + | == Creating a "Labels" Master Document <br> == |
{| width="200" cellspacing="1" cellpadding="1" border="1" class="wikitable" | {| width="200" cellspacing="1" cellpadding="1" border="1" class="wikitable" | ||
|- | |- | ||
| − | | <br> | + | | [[Image:Labels or envelopes Word 2002-2003 001.png]]<br> |
|- | |- | ||
| − | | < | + | | |
| + | '''<span style="color: rgb(255, 0, 0);">A: </span>'''In the '''''Word''''' editor, click on the [[Image:Button Main document setup.png]] button to choose the document type. | ||
| + | |||
|} | |} | ||
<br> | <br> | ||
| − | {| | + | {| cellspacing="1" cellpadding="1" border="1" style="width: 197px; height: 264px;" class="wikitable" |
|- | |- | ||
| − | | | + | | |
| + | This window opens. | ||
| + | |||
|- | |- | ||
| − | | <br> | + | | [[Image:Labels or envelopes Word 2002-2003 002.png]]<br> |
|- | |- | ||
| − | | < | + | | |
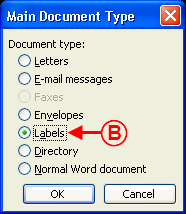
| + | '''<span style="color: rgb(255, 0, 0);">B: </span>'''Select "Labels" as "Main Document Type", then click on "OK" to determine the label format. | ||
| + | |||
|} | |} | ||
<br> | <br> | ||
| − | {| | + | {| cellspacing="1" cellpadding="1" border="1" style="width: 444px; height: 381px;" class="wikitable" |
|- | |- | ||
| − | | colspan="2" | | + | | colspan="2" | |
| + | This window opens. | ||
| + | |||
|- | |- | ||
| − | | | + | | colspan="2" | [[Image:Labels or envelopes Word 2002-2003 003.png]] |
| − | |||
|- | |- | ||
| − | | width="50%" | < | + | | width="50%" | |
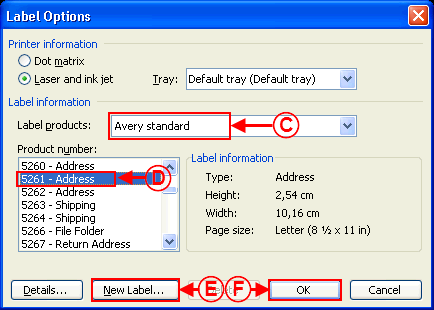
| − | | width="50%" | < | + | '''<span style="color: rgb(255, 0, 0);">C: </span>'''Choose the label product. |
| + | |||
| + | | width="50%" | | ||
| + | '''<span style="color: rgb(255, 0, 0);">D: </span>'''Choose the label format. | ||
| + | |||
|- | |- | ||
| − | | width="50%" | < | + | | width="50%" | |
| − | | width="50%" | < | + | '''<span style="color: rgb(255, 0, 0);">E: </span>'''If the label format is not available, it is possible to specify it by clicking on "New label...". |
| + | |||
| + | | width="50%" | | ||
| + | '''<span style="color: rgb(255, 0, 0);">F: </span>'''When the label format is selected, click on "OK". | ||
| + | |||
|} | |} | ||
| Line 65: | Line 82: | ||
{| width="200" cellspacing="1" cellpadding="1" border="1" class="wikitable" | {| width="200" cellspacing="1" cellpadding="1" border="1" class="wikitable" | ||
|- | |- | ||
| − | | <br> | + | | [[Image:Labels or envelopes Word 2002-2003 004.png]]<br> |
|- | |- | ||
| − | | < | + | | |
| + | '''<span style="color: rgb(255, 0, 0);">G: </span>'''Click on the [[Image:Button Insert merge field.png]] button to select the merge fields that will be on the labels. | ||
| + | |||
|} | |} | ||
<br> | <br> | ||
| − | {| | + | {| cellspacing="1" cellpadding="1" border="1" class="wikitable" style="width: 283px; height: 375px;" |
|- | |- | ||
| − | | colspan="2" | <br> | + | | colspan="2" | [[Image:Labels or envelopes Word 2002-2003 005.png]]<br> |
|- | |- | ||
| − | | width="50%" | < | + | | width="50%" | |
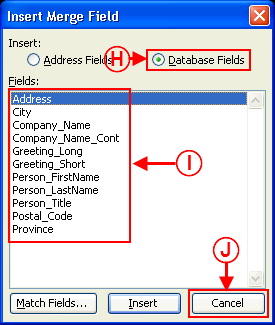
| − | | width="50%" | < | + | '''<span style="color: rgb(255, 0, 0);">H: </span>'''Activate the option "Database fields". |
| + | |||
| + | | width="50%" | | ||
| + | '''<span style="color: rgb(255, 0, 0);">I: </span>'''Choose the fields to insert on the labels. To do so, double-click on each field to insert or select the field, then click on "Insert". | ||
| + | |||
|- | |- | ||
| − | | width="50%" | < | + | | width="50%" | |
| − | | width="50%" | | + | '''<span style="color: rgb(255, 0, 0);">J: </span>'''When all the fields have been selected, click on "Cancel". |
| + | |||
| + | | width="50%" | | ||
| + | '''NOTE: '''The fields will be inserted one after the other, unformatted. | ||
| + | |||
|} | |} | ||
<br> | <br> | ||
| − | {| | + | {| cellspacing="1" cellpadding="1" border="1" style="width: 667px; height: 371px;" class="wikitable" |
|- | |- | ||
| − | | colspan="2" | <br> | + | | colspan="2" | [[Image:Labels or envelopes Word 2002-2003 006.png]]<br> |
|- | |- | ||
| − | | width="50%" | < | + | | width="50%" | |
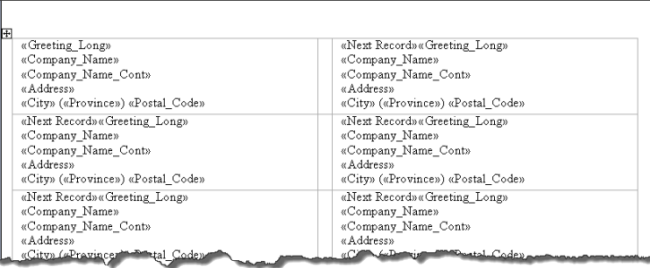
| − | | width="50%" | < | + | '''<span style="color: rgb(255, 0, 0);">K: </span>'''Format the fields (add spaces, "Enter", parentheses, etc. in between the fields). |
| + | |||
| + | | width="50%" | | ||
| + | '''<span style="color: rgb(255, 0, 0);">L: </span>'''Click on the [[Image:Button propagate labels.png]] button so that the merge fields are inserted on all the labels. | ||
| + | |||
|} | |} | ||
| Line 100: | Line 131: | ||
|- | |- | ||
| | | | ||
| + | {| width="200" cellspacing="1" cellpadding="1" border="1" class="wikitable" | ||
| + | |- | ||
| + | | [[Image:Labels or envelopes Word 2002-2003 007.png]] | ||
| + | |- | ||
| + | | | ||
| + | The master document is ready to be used. Save the document by clicking on the "File" menu, then on "Save". | ||
| + | |||
| + | '''CAUTION: '''Do not "Save as" the document, the database automatically provides a location to the master document. | ||
| + | |||
| + | |} | ||
| + | |||
|} | |} | ||
<br> | <br> | ||
| − | == | + | == Creating an "Envelope" Master Document == |
{| width="200" cellspacing="1" cellpadding="1" border="1" class="wikitable" | {| width="200" cellspacing="1" cellpadding="1" border="1" class="wikitable" | ||
|- | |- | ||
| − | | | + | | [[Image:Labels or envelopes Word 2002-2003 001.png]] |
|- | |- | ||
| | | | ||
| + | '''<span style="color: rgb(255, 0, 0);">A: </span>'''In the '''''Word''''' editor, click on the [[Image:Button Main document setup.png]] button to choose the document type.<br> | ||
| + | |||
|} | |} | ||
<br> | <br> | ||
| − | {| | + | {| cellspacing="1" cellpadding="1" border="1" style="width: 194px; height: 280px;" class="wikitable" |
|- | |- | ||
| | | | ||
| + | This window opens. | ||
| + | |||
|- | |- | ||
| − | | | + | | [[Image:Labels or envelopes Word 2002-2003 008.png]] |
|- | |- | ||
| | | | ||
| + | '''<span style="color: rgb(255, 0, 0);">B:</span>'''<span style="color: rgb(255, 0, 0);"> </span><span style="color: rgb(0, 0, 0);">Select "Envelopes" as "Main Document Type", then click on "OK" to determine the envelope format.</span> | ||
| + | |||
|} | |} | ||
<br> | <br> | ||
| − | {| | + | {| cellspacing="1" cellpadding="1" border="1" class="wikitable" style="width: 315px; height: 519px;" |
|- | |- | ||
| colspan="2" | | | colspan="2" | | ||
| + | This window opens. | ||
| + | |||
|- | |- | ||
| − | | colspan="2" | | + | | colspan="2" | [[Image:Labels or envelopes Word 2002-2003 009.png]] |
|- | |- | ||
| width="50%" | | | width="50%" | | ||
| + | '''<span style="color: rgb(255, 0, 0);">C: </span>'''Select the envelope format. | ||
| + | |||
| width="50%" | | | width="50%" | | ||
| + | '''<span style="color: rgb(255, 0, 0);">D: </span>'''Define the wanted font options. | ||
| + | |||
|- | |- | ||
| width="50%" | | | width="50%" | | ||
| + | '''<span style="color: rgb(255, 0, 0);">E: </span>'''When the envelope format is selected, click on "OK". | ||
| + | |||
| width="50%" | | | width="50%" | | ||
|} | |} | ||
| Line 143: | Line 199: | ||
{| width="200" cellspacing="1" cellpadding="1" border="1" class="wikitable" | {| width="200" cellspacing="1" cellpadding="1" border="1" class="wikitable" | ||
|- | |- | ||
| − | | | + | | [[Image:Labels or envelopes Word 2002-2003 010.png]] |
|- | |- | ||
| | | | ||
| + | '''<span style="color: rgb(255, 0, 0);">F: </span>'''Click on the [[Image:Button Insert merge field.png]] button to choose the merge fields that will be on the envelope. | ||
| + | |||
|} | |} | ||
<br> | <br> | ||
| − | {| | + | {| cellspacing="1" cellpadding="1" border="1" class="wikitable" style="width: 284px; height: 375px;" |
|- | |- | ||
| − | | colspan="2" | | + | | colspan="2" | [[Image:Labels or envelopes Word 2002-2003 011.png]] |
|- | |- | ||
| width="50%" | | | width="50%" | | ||
| + | '''<span style="color: rgb(255, 0, 0);">G: </span>'''Activate the option "Database Fields". | ||
| + | |||
| width="50%" | | | width="50%" | | ||
| + | '''<span style="color: rgb(255, 0, 0);">H: </span>'''Choose the fields to insert on the envelope. To do so, double-click on each field to insert or select the field, then click on "Insert". | ||
| + | |||
|- | |- | ||
| width="50%" | | | width="50%" | | ||
| + | '''<span style="color: rgb(255, 0, 0);">I:</span>'''<span style="color: rgb(0, 0, 0);">''' '''When all the fields have been selected, click on "Cancel". </span> | ||
| + | |||
| width="50%" | | | width="50%" | | ||
| + | <span style="color: rgb(0, 0, 0);"> | ||
| + | '''NOTE:''' The fields will be inserted one after the other, unformatted.</span> | ||
| + | |||
|} | |} | ||
| Line 165: | Line 232: | ||
{| width="200" cellspacing="1" cellpadding="1" border="1" class="wikitable" | {| width="200" cellspacing="1" cellpadding="1" border="1" class="wikitable" | ||
|- | |- | ||
| − | | | + | | [[Image:Labels or envelopes Word 2002-2003 012.png]] |
|- | |- | ||
| | | | ||
| + | '''<span style="color: rgb(255, 0, 0);">J: </span>'''Format the fields (add spaces, "Enter", parentheses, etc. in between the fields). | ||
| + | |||
|} | |} | ||
<br> | <br> | ||
| − | {| | + | {| cellspacing="1" cellpadding="1" border="1" class="wikitable" style="width: 711px; height: 262px;" |
|- | |- | ||
| − | | | + | | [[Image:Labels or envelopes Word 2002-2003 013.png]] |
| − | |||
|- | |- | ||
| | | | ||
| − | + | The master document is ready to be used. Save the document by clicking on the "File" menu, then on "Save". | |
| + | |||
| + | '''CAUTION:''' Do not "Save as" the document, the database automatically provides a location to the master document. | ||
| + | |||
|} | |} | ||
| Line 185: | Line 256: | ||
<br> | <br> | ||
| − | {{Footer_ProDon}} | + | {{Footer_ProDon}}<br> |
Latest revision as of 08:41, 5 May 2016
| Labels or Envelopes Word 2002-2003 |
Introduction
This procedure explains the steps to create a "labels" or "envelopes" master document.
Master Document Configuration
From the software home page, click on the "Mailings" menu, then select "Master documents".
In the "Master document management" window, click on ![]() button.
button.
Name the document.
Choose the "Client" document type, select the language and choose the wanted merge fields.
When the master document is configured, click on the ![]() button, then open the document in the editor.
button, then open the document in the editor.
NOTE: If the option "Use a document by language" was chosen, a button for each language is available.
For more information concerning the master document configuration, consult the section master document configuration of the "Master document management" procedure.
Creating a "Labels" Master Document
 |
|
A: In the Word editor, click on the |
|
This window opens. |
 |
|
B: Select "Labels" as "Main Document Type", then click on "OK" to determine the label format. |
 |
|
G: Click on the |
 | |
|
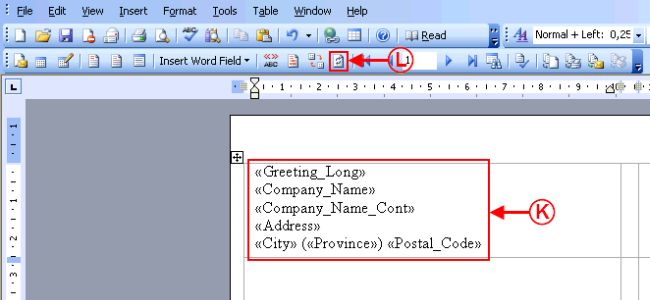
K: Format the fields (add spaces, "Enter", parentheses, etc. in between the fields). |
L: Click on the |
Creating an "Envelope" Master Document

|
|
A: In the Word editor, click on the |
|
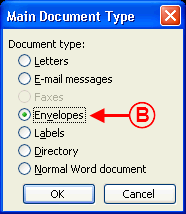
This window opens. |
|
|
B: Select "Envelopes" as "Main Document Type", then click on "OK" to determine the envelope format. |
|
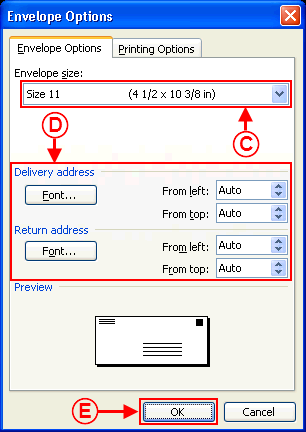
This window opens. | |
| |
|
C: Select the envelope format. |
D: Define the wanted font options. |
|
E: When the envelope format is selected, click on "OK". |
|

|
|
F: Click on the |
| |
|
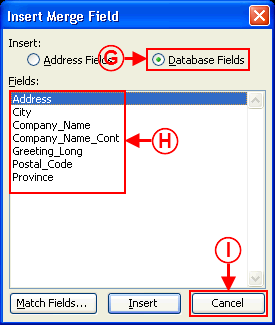
G: Activate the option "Database Fields". |
H: Choose the fields to insert on the envelope. To do so, double-click on each field to insert or select the field, then click on "Insert". |
|
I: When all the fields have been selected, click on "Cancel". |
NOTE: The fields will be inserted one after the other, unformatted. |
|
|
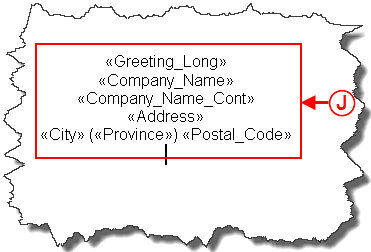
J: Format the fields (add spaces, "Enter", parentheses, etc. in between the fields). |

|
|
The master document is ready to be used. Save the document by clicking on the "File" menu, then on "Save". CAUTION: Do not "Save as" the document, the database automatically provides a location to the master document. |
Document name: ProDon:Labels or Envelopes Word 2002-2003
