Difference between revisions of "ProDon:Thank-you email configuration"
Jguillemette (talk | contribs) (→Master document configuration) |
Jguillemette (talk | contribs) (→Master Document configuration) |
||
| (31 intermediate revisions by the same user not shown) | |||
| Line 1: | Line 1: | ||
{{Header_TOC}}<br> | {{Header_TOC}}<br> | ||
| − | + | ||
<span style="color: rgb(255, 0, 0);">'''CAUTION: This document is currently being revised, it may be possible that some parts are missing or outdated'''</span> | <span style="color: rgb(255, 0, 0);">'''CAUTION: This document is currently being revised, it may be possible that some parts are missing or outdated'''</span> | ||
| − | |||
| − | |||
| − | + | = Introduction = | |
| − | + | The eReceipt Module allows the receipt to be sent by email. | |
| − | + | The email sent with the receipt may be used as a thank-you, similar to the thank-you letters (Master Documents) and the integrated thank-you. | |
| − | + | It is even possible to customize the thank-you depending on the occasion or the activity for which the receipt has been sent. | |
| − | + | The current document explains how to configure the thank-you email and how to link it to the right occasion. | |
| − | + | = Email configuration for the eReceipt = | |
| + | First, the user must configure the thank-you email for the eReceipt. | ||
| − | + | This configuration is done in 3 steps: <br> | |
| − | + | - Master Document configuration <br> | |
| + | - Thank-you configuration <br> | ||
| + | - Link the thank-you to the right occasion <br> | ||
| + | == Master Document configuration == | ||
| + | The Master Document is the email that the clients will receive. To create the Master Document, go to the "Master Documents Management" and click on the [[File:button +.png]]. | ||
| − | {| width="20%" cellspacing="1" cellpadding="1" border="1" class="wikitable" | + | {| width="20%" cellspacing="1" cellpadding="1" border="1" class="wikitable" |
|- | |- | ||
| − | | colspan="2" | | + | | colspan="2" | [[File:ProDon5_Thank-you email configuration_001.png]] |
| − | |||
|- | |- | ||
| − | | | + | |
| + | | width="50%" | <span style="color: rgb(255, 0, 0);">'''A:'''</span> The "Description" box allows the user to name the document (example: general thank-you, golf thank-you, etc.) | ||
| + | | <span style="color: rgb(255, 0, 0);">'''B:'''</span> Select the "Thank-you for eReceipts" type. | ||
|- | |- | ||
| − | + | | <span style="color: rgb(255, 0, 0);">'''C:'''</span> Check the desired merge fields. By choosing the "Thank-you for eReceipts" document type in <span style="color: rgb(255, 0, 0);">'''B'''</span>, the merge field "Receipts_Email_Trx_Summary" becomes available. It will display the amount of the receipt that will be sent by email. To learn how to use the merge fields, please read the [[ProDon:Master_Document_Management#.22Merge_Fields.22_Tab|"Merge fields"]] section of the [[ProDon:Master_Document_Management|"Master Document Management"]] document. | |
| − | |||
| − | |||
| − | | <span style="color: rgb(255, 0, 0);">''' | + | | <span style="color: rgb(255, 0, 0);">'''D:'''</span> Click on the [[File:Bouton_Ouvrir_Editeur.png]] button to open the master document in '''''Word''''' for the purpose of writing what it will contain. |
| − | |||
| − | |||
| − | |||
| − | |||
| − | |||
|} | |} | ||
{| width="20%" cellspacing="1" cellpadding="1" border="1" class="wikitable" | {| width="20%" cellspacing="1" cellpadding="1" border="1" class="wikitable" | ||
| − | | colspan="2" | | + | | colspan="2" | After clicking on the [[File:Bouton_Ouvrir_Editeur.png]], this window will open. |
| − | |||
|- | |- | ||
| − | | colspan="2" |[[ | + | | colspan="2" |[[File:ProDon5_Thank-you email configuration_002.png]] |
|- | |- | ||
| − | | | + | | Given that emails for receipts are sent from an email blast tool, the master documents created for this purpose must respect some formatting rules. To learn the formatting rules to respect, please read the [[ProDon:Preparing_the_Master_Document#Formatting_Rules|"Formatting rules"]] section of the [[ProDon:Preparing_the_Master_Document|"Preparing the Master Document"]] document. |
| − | + | Furthermore, the Master Documents need the use of "tags". To learn how to use the tags, please read the [[ProDon:Preparing_the_Master_Document#Tags|"Tags"]] section of the [[ProDon:Preparing_the_Master_Document|"Preparing the Master Document"]] document. In the context of the eReceipts, the user will have to insert the "[RECEIPTS]" tag in their Master Document as Hyperlink to let the clients access their receipt. | |
| − | + | <span style="color: rgb(255, 0, 0);">'''Reminder''':</span> To save the Master Document, always use '''''Word's''''' "'''Save'''" function and not the "'''Save as...'''" for the purpose of keeping the link between '''''ProDon''''' and the Master Document. | |
|} | |} | ||
| − | == | + | == Thank-you configuration for the receipts == |
| + | After creating the Master Document, it must be linked to a thank-you for receipt. To do so, in the "Configuration" tab of the main menu of '''''ProDon''''', select "Thank-you for receipts". From this window, click on the [[File:Button +.png]] to create a thank-you for receipt. | ||
| − | + | {| width="20%" cellspacing="1" cellpadding="1" border="1" class="wikitable" | |
| + | | colspan="2" | After adding a thank-you, this window will open. | ||
| − | |||
|- | |- | ||
| − | | colspan="2" | | + | | colspan="2" |[[File:ProDon5_Thank-you email configuration_003.png]] |
| − | |||
| − | |||
|- | |- | ||
| − | | | + | | width=50% |<span style="color: rgb(255, 0, 0);">'''A:'''</span> In the "Email thank-you letter" box, select the Master Document previously created by clicking on the [[File:Button_Selection_3_dots.png]] button. |
| − | |||
| − | + | |<span style="color: rgb(255, 0, 0);">'''B:'''</span> The "Paper receipt type" box allows the selection of if the mailed paper receipt have a thank-you or not. For more information about thank-you letter integrated to a receipt, please read the [[ProDon:Configuration_of_a_Thank-you_Letter_Integrated_to_a_Receipt|"Configuration of a Thank-you Letter Integrated to a Receipt"]] section. | |
| − | |||
|- | |- | ||
| − | | colspan="2" | | + | | colspan="2" |<span style="color: rgb(255, 0, 0);">'''C:'''</span> The "Thank-you" section allows the conception of the thank-you that will be used on the paper receipt is the option in <span style="color: rgb(255, 0, 0);">'''B'''</span> is "With thank-you". |
| − | + | ||
| − | |||
|} | |} | ||
| − | + | == Link the thank-you to the right occasion == | |
| − | == | + | Next, it is necessary to link the thank-you to the right occasion for the purpose of determining which thank-you must be used for each occasion. To do so, go to the "Donation Occasion Management" and open the occasion that must be linked to the thank-you. |
{| width="20%" cellspacing="1" cellpadding="1" border="1" class="wikitable" | {| width="20%" cellspacing="1" cellpadding="1" border="1" class="wikitable" | ||
| − | |||
|- | |- | ||
| − | | colspan="2" |[[ | + | | colspan="2" |[[File:ProDon5_Thank-you email configuration_004.png]] |
| + | |- | ||
| + | | colspan="2" | In the window to edit the donation occasion, go in the "Thank-you" tab and in the "Default thank-you" field, select the thank-you for receipt that was just created. | ||
|} | |} | ||
| − | == | + | = Verification of the Master Documents checked in the occasion = |
| + | If the Master Documents are checked in the occasion, it is possible that some documents must not be generated when an eReceipt is generated. An option in the Master Documents of "Donation transaction" type lets avoid the generation of the document when an eReceipt is sent to a client. This option is the "Do not generate for emailed receipts" box. | ||
| − | {| width="20%" cellspacing="1" cellpadding="1" border="1" class="wikitable" | + | {| width="20%" cellspacing="1" cellpadding="1" border="1" class="wikitable |
| − | |[[ | + | |- |
| − | | | + | | colspan="2" |[[File:ProDon5_Thank-you email configuration_005.png]] |
| + | |- | ||
| + | | By checking this box, if this document must be sent with receipts, it will only be sent with the paper receipts. | ||
| − | |||
| − | |||
| − | |||
| − | |||
|} | |} | ||
| − | |||
{{Footer_ProDon_Version|5.0.3.4}}<br> | {{Footer_ProDon_Version|5.0.3.4}}<br> | ||
Latest revision as of 13:32, 15 June 2017
| Thank-you email configuration |
CAUTION: This document is currently being revised, it may be possible that some parts are missing or outdated
Introduction
The eReceipt Module allows the receipt to be sent by email.
The email sent with the receipt may be used as a thank-you, similar to the thank-you letters (Master Documents) and the integrated thank-you.
It is even possible to customize the thank-you depending on the occasion or the activity for which the receipt has been sent.
The current document explains how to configure the thank-you email and how to link it to the right occasion.
Email configuration for the eReceipt
First, the user must configure the thank-you email for the eReceipt.
This configuration is done in 3 steps:
- Master Document configuration
- Thank-you configuration
- Link the thank-you to the right occasion
Master Document configuration
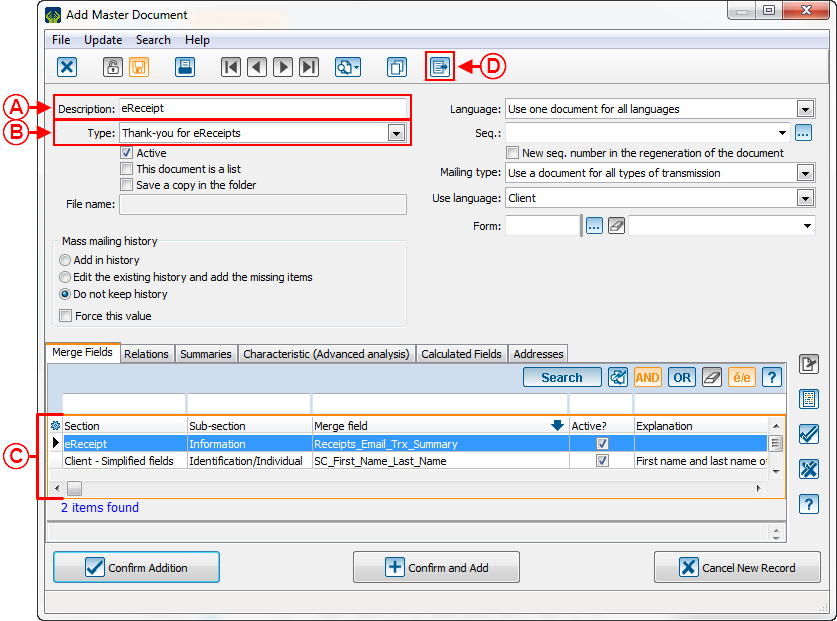
The Master Document is the email that the clients will receive. To create the Master Document, go to the "Master Documents Management" and click on the ![]() .
.
| |
| A: The "Description" box allows the user to name the document (example: general thank-you, golf thank-you, etc.) | B: Select the "Thank-you for eReceipts" type. |
| C: Check the desired merge fields. By choosing the "Thank-you for eReceipts" document type in B, the merge field "Receipts_Email_Trx_Summary" becomes available. It will display the amount of the receipt that will be sent by email. To learn how to use the merge fields, please read the "Merge fields" section of the "Master Document Management" document. | D: Click on the |
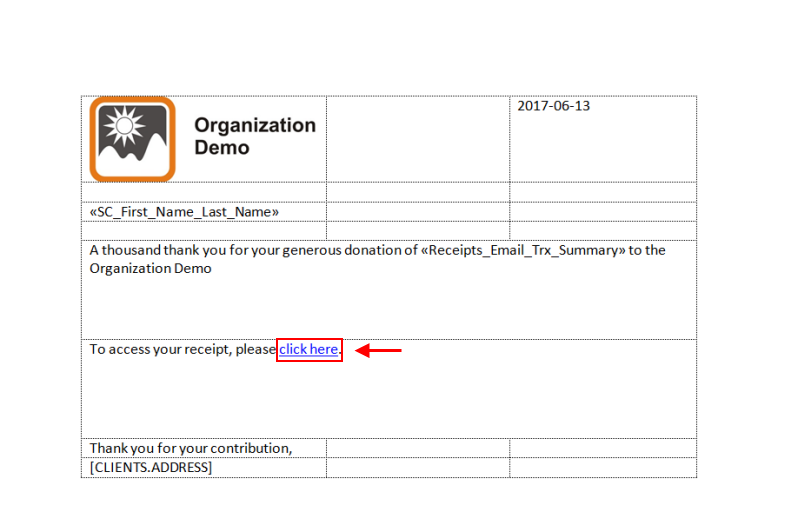
| After clicking on the | |
| |
| Given that emails for receipts are sent from an email blast tool, the master documents created for this purpose must respect some formatting rules. To learn the formatting rules to respect, please read the "Formatting rules" section of the "Preparing the Master Document" document.
Furthermore, the Master Documents need the use of "tags". To learn how to use the tags, please read the "Tags" section of the "Preparing the Master Document" document. In the context of the eReceipts, the user will have to insert the "[RECEIPTS]" tag in their Master Document as Hyperlink to let the clients access their receipt. Reminder: To save the Master Document, always use Word's "Save" function and not the "Save as..." for the purpose of keeping the link between ProDon and the Master Document. | |
Thank-you configuration for the receipts
After creating the Master Document, it must be linked to a thank-you for receipt. To do so, in the "Configuration" tab of the main menu of ProDon, select "Thank-you for receipts". From this window, click on the ![]() to create a thank-you for receipt.
to create a thank-you for receipt.
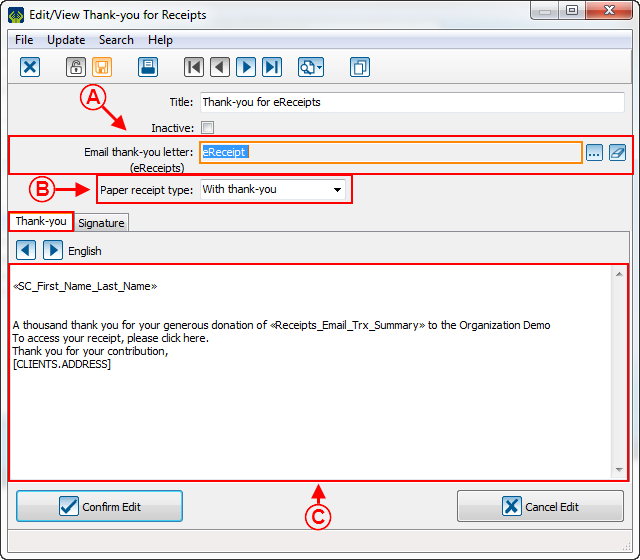
| After adding a thank-you, this window will open. | |
| |
| A: In the "Email thank-you letter" box, select the Master Document previously created by clicking on the |
B: The "Paper receipt type" box allows the selection of if the mailed paper receipt have a thank-you or not. For more information about thank-you letter integrated to a receipt, please read the "Configuration of a Thank-you Letter Integrated to a Receipt" section. |
| C: The "Thank-you" section allows the conception of the thank-you that will be used on the paper receipt is the option in B is "With thank-you". | |
Link the thank-you to the right occasion
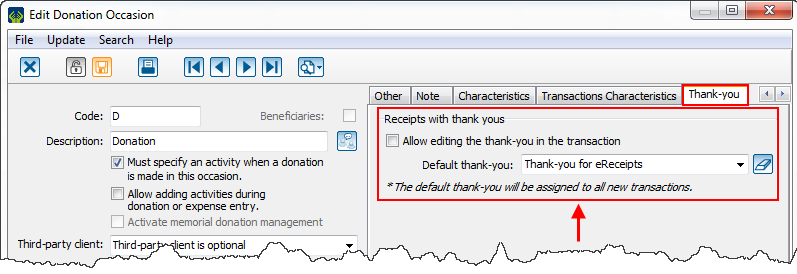
Next, it is necessary to link the thank-you to the right occasion for the purpose of determining which thank-you must be used for each occasion. To do so, go to the "Donation Occasion Management" and open the occasion that must be linked to the thank-you.
| |
| In the window to edit the donation occasion, go in the "Thank-you" tab and in the "Default thank-you" field, select the thank-you for receipt that was just created. |
Verification of the Master Documents checked in the occasion
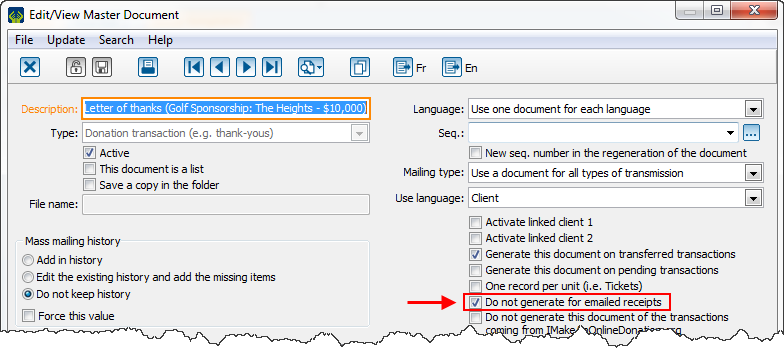
If the Master Documents are checked in the occasion, it is possible that some documents must not be generated when an eReceipt is generated. An option in the Master Documents of "Donation transaction" type lets avoid the generation of the document when an eReceipt is sent to a client. This option is the "Do not generate for emailed receipts" box.
| |
| By checking this box, if this document must be sent with receipts, it will only be sent with the paper receipts. | |
Document name: ProDon:Thank-you email configuration
Version : 5.0.3.4