Difference between revisions of "ProDon:User Management"
Jguillemette (talk | contribs) |
Jguillemette (talk | contribs) |
||
| (One intermediate revision by the same user not shown) | |||
| Line 48: | Line 48: | ||
|- | |- | ||
| | | | ||
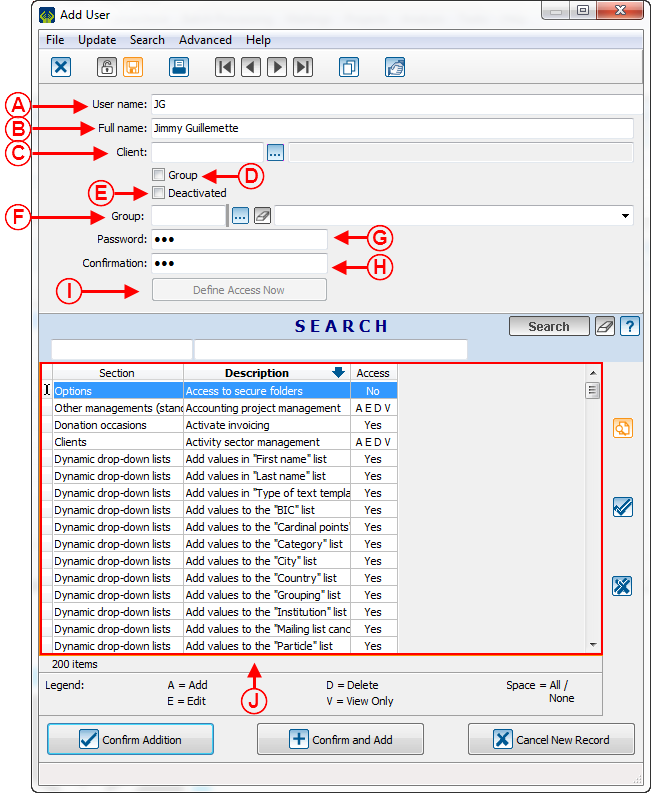
| − | <span style="color: rgb(255, 0, 0);">'''C:'''</span> This allows | + | <span style="color: rgb(255, 0, 0);">'''C:'''</span> This allows a user to be linked to their client file. The user is not forced to link a user to a client. |
| | | | ||
| − | <span style="color: rgb(255, 0, 0);">'''D:'''</span> This option allows | + | <span style="color: rgb(255, 0, 0);">'''D:'''</span> This option allows a group to be created. Set the accesses of the group first. Then, assign members to it by creating new users and by assigning the group to the option in <span style="color: rgb(255, 0, 0);">'''F'''</span>. |
|- | |- | ||
| | | | ||
| − | <span style="color: rgb(255, 0, 0);">'''E:'''</span> This option allows | + | <span style="color: rgb(255, 0, 0);">'''E:'''</span> This option allows a user to be deactivated. Ideally, never delete a user, because everything the user has done into the software is linked to this user. It is important to keep track of everything that has been done in ProDon. |
| | | | ||
| − | <span style="color: rgb(255, 0, 0);">'''F:'''</span> This option allows | + | <span style="color: rgb(255, 0, 0);">'''F:'''</span> This option allows the selection of the group which will set the user's accesses. It is not required to link a user to a group, but to save some work, it is recommended to create groups and class users according to their accesses. |
|- | |- | ||
| | | | ||
| Line 66: | Line 66: | ||
|- | |- | ||
| | | | ||
| − | <span style="color: rgb(255, 0, 0);">'''I:'''</span> This option allows | + | <span style="color: rgb(255, 0, 0);">'''I:'''</span> This option allows the selection of the user accesses. |
| | | | ||
<span style="color: rgb(255, 0, 0);">'''J:'''</span> This window displays the accesses, their descriptions and the section in which they are. | <span style="color: rgb(255, 0, 0);">'''J:'''</span> This window displays the accesses, their descriptions and the section in which they are. | ||
| Line 101: | Line 101: | ||
| | | | ||
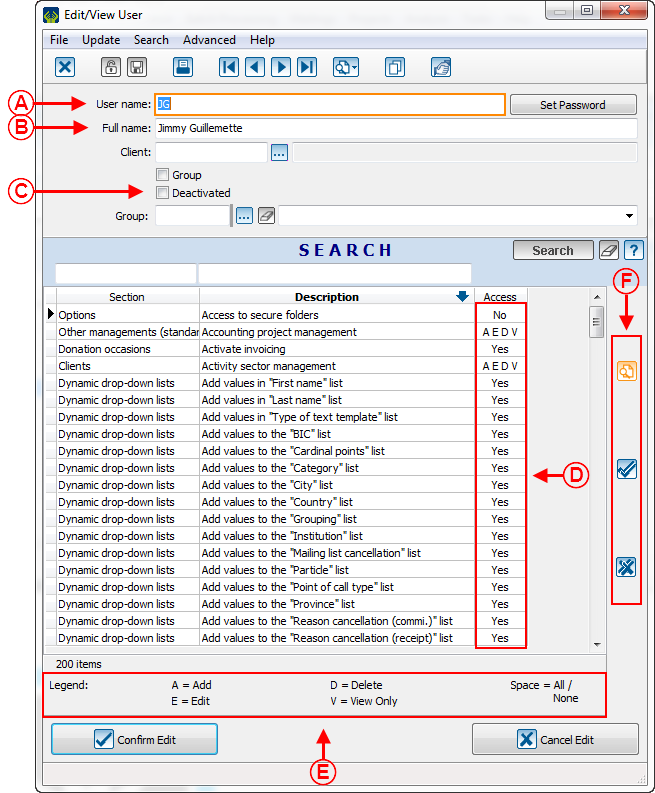
| − | <span style="color: rgb(255, 0, 0);">'''F:'''</span> The [[File:Button_funky_check_mark.png]] button allows to | + | <span style="color: rgb(255, 0, 0);">'''F:'''</span> The [[File:Button_funky_check_mark.png]] button allows all of them to be activated and the [[File:Button funky x.png]] button allows all of them to be removed. |
|} | |} | ||
| Line 109: | Line 109: | ||
{| width="200" cellspacing="1" cellpadding="1" border="1" class="wikitable" | {| width="200" cellspacing="1" cellpadding="1" border="1" class="wikitable" | ||
| − | | In this example, | + | | In this example, see that the user "Jimmy Guillemette" has created the client "Bobby Bob". |
|- | |- | ||
|[[File:ProDon5_User_Management_007.png]] | |[[File:ProDon5_User_Management_007.png]] | ||
|- | |- | ||
| − | | Then, "Jimmy" announce | + | | Then, "Jimmy" announce that he has changed his last name. He has become "Jimmy Burns", so go to "Edit / View a user". |
|- | |- | ||
|[[File:ProDon5_User_Management_008.png]] | |[[File:ProDon5_User_Management_008.png]] | ||
|- | |- | ||
| − | | When | + | | When back to see who created the client "Bobby Bob", the name of the person who created it has been edited. |
|- | |- | ||
|[[File:ProDon5_User_Management_009.png]] | |[[File:ProDon5_User_Management_009.png]] | ||
|- | |- | ||
| − | | This is why | + | | This is why a renaming must not be taken lightly, because it will destroy important information. |
|} | |} | ||
| Line 129: | Line 129: | ||
== Create an access group == | == Create an access group == | ||
| − | It is very useful to create access group, because this will help | + | It is very useful to create access group, because this will help avoiding to do this each time a user is to be add. |
{| width="200" cellspacing="1" cellpadding="1" border="1" class="wikitable" | {| width="200" cellspacing="1" cellpadding="1" border="1" class="wikitable" | ||
| Line 138: | Line 138: | ||
|- | |- | ||
| width="50%" | | | width="50%" | | ||
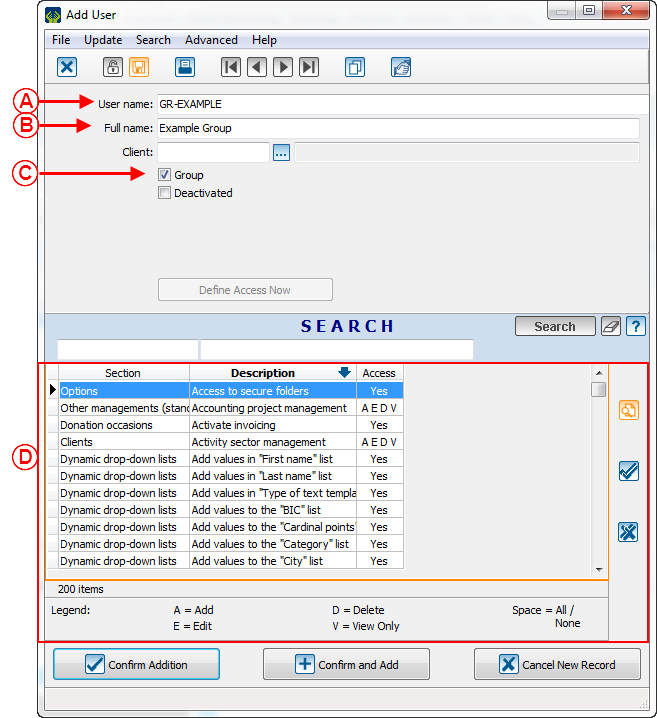
| − | <span style="color: rgb(255, 0, 0);">'''A: '''</span> In this section, | + | <span style="color: rgb(255, 0, 0);">'''A: '''</span> In this section, name the group. |
| | | | ||
| − | <span style="color: rgb(255, 0, 0);">'''B:'''</span> In this box, | + | <span style="color: rgb(255, 0, 0);">'''B:'''</span> In this box, enter the name of the group. |
|- | |- | ||
| | | | ||
| − | <span style="color: rgb(255, 0, 0);">'''C:'''</span> | + | <span style="color: rgb(255, 0, 0);">'''C:'''</span> To create a group, this box must me checked. |
| | | | ||
| − | <span style="color: rgb(255, 0, 0);">'''D:'''</span> Here, | + | <span style="color: rgb(255, 0, 0);">'''D:'''</span> Here, select accesses and securities for the group. |
|} | |} | ||
| − | Then, to assign a user to a group, | + | Then, to assign a user to a group, go into a user file, in the group box and select the group in question. |
{| width="200" cellspacing="1" cellpadding="1" border="1" class="wikitable" | {| width="200" cellspacing="1" cellpadding="1" border="1" class="wikitable" | ||
Latest revision as of 12:54, 24 February 2017
| User Management |
Introduction
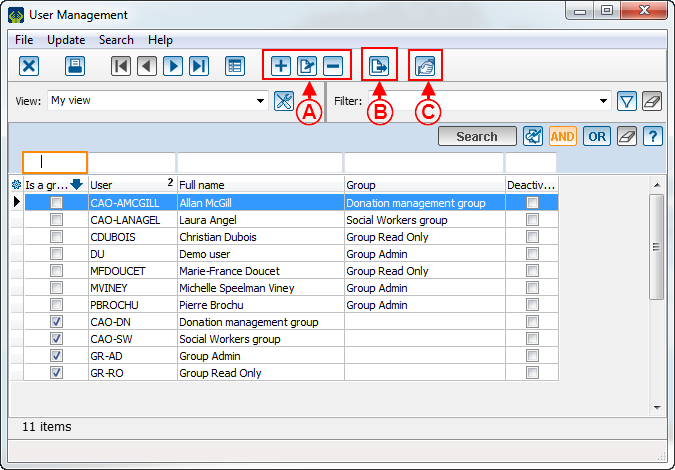
The user management is a very important part of ProDon to be able to create new users, to create user groups, to manage users' rights and accesses, and to edit users.
Add a user
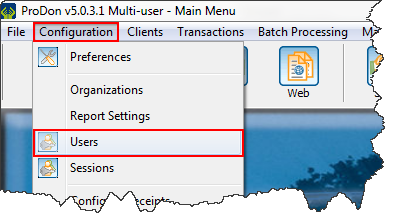
To add a user, click on the "Configuration" menu and then select the "Users" option.
|
New user configuration
Edit accesses, deactivate and rename a user
It is possible to edit, deactivate or rename a user. To do so, click on the edit button or double-click on the user.
Rename Example
This is an example of what happens in the software when renaming a user.
Create an access group
It is very useful to create access group, because this will help avoiding to do this each time a user is to be add.
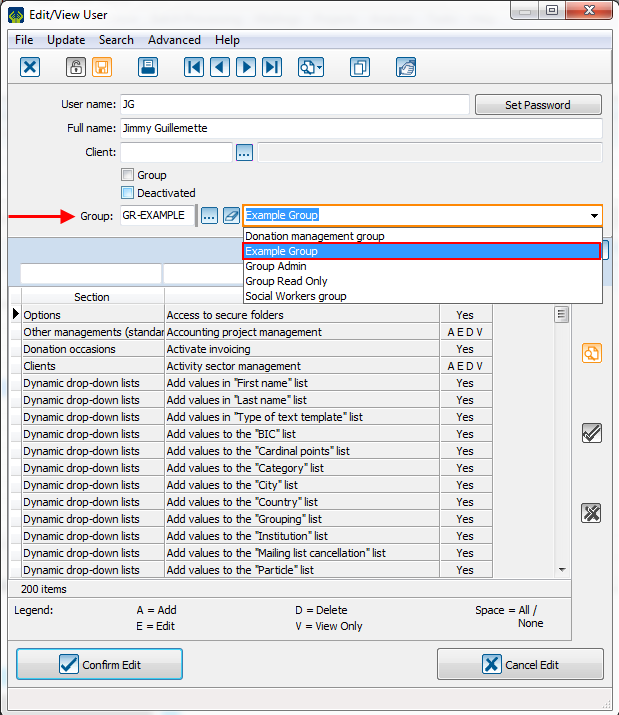
Then, to assign a user to a group, go into a user file, in the group box and select the group in question.
 |
Document name: ProDon:User Management
Version : 5.0.3.1
