Difference between revisions of "ProDon:Validation and Transfer of a Transaction Batch"
Jguillemette (talk | contribs) (→Introduction ) |
Jguillemette (talk | contribs) (→Introduction ) |
||
| Line 9: | Line 9: | ||
Once all transactions of a batch are entered, you must perform a transaction transfer. To learn how to enter transactions, see [[ProDon:Transaction Logging|this document]]. | Once all transactions of a batch are entered, you must perform a transaction transfer. To learn how to enter transactions, see [[ProDon:Transaction Logging|this document]]. | ||
| − | + | Prior to transferring the transactions, we recommend you to create report to validate your data in order to make sure that there are no errors. To learn how to validate the batch before transferring it, [[ProDon:Validation and Transfer of a Transaction Batch#Validation_of_the_Transaction_Batch|click here]]. <br> Once the validation is made, the transaction transfer (deposit) can be made. To learn how to transfer transactions, [[ProDon:Validation and Transfer of a Transaction Batch#Transaction_Transfer|click here]]. <br> | |
== Validation of the Transaction Batch == | == Validation of the Transaction Batch == | ||
Revision as of 11:45, 8 December 2016
| Validation and Transfer of a Transaction Batch |
CAUTION: This document is for VERSION 5 of ProDon. To get to the version 4, click here.
Caution: This document is currently being revised, it is possible that some parts are missing or outdated.
Introduction
Once all transactions of a batch are entered, you must perform a transaction transfer. To learn how to enter transactions, see this document.
Prior to transferring the transactions, we recommend you to create report to validate your data in order to make sure that there are no errors. To learn how to validate the batch before transferring it, click here.
Once the validation is made, the transaction transfer (deposit) can be made. To learn how to transfer transactions, click here.
Validation of the Transaction Batch
To validate a transaction batch before transferring it, go to the "Transaction management".
|
To make sure there are no mistakes in the transactions to transfer, generate a report of the transaction batch. | |
 | |
|
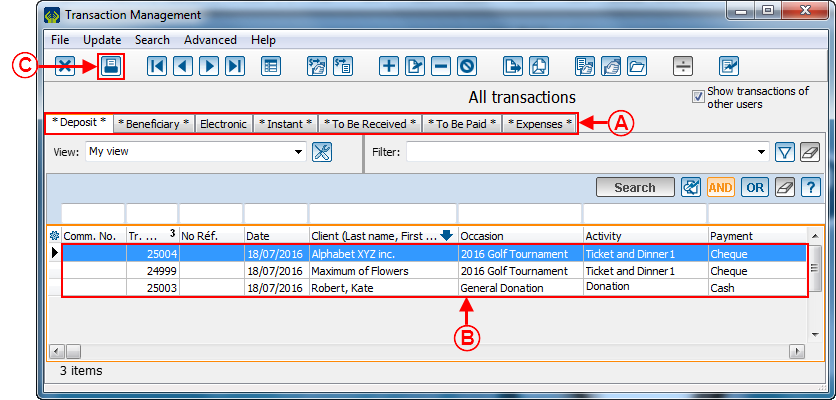
A: Go to the tab for which the transactions must be transferred. |
B: Conduct a search or apply a filter in order to only display the elements to transfer in the current list. |
|
NOTE: Under the "Deposit" tab, there are transactions by cheque, in cash, but also donations in goods and services. When transferring transactions by cheque or in cash, make sure the transactions of the donations in goods and services are not in the current list, or vice-versa. | |
 | |
|
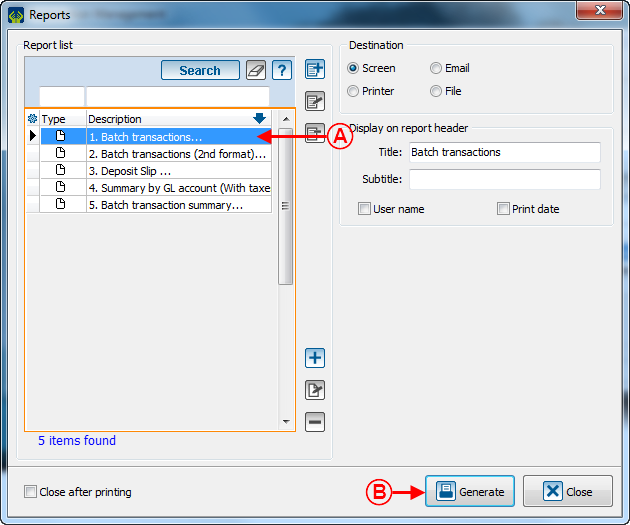
A: Select the "1, Batch transactions..." report. |
|
|
After clicking on the " | |
 | |
|
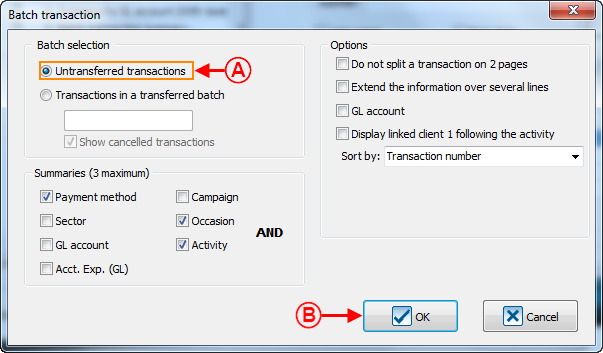
A: Select the "Untransferred transactions" option. |
|
 | |
|
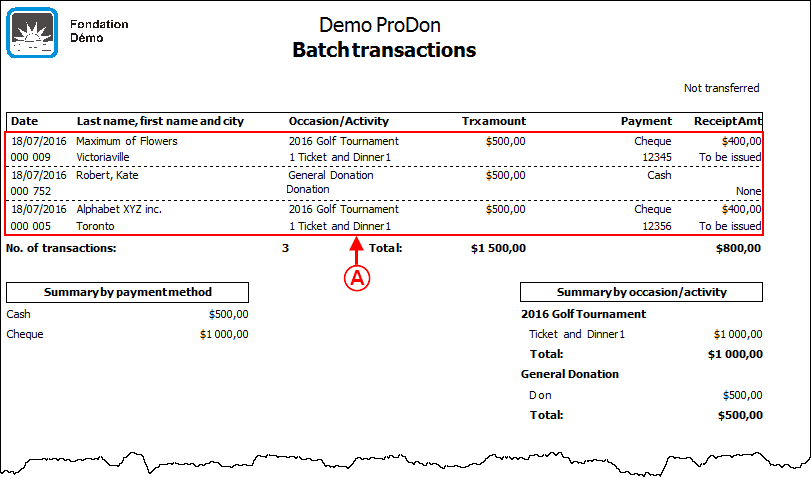
A: Validate each transaction to make sure there are no mistakes before transferring them. |
If there are mistakes in the transactions, correct them prior to transferring the transaction batch.
To correct a transaction, return to the transaction management, and double-click on the transaction to correct.
Transaction Transfer
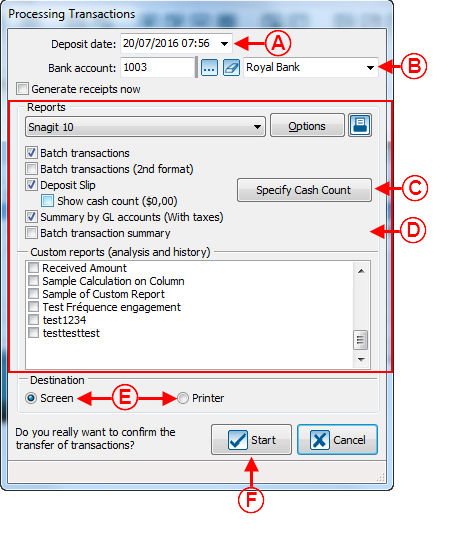
Once the transactions have been validated and do not contain any mistakes, transfer the transaction batch.
 | |
|
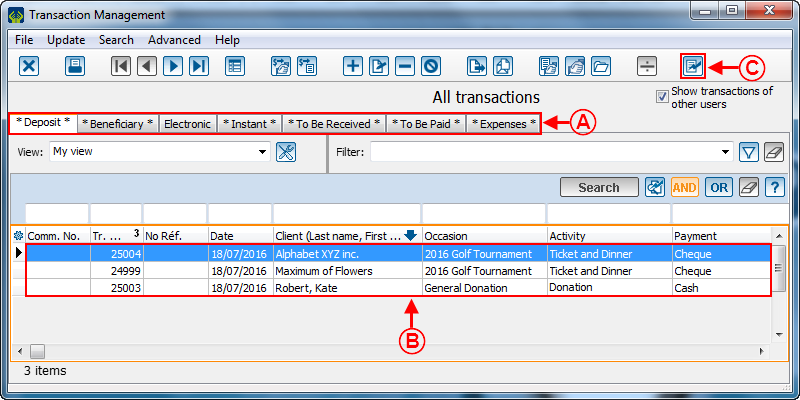
A: Select the tab for which the transactions must be transferred. |
B: Conduct a search or apply a filter in order to display only the elements to transfer in the current list. |
|
NOTE: It is not possible to transfer all the transactions of all the tabs of the "Transaction management" at the same time. You must therefore transfer the transactions of each tab one at a time. | |
The transactions have now been transferred, removed from the current list of transaction management and sent to 'Analysis & History'.
After transferring transactions, do not forget to generate the receipts and documents related to the transferred transactions.
For more details concerning the processing of receipts to be issued, see this document.
For more details concerning the processing of documents to be issued, see this document.
Document name: ProDon:Validation and Transfer of a Transaction Batch
Version : 5.0.3
