Difference between revisions of "ProDon:Sending the E-mail Blast"
| (48 intermediate revisions by 3 users not shown) | |||
| Line 1: | Line 1: | ||
| − | {{ | + | {{Header_TOC}}<br> |
<br> | <br> | ||
| Line 5: | Line 5: | ||
== Introduction == | == Introduction == | ||
| − | + | The E-mail Blast module allows you to perform massive emailing and compile statistics for each mailing made (number of emails sent, opened, rejected, etc.), in order to evaluate the efficiency of the mailings. A reject management is also integrated to avoid problems with spam. To learn how to view the mailing statistics, see [[ProDon:Viewing Mailing Statistics|this document]]. | |
| − | <br> | + | <br> Moreover, Internet users can subscribe to distribution lists to receive the information emails that are of interest to them, from the organization's website. Following their subscription, they receive an automatic confirmation email, prepared for this purpose. |
| − | <br> | + | <br> Sending an E-mail Blast can be explained in three steps: You must first prepare the master document, then prepare the distribution list and send the E-mail Blast. |
| − | <br> | + | <br> The following document talks about the E-mail Blast. You must first prepare the master document and the distribution list prior to sending the E-mail Blast. |
| − | + | To learn how to prepare the master document, see [[ProDon:Preparing the Master Document|this document]]. To learn how to prepare the distribution list, see [[ProDon:Preparing the Distribution List|this document]]. | |
<br> | <br> | ||
| − | + | It is possible to send an E-mail Blast in two different ways in '''''ProDon''''' : | |
| − | *[[ProDon: | + | *[[ProDon:Sending the E-mail Blast#Creating_a_Mailing_from_a_Permanent_Distribution_List.C2.A0|From a permanent distribution list]] |
| − | *[[ProDon: | + | *[[ProDon:Sending the E-mail Blast#Creating_a_Mailing_from_a_Provisional_Distribution_List|From a provisional distribution list]] |
<br> | <br> | ||
| Line 26: | Line 26: | ||
== Creating a Mailing from a Permanent Distribution List == | == Creating a Mailing from a Permanent Distribution List == | ||
| − | + | To create an E-mail Blast from a permanent list, you must first create the master document and the distribution list. | |
| − | + | Go to the "E-mail Blast management". | |
{| width="200" cellspacing="1" cellpadding="1" border="1" class="wikitable" | {| width="200" cellspacing="1" cellpadding="1" border="1" class="wikitable" | ||
|- | |- | ||
| colspan="2" | | | colspan="2" | | ||
| − | + | To do so, from '''''ProDon''''''s home page, click on the "Mailings" menu, then select "E-mail Blast - Mailings".<br> | |
|- | |- | ||
| Line 44: | Line 44: | ||
|- | |- | ||
| colspan="2" | | | colspan="2" | | ||
| − | + | After clicking on "E-mail Blast - Mailings", this window opens. | |
|- | |- | ||
| Line 50: | Line 50: | ||
|- | |- | ||
| width="50%" | | | width="50%" | | ||
| − | <span style="color: rgb(255, 0, 0);">'''A | + | <span style="color: rgb(255, 0, 0);">'''A:'''</span> The "Active" tab contains all the active mailings that have already been made or planned. |
| width="50%" | | | width="50%" | | ||
| − | <span style="color: rgb(255, 0, 0);">'''B | + | <span style="color: rgb(255, 0, 0);">'''B:'''</span> The "Archived" tab contains all the inactive mailings that were made. |
|- | |- | ||
| | | | ||
| − | <span style="color: rgb(255, 0, 0);">'''C | + | <span style="color: rgb(255, 0, 0);">'''C:'''</span> The "All" tab contains all the mailings that have been made or planned, whether they are active or inactive. |
| | | | ||
| − | <span style="color: rgb(255, 0, 0);">'''D | + | <span style="color: rgb(255, 0, 0);">'''D:'''</span> The [[Image:Button add plus.png]] button allows you to create a new mailing to add to the list at <span style="color: rgb(255, 0, 0);">'''G'''</span>. After clicking on the [[Image:Button add plus.png]] button,[[ProDon:Sending the E-mail Blast#Configuring_the_Mailing_2|this window]] opens. |
|- | |- | ||
| | | | ||
| − | <span style="color: rgb(255, 0, 0);">'''E | + | <span style="color: rgb(255, 0, 0);">'''E:'''</span> The [[Image:Button Edit.png]] button allows you to modify a mailing of the list at <span style="color: rgb(255, 0, 0);">'''G'''</span>. To do so, select the mailing to modify at <span style="color: rgb(255, 0, 0);">'''G'''</span>, then click on the [[Image:Button Edit.png]] button. After clicking on the [[Image:Button Edit.png]] button,[[ProDon:Sending the E-mail Blast#Configuring_the_Mailing|this window]] opens. |
| | | | ||
| − | <span style="color: rgb(255, 0, 0);">'''F | + | <span style="color: rgb(255, 0, 0);">'''F:'''</span> The [[Image:Button Minus remove delete.png]] button allows you to delete a mailing from the list at <span style="color: rgb(255, 0, 0);">'''G'''</span>. To do so, select the mailing to delete at <span style="color: rgb(255, 0, 0);">'''G'''</span>, then click on the [[Image:Button Minus remove delete.png]] button. |
|- | |- | ||
| | | | ||
| − | <span style="color: rgb(255, 0, 0);">'''G | + | <span style="color: rgb(255, 0, 0);">'''G:'''</span> It is the list of the active mailings that have been made or planned. |
| <br> | | <br> | ||
| Line 83: | Line 83: | ||
|- | |- | ||
| colspan="2" | | | colspan="2" | | ||
| − | + | After clicking on the [[Image:Button add plus.png]] or [[Image:Button Edit.png]] button, the following window opens. | |
|- | |- | ||
| Line 89: | Line 89: | ||
|- | |- | ||
| width="50%" | | | width="50%" | | ||
| − | <span style="color: rgb(255, 0, 0);">'''A | + | <span style="color: rgb(255, 0, 0);">'''A:'''</span> The [[Image:Bouton dupliquer.png]] button allows you to duplicate an existing mailing in '''''ProDon'''''.<br> |
| width="50%" | | | width="50%" | | ||
| − | <span style="color: rgb(255, 0, 0);">'''B | + | <span style="color: rgb(255, 0, 0);">'''B:'''</span> The [[Image:Archive button.png]] button allows you to archive mailings. After clicking on that button, the mailing goes under the "Archived" tab of the "E-mail Blast mailing management". |
|- | |- | ||
| | | | ||
| − | <span style="color: rgb(255, 0, 0);">'''C | + | <span style="color: rgb(255, 0, 0);">'''C:'''</span> Name the mailing.<br> '''NOTE:''' This name remains for inernal use, it does not appear in the mailing. |
| | | | ||
| − | <span style="color: rgb(255, 0, 0);">'''D | + | <span style="color: rgb(255, 0, 0);">'''D:'''</span> Select the [[ProDon:Preparing the Distribution List|distribution list]] for which the E-mail Blast needs to be sent. |
|- | |- | ||
| | | | ||
| − | <span style="color: rgb(255, 0, 0);">'''E | + | <span style="color: rgb(255, 0, 0);">'''E:'''</span> Enter the name of the recipient and the return email address. |
| − | '''NOTE | + | '''NOTE:''' This information is automatically entered when the mailing list is selected at <span style="color: rgb(255, 0, 0);">'''C'''</span>. |
| | | | ||
| − | <span style="color: rgb(255, 0, 0);">'''F | + | <span style="color: rgb(255, 0, 0);">'''F:'''</span> Enter the subject of the E-mail Blast. |
|- | |- | ||
| | | | ||
| − | <span style="color: rgb(255, 0, 0);">'''G | + | <span style="color: rgb(255, 0, 0);">'''G:'''</span> If this option is checked, the statistics of clicks on the hyperlinks of the email will be compiled for this mailing. |
| | | | ||
| − | <span style="color: rgb(255, 0, 0);">'''H | + | <span style="color: rgb(255, 0, 0);">'''H:'''</span> If this option is checked, the statistics of email opening will be compiled for this mailing. |
|- | |- | ||
| | | | ||
| − | <span style="color: rgb(255, 0, 0);">'''I | + | <span style="color: rgb(255, 0, 0);">'''I:'''</span> If this option is checked, an unsubscription link will be inserted in the E-mail Blast. <br> |
| − | '''NOTE | + | '''NOTE:''' It is not recommended to use this option, it is advisable to use a more precise link. For more details about the unsubscription link, see the [[ProDon:Preparing the Master Document#Formatting_Rules|"Formatting Rules"]] section of the [[ProDon:Preparing the Master Document|"Preparing the Master Document"]] document. |
| | | | ||
| − | <span style="color: rgb(255, 0, 0);">'''J | + | <span style="color: rgb(255, 0, 0);">'''J:'''</span> The [[ProDon:Sending the E-mail Blast#.22Message.22_Tab|"Message"]] tab allows you to choose which master document will be sent to the E-mail Blast. |
|- | |- | ||
| | | | ||
| − | <span style="color: rgb(255, 0, 0);">'''K | + | <span style="color: rgb(255, 0, 0);">'''K:'''</span> The [[ProDon:Sending the E-mail Blast#.22Subscriptions_to_List.22_Tab|"Subscriptions to lists"]] tab allows you to view the list of the clients registered to the list. |
| | | | ||
| − | <span style="color: rgb(255, 0, 0);">'''L | + | <span style="color: rgb(255, 0, 0);">'''L:'''</span> The [[ProDon:Sending the E-mail Blast#.22Exclusions.22_Tab|"Exclusions"]] tab allows you to exclude certain clients from the mailing in progress only. These clients will still be part of the distribution list. |
|} | |} | ||
| Line 144: | Line 144: | ||
|- | |- | ||
| width="50%" | | | width="50%" | | ||
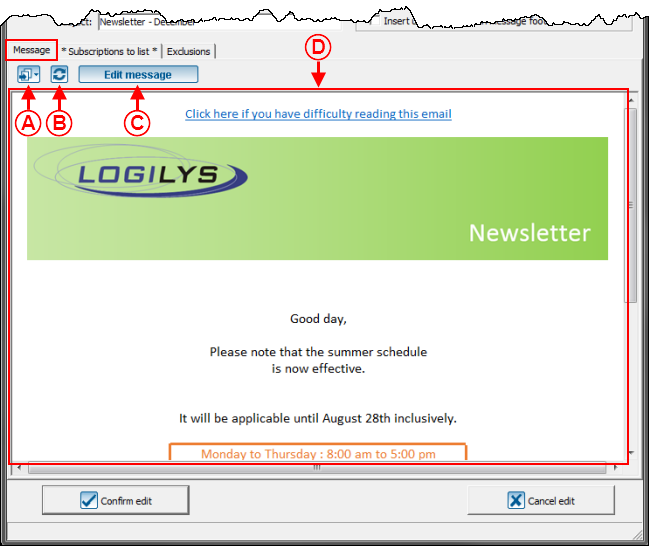
| − | <span style="color: rgb(255, 0, 0);">'''A | + | <span style="color: rgb(255, 0, 0);">'''A:'''</span> The [[Image:Master document button.png]] button allows you to choose the master document to send. |
| width="50%" | | | width="50%" | | ||
| − | <span style="color: rgb(255, 0, 0);">'''B | + | <span style="color: rgb(255, 0, 0);">'''B:'''</span> The [[Image:Refresh button.png]] button allows you to update the fields of the master document. |
|- | |- | ||
| | | | ||
| − | <span style="color: rgb(255, 0, 0);">'''C | + | <span style="color: rgb(255, 0, 0);">'''C:'''</span> The "Edit message" button displays the message as it will be sent or allows you to modify it in HTML codes. |
| | | | ||
| − | <span style="color: rgb(255, 0, 0);">'''D | + | <span style="color: rgb(255, 0, 0);">'''D:'''</span> It is the message that will appear in the E-mail Blast. |
|} | |} | ||
| Line 160: | Line 160: | ||
<br> | <br> | ||
| − | ==== " | + | ==== "Subscriptions to list" Tab ==== |
{| width="200" cellspacing="1" cellpadding="1" border="1" class="wikitable" | {| width="200" cellspacing="1" cellpadding="1" border="1" class="wikitable" | ||
| Line 167: | Line 167: | ||
|- | |- | ||
| width="50%" | | | width="50%" | | ||
| − | <span style="color: rgb(255, 0, 0);">'''A | + | <span style="color: rgb(255, 0, 0);">'''A:'''</span> These are all the addresses registered to the distribution list chosen earlier. Fields "X", "Email" and "Duplicates" are always visible, the other fields were checked in the distribution list. |
| width="50%" | | | width="50%" | | ||
| − | <span style="color: rgb(255, 0, 0);">'''B | + | <span style="color: rgb(255, 0, 0);">'''B:'''</span> The crossed out addresses are the ones that are excluded for this mailing. For more details concerning exclusions, see the [[ProDon:Sending the E-mail Blast#.22Exclusions.22_Tab|"Exclusions" Tab"]] section. |
|- | |- | ||
| | | | ||
| − | <span style="color: rgb(255, 0, 0);">'''C | + | <span style="color: rgb(255, 0, 0);">'''C:'''</span> The email addresses in yellow are the ones that are assigned to more than one client of the database. |
| | | | ||
| − | <span style="color: rgb(255, 0, 0);">'''D | + | <span style="color: rgb(255, 0, 0);">'''D:'''</span> The [[Image:Bouton Client.png]] button allows you to open the file of the client selected at <span style="color: rgb(255, 0, 0);">'''A'''</span>. |
|} | |} | ||
| Line 190: | Line 190: | ||
|- | |- | ||
| width="50%" | | | width="50%" | | ||
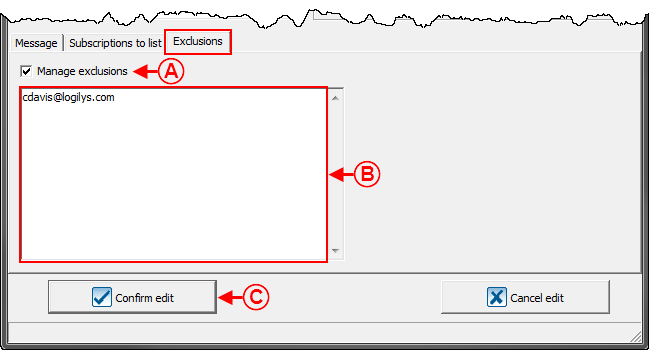
| − | <span style="color: rgb(255, 0, 0);">'''A | + | <span style="color: rgb(255, 0, 0);">'''A:'''</span> If this checkbox is checked, it is possible to enter the addresses to exclude from the mailing at <span style="color: rgb(255, 0, 0);">'''B'''</span>. |
| width="50%" | | | width="50%" | | ||
| − | <span style="color: rgb(255, 0, 0);">'''B | + | <span style="color: rgb(255, 0, 0);">'''B:'''</span> Enter the addresses to be excluded from the mailing. |
|- | |- | ||
| | | | ||
| − | <span style="color: rgb(255, 0, 0);">'''C | + | <span style="color: rgb(255, 0, 0);">'''C:'''</span> After entering the addresses to exclude from the mailing, click on the "[[Image:Button Check mark Confirm.png]] Confirm edit" button to save the addition or the modification. |
| <br> | | <br> | ||
| Line 206: | Line 206: | ||
=== Testing the Mailing === | === Testing the Mailing === | ||
| − | + | It is recommended to perform a test mailing prior to sending the E-mail Blast, in order to test all the hyperlinks and to see a preview of the E-mail Blast as it will be received. | |
| − | + | It is suggested to perform many test mailings with different addresses (e.g. ''Gmail, Yahoo, Hotmail, Outlook'', etc.) before sending the E-mail Blast, in order to be sure of the different interpretations of inboxes. | |
| − | + | To test the email, first go to the "Mailing management". | |
{| width="200" cellspacing="1" cellpadding="1" border="1" class="wikitable" | {| width="200" cellspacing="1" cellpadding="1" border="1" class="wikitable" | ||
|- | |- | ||
| colspan="2" | | | colspan="2" | | ||
| − | + | To do so, from '''''ProDon''''''s home page, click on the "Mailings" menu, then select "[[Image:Send E-mail Blast button.png]] E-mail Blast - Mailings". | |
|- | |- | ||
| Line 226: | Line 226: | ||
|- | |- | ||
| colspan="2" | | | colspan="2" | | ||
| − | + | After clicking on "[[Image:Send E-mail Blast button.png]] E-mail Blast - Mailings", this window opens. <br> | |
|- | |- | ||
| Line 232: | Line 232: | ||
|- | |- | ||
| width="50%" | | | width="50%" | | ||
| − | <span style="color: rgb(255, 0, 0);">'''A | + | <span style="color: rgb(255, 0, 0);">'''A:'''</span> Select the E-mail Blast to test.<br> |
| width="50%" | | | width="50%" | | ||
| − | <span style="color: rgb(255, 0, 0);">'''B | + | <span style="color: rgb(255, 0, 0);">'''B:'''</span> After selecting the E-mail Blast to test, click on the [[Image:Envelop question mark button.png]] button.<br> |
|} | |} | ||
| Line 244: | Line 244: | ||
|- | |- | ||
| colspan="2" | | | colspan="2" | | ||
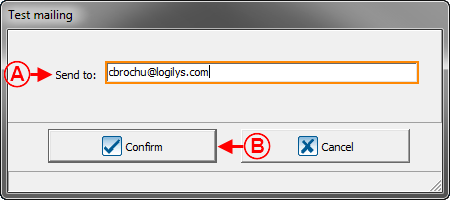
| − | + | After clicking on the [[Image:Envelop question mark button.png]] button, this window opens.<br> | |
|- | |- | ||
| Line 250: | Line 250: | ||
|- | |- | ||
| width="50%" | | | width="50%" | | ||
| − | <span style="color: rgb(255, 0, 0);">'''A | + | <span style="color: rgb(255, 0, 0);">'''A:'''</span> Enter the email address to which the E-mail Blast should be sent.<br> |
| − | '''NOTE | + | '''NOTE:''' The sender's address specified in the preparation of the distribution list is entered by default. <br> |
| width="50%" | | | width="50%" | | ||
| − | <span style="color: rgb(255, 0, 0);">'''B | + | <span style="color: rgb(255, 0, 0);">'''B:'''</span> After entering the email address to which the test email must be sent, click on the "[[Image:Button Check mark Confirm.png]] Confirm" button. <br> |
|} | |} | ||
| Line 264: | Line 264: | ||
|- | |- | ||
| colspan="2" | | | colspan="2" | | ||
| − | + | After clicking on the "[[Image:Button Check mark Confirm.png]] Confirm"button, this window opens. | |
|- | |- | ||
| Line 270: | Line 270: | ||
|- | |- | ||
| colspan="2" | | | colspan="2" | | ||
| − | + | This window confirms that the test email has been sent successfully. To close the window, click on the "[[Image:Button Check mark Confirm.png]] Ok" button. | |
|} | |} | ||
| Line 278: | Line 278: | ||
=== Performing the Mailing<br> === | === Performing the Mailing<br> === | ||
| − | + | To send the email, go to the "Mailing management". | |
{| width="200" cellspacing="1" cellpadding="1" border="1" class="wikitable" | {| width="200" cellspacing="1" cellpadding="1" border="1" class="wikitable" | ||
|- | |- | ||
| colspan="2" | | | colspan="2" | | ||
| − | + | To do so, from '''''ProDon''''''s home page, click on the "Mailings" menu, then select "[[Image:Send E-mail Blast button.png]] E-mail Blast - Mailings". | |
|- | |- | ||
| Line 294: | Line 294: | ||
|- | |- | ||
| colspan="2" | | | colspan="2" | | ||
| − | + | After clicking on "[[Image:Send E-mail Blast button.png]] E-mail Blast - Mailings", this window opens.<br> | |
|- | |- | ||
| Line 300: | Line 300: | ||
|- | |- | ||
| width="50%" | | | width="50%" | | ||
| − | <span style="color: rgb(255, 0, 0);">'''A | + | <span style="color: rgb(255, 0, 0);">'''A:'''</span> Select the E-mail Blast you want to send.<br> |
| width="50%" | | | width="50%" | | ||
| − | <span style="color: rgb(255, 0, 0);">'''B | + | <span style="color: rgb(255, 0, 0);">'''B:'''</span> After selecting the E-mail Blast to send, click on the [[Image:Envelop question mark button.png]] button. <br> |
|} | |} | ||
| Line 312: | Line 312: | ||
|- | |- | ||
| colspan="2" | | | colspan="2" | | ||
| − | + | After clicking on the [[Image:Envelop question mark button.png]] button, this window opens.<br> | |
|- | |- | ||
| Line 318: | Line 318: | ||
|- | |- | ||
| width="50%" colspan="2" | | | width="50%" colspan="2" | | ||
| − | + | You must synchronize the subscriptions with the distribution list, prior to sending the email. To do so, click on the "[[Image:Button Check mark Confirm.png]] Yes" button. | |
| − | '''NOTE | + | '''NOTE:''' If you click on the "[[Image:Button cancel.png]] No" button, '''''ProDon''''' will not send the E-mail Blast and will go back to the "Mailing management". |
|} | |} | ||
| Line 326: | Line 326: | ||
<br> | <br> | ||
| − | ==== Sending the E-mail Blast | + | ==== Sending the E-mail Blast Now<br> ==== |
{| width="200" cellspacing="1" cellpadding="1" border="1" class="wikitable" | {| width="200" cellspacing="1" cellpadding="1" border="1" class="wikitable" | ||
|- | |- | ||
| colspan="2" | | | colspan="2" | | ||
| − | + | After clicking on the "[[Image:Button Check mark Confirm.png]] Yes" button, this window opens. | |
|- | |- | ||
| Line 337: | Line 337: | ||
|- | |- | ||
| width="50%" | | | width="50%" | | ||
| − | <span style="color: rgb(255, 0, 0);">'''A | + | <span style="color: rgb(255, 0, 0);">'''A:'''</span> To send the E-mail Blast, select this option, then follow points <span style="color: rgb(255, 0, 0);">'''C'''</span> and <span style="color: rgb(255, 0, 0);">'''D'''</span>. |
| width="50%" | | | width="50%" | | ||
| − | <span style="color: rgb(255, 0, 0);">'''B | + | <span style="color: rgb(255, 0, 0);">'''B:'''</span> This option allows you to plan the mailing of an E-mail Blast. To learn about the procedure, see [[ProDon:Sending the E-mail Blast#Planning_the_Mailing_of_the_E-mail_Blast|this section]]. |
|- | |- | ||
| | | | ||
| − | <span style="color: rgb(255, 0, 0);">'''C | + | <span style="color: rgb(255, 0, 0);">'''C:'''</span> This checkbox must be checked to send an E-mail Blast. |
| | | | ||
| − | <span style="color: rgb(255, 0, 0);">'''D | + | <span style="color: rgb(255, 0, 0);">'''D:'''</span> After selecting option <span style="color: rgb(255, 0, 0);">'''A'''</span>, checking the checkbox at <span style="color: rgb(255, 0, 0);">'''C'''</span>, click on the "[[Image:Button Check mark Confirm.png]] Confirm" button. |
|} | |} | ||
| Line 356: | Line 356: | ||
|- | |- | ||
| colspan="2" | | | colspan="2" | | ||
| − | + | After clicking on the "[[Image:Button Check mark Confirm.png]] Confirm" button, this window opens. | |
|- | |- | ||
| Line 362: | Line 362: | ||
|- | |- | ||
| colspan="2" | | | colspan="2" | | ||
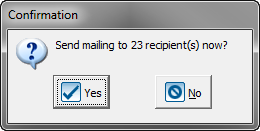
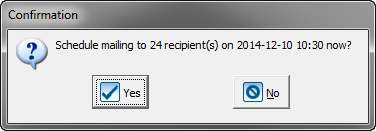
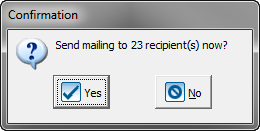
| − | + | This window allows you to confirm the number of recipients. To confirm the number indicated, click on the "[[Image:Button Check mark Confirm.png]] Yes" button. | |
| − | '''NOTE | + | '''NOTE:''' If you click on the "[[Image:Button cancel.png]] No" button, '''''ProDon''''' will not send the E-mail Blast and willl return to the "Mailing management". |
|} | |} | ||
| Line 373: | Line 373: | ||
|- | |- | ||
| colspan="2" | | | colspan="2" | | ||
| − | + | After clicking on the "[[Image:Button Check mark Confirm.png]] Yes" button, this window opens. | |
|- | |- | ||
| Line 379: | Line 379: | ||
|- | |- | ||
| colspan="2" | | | colspan="2" | | ||
| − | + | This window confirms that the E-mail Blast has been sent successfully. Click on the "[[Image:Button Check mark Confirm.png]] Ok" button to close the window. | |
|} | |} | ||
| Line 388: | Line 388: | ||
|- | |- | ||
| colspan="2" | | | colspan="2" | | ||
| − | + | After clicking on the "[[Image:Button Check mark Confirm.png]] Ok" button, '''''ProDon''''' returns to the "E-mail Blast management". | |
|- | |- | ||
| Line 394: | Line 394: | ||
|- | |- | ||
| width="50%" | | | width="50%" | | ||
| − | <span style="color: rgb(255, 0, 0);">'''A | + | <span style="color: rgb(255, 0, 0);">'''A:'''</span> The status of the mailing is green, which means that the mailing has been sent successfully. |
| width="50%" | | | width="50%" | | ||
| − | <span style="color: rgb(255, 0, 0);">'''B | + | <span style="color: rgb(255, 0, 0);">'''B:'''</span> The [[Image:Synchronisation button.png]] button allows you to view the mailing statistics. To learn about the procedure, see [[ProDon:Viewing Mailing Statistics|this document]]. |
|} | |} | ||
| Line 405: | Line 405: | ||
==== Planning the Mailing of the E-mail Blast ==== | ==== Planning the Mailing of the E-mail Blast ==== | ||
| − | '''NOTE | + | '''NOTE:''' When an E-mail Blast is planned, the information is immediately transmitted to the website of the E-mail Blast server, which means that '''''ProDon''''' and the computer do not need to be on for the E-mail Blast to be sent on the planned date and time. |
{| width="200" cellspacing="1" cellpadding="1" border="1" class="wikitable" | {| width="200" cellspacing="1" cellpadding="1" border="1" class="wikitable" | ||
|- | |- | ||
| colspan="2" | | | colspan="2" | | ||
| − | + | After clicking on the "[[Image:Button Check mark Confirm.png]] Yes" button, this window opens. | |
|- | |- | ||
| Line 416: | Line 416: | ||
|- | |- | ||
| width="50%" | | | width="50%" | | ||
| − | <span style="color: rgb(255, 0, 0);">'''A | + | <span style="color: rgb(255, 0, 0);">'''A:'''</span> This option allows you to send the E-mail Blast now. To learn about the procedure, see [[ProDon:Sending the E-mail Blast#Sending_the_E-mail_Blast_Now|this section]]. |
| width="50%" | | | width="50%" | | ||
| − | <span style="color: rgb(255, 0, 0);">'''B | + | <span style="color: rgb(255, 0, 0);">'''B:'''</span> To plan the mailing of an E-mail Blast for later, select this option, then follow points <span style="color: rgb(255, 0, 0);">'''C'''</span> and <span style="color: rgb(255, 0, 0);">'''D'''</span>. |
|- | |- | ||
| | | | ||
| − | <span style="color: rgb(255, 0, 0);">'''C | + | <span style="color: rgb(255, 0, 0);">'''C:'''</span> This checkbox must be checked to send the E-mail Blast. |
| | | | ||
| − | <span style="color: rgb(255, 0, 0);">'''D | + | <span style="color: rgb(255, 0, 0);">'''D:'''</span> After selecting option <span style="color: rgb(255, 0, 0);">'''B'''</span>, and checking the checkbox at <span style="color: rgb(255, 0, 0);">'''C'''</span>, click on the "[[Image:Button Check mark Confirm.png]] Confirm" button. |
|} | |} | ||
| Line 435: | Line 435: | ||
|- | |- | ||
| colspan="2" | | | colspan="2" | | ||
| − | + | After clicking on the "[[Image:Button Check mark Confirm.png]] Confirm" button, this window opens. | |
|- | |- | ||
| Line 441: | Line 441: | ||
|- | |- | ||
| colspan="2" | | | colspan="2" | | ||
| − | + | This window allows you to confirm the number of recipients. To confirm the indicated number, click on the "[[Image:Button Check mark Confirm.png]] Yes" button. | |
| − | '''NOTE | + | '''NOTE:''' By clicking on the "[[Image:Button cancel.png]] No" button, '''''ProDon''''' will not send the E-mail Blast and will go back to the "Mailing management". |
|} | |} | ||
| Line 452: | Line 452: | ||
|- | |- | ||
| colspan="2" | | | colspan="2" | | ||
| − | + | After clicking on the "[[Image:Button Check mark Confirm.png]] Yes" button, this window opens. | |
|- | |- | ||
| Line 458: | Line 458: | ||
|- | |- | ||
| colspan="2" | | | colspan="2" | | ||
| − | + | This window confirms that the mailing of the E-mail Blast has really been planned. To close the window, click on the "[[Image:Button Check mark Confirm.png]] Ok" button. | |
|} | |} | ||
| Line 467: | Line 467: | ||
|- | |- | ||
| colspan="2" | | | colspan="2" | | ||
| − | + | After clicking on the "[[Image:Button Check mark Confirm.png]] Ok" button, ProDon returns to the "E-mail Blast mailing management". | |
|- | |- | ||
| Line 473: | Line 473: | ||
|- | |- | ||
| width="50%" | | | width="50%" | | ||
| − | <span style="color: rgb(255, 0, 0);">'''A | + | <span style="color: rgb(255, 0, 0);">'''A:'''</span> The status of the mailing is yellow, which means the mailing has really been planned. |
| width="50%" | | | width="50%" | | ||
| − | <span style="color: rgb(255, 0, 0);">'''B | + | <span style="color: rgb(255, 0, 0);">'''B:'''</span> The [[Image:Synchronisation button.png]] button allows you to synchronize the status and the date of the selected mailing. To learn about the procedure, see [[ProDon:Viewing Mailing Statistics|this document]]. |
|- | |- | ||
| width="50%" colspan="2" | | | width="50%" colspan="2" | | ||
| − | '''NOTE | + | '''NOTE:''' The status of the mailing, at <span style="color: rgb(255, 0, 0);">'''A'''</span>, will not be updated automatically when the mailing is made. Therefore, you must click on the button at <span style="color: rgb(255, 0, 0);">'''B'''</span> to see if the mailing has really been made. If the status of the mailing at <span style="color: rgb(255, 0, 0);">'''A'''</span> turns to green, this means the E-mail Blast has been sent. |
|} | |} | ||
| Line 486: | Line 486: | ||
<br> | <br> | ||
| − | === | + | === Synchronizing the Status and the Mailing Date === |
| − | + | The status of the planned mailings is not updated automatically, this is why you must synchronize them, in order to view the mailing statistics. | |
| − | + | To synchronize the status of a mailing, first go to the "E-mail Blast mailing management". | |
{| width="200" cellspacing="1" cellpadding="1" border="1" class="wikitable" | {| width="200" cellspacing="1" cellpadding="1" border="1" class="wikitable" | ||
|- | |- | ||
| colspan="2" | | | colspan="2" | | ||
| − | + | To do so, click on the "Mailings" menu, from '''''ProDon''''''s home page, then select "[[Image:Send E-mail Blast button.png]] E-mail Blast - Mailings". | |
|- | |- | ||
| Line 506: | Line 506: | ||
|- | |- | ||
| colspan="2" | | | colspan="2" | | ||
| − | + | After clicking on "[[Image:Send E-mail Blast button.png]] E-mail Blast - Mailings", this window opens. | |
|- | |- | ||
| Line 512: | Line 512: | ||
|- | |- | ||
| width="50%" | | | width="50%" | | ||
| − | <span style="color: rgb(255, 0, 0);">'''A | + | <span style="color: rgb(255, 0, 0);">'''A:'''</span> Select the mailing to synchronize. |
| width="50%" | | | width="50%" | | ||
| − | <span style="color: rgb(255, 0, 0);">'''B | + | <span style="color: rgb(255, 0, 0);">'''B:'''</span> After selecting the mailing to synchronize, click on the [[Image:Synchronisation button.png]] button. |
|} | |} | ||
| Line 524: | Line 524: | ||
|- | |- | ||
| colspan="2" | | | colspan="2" | | ||
| − | + | After clicking on the [[Image:Synchronisation button.png]] button, the status is synchronized. | |
|- | |- | ||
| Line 530: | Line 530: | ||
|- | |- | ||
| width="50%" | | | width="50%" | | ||
| − | <span style="color: rgb(255, 0, 0);">'''A | + | <span style="color: rgb(255, 0, 0);">'''A:'''</span> The status of the mailing turns to green, which means the mailing has really been made. |
| width="50%" | | | width="50%" | | ||
| − | <span style="color: rgb(255, 0, 0);">'''B | + | <span style="color: rgb(255, 0, 0);">'''B:'''</span> Once the status of the mailing is green, it is possible to view the mailing statistics. To learn about the procedure, see [[ProDon:Viewing Mailing Statistics|this document]]. |
|- | |- | ||
| width="50%" colspan="2" | | | width="50%" colspan="2" | | ||
| − | '''NOTE | + | '''NOTE:''' If the status of the mailing remains yellow, it means that the E-mail Blast has not yet been sent. |
|} | |} | ||
| Line 545: | Line 545: | ||
== Creating a Mailing from a Provisional Distribution List == | == Creating a Mailing from a Provisional Distribution List == | ||
| − | + | To create an E-mail Blast mailing from a provisional list, you must have previously created the master document. For a provisional mailing, the distribution list must be created at the moment of the mailing and cannot be used following the mailing. <br> | |
| − | |||
| − | <br> | ||
=== Preparing the Provisional Mailing List === | === Preparing the Provisional Mailing List === | ||
| − | + | First go to the "Client management", in order to prepare the distribution list. | |
{| width="200" cellspacing="1" cellpadding="1" border="1" class="wikitable" | {| width="200" cellspacing="1" cellpadding="1" border="1" class="wikitable" | ||
|- | |- | ||
| colspan="2" | | | colspan="2" | | ||
| − | + | To do so, click on the "Clients" menu from '''''ProDon''''''s home page, then select "[[Image:Clients button colour.png]] Clients". | |
|- | |- | ||
| Line 567: | Line 565: | ||
|- | |- | ||
| colspan="2" | | | colspan="2" | | ||
| − | + | After clicking on "[[Image:Clients button colour.png]] Clients", the "Client management" opens. | |
|- | |- | ||
| Line 573: | Line 571: | ||
|- | |- | ||
| width="50%" | | | width="50%" | | ||
| − | <span style="color: rgb(255, 0, 0);">'''A | + | <span style="color: rgb(255, 0, 0);">'''A:'''</span> Search, using the [[Common functions:Search Bar|search bar]], for the clients to whom the E-mail Blast must be sent. |
| width="50%" | | | width="50%" | | ||
| − | <span style="color: rgb(255, 0, 0);">'''B | + | <span style="color: rgb(255, 0, 0);">'''B:'''</span> These are all the clients who will be part of the mailing list. |
|- | |- | ||
| | | | ||
| − | <span style="color: rgb(255, 0, 0);">'''C | + | <span style="color: rgb(255, 0, 0);">'''C:'''</span> After searching for all the clients to whom the E-mail Blast must be sent at <span style="color: rgb(255, 0, 0);">'''A'''</span>, click on the [[Image:Provisional mailing button.png]] button. |
| <br> | | <br> | ||
| Line 592: | Line 590: | ||
|- | |- | ||
| colspan="2" | | | colspan="2" | | ||
| − | + | After clicking on the [[Image:Provisional mailing button.png]] button, this window opens, in order to configure the mailing. | |
|- | |- | ||
| Line 598: | Line 596: | ||
|- | |- | ||
| width="50%" | | | width="50%" | | ||
| − | <span style="color: rgb(255, 0, 0);">'''A | + | <span style="color: rgb(255, 0, 0);">'''A:'''</span> To learn how to configure this window, see [[ProDon:Sending the E-mail Blast#Configuring_the_Mailing_2|this section]]. |
| width="50%" | | | width="50%" | | ||
| − | <span style="color: rgb(255, 0, 0);">'''B | + | <span style="color: rgb(255, 0, 0);">'''B:'''</span> To learn how to configure the "Message" tab, see [[ProDon:Sending the E-mail Blast#.22Message.22_Tab|this section]]. |
|- | |- | ||
| | | | ||
| − | <span style="color: rgb(255, 0, 0);">'''C | + | <span style="color: rgb(255, 0, 0);">'''C:'''</span> To learn how to configure the "Subscriptions to list" tab, see [[ProDon:Sending the E-mail Blast#.22Subscriptions_to_list.22_Tab|this section]]. |
| | | | ||
| − | <span style="color: rgb(255, 0, 0);">'''D | + | <span style="color: rgb(255, 0, 0);">'''D:'''</span> To learn how to configure the "Exclusions" tab, see [[ProDon:Sending the E-mail Blast#.22Exclusions.22_Tab|this section]]. |
|- | |- | ||
| | | | ||
| − | <span style="color: rgb(255, 0, 0);">'''E | + | <span style="color: rgb(255, 0, 0);">'''E:'''</span> After specifying all the necessary information, click on the "[[Image:Button Check mark Confirm.png]] Confirm addition" button. |
| <br> | | <br> | ||
| Line 622: | Line 620: | ||
|- | |- | ||
| colspan="2" | | | colspan="2" | | ||
| − | + | After clicking on the "[[Image:Button Check mark Confirm.png]] Confirm addition" button, this window opens. | |
|- | |- | ||
| − | | colspan="2" | {{Anchor|| | + | | colspan="2" | {{Anchor||ConfirmationWindow}}[[Image:Sending the E-mail Blast 028.png]] |
|- | |- | ||
| width="50%" | | | width="50%" | | ||
| − | <span style="color: rgb(255, 0, 0);">'''A | + | <span style="color: rgb(255, 0, 0);">'''A:'''</span> By clicking on the "[[Image:Button Check mark Confirm.png]] Confirm" button, the mailing will go to the "E-mail Blast mailing management". You will then have [[ProDon:Sending the E-mail Blast#Testing_the_Mailing_2|to test the mailing]] and [[ProDon:Sending the E-mail Blast#Performing_the_Mailing|send the E-mail Blast"]]. |
| width="50%" | | | width="50%" | | ||
| − | <span style="color: rgb(255, 0, 0);">'''B | + | <span style="color: rgb(255, 0, 0);">'''B:'''</span> By clicking on the "Confirm and test mailing" button, a test mailing will be made and the mailing will go to the "E-mail Blast mailing management". To learn how to test a provisional mailing, [[ProDon:Sending the E-mail Blast#Testing_the_Mailing_2|click here]]. |
|- | |- | ||
| | | | ||
| − | <span style="color: rgb(255, 0, 0);">'''C | + | <span style="color: rgb(255, 0, 0);">'''C:'''</span> By clicking on the "Confirm and send now" button, the E-mail Blast will automatically be sent to the recipients selected earlier. to learn how to send an E-mail Blast, [[ProDon:Sending the E-mail Blast#Performing_the_Mailing_2|click here]]. |
| <br> | | <br> | ||
| Line 647: | Line 645: | ||
|- | |- | ||
| colspan="2" | | | colspan="2" | | ||
| − | + | After clicking on the "Confirm and test mailing" button of [[#ConfirmationWindow|this window]], the following window opens. <br> | |
|- | |- | ||
| Line 653: | Line 651: | ||
|- | |- | ||
| width="50%" | | | width="50%" | | ||
| − | <span style="color: rgb(255, 0, 0);">'''A | + | <span style="color: rgb(255, 0, 0);">'''A:'''</span> Enter the email address to which the test email must be sent. <br> |
| − | '''NOTE | + | '''NOTE:''' The address of the recipient specified when preparing the distribution list is entered by default.<br> |
| width="50%" | | | width="50%" | | ||
| − | <span style="color: rgb(255, 0, 0);">'''B | + | <span style="color: rgb(255, 0, 0);">'''B:'''</span> After entering the email address to which the test email must be sent, click on the "[[Image:Button Check mark Confirm.png]] Confirm" button. <br> |
|} | |} | ||
| Line 667: | Line 665: | ||
|- | |- | ||
| colspan="2" | | | colspan="2" | | ||
| − | + | After clicking on the "[[Image:Button Check mark Confirm.png]] Confirm" button, this window opens. | |
|- | |- | ||
| Line 673: | Line 671: | ||
|- | |- | ||
| colspan="2" | | | colspan="2" | | ||
| − | + | This window confirms that the test email has been sent successfully. To close the window, click on the "[[Image:Button Check mark Confirm.png]] Ok" button. | |
|} | |} | ||
| Line 679: | Line 677: | ||
<br> | <br> | ||
| − | + | After performing the test, the mailing goes to the "E-mail Blast mailing management". To learn how to send the email, see [[ProDon:Sending the E-mail Blast#Performing_the_Mailing|this section]]. | |
<br> | <br> | ||
| Line 688: | Line 686: | ||
|- | |- | ||
| colspan="2" | | | colspan="2" | | ||
| − | + | After clicking on the "Confirm and send now" button of [[#ConfirmationWindow|this window]], the following window opens.<br> | |
|- | |- | ||
| Line 694: | Line 692: | ||
|- | |- | ||
| width="50%" colspan="2" | | | width="50%" colspan="2" | | ||
| − | + | You must synchronize the subscriptions with the distribution list, prior to performing the mailing. To do so, click on the "[[Image:Button Check mark Confirm.png]] Yes" button. | |
| − | '''NOTE | + | '''NOTE:''' By clicking on the "[[Image:Button cancel.png]] No" button, '''''ProDon''''' will not send the E-mail Blast and will return to the [[ProDon:Sending the E-mail Blast#Configuring_the_Mailing_2|"Add mailing"]] window. <br> |
|} | |} | ||
| Line 707: | Line 705: | ||
|- | |- | ||
| colspan="2" | | | colspan="2" | | ||
| − | + | After clicking on the "[[Image:Button Check mark Confirm.png]] Yes" button, this window opens. | |
|- | |- | ||
| Line 713: | Line 711: | ||
|- | |- | ||
| width="50%" | | | width="50%" | | ||
| − | <span style="color: rgb(255, 0, 0);">'''A | + | <span style="color: rgb(255, 0, 0);">'''A:'''</span> To send the E-mail Blast now, select this option, then follow points <span style="color: rgb(255, 0, 0);">'''C'''</span> and <span style="color: rgb(255, 0, 0);">'''D'''</span>. |
| width="50%" | | | width="50%" | | ||
| − | <span style="color: rgb(255, 0, 0);">'''B | + | <span style="color: rgb(255, 0, 0);">'''B:'''</span> This options allows you to plan the mailing of the E-mail Blast. To learn about the procedure, see [[ProDon:Sending the E-mail Blast#Planning_the_Mailing_of_the_E-mail_Blast|this section]]. |
|- | |- | ||
| | | | ||
| − | <span style="color: rgb(255, 0, 0);">'''C | + | <span style="color: rgb(255, 0, 0);">'''C:'''</span> This checkbox must be checked to send the E-mail Blast. |
| | | | ||
| − | <span style="color: rgb(255, 0, 0);">'''D | + | <span style="color: rgb(255, 0, 0);">'''D:'''</span> After selecting option <span style="color: rgb(255, 0, 0);">'''A'''</span>, and checking the checkbox at <span style="color: rgb(255, 0, 0);">'''C'''</span>, click on the "[[Image:Button Check mark Confirm.png]] Confirm" button. |
|} | |} | ||
| Line 732: | Line 730: | ||
|- | |- | ||
| colspan="2" | | | colspan="2" | | ||
| − | + | After clicking on the "[[Image:Button Check mark Confirm.png]] Confirm" button, this window opens. | |
|- | |- | ||
| Line 738: | Line 736: | ||
|- | |- | ||
| colspan="2" | | | colspan="2" | | ||
| − | + | This window allows you to confirm the number of recipients. To confirm the indicated number, click on the "[[Image:Button Check mark Confirm.png]] Yes" button. | |
| − | '''NOTE | + | '''NOTE:''' By clicking on the "[[Image:Button cancel.png]] No" button, '''''ProDon''''' will not send the E-mail Blast and will return to the "Mailing confirmation" window. |
|} | |} | ||
| Line 749: | Line 747: | ||
|- | |- | ||
| colspan="2" | | | colspan="2" | | ||
| − | + | After clicking on the "[[Image:Button Check mark Confirm.png]] Yes" button, this window opens. | |
|- | |- | ||
| Line 755: | Line 753: | ||
|- | |- | ||
| colspan="2" | | | colspan="2" | | ||
| − | + | This window confirms that the E-mail Blast has been sent successfully. To close the window, click on the "[[Image:Button Check mark Confirm.png]] Ok" button. | |
|} | |} | ||
| Line 761: | Line 759: | ||
<br> | <br> | ||
| − | + | After clicking on the "[[Image:Button Check mark Confirm.png]] Ok" button, '''''ProDon''''' returns to the "Client management".<br> | |
<br> | <br> | ||
| Line 770: | Line 768: | ||
|- | |- | ||
| colspan="2" | | | colspan="2" | | ||
| − | + | After clicking on the "[[Image:Button Check mark Confirm.png]] Yes" button, this window opens. | |
|- | |- | ||
| Line 776: | Line 774: | ||
|- | |- | ||
| width="50%" | | | width="50%" | | ||
| − | <span style="color: rgb(255, 0, 0);">'''A | + | <span style="color: rgb(255, 0, 0);">'''A:'''</span> This option allows you to send the E-mail Blast now. To learn about the procedure, see [[ProDon:Sending the E-mail Blast#Sending_the_E-mail_Blast_Now|this section]]. |
| width="50%" | | | width="50%" | | ||
| − | <span style="color: rgb(255, 0, 0);">'''B | + | <span style="color: rgb(255, 0, 0);">'''B:'''</span> To plan the mailing of an E-mail Blast, select this option, then follow points <span style="color: rgb(255, 0, 0);">'''C'''</span> and <span style="color: rgb(255, 0, 0);">'''D'''</span>. |
|- | |- | ||
| | | | ||
| − | <span style="color: rgb(255, 0, 0);">'''C | + | <span style="color: rgb(255, 0, 0);">'''C:'''</span> This checkbox must be checked to plan the mailing of an E-mail Blast. |
| | | | ||
| − | <span style="color: rgb(255, 0, 0);">'''D | + | <span style="color: rgb(255, 0, 0);">'''D:'''</span> After selecting the option at <span style="color: rgb(255, 0, 0);">'''B'''</span>, and checking the checkbox at <span style="color: rgb(255, 0, 0);">'''C'''</span>, click on the "[[Image:Button Check mark Confirm.png]] Confirm" button. |
|} | |} | ||
| Line 795: | Line 793: | ||
|- | |- | ||
| colspan="2" | | | colspan="2" | | ||
| − | + | After clicking on the "[[Image:Button Check mark Confirm.png]] Confirm" button, this window opens. | |
|- | |- | ||
| Line 801: | Line 799: | ||
|- | |- | ||
| colspan="2" | | | colspan="2" | | ||
| − | + | This window allows you to confirm the number of recipients. To confirm the indicated number, click on the "[[Image:Button Check mark Confirm.png]] Yes" button. | |
| − | '''NOTE | + | '''NOTE:''' By clicking on the "[[Image:Button cancel.png]] No" button, '''''ProDon''''' will not send the E-mail Blast and will return to the [[ProDon:Sending the E-mail Blast#Sending_the_E-mail_Blast_Now|"Mailing confirmation"]] window. |
|} | |} | ||
| Line 812: | Line 810: | ||
|- | |- | ||
| colspan="2" | | | colspan="2" | | ||
| − | + | After clicking on the "[[Image:Button Check mark Confirm.png]] Yes" button, this window opens. | |
|- | |- | ||
| Line 818: | Line 816: | ||
|- | |- | ||
| colspan="2" | | | colspan="2" | | ||
| − | + | This window confirms that the E-mail Blast has been planned successfully. To close the window, click on the "[[Image:Button Check mark Confirm.png]] Ok" button. | |
|} | |} | ||
| Line 824: | Line 822: | ||
<br> | <br> | ||
| − | + | After clicking on the "[[Image:Button Check mark Confirm.png]] Ok" button, '''''ProDon''''' returns to the "Client management". <br> | |
| − | + | To learn how to synchronize the status of the mailing once it is made, see [[ProDon:Sending the E-mail Blast#Synchronizing_the_Status_and_the_Mailing_Date.C2.A0|this section]]. | |
| − | + | To learn how to view the mailing statistics, see [[ProDon:Viewing Mailing Statistics|this document]]. <br> | |
| − | + | {{Footer_ProDon_Version|4.6.7.19}}<br> | |
Latest revision as of 09:24, 5 May 2016
| Sending the E-mail Blast |
Introduction
The E-mail Blast module allows you to perform massive emailing and compile statistics for each mailing made (number of emails sent, opened, rejected, etc.), in order to evaluate the efficiency of the mailings. A reject management is also integrated to avoid problems with spam. To learn how to view the mailing statistics, see this document.
Moreover, Internet users can subscribe to distribution lists to receive the information emails that are of interest to them, from the organization's website. Following their subscription, they receive an automatic confirmation email, prepared for this purpose.
Sending an E-mail Blast can be explained in three steps: You must first prepare the master document, then prepare the distribution list and send the E-mail Blast.
The following document talks about the E-mail Blast. You must first prepare the master document and the distribution list prior to sending the E-mail Blast.
To learn how to prepare the master document, see this document. To learn how to prepare the distribution list, see this document.
It is possible to send an E-mail Blast in two different ways in ProDon :
Creating a Mailing from a Permanent Distribution List
To create an E-mail Blast from a permanent list, you must first create the master document and the distribution list.
Go to the "E-mail Blast management".
|
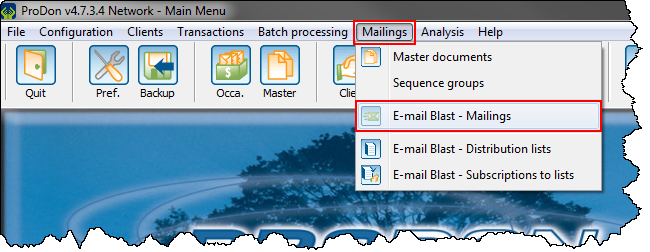
To do so, from ProDon's home page, click on the "Mailings" menu, then select "E-mail Blast - Mailings". | |
 |
|
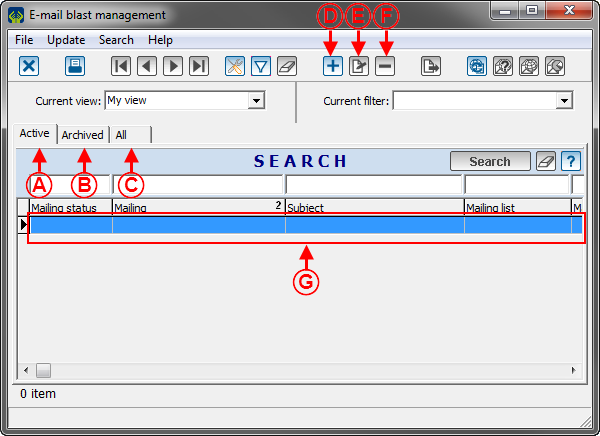
After clicking on "E-mail Blast - Mailings", this window opens. | |
| |
|
A: The "Active" tab contains all the active mailings that have already been made or planned. |
B: The "Archived" tab contains all the inactive mailings that were made. |
|
C: The "All" tab contains all the mailings that have been made or planned, whether they are active or inactive. |
D: The |
|
E: The |
F: The |
|
G: It is the list of the active mailings that have been made or planned. |
|
Configuring the Mailing
|
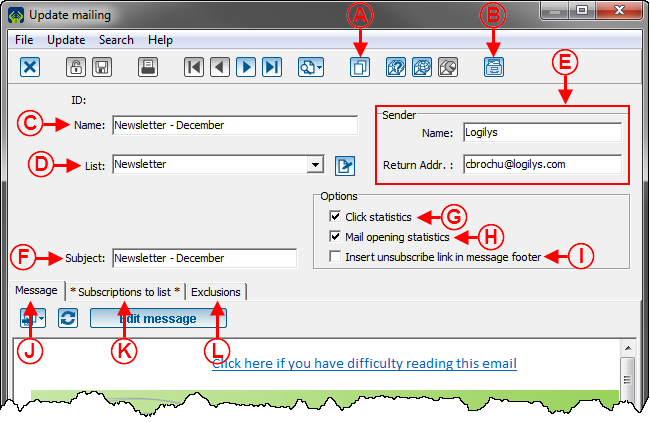
After clicking on the | |
 | |
|
A: The |
B: The |
|
C: Name the mailing. |
D: Select the distribution list for which the E-mail Blast needs to be sent. |
|
E: Enter the name of the recipient and the return email address. NOTE: This information is automatically entered when the mailing list is selected at C. |
F: Enter the subject of the E-mail Blast. |
|
G: If this option is checked, the statistics of clicks on the hyperlinks of the email will be compiled for this mailing. |
H: If this option is checked, the statistics of email opening will be compiled for this mailing. |
|
I: If this option is checked, an unsubscription link will be inserted in the E-mail Blast. NOTE: It is not recommended to use this option, it is advisable to use a more precise link. For more details about the unsubscription link, see the "Formatting Rules" section of the "Preparing the Master Document" document. |
J: The "Message" tab allows you to choose which master document will be sent to the E-mail Blast. |
|
K: The "Subscriptions to lists" tab allows you to view the list of the clients registered to the list. |
L: The "Exclusions" tab allows you to exclude certain clients from the mailing in progress only. These clients will still be part of the distribution list. |
"Message" Tab
"Subscriptions to list" Tab
 | |
|
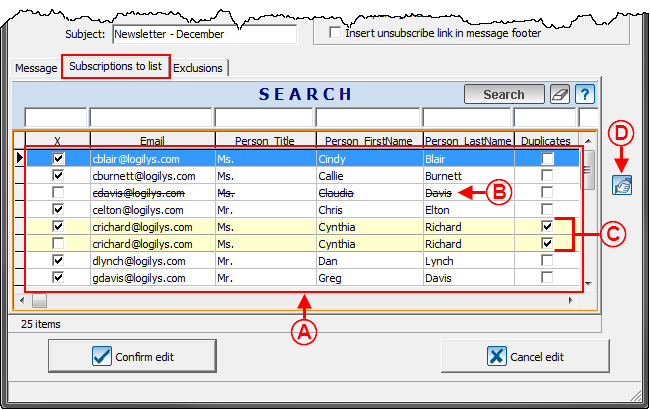
A: These are all the addresses registered to the distribution list chosen earlier. Fields "X", "Email" and "Duplicates" are always visible, the other fields were checked in the distribution list. |
B: The crossed out addresses are the ones that are excluded for this mailing. For more details concerning exclusions, see the "Exclusions" Tab" section. |
|
C: The email addresses in yellow are the ones that are assigned to more than one client of the database. |
D: The |
"Exclusions" Tab
Testing the Mailing
It is recommended to perform a test mailing prior to sending the E-mail Blast, in order to test all the hyperlinks and to see a preview of the E-mail Blast as it will be received.
It is suggested to perform many test mailings with different addresses (e.g. Gmail, Yahoo, Hotmail, Outlook, etc.) before sending the E-mail Blast, in order to be sure of the different interpretations of inboxes.
To test the email, first go to the "Mailing management".
|
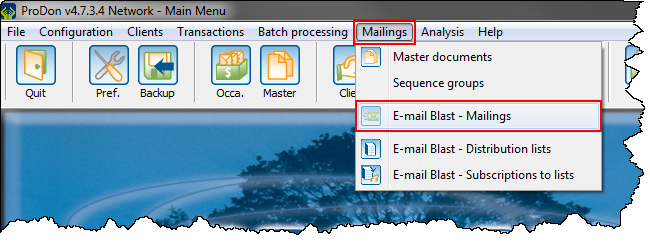
To do so, from ProDon's home page, click on the "Mailings" menu, then select " | |
 |
|
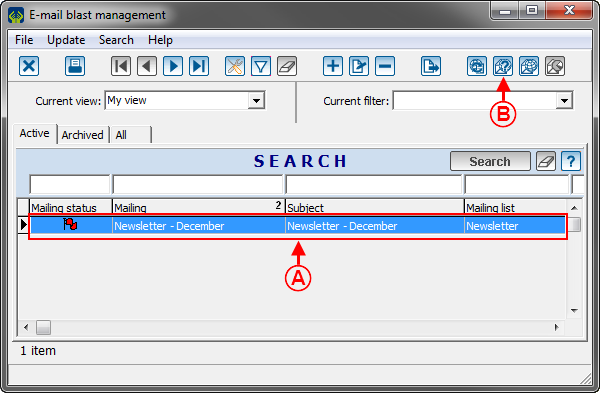
After clicking on " | |
 | |
|
A: Select the E-mail Blast to test. |
B: After selecting the E-mail Blast to test, click on the |
 | |
|
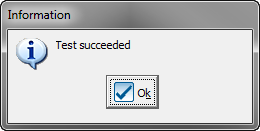
This window confirms that the test email has been sent successfully. To close the window, click on the " |
Performing the Mailing
To send the email, go to the "Mailing management".
|
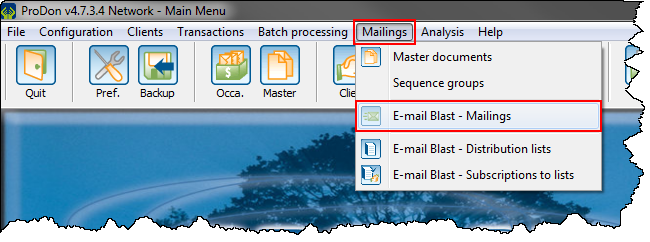
To do so, from ProDon's home page, click on the "Mailings" menu, then select " | |
 |
|
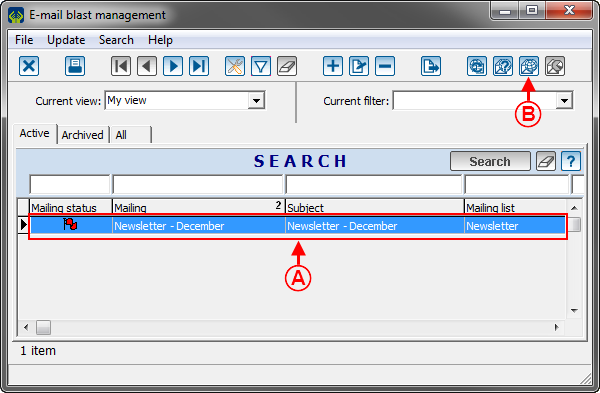
After clicking on " | |
 | |
|
A: Select the E-mail Blast you want to send. |
B: After selecting the E-mail Blast to send, click on the |
Sending the E-mail Blast Now
 | |
|
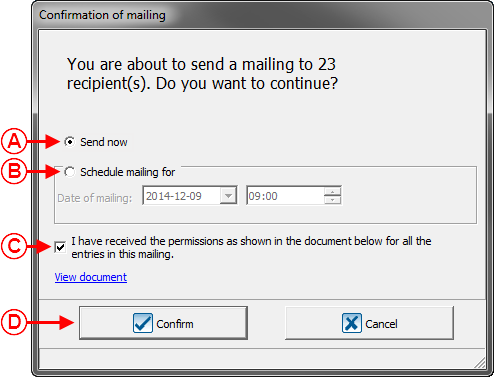
A: To send the E-mail Blast, select this option, then follow points C and D. |
B: This option allows you to plan the mailing of an E-mail Blast. To learn about the procedure, see this section. |
|
C: This checkbox must be checked to send an E-mail Blast. |
D: After selecting option A, checking the checkbox at C, click on the " |
 | |
|
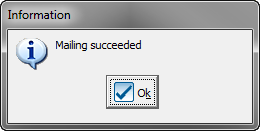
This window confirms that the E-mail Blast has been sent successfully. Click on the " |
|
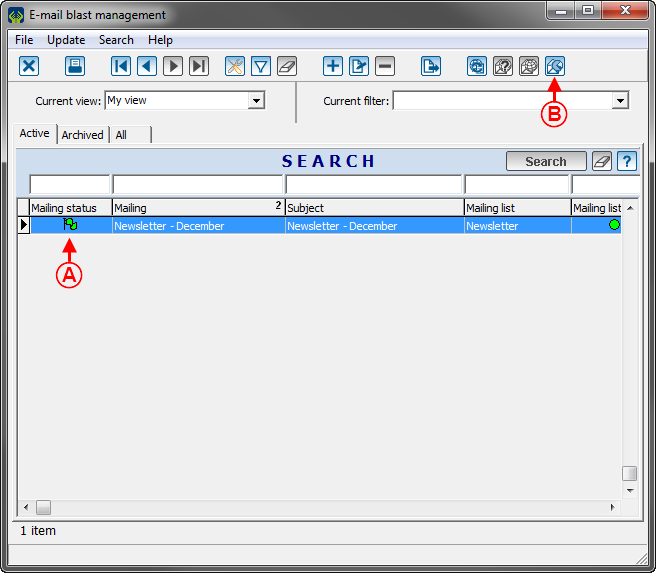
After clicking on the " | |
 | |
|
A: The status of the mailing is green, which means that the mailing has been sent successfully. |
B: The |
Planning the Mailing of the E-mail Blast
NOTE: When an E-mail Blast is planned, the information is immediately transmitted to the website of the E-mail Blast server, which means that ProDon and the computer do not need to be on for the E-mail Blast to be sent on the planned date and time.
 | |
|
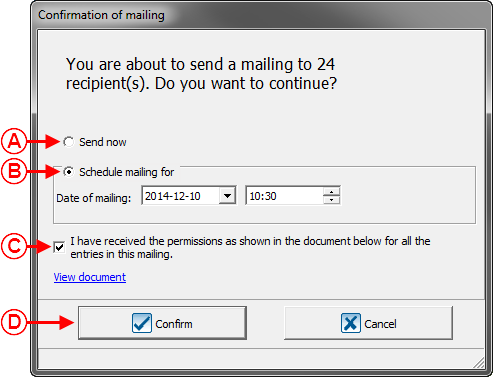
A: This option allows you to send the E-mail Blast now. To learn about the procedure, see this section. |
B: To plan the mailing of an E-mail Blast for later, select this option, then follow points C and D. |
|
C: This checkbox must be checked to send the E-mail Blast. |
D: After selecting option B, and checking the checkbox at C, click on the " |
 | |
|
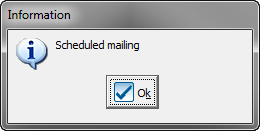
This window confirms that the mailing of the E-mail Blast has really been planned. To close the window, click on the " |
|
After clicking on the " | |
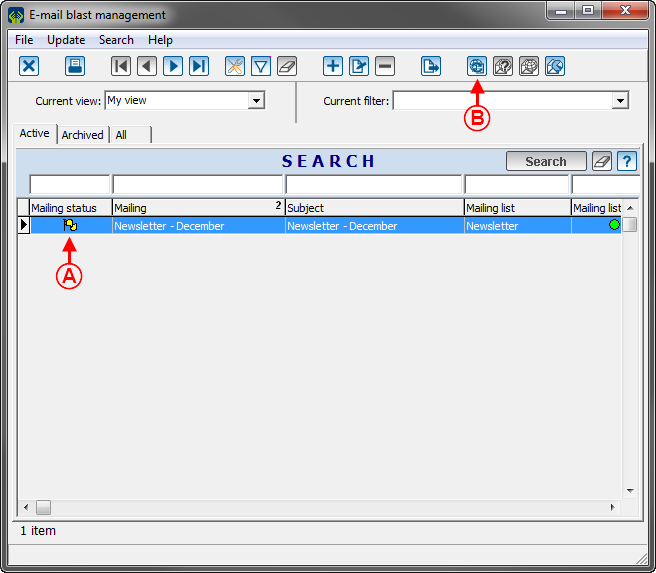 | |
|
A: The status of the mailing is yellow, which means the mailing has really been planned. |
B: The |
|
NOTE: The status of the mailing, at A, will not be updated automatically when the mailing is made. Therefore, you must click on the button at B to see if the mailing has really been made. If the status of the mailing at A turns to green, this means the E-mail Blast has been sent. | |
Synchronizing the Status and the Mailing Date
The status of the planned mailings is not updated automatically, this is why you must synchronize them, in order to view the mailing statistics.
To synchronize the status of a mailing, first go to the "E-mail Blast mailing management".
|
To do so, click on the "Mailings" menu, from ProDon's home page, then select " | |
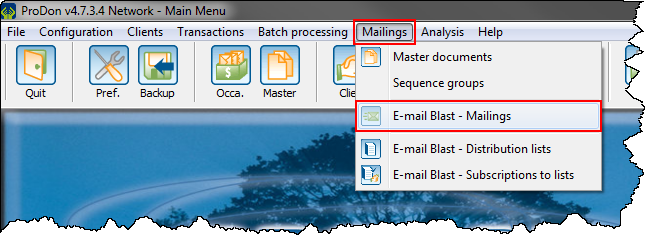 |
|
After clicking on " | |
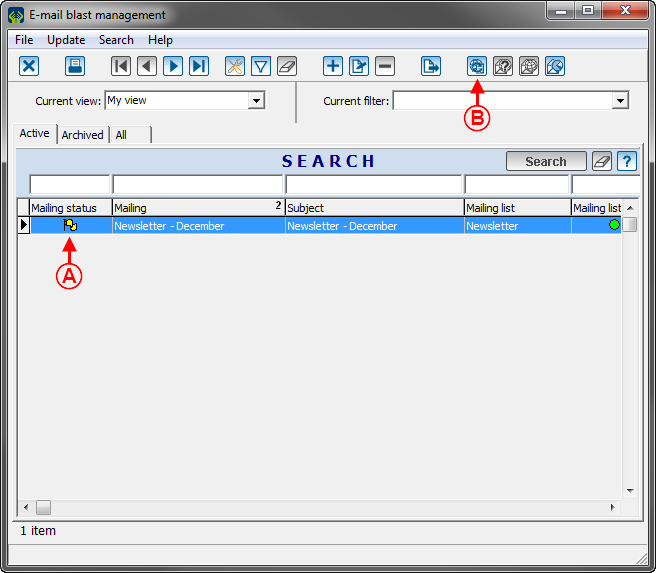 | |
|
A: Select the mailing to synchronize. |
B: After selecting the mailing to synchronize, click on the |
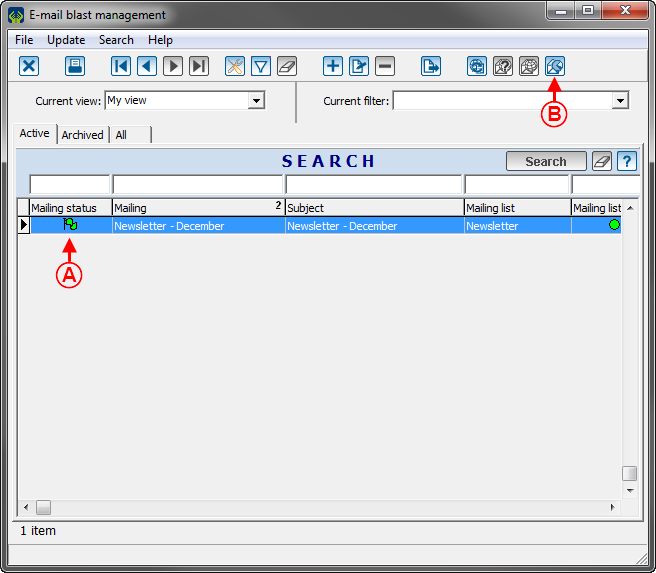 | |
|
A: The status of the mailing turns to green, which means the mailing has really been made. |
B: Once the status of the mailing is green, it is possible to view the mailing statistics. To learn about the procedure, see this document. |
|
NOTE: If the status of the mailing remains yellow, it means that the E-mail Blast has not yet been sent. | |
Creating a Mailing from a Provisional Distribution List
To create an E-mail Blast mailing from a provisional list, you must have previously created the master document. For a provisional mailing, the distribution list must be created at the moment of the mailing and cannot be used following the mailing.
Preparing the Provisional Mailing List
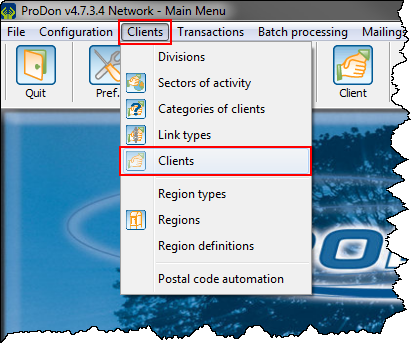
First go to the "Client management", in order to prepare the distribution list.
|
To do so, click on the "Clients" menu from ProDon's home page, then select " | |
 |
|
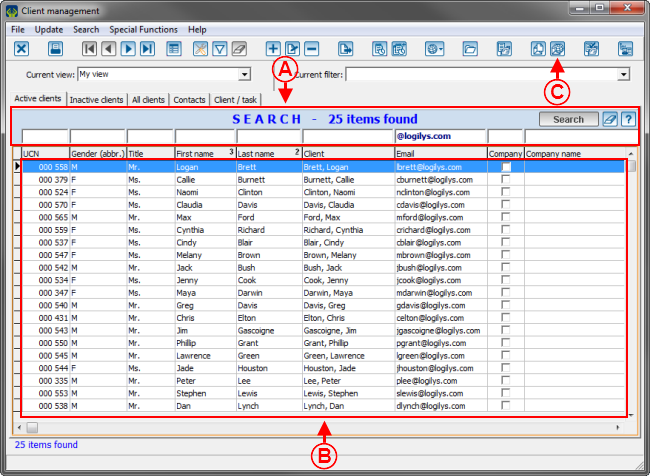
After clicking on " | |
 | |
|
A: Search, using the search bar, for the clients to whom the E-mail Blast must be sent. |
B: These are all the clients who will be part of the mailing list. |
|
C: After searching for all the clients to whom the E-mail Blast must be sent at A, click on the |
|
Configuring the Mailing
|
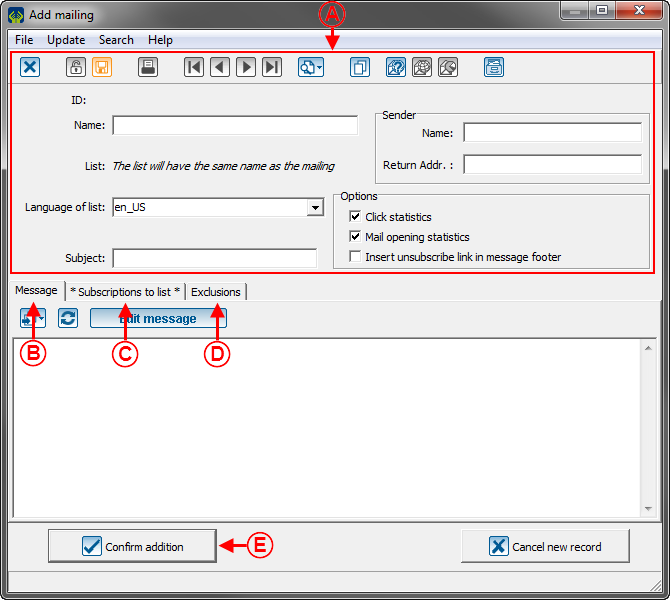
After clicking on the | |
| |
|
A: To learn how to configure this window, see this section. |
B: To learn how to configure the "Message" tab, see this section. |
|
C: To learn how to configure the "Subscriptions to list" tab, see this section. |
D: To learn how to configure the "Exclusions" tab, see this section. |
|
E: After specifying all the necessary information, click on the " |
|
|
After clicking on the " | |

| |
|
A: By clicking on the " |
B: By clicking on the "Confirm and test mailing" button, a test mailing will be made and the mailing will go to the "E-mail Blast mailing management". To learn how to test a provisional mailing, click here. |
|
C: By clicking on the "Confirm and send now" button, the E-mail Blast will automatically be sent to the recipients selected earlier. to learn how to send an E-mail Blast, click here. |
|
Testing the Mailing
|
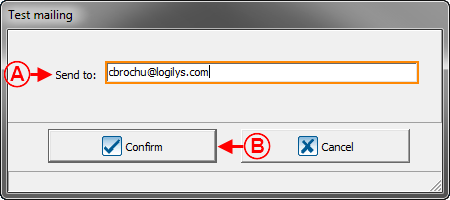
After clicking on the "Confirm and test mailing" button of this window, the following window opens. | |
 | |
|
A: Enter the email address to which the test email must be sent. NOTE: The address of the recipient specified when preparing the distribution list is entered by default. |
B: After entering the email address to which the test email must be sent, click on the " |
 | |
|
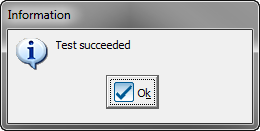
This window confirms that the test email has been sent successfully. To close the window, click on the " |
After performing the test, the mailing goes to the "E-mail Blast mailing management". To learn how to send the email, see this section.
Performing the Mailing
|
After clicking on the "Confirm and send now" button of this window, the following window opens. | |
 | |
|
You must synchronize the subscriptions with the distribution list, prior to performing the mailing. To do so, click on the " NOTE: By clicking on the " |
Sending the E-mail Blast
| |
|
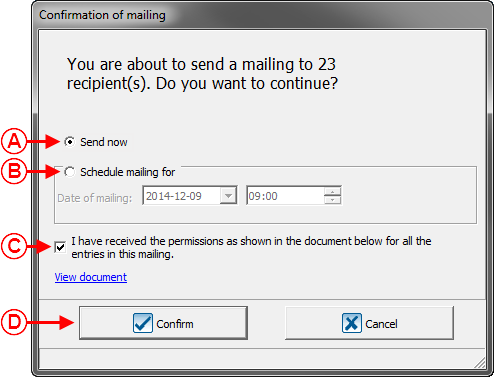
A: To send the E-mail Blast now, select this option, then follow points C and D. |
B: This options allows you to plan the mailing of the E-mail Blast. To learn about the procedure, see this section. |
|
C: This checkbox must be checked to send the E-mail Blast. |
D: After selecting option A, and checking the checkbox at C, click on the " |
 | |
|
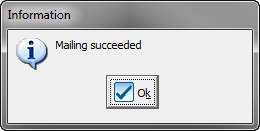
This window confirms that the E-mail Blast has been sent successfully. To close the window, click on the " |
After clicking on the "![]() Ok" button, ProDon returns to the "Client management".
Ok" button, ProDon returns to the "Client management".
Planning the Mailing of the E-mail Blast
 | |
|
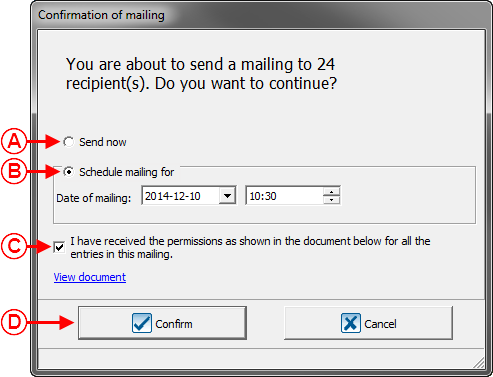
A: This option allows you to send the E-mail Blast now. To learn about the procedure, see this section. |
B: To plan the mailing of an E-mail Blast, select this option, then follow points C and D. |
|
C: This checkbox must be checked to plan the mailing of an E-mail Blast. |
D: After selecting the option at B, and checking the checkbox at C, click on the " |
 | |
|
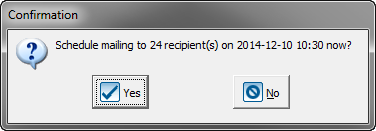
This window allows you to confirm the number of recipients. To confirm the indicated number, click on the " NOTE: By clicking on the " |
 | |
|
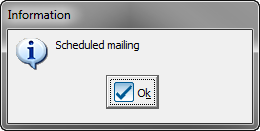
This window confirms that the E-mail Blast has been planned successfully. To close the window, click on the " |
After clicking on the "![]() Ok" button, ProDon returns to the "Client management".
Ok" button, ProDon returns to the "Client management".
To learn how to synchronize the status of the mailing once it is made, see this section.
To learn how to view the mailing statistics, see this document.
Document name: ProDon:Sending the E-mail Blast
Version : 4.6.7.19
