Difference between revisions of "ProDon:Preparing the Distribution List"
(→"Merge fields" Tab ) |
|||
| (52 intermediate revisions by 2 users not shown) | |||
| Line 1: | Line 1: | ||
| − | {{ | + | {{Header_TOC}}<br> |
== Introduction<br> == | == Introduction<br> == | ||
| Line 5: | Line 5: | ||
The E-mail Blast module allows you to perform mass emailing and compile statistics for each mailing made (number of emails sent, opened, rejected, etc.), in order to evaluate the efficiency of the mailings. A reject management is also integrated to avoid problems with spam. To learn how to view the mailing statistics, see [[ProDon:Viewing Mailing Statistics|this document]]. | The E-mail Blast module allows you to perform mass emailing and compile statistics for each mailing made (number of emails sent, opened, rejected, etc.), in order to evaluate the efficiency of the mailings. A reject management is also integrated to avoid problems with spam. To learn how to view the mailing statistics, see [[ProDon:Viewing Mailing Statistics|this document]]. | ||
| − | <br>Moreover, Internet users can subscribe to distribution lists to receive information emails of interest to them | + | <br>Moreover, Internet users can subscribe to distribution lists from the organization website to receive information emails of interest to them. Following their subscription, they receive an automatic confirmation email, prepared for this purpose. This function requires the intervention of '''''Logilys''''', so if you are interested, please contact the technical support. <br> |
<br>An E-mail Blast can be summed up in three steps: You must first prepare the master document, then prepare the distribution list and finally, send the E-mail Blast. | <br>An E-mail Blast can be summed up in three steps: You must first prepare the master document, then prepare the distribution list and finally, send the E-mail Blast. | ||
| Line 13: | Line 13: | ||
<br> | <br> | ||
| − | A distribution list the list of clients to whom the email will be sent. There are two types of distribution lists: : <br> | + | A distribution list is the list of clients to whom the email will be sent. There are two types of distribution lists: : <br> |
*[[ProDon:Preparing the Distribution List#Preparing_a_Provisional_Distribution_List|A provisional distribution list]]<br> | *[[ProDon:Preparing the Distribution List#Preparing_a_Provisional_Distribution_List|A provisional distribution list]]<br> | ||
*[[ProDon:Preparing the Distribution List#Preparing_a_Permanent_Distribution_List.C2.A0|A permanent distribution list]]<br> | *[[ProDon:Preparing the Distribution List#Preparing_a_Permanent_Distribution_List.C2.A0|A permanent distribution list]]<br> | ||
| − | <br> | + | <br> |
== Preparing a Provisional Distribution List<br> == | == Preparing a Provisional Distribution List<br> == | ||
| − | A provisional distribution list is a list can only be used once. For instance, it can be used to thank the clients who participated in an activity. In that event, the list can never be used again since never the same clients attend to the different activities. Moreover, the provisional distribution list must not be created in advance, it should only be created when sending the E-mail Blast. <br> | + | A provisional distribution list is a list that can only be used once. For instance, it can be used to thank the clients who participated in an activity. In that event, the list can never be used again since never the same clients attend to the different activities. Moreover, the provisional distribution list must not be created in advance, it should only be created when sending the E-mail Blast. <br> |
To learn how to perform an E-mail Blast with a provisional distribution list, see the [[ProDon:Sending the E-mail Blast#Creating_a_Mailing_from_a_Provisional_Distribution_List|"Creating a Mailing from a Provisional Distribution List"]] section of the [[ProDon:Sending the E-mail Blast|"Sending the E-mail Blast"]] document. <br> | To learn how to perform an E-mail Blast with a provisional distribution list, see the [[ProDon:Sending the E-mail Blast#Creating_a_Mailing_from_a_Provisional_Distribution_List|"Creating a Mailing from a Provisional Distribution List"]] section of the [[ProDon:Sending the E-mail Blast|"Sending the E-mail Blast"]] document. <br> | ||
| − | <br> | + | <br> |
== Preparing a Permanent Distribution List == | == Preparing a Permanent Distribution List == | ||
| Line 32: | Line 32: | ||
A permanent distribution list is a list that can be used many times. For instance, it can be used to send a monthly bulletin, a newsletter, information on upcoming activities, etc. It is possible to subscribe or unsubscribe from the list at all times. As opposed to the provisional distribution list, the permanent distribution list must be created prior to performing the E-mail Blast. <br> | A permanent distribution list is a list that can be used many times. For instance, it can be used to send a monthly bulletin, a newsletter, information on upcoming activities, etc. It is possible to subscribe or unsubscribe from the list at all times. As opposed to the provisional distribution list, the permanent distribution list must be created prior to performing the E-mail Blast. <br> | ||
| − | It is possible to create and modify permanent distribution lists in two ways in '''''ProDon''''':<br> | + | It is possible to create and modify permanent distribution lists in two different ways in '''''ProDon''''':<br> |
*From the "Distribution list management"<br> | *From the "Distribution list management"<br> | ||
| Line 41: | Line 41: | ||
=== Creating or Modifying a Permanent Distribution List from the "Distribution list management" <br> === | === Creating or Modifying a Permanent Distribution List from the "Distribution list management" <br> === | ||
| − | In order for a distribution list to be ready to use for | + | In order for a distribution list to be ready to use for an E-mail Blast, you must first [[ProDon:Preparing the Distribution List#Configuring_the_Distribution_List|configure the distribution list]], then [[ProDon:Preparing the Distribution List#Registering_Clients_to_a_Distribution_List|register the clients]] who will be part of it.<br> |
<br> | <br> | ||
| Line 124: | Line 124: | ||
| | | | ||
| − | <span style="color: rgb(255, 0, 0);">'''H:'''</span> The [[ProDon:Preparing the Distribution List#.22Subscriptions.22_Tab|"Subscriptions"]] tab contains | + | <span style="color: rgb(255, 0, 0);">'''H:'''</span> The [[ProDon:Preparing the Distribution List#.22Subscriptions.22_Tab|"Subscriptions"]] tab contains the list of all the clients who subscribed to the distribution list. |
|} | |} | ||
| Line 132: | Line 132: | ||
===== "Merge fields" Tab ===== | ===== "Merge fields" Tab ===== | ||
| − | This tab allows you to select | + | This tab allows you to select the merge fields that will be used in the master documents sent with this distribution list. |
| − | ''' | + | '''CAUTION:''' The fields must be checked in the master document '''AND''' in the distribution list. If they are not checked in both places, they will not be merged in the mailing. <br> |
{| width="200" cellspacing="1" cellpadding="1" border="1" class="wikitable" | {| width="200" cellspacing="1" cellpadding="1" border="1" class="wikitable" | ||
| Line 141: | Line 141: | ||
|- | |- | ||
| width="50%" | | | width="50%" | | ||
| − | <span style="color: rgb(255, 0, 0);">'''A | + | <span style="color: rgb(255, 0, 0);">'''A:'''</span> Check the fields that have been inserted in the master documents, which will be sent with this distribution list. <br> |
| width="50%" | | | width="50%" | | ||
| − | <span style="color: rgb(255, 0, 0);">'''B | + | <span style="color: rgb(255, 0, 0);">'''B:'''</span> The [[Image:Button funky x.png]] button allows you to uncheck all the fields of the list at <span style="color: rgb(255, 0, 0);">'''A'''</span>.<br> |
|- | |- | ||
| | | | ||
| − | <span style="color: rgb(255, 0, 0);">'''C | + | <span style="color: rgb(255, 0, 0);">'''C:'''</span> The [[Image:Bouton Rechercher.png]] button allows you to display or not the [[Common functions:Search Bar|search bar]].<br> |
| | | | ||
| − | '''NOTE | + | '''NOTE:''' It is important to check, at <span style="color: rgb(255, 0, 0);">'''A'''</span>, only the fields used in the master documents that will be sent with this distribution list; since the fields activated here can no longer be deactivated once the mailing is made. It will be possible to uncheck the fields, but they will still remain active on the mailing server website of the E-mail Blast. Moreover, all the fields checked would have to be synchronized one by one with the fields included in the master document in each mailing; which will considerably increase the time spent on sending the E-mail Blast. To deactivate the fields on the mailing server website of the E-mail Blast, contact '''''Logilys'''''.<br> |
|} | |} | ||
| − | <br> | + | <br> |
===== "Registration confirmation email" Tab ===== | ===== "Registration confirmation email" Tab ===== | ||
| − | + | This tab allows you to write the email that will be sent to the clients who will subscribe to this distribution list. | |
{| width="200" cellspacing="1" cellpadding="1" border="1" class="wikitable" | {| width="200" cellspacing="1" cellpadding="1" border="1" class="wikitable" | ||
| Line 166: | Line 166: | ||
|- | |- | ||
| width="50%" | | | width="50%" | | ||
| − | <span style="color: rgb(255, 0, 0);">'''A | + | <span style="color: rgb(255, 0, 0);">'''A:'''</span> Enter the subject of the email in this field. |
| width="50%" | | | width="50%" | | ||
| − | <span style="color: rgb(255, 0, 0);">'''B | + | <span style="color: rgb(255, 0, 0);">'''B:'''</span> The [[Image:Import file button.png]] button allows you import an HTML file to display at <span style="color: rgb(255, 0, 0);">'''C'''</span>. |
| − | '''NOTE | + | '''NOTE:''' It is also possible to write the email at <span style="color: rgb(255, 0, 0);">'''C'''</span>, rather than importing an HTML document. |
|- | |- | ||
| | | | ||
| − | <span style="color: rgb(255, 0, 0);">'''C | + | <span style="color: rgb(255, 0, 0);">'''C:'''</span> This is the email in HTML codes. To view the email as it will be sent, click on the "Message preview" button at <span style="color: rgb(255, 0, 0);">'''D'''</span>, or see [[#Overview|this section]].<br> |
| − | '''NOTE | + | '''NOTE:''' It is possible to import the HTML text by using the button at <span style="color: rgb(255, 0, 0);">'''C'''</span> or to write it directly here. |
| | | | ||
| − | <span style="color: rgb(255, 0, 0);">'''D | + | <span style="color: rgb(255, 0, 0);">'''D:'''</span> The "Message preview" button allows you to display the email in HTML codes or to display the email as it will be sent.<br> |
| − | '''NOTE | + | '''NOTE:''' When the email is in "Message preview" mode, it is not possible to modify it; it is only possible to view it. To write or modify the message, display the email in "Display in HTML" mode. |
|- | |- | ||
| colspan="2" | | | colspan="2" | | ||
| − | '''NOTE | + | '''NOTE:''' During the E-mail Blast training, the trainer should normally have provided you with an example of an email written in HTML codes. In the event that example has been lost or not received during the training and you wish to learn how to write an email in HTML codes, contact '''''Logilys'''''. |
|} | |} | ||
| Line 192: | Line 192: | ||
<br> | <br> | ||
| − | '''{{Anchor|| | + | '''{{Anchor||Overview}}Confirmation Email Preview''' |
{| width="200" cellspacing="1" cellpadding="1" border="1" class="wikitable" | {| width="200" cellspacing="1" cellpadding="1" border="1" class="wikitable" | ||
| Line 199: | Line 199: | ||
|- | |- | ||
| colspan="2" | | | colspan="2" | | ||
| − | <span style="color: rgb(255, 0, 0);">'''A | + | <span style="color: rgb(255, 0, 0);">'''A:'''</span> When this button is in "Message preview" mode, the email is displayed as it will be sent. |
| − | '''NOTE | + | '''NOTE:''' However, it is not possible to modify the email in "Message preview" mode. |
|} | |} | ||
| Line 209: | Line 209: | ||
===== "Subscriptions" Tab ===== | ===== "Subscriptions" Tab ===== | ||
| − | + | This tab allows you to view the list of clients who subscribed to this distribution list. | |
| − | '''NOTE | + | '''NOTE:''' To learn how to register clients to a distribution list, [[ProDon:Preparing the Distribution List#Registering_Clients_to_a_Distribution_List|click here]]. To learn how to unregister clients from a distribution list, [[ProDon:Preparing the Distribution List#Unregistering_Clients_from_a_Distribution_List|click here]]. <br> |
{| width="200" cellspacing="1" cellpadding="1" border="1" class="wikitable" | {| width="200" cellspacing="1" cellpadding="1" border="1" class="wikitable" | ||
| Line 218: | Line 218: | ||
|- | |- | ||
| width="50%" | | | width="50%" | | ||
| − | <span style="color: rgb(255, 0, 0);">'''A | + | <span style="color: rgb(255, 0, 0);">'''A:'''</span> It is the list of all the clients who subscribed to the distribution list. In this example, no client has subscribed to the list. To learn how to add clients to the list, see [[ProDon:Preparing the Distribution List#Registering_Clients_to_a_Distribution_List|this section]]. <br> |
| width="50%" | | | width="50%" | | ||
| − | <span style="color: rgb(255, 0, 0);">'''B | + | <span style="color: rgb(255, 0, 0);">'''B:'''</span> The [[Image:Bouton Rechercher.png]] button allows you to display or not the [[Common functions:Search Bar|search bar]]. <br> |
|- | |- | ||
| | | | ||
| − | <span style="color: rgb(255, 0, 0);">'''C | + | <span style="color: rgb(255, 0, 0);">'''C:'''</span> After completing all the information of the addition or modification file of the distribution list, click on the "[[Image:Button add plus.png]] Confirm and add" button to save the modifications. |
| | | | ||
| − | <span style="color: rgb(255, 0, 0);">'''D | + | <span style="color: rgb(255, 0, 0);">'''D:'''</span> After completing all the information of the addition or modification file of the distribution list, click on "[[Image:Button add plus.png]] Confirm and add" to save the modifications and open a new addition file to create a new distribution list. |
|} | |} | ||
| − | <br> | + | <br> |
| − | ==== | + | ==== Registering Clients to a Distribution List ==== |
| − | + | It is possible to register clients to a distribution in two different ways in '''''ProDon''''' : | |
| − | *[[ProDon: | + | *[[ProDon:Preparing the Distribution List#Registering_many_Clients_from_the_.22Client_management.22|Registering many Clients from the "Client management"]] |
| − | *[[ProDon: | + | *[[ProDon:Preparing the Distribution List#Registering_a_Client_from_his_or_her_Client_File|Registering a Client from his or her Client File]] |
| − | <br> '''NOTE | + | <br> '''IMPORTANT NOTE:''' It is not possible to use generic email addresses (e.g. info@..., admin@..., management@..., etc.) in a distribution list.<br> |
| − | + | To see the complete list of addresses that cannot be used in a disribution list, [http://wikifr.logilys.com/index.php/Fonctions_communes:Courriels_g%C3%A9n%C3%A9riques click here].<br> | |
<br> | <br> | ||
| − | ===== | + | ===== Registering many Clients from the "Client management"<br> ===== |
| − | + | To register many clients to the distribution list at the same time, go to the "Client management". | |
{| width="200" cellspacing="1" cellpadding="1" border="1" class="wikitable" | {| width="200" cellspacing="1" cellpadding="1" border="1" class="wikitable" | ||
|- | |- | ||
| colspan="2" | | | colspan="2" | | ||
| − | + | To do so, from '''''ProDon''''''s home page, click on the "Clients" menu, then select "[[Image:Clients button colour.png]] Clients". | |
|- | |- | ||
| Line 266: | Line 266: | ||
|- | |- | ||
| colspan="2" | | | colspan="2" | | ||
| − | + | After clicking on "[[Image:Clients button colour.png]] Clients", this window opens. | |
|- | |- | ||
| Line 272: | Line 272: | ||
|- | |- | ||
| width="50%" | | | width="50%" | | ||
| − | <span style="color: rgb(255, 0, 0);">'''A | + | <span style="color: rgb(255, 0, 0);">'''A:'''</span> Search for clients who should be added to the distribution list, using the [[Common functions:Search Bar|search bar]]. |
| width="50%" | | | width="50%" | | ||
| − | <span style="color: rgb(255, 0, 0);">'''B | + | <span style="color: rgb(255, 0, 0);">'''B:'''</span> It is the current list of clients who will be added to the distribution list. |
|- | |- | ||
| | | | ||
| − | <span style="color: rgb(255, 0, 0);">'''C | + | <span style="color: rgb(255, 0, 0);">'''C:'''</span> After searching for the clients who should be part of the distribution list, click on the [[Image:Distribution list button.png]] button. |
| <br> | | <br> | ||
| Line 289: | Line 289: | ||
|- | |- | ||
| colspan="2" | | | colspan="2" | | ||
| − | + | After clicking on the [[Image:Distribution list button.png]] button, this window opens. | |
|- | |- | ||
| Line 295: | Line 295: | ||
|- | |- | ||
| width="50%" | | | width="50%" | | ||
| − | <span style="color: rgb(255, 0, 0);">'''A | + | <span style="color: rgb(255, 0, 0);">'''A:'''</span> Choose whether to add all filtered clients or the selected client only.<br> |
| width="50%" | | | width="50%" | | ||
| − | <span style="color: rgb(255, 0, 0);">'''B | + | <span style="color: rgb(255, 0, 0);">'''B:'''</span> Allows you to add the filtered clients to an existing distribution list. |
|- | |- | ||
| | | | ||
| − | <span style="color: rgb(255, 0, 0);">'''C | + | <span style="color: rgb(255, 0, 0);">'''C:'''</span> Select an existing permanent distribution list, using the drop-down list. |
| | | | ||
| − | <span style="color: rgb(255, 0, 0);">'''D:'''</span> | + | <span style="color: rgb(255, 0, 0);">'''D:'''</span> After selecting the desired options and choosing the distribution list to which the filtered clients should be added, click on the "[[Image:Button Check mark Confirm.png]] Confirm" button. |
|} | |} | ||
| Line 311: | Line 311: | ||
<br> | <br> | ||
| − | ===== | + | ===== Registering a Client from his or her Client File <br> ===== |
| − | + | To register only one client to a distribution list, go to the "Client management", then in the client file of the client who should be registered to the list. <br> | |
{| width="200" cellspacing="1" cellpadding="1" border="1" class="wikitable" | {| width="200" cellspacing="1" cellpadding="1" border="1" class="wikitable" | ||
|- | |- | ||
| colspan="2" | | | colspan="2" | | ||
| − | + | After clicking on "[[Image:Clients button colour.png]] Clients", this window opens.<br> | |
| − | |||
| − | |||
| − | |||
| − | |||
| − | |||
| − | |||
| − | |||
| − | |||
| − | |||
| − | |||
| − | |||
|- | |- | ||
| Line 335: | Line 324: | ||
|- | |- | ||
| width="50%" | | | width="50%" | | ||
| − | <span style="color: rgb(255, 0, 0);">'''A | + | <span style="color: rgb(255, 0, 0);">'''A:'''</span> Search for the client you want to add to the distribution list, using the [[Common functions:Search Bar|search bar]]. <br> |
| width="50%" | | | width="50%" | | ||
| − | <span style="color: rgb(255, 0, 0);">'''B | + | <span style="color: rgb(255, 0, 0);">'''B:'''</span> Double-click on the client to open his or her client file or select the line, then click on the [[Image:Button Edit.png]] button at <span style="color: rgb(255, 0, 0);">'''C'''</span>.<br> |
|- | |- | ||
| | | | ||
| − | <span style="color: rgb(255, 0, 0);">'''C | + | <span style="color: rgb(255, 0, 0);">'''C:'''</span> After selecting the line at <span style="color: rgb(255, 0, 0);">'''B'''</span>, click on the [[Image:Button Edit.png]] button to open the client file.<br> |
| <br> | | <br> | ||
| Line 352: | Line 341: | ||
|- | |- | ||
| colspan="2" | | | colspan="2" | | ||
| − | + | After double-clicking on the line or clicking on the [[Image:Button Edit.png]] button, the client file opens.<br> | |
|- | |- | ||
| Line 358: | Line 347: | ||
|- | |- | ||
| colspan="2" | | | colspan="2" | | ||
| − | <span style="color: rgb(255, 0, 0);">'''A | + | <span style="color: rgb(255, 0, 0);">'''A:'''</span> Click on the [[Image:Distribution list button.png]] button to choose to which distribution list(s) you want to add the client. <br> |
|} | |} | ||
| Line 367: | Line 356: | ||
|- | |- | ||
| colspan="2" | | | colspan="2" | | ||
| − | + | After clicking on the [[Image:Distribution list button.png]] button, this window opens. | |
|- | |- | ||
| Line 373: | Line 362: | ||
|- | |- | ||
| width="50%" | | | width="50%" | | ||
| − | <span style="color: rgb(255, 0, 0);">'''A | + | <span style="color: rgb(255, 0, 0);">'''A:'''</span> Check this checkbox to send a registration confirmation email to the client who is registered. <br> |
| width="50%" | | | width="50%" | | ||
| − | <span style="color: rgb(255, 0, 0);">'''B | + | <span style="color: rgb(255, 0, 0);">'''B:'''</span> These are all the existing permanent distribution lists in '''''ProDon'''''. It is possible to register the client to the list by selecting the distribution list, then by pressing the spacebar of the keyboard. |
|- | |- | ||
| | | | ||
| − | <span style="color: rgb(255, 0, 0);">'''C | + | <span style="color: rgb(255, 0, 0);">'''C:'''</span> This button allows you to register the client to the selected list only or to all the lists at <span style="color: rgb(255, 0, 0);">'''B'''</span>. |
| | | | ||
| − | <span style="color: rgb(255, 0, 0);">'''D | + | <span style="color: rgb(255, 0, 0);">'''D:'''</span> After registering the client to all the desired lists, click on the "[[Image:Button Edit.png]] Confirm edit" button save the changes made. |
|} | |} | ||
| Line 389: | Line 378: | ||
<br> | <br> | ||
| − | ==== | + | ==== Unregistering Clients from a Distribution List ==== |
| − | + | It is possible to unregister clients from a distribution list in three different ways in '''''ProDon''''': | |
| − | *[[ProDon: | + | *[[ProDon:Preparing the Distribution List#Unregistering_many_Clients_from_the_.22Client_management.22|Unregistering many Clients from the "Client management"]] |
| − | *[[ProDon: | + | *[[ProDon:Preparing the Distribution List#Unregistering_a_Client_from_his_or_her_Client_File|Unregistering a Client from his or her Client File]] |
| − | *[[ProDon: | + | *[[ProDon:Preparing the Distribution List#Unregistering_a_Client_from_the_.22Distribution_list_subscription_management.22.C2.A0|Unregistering a Client from the "Distribution list subscription management"]] |
<br> | <br> | ||
| − | ===== | + | ===== Unregistering many Clients from the "Client management" <br> ===== |
| − | + | To unregister many clients from the distribution list at the same time, go to the "Client management". | |
{| width="200" cellspacing="1" cellpadding="1" border="1" class="wikitable" | {| width="200" cellspacing="1" cellpadding="1" border="1" class="wikitable" | ||
|- | |- | ||
| colspan="2" | | | colspan="2" | | ||
| − | + | To do so, go to the '''''ProDon''''''s home page, click on the "Clients" menu, then select "[[Image:Clients button colour.png]] Clients". | |
|- | |- | ||
| Line 417: | Line 406: | ||
|- | |- | ||
| colspan="2" | | | colspan="2" | | ||
| − | + | After clicking on "[[Image:Clients button colour.png]] Clients", this window opens. | |
|- | |- | ||
| Line 423: | Line 412: | ||
|- | |- | ||
| width="50%" | | | width="50%" | | ||
| − | <span style="color: rgb(255, 0, 0);">'''A | + | <span style="color: rgb(255, 0, 0);">'''A:'''</span> Search for the clients you want to remove from the distribution list, using the [[Common functions:Search Bar|search bar]]. |
| width="50%" | | | width="50%" | | ||
| − | <span style="color: rgb(255, 0, 0);">'''B | + | <span style="color: rgb(255, 0, 0);">'''B:'''</span> It is the list of clients who will be removed from the distribution list. |
|- | |- | ||
| | | | ||
| − | <span style="color: rgb(255, 0, 0);">'''C | + | <span style="color: rgb(255, 0, 0);">'''C:'''</span> After searching for the clients you want to remove from the distribution list, click on the [[Image:Distribution list button.png]] button. |
| <br> | | <br> | ||
| Line 440: | Line 429: | ||
|- | |- | ||
| colspan="2" | | | colspan="2" | | ||
| − | + | After clicking on the [[Image:Distribution list button.png]] button, this window opens. | |
|- | |- | ||
| Line 446: | Line 435: | ||
|- | |- | ||
| width="50%" | | | width="50%" | | ||
| − | <span style="color: rgb(255, 0, 0);">'''A | + | <span style="color: rgb(255, 0, 0);">'''A:'''</span> Choose whether you want to remove all filtered clients or only the selected client. |
| width="50%" | | | width="50%" | | ||
| − | <span style="color: rgb(255, 0, 0);">'''B | + | <span style="color: rgb(255, 0, 0);">'''B:'''</span> Allows you to remove the filtered clients from an existing distribution list. |
|- | |- | ||
| | | | ||
| − | <span style="color: rgb(255, 0, 0);">'''C | + | <span style="color: rgb(255, 0, 0);">'''C:'''</span> Select an existing permanent distribution list using the drop-down list. |
| | | | ||
| − | <span style="color: rgb(255, 0, 0);">'''D:'''</span> | + | <span style="color: rgb(255, 0, 0);">'''D:'''</span> After selecting the desired options and choosing the distribution list from which the filtered clients need to be removed, click on the "[[Image:Button Check mark Confirm.png]] Confirm" button. |
|} | |} | ||
| Line 462: | Line 451: | ||
<br> | <br> | ||
| − | ===== | + | ===== Unregistering a Client from his or her Client File<br> ===== |
| − | + | To unregister only one client from a distribution list, go to the "Client management", then to the file of the client you want to unregister from the list.<br> | |
{| width="200" cellspacing="1" cellpadding="1" border="1" class="wikitable" | {| width="200" cellspacing="1" cellpadding="1" border="1" class="wikitable" | ||
|- | |- | ||
| colspan="2" | | | colspan="2" | | ||
| − | + | To do so, from '''''ProDon''''''s home page, click on the "Clients" menu, then select "[[Image:Clients button colour.png]] Clients". | |
|- | |- | ||
| Line 480: | Line 469: | ||
|- | |- | ||
| colspan="2" | | | colspan="2" | | ||
| − | + | After clicking on the "[[Image:Clients button colour.png]] Clients" button, this window opens.<br> | |
|- | |- | ||
| Line 486: | Line 475: | ||
|- | |- | ||
| width="50%" | | | width="50%" | | ||
| − | <span style="color: rgb(255, 0, 0);">'''A | + | <span style="color: rgb(255, 0, 0);">'''A:'''</span> Search for the client you want to unregister from a distribution list using the [[Common functions:Search Bar|search bar]]. <br> |
| width="50%" | | | width="50%" | | ||
| − | <span style="color: rgb(255, 0, 0);">'''B | + | <span style="color: rgb(255, 0, 0);">'''B:'''</span> Double-click on the client to open his or her client file or select the line, then click on the [[Image:Button Edit.png]] button at <span style="color: rgb(255, 0, 0);">'''C'''</span>.<br> |
|- | |- | ||
| | | | ||
| − | <span style="color: rgb(255, 0, 0);">'''C | + | <span style="color: rgb(255, 0, 0);">'''C:'''</span> After selecting the line at <span style="color: rgb(255, 0, 0);">'''B'''</span>, click on the [[Image:Button Edit.png]] button to open the client file. <br> |
| <br> | | <br> | ||
| Line 503: | Line 492: | ||
|- | |- | ||
| colspan="2" | | | colspan="2" | | ||
| − | + | After double-clicking on the line or clicking on the [[Image:Button Edit.png]] button, the client file opens.<br> | |
|- | |- | ||
| Line 509: | Line 498: | ||
|- | |- | ||
| colspan="2" | | | colspan="2" | | ||
| − | <span style="color: rgb(255, 0, 0);">'''A | + | <span style="color: rgb(255, 0, 0);">'''A:'''</span> Click on the [[Image:Distribution list button.png]] button to choose from which distribution list(s) the client should be removed.<br> |
|} | |} | ||
| Line 518: | Line 507: | ||
|- | |- | ||
| colspan="2" | | | colspan="2" | | ||
| − | + | After clicking on the [[Image:Distribution list button.png]] button, this window opens. | |
|- | |- | ||
| − | | colspan="2" | {{Anchor|| | + | | colspan="2" | {{Anchor||SubscriptionToListsWindow1}}[[Image:Preparing the Distribution List 021.png]] |
|- | |- | ||
| width="50%" | | | width="50%" | | ||
| − | <span style="color: rgb(255, 0, 0);">'''A | + | <span style="color: rgb(255, 0, 0);">'''A:'''</span> These are all the existing permanent distribution lists in '''''ProDon'''''. It is possible to unregister a client from a list by selecting the distribution list, then by pressing on the spacebar of the keyboard. |
| width="50%" | | | width="50%" | | ||
| − | <span style="color: rgb(255, 0, 0);">'''B | + | <span style="color: rgb(255, 0, 0);">'''B:'''</span> This button allows you to unregister the client from the selected list only or from all the lists at <span style="color: rgb(255, 0, 0);">'''B'''</span>. After unregistering the client from at least one list, [[#CancellationReasonWindow1|this window]] opens, to specify the reason of the cancellation. |
|- | |- | ||
| | | | ||
| − | <span style="color: rgb(255, 0, 0);">'''C | + | <span style="color: rgb(255, 0, 0);">'''C:'''</span> This button allows you to modify the reason of the unsubscription. |
| | | | ||
| − | <span style="color: rgb(255, 0, 0);">'''D | + | <span style="color: rgb(255, 0, 0);">'''D:'''</span> After unregistering the client from all the desired lists, click on the "[[Image:Button Check mark Confirm.png]] Confirm edit" button to save the changes made. |
|} | |} | ||
| Line 543: | Line 532: | ||
|- | |- | ||
| colspan="2" | | | colspan="2" | | ||
| − | + | After unregistering the client from a list from [[#SubscriptionToListsWindow1|this window]], the following window opens to specify the reason of the cancellation. <br> | |
|- | |- | ||
| − | | colspan="2" | {{Anchor|| | + | | colspan="2" | {{Anchor||CancellationReasonWindow1}}[[Image:Preparing the Distribution List 022.png]] |
|- | |- | ||
| width="50%" | | | width="50%" | | ||
| − | <span style="color: rgb(255, 0, 0);">'''A | + | <span style="color: rgb(255, 0, 0);">'''A:'''</span> Enter a new cancellation reason or choose an existing one from the drop-down list. |
| width="50%" | | | width="50%" | | ||
| − | <span style="color: rgb(255, 0, 0);">'''B | + | <span style="color: rgb(255, 0, 0);">'''B:'''</span> After specifying the reason of the cancellation, click on the "[[Image:Button Check mark Confirm.png]] Confirm edit" button. |
|} | |} | ||
| Line 558: | Line 547: | ||
<br> | <br> | ||
| − | ===== | + | ===== Unregistering a Client from the "Distribution list subscription management" ===== |
| − | + | The second way to unregister only one client from a distribution list from the "Distribution list subscription management".<br> | |
{| width="200" cellspacing="1" cellpadding="1" border="1" class="wikitable" | {| width="200" cellspacing="1" cellpadding="1" border="1" class="wikitable" | ||
|- | |- | ||
| colspan="2" | | | colspan="2" | | ||
| − | + | To do so, from '''''ProDon''''''s home page, click on the "Mailings" menu, then select "[[Image:E-mail Blast button.png]] E-mail Blast - Subscriptions to lists". | |
|- | |- | ||
| Line 576: | Line 565: | ||
|- | |- | ||
| colspan="2" | | | colspan="2" | | ||
| − | + | After clicking on "[[Image:E-mail Blast button.png]] E-mail Blast - Subscriptions to lists", this window opens. | |
|- | |- | ||
| − | | colspan="2" | {{Anchor|| | + | | colspan="2" | {{Anchor||ListSubscriptionManagement}}[[Image:Preparing the Distribution List 024.png]] |
|- | |- | ||
| width="50%" | | | width="50%" | | ||
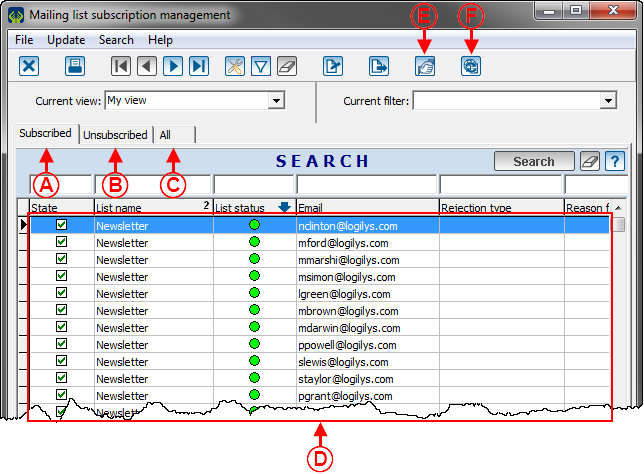
| − | <span style="color: rgb(255, 0, 0);">'''A | + | <span style="color: rgb(255, 0, 0);">'''A:'''</span> The "Subscribed" tab contains all the clients who subscribed to at least one distribution list. |
| width="50%" | | | width="50%" | | ||
| − | <span style="color: rgb(255, 0, 0);">'''B | + | <span style="color: rgb(255, 0, 0);">'''B:'''</span> The "Unsubscribed" tab contains all the clients who unsubscribed from at least one distribution list. |
|- | |- | ||
| | | | ||
| − | <span style="color: rgb(255, 0, 0);">'''C | + | <span style="color: rgb(255, 0, 0);">'''C:'''</span> The "All" tab contains all the clients who subscribed to at least one list or have already subscribed to a list. |
| | | | ||
| − | <span style="color: rgb(255, 0, 0);">'''D | + | <span style="color: rgb(255, 0, 0);">'''D:'''</span> These are all the clients who subscribed to at least one distribution list. To unregister a client, double-click on the line of the address to unregister. |
|- | |- | ||
| | | | ||
| − | <span style="color: rgb(255, 0, 0);">'''E | + | <span style="color: rgb(255, 0, 0);">'''E:'''</span> The [[Image:Bouton Client.png]] button allows you to open the file of a client on the list at <span style="color: rgb(255, 0, 0);">'''D'''</span>. |
| | | | ||
| − | <span style="color: rgb(255, 0, 0);">'''F | + | <span style="color: rgb(255, 0, 0);">'''F:'''</span> The [[Image:Synchronisation button.png]] button allows you to synchronize the subscriptions and unsubscriptions to distribution lists. |
|} | |} | ||
| Line 608: | Line 597: | ||
|- | |- | ||
| colspan="2" | | | colspan="2" | | ||
| − | + | After double-clicking on the address to unsubscribe from [[#ListSubscriptionManagement|this window]], the following window opens. | |
|- | |- | ||
| Line 614: | Line 603: | ||
|- | |- | ||
| width="50%" | | | width="50%" | | ||
| − | <span style="color: rgb(255, 0, 0);">'''A | + | <span style="color: rgb(255, 0, 0);">'''A:'''</span> These are all the existing permanent distribution lists in '''''ProDon'''''. It is possible to unregister a client from a list by selecting the distribution list, then by pressing the spacebar of the keyboard. |
| width="50%" | | | width="50%" | | ||
| − | <span style="color: rgb(255, 0, 0);">'''B | + | <span style="color: rgb(255, 0, 0);">'''B:'''</span> This button allows you to unregister the client from the selected list or from all the lists at <span style="color: rgb(255, 0, 0);">'''B'''</span>. After unregistering the client from at least one list, [[#CancellationReasonWindow1|this window]] opens to specify the reason of the cancellation. |
|- | |- | ||
| | | | ||
| − | <span style="color: rgb(255, 0, 0);">'''C | + | <span style="color: rgb(255, 0, 0);">'''C:'''</span> This button allows you to modify the reason of the unsubscription. |
| | | | ||
| − | <span style="color: rgb(255, 0, 0);">'''D | + | <span style="color: rgb(255, 0, 0);">'''D:'''</span> After unregistering the client from all the desired lists, click on the "[[Image:Button Check mark Confirm.png]] Confirm edit" button to save the changes made. |
|} | |} | ||
| Line 633: | Line 622: | ||
|- | |- | ||
| colspan="2" | | | colspan="2" | | ||
| − | + | After unregistering the client from a list, from [[#ListSubscriptionWindow|this window]], the following window opens to specify the reason of the cancellation. | |
|- | |- | ||
| Line 639: | Line 628: | ||
|- | |- | ||
| width="50%" | | | width="50%" | | ||
| − | <span style="color: rgb(255, 0, 0);">'''A | + | <span style="color: rgb(255, 0, 0);">'''A:'''</span> Enter a new cancellation reason or choose an existing one in the drop-down list. |
| width="50%" | | | width="50%" | | ||
| − | <span style="color: rgb(255, 0, 0);">'''B | + | <span style="color: rgb(255, 0, 0);">'''B:'''</span> After specifying a cancellation reason, click on the "[[Image:Button Check mark Confirm.png]] Confirm edits" button.<br> |
|} | |} | ||
| − | <br> {{ | + | <br> |
| + | |||
| + | {{Footer_ProDon_Version|4.6.7.19}}<br> | ||
Latest revision as of 09:24, 5 May 2016
| Preparing the Distribution List |
Contents
[hide]- 1 Introduction
- 2 Preparing a Provisional Distribution List
- 3 Preparing a Permanent Distribution List
Introduction
The E-mail Blast module allows you to perform mass emailing and compile statistics for each mailing made (number of emails sent, opened, rejected, etc.), in order to evaluate the efficiency of the mailings. A reject management is also integrated to avoid problems with spam. To learn how to view the mailing statistics, see this document.
Moreover, Internet users can subscribe to distribution lists from the organization website to receive information emails of interest to them. Following their subscription, they receive an automatic confirmation email, prepared for this purpose. This function requires the intervention of Logilys, so if you are interested, please contact the technical support.
An E-mail Blast can be summed up in three steps: You must first prepare the master document, then prepare the distribution list and finally, send the E-mail Blast.
The present document deals with the preparation of the distribution list. To learn how to prepare the master document, see this document. To learn how to send the E-mail Blast, see this document.
A distribution list is the list of clients to whom the email will be sent. There are two types of distribution lists: :
Preparing a Provisional Distribution List
A provisional distribution list is a list that can only be used once. For instance, it can be used to thank the clients who participated in an activity. In that event, the list can never be used again since never the same clients attend to the different activities. Moreover, the provisional distribution list must not be created in advance, it should only be created when sending the E-mail Blast.
To learn how to perform an E-mail Blast with a provisional distribution list, see the "Creating a Mailing from a Provisional Distribution List" section of the "Sending the E-mail Blast" document.
Preparing a Permanent Distribution List
A permanent distribution list is a list that can be used many times. For instance, it can be used to send a monthly bulletin, a newsletter, information on upcoming activities, etc. It is possible to subscribe or unsubscribe from the list at all times. As opposed to the provisional distribution list, the permanent distribution list must be created prior to performing the E-mail Blast.
It is possible to create and modify permanent distribution lists in two different ways in ProDon:
- From the "Distribution list management"
- From the "Client management"
Creating or Modifying a Permanent Distribution List from the "Distribution list management"
In order for a distribution list to be ready to use for an E-mail Blast, you must first configure the distribution list, then register the clients who will be part of it.
Configuring the Distribution List
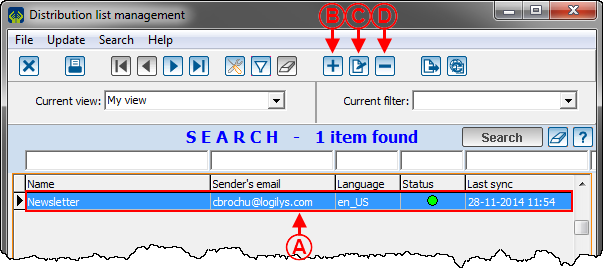
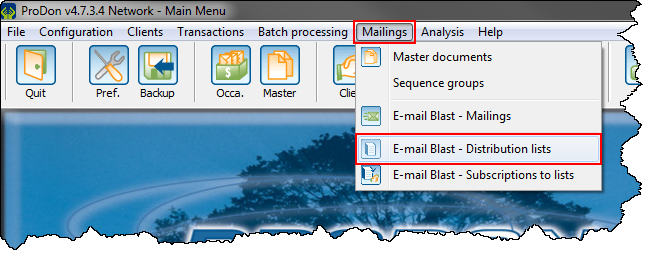
To configure the distribution list, go to the "Distribution list management".
|
To do so, click on the "Mailings" menu of ProDon's home page, then select "E-mail Blast - Distribution lists". | |
|
|
After clicking on the | |
 | |
|
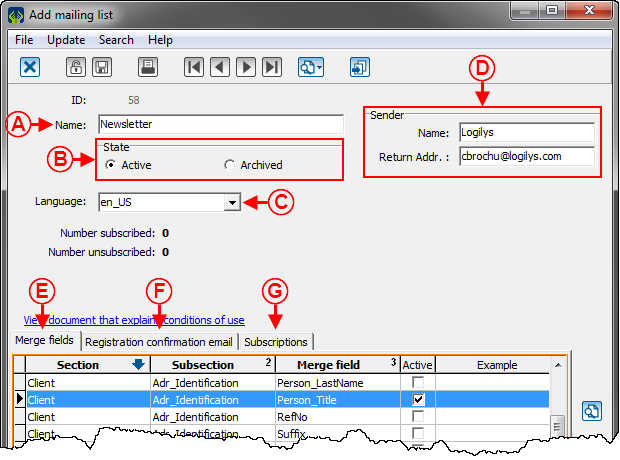
A: Name the permanent distribution list. |
B: These options allow you to activate or archive the distribution list. When a distribution list is archived, it can no longer be used for another E-mail Blast. |
|
C: Allows you to indicate the language in which the E-mail Blast will be sent. NOTE: If an E-mail Blast has to be sent both in English and in French, you will have to create two master documents (one for each language) and two distribution lists (one for each language). |
D: Enter the name and the email address of the organization or person who will receive the replies of the E-mail Blasts sent to this distribution list. |
|
E: This section allows you to configure the distribution of the distribution lists on the organization's website. This option requires configurations from Logilys; therefore, contact Logilys for more information. |
F: The "Merge fields" tab allows you to select the merge fields that will be used in the master documents sent to this distribution list. NOTE: These fields must be checked both in the master document AND in the distribution list. If they are not checked in both places, they will not be merged when mailing. |
|
G: The "Registration confirmation email" tab allows you to write the email that will be sent to the clients who subscribe to the distribution list. |
H: The "Subscriptions" tab contains the list of all the clients who subscribed to the distribution list. |
"Merge fields" Tab
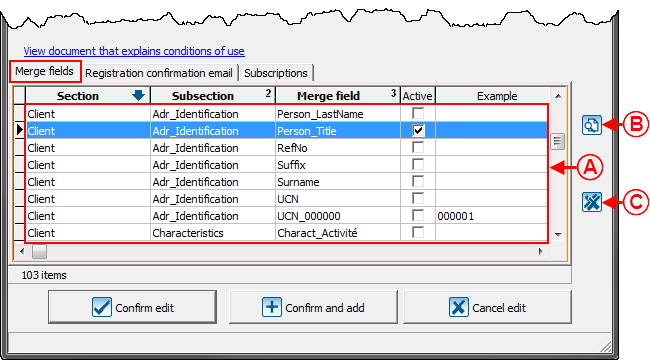
This tab allows you to select the merge fields that will be used in the master documents sent with this distribution list.
CAUTION: The fields must be checked in the master document AND in the distribution list. If they are not checked in both places, they will not be merged in the mailing.
 | |
|
A: Check the fields that have been inserted in the master documents, which will be sent with this distribution list. |
B: The |
|
C: The |
NOTE: It is important to check, at A, only the fields used in the master documents that will be sent with this distribution list; since the fields activated here can no longer be deactivated once the mailing is made. It will be possible to uncheck the fields, but they will still remain active on the mailing server website of the E-mail Blast. Moreover, all the fields checked would have to be synchronized one by one with the fields included in the master document in each mailing; which will considerably increase the time spent on sending the E-mail Blast. To deactivate the fields on the mailing server website of the E-mail Blast, contact Logilys. |
"Registration confirmation email" Tab
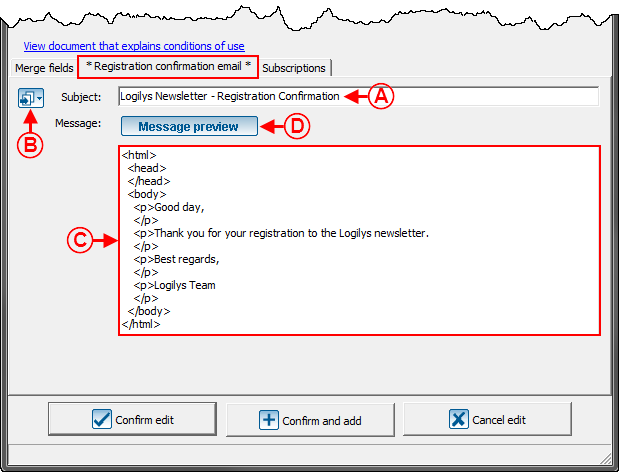
This tab allows you to write the email that will be sent to the clients who will subscribe to this distribution list.
 | |
|
A: Enter the subject of the email in this field. |
B: The NOTE: It is also possible to write the email at C, rather than importing an HTML document. |
|
C: This is the email in HTML codes. To view the email as it will be sent, click on the "Message preview" button at D, or see this section. NOTE: It is possible to import the HTML text by using the button at C or to write it directly here. |
D: The "Message preview" button allows you to display the email in HTML codes or to display the email as it will be sent. NOTE: When the email is in "Message preview" mode, it is not possible to modify it; it is only possible to view it. To write or modify the message, display the email in "Display in HTML" mode. |
|
NOTE: During the E-mail Blast training, the trainer should normally have provided you with an example of an email written in HTML codes. In the event that example has been lost or not received during the training and you wish to learn how to write an email in HTML codes, contact Logilys. | |
Confirmation Email Preview
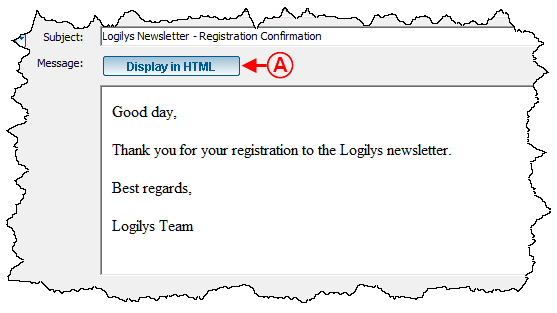
| |
|
A: When this button is in "Message preview" mode, the email is displayed as it will be sent. NOTE: However, it is not possible to modify the email in "Message preview" mode. |
"Subscriptions" Tab
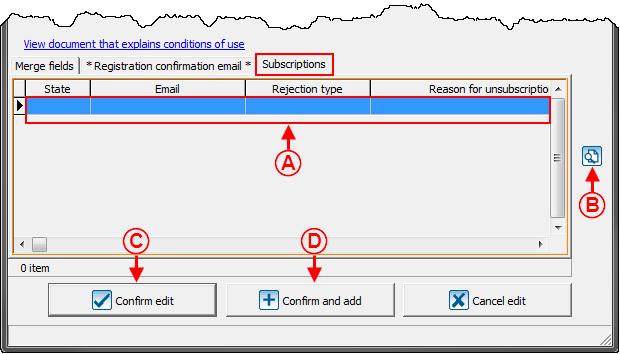
This tab allows you to view the list of clients who subscribed to this distribution list.
NOTE: To learn how to register clients to a distribution list, click here. To learn how to unregister clients from a distribution list, click here.
 | |
|
A: It is the list of all the clients who subscribed to the distribution list. In this example, no client has subscribed to the list. To learn how to add clients to the list, see this section. |
B: The |
|
C: After completing all the information of the addition or modification file of the distribution list, click on the " |
D: After completing all the information of the addition or modification file of the distribution list, click on " |
Registering Clients to a Distribution List
It is possible to register clients to a distribution in two different ways in ProDon :
IMPORTANT NOTE: It is not possible to use generic email addresses (e.g. info@..., admin@..., management@..., etc.) in a distribution list.
To see the complete list of addresses that cannot be used in a disribution list, click here.
Registering many Clients from the "Client management"
To register many clients to the distribution list at the same time, go to the "Client management".
|
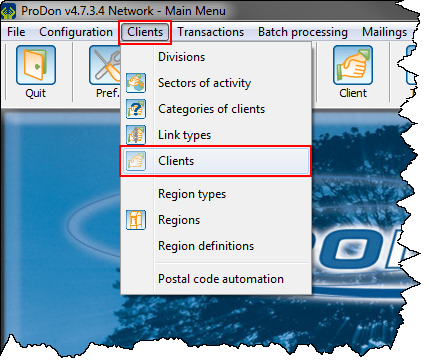
To do so, from ProDon's home page, click on the "Clients" menu, then select " | |
|
| |
|
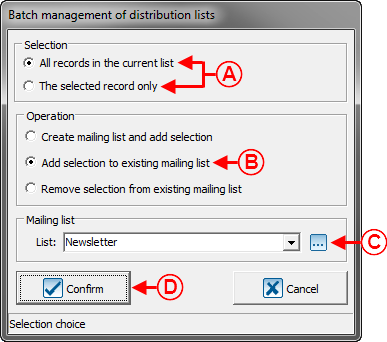
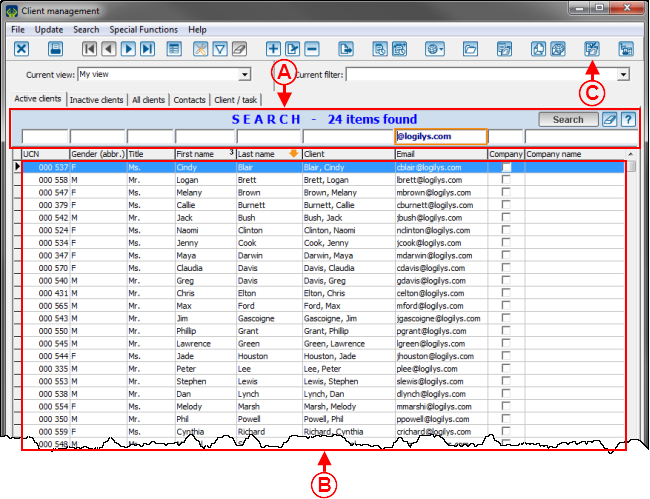
A: Search for clients who should be added to the distribution list, using the search bar. |
B: It is the current list of clients who will be added to the distribution list. |
|
C: After searching for the clients who should be part of the distribution list, click on the |
|
Registering a Client from his or her Client File
To register only one client to a distribution list, go to the "Client management", then in the client file of the client who should be registered to the list.
 | |
|
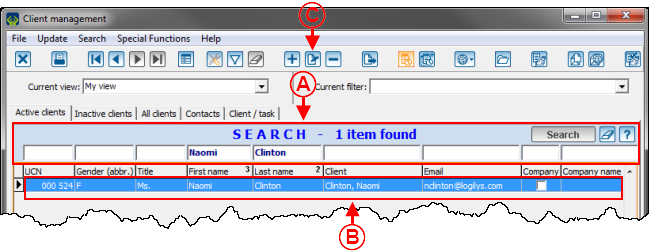
A: Search for the client you want to add to the distribution list, using the search bar. |
B: Double-click on the client to open his or her client file or select the line, then click on the |
|
C: After selecting the line at B, click on the |
|
|
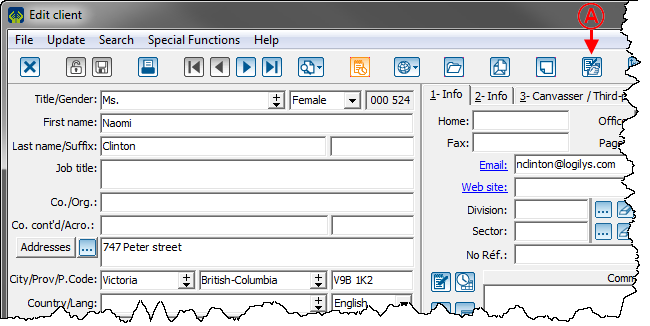
After double-clicking on the line or clicking on the | |
 | |
|
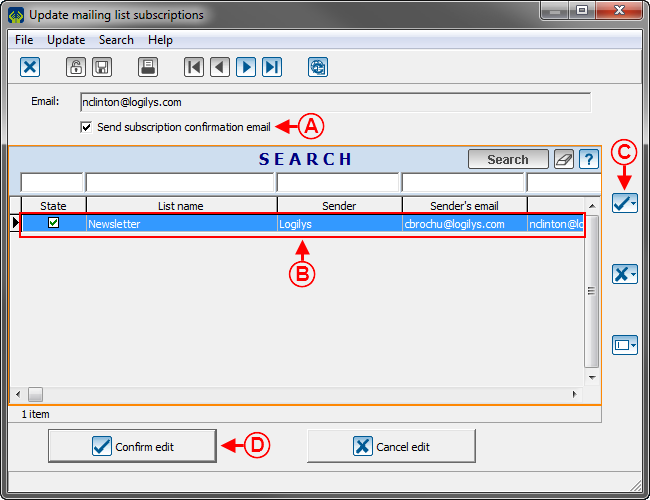
A: Click on the |
Unregistering Clients from a Distribution List
It is possible to unregister clients from a distribution list in three different ways in ProDon:
- Unregistering many Clients from the "Client management"
- Unregistering a Client from his or her Client File
- Unregistering a Client from the "Distribution list subscription management"
Unregistering many Clients from the "Client management"
To unregister many clients from the distribution list at the same time, go to the "Client management".
|
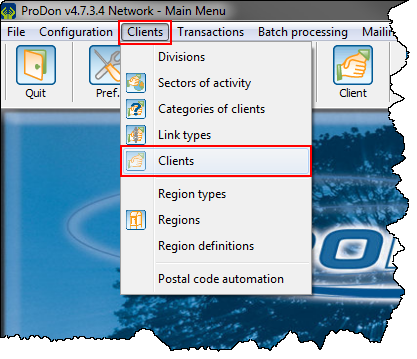
To do so, go to the ProDon's home page, click on the "Clients" menu, then select " | |
|
| |
|
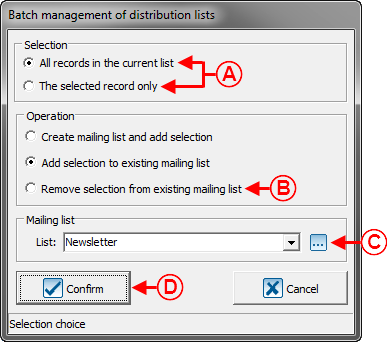
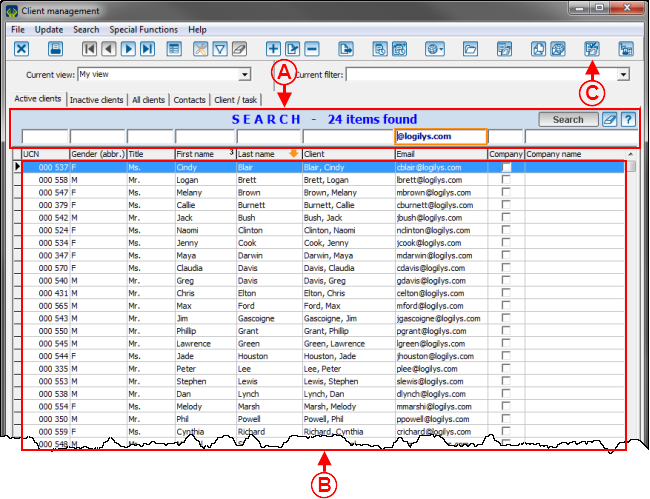
A: Search for the clients you want to remove from the distribution list, using the search bar. |
B: It is the list of clients who will be removed from the distribution list. |
|
C: After searching for the clients you want to remove from the distribution list, click on the |
|
Unregistering a Client from his or her Client File
To unregister only one client from a distribution list, go to the "Client management", then to the file of the client you want to unregister from the list.
|
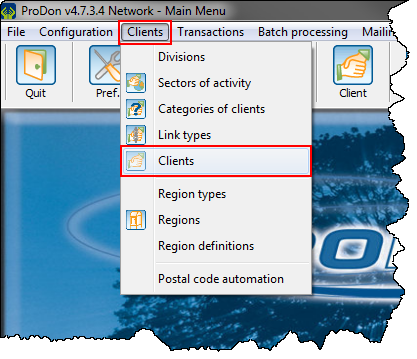
To do so, from ProDon's home page, click on the "Clients" menu, then select " | |
|
 | |
|
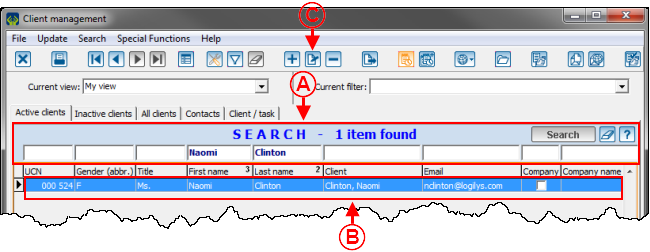
A: Search for the client you want to unregister from a distribution list using the search bar. |
B: Double-click on the client to open his or her client file or select the line, then click on the |
|
C: After selecting the line at B, click on the |
|
|
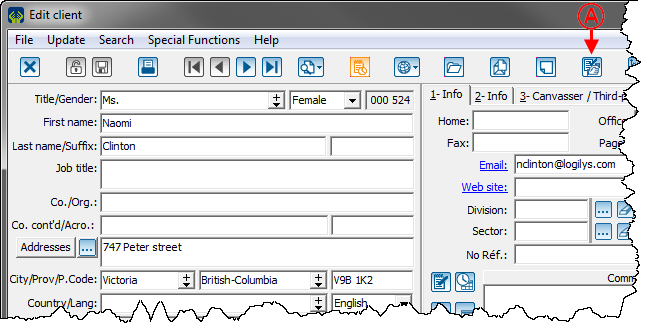
After double-clicking on the line or clicking on the | |
 | |
|
A: Click on the |
| |
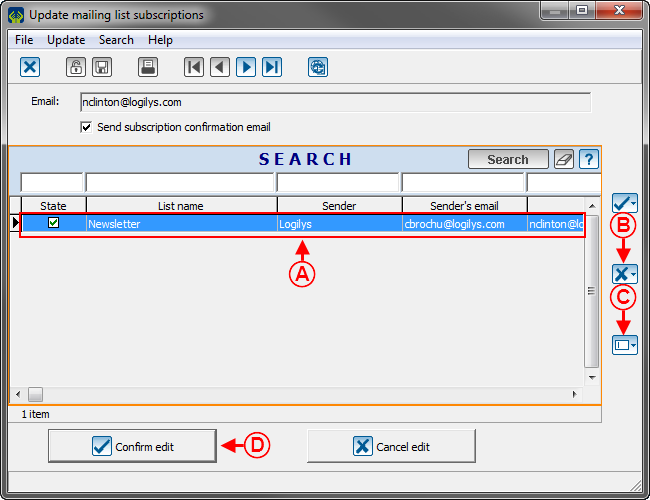
|
A: These are all the existing permanent distribution lists in ProDon. It is possible to unregister a client from a list by selecting the distribution list, then by pressing on the spacebar of the keyboard. |
B: This button allows you to unregister the client from the selected list only or from all the lists at B. After unregistering the client from at least one list, this window opens, to specify the reason of the cancellation. |
|
C: This button allows you to modify the reason of the unsubscription. |
D: After unregistering the client from all the desired lists, click on the " |
|
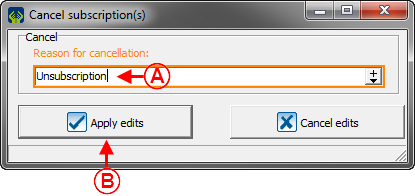
After unregistering the client from a list from this window, the following window opens to specify the reason of the cancellation. | |
| |
|
A: Enter a new cancellation reason or choose an existing one from the drop-down list. |
B: After specifying the reason of the cancellation, click on the " |
Unregistering a Client from the "Distribution list subscription management"
The second way to unregister only one client from a distribution list from the "Distribution list subscription management".
|
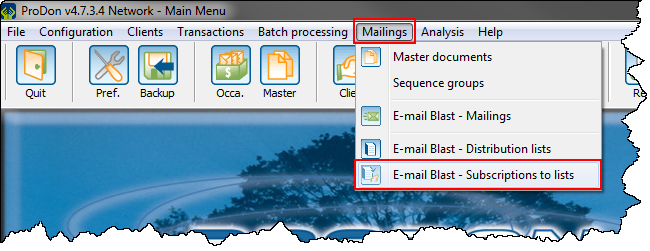
To do so, from ProDon's home page, click on the "Mailings" menu, then select " | |
|
|
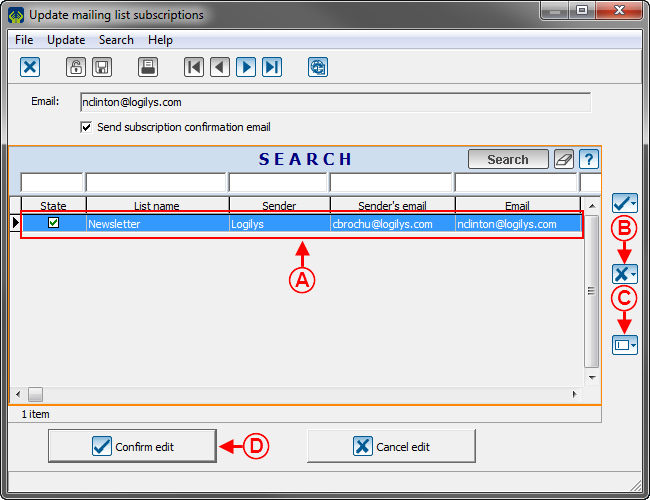
After double-clicking on the address to unsubscribe from this window, the following window opens. | |
| |
|
A: These are all the existing permanent distribution lists in ProDon. It is possible to unregister a client from a list by selecting the distribution list, then by pressing the spacebar of the keyboard. |
B: This button allows you to unregister the client from the selected list or from all the lists at B. After unregistering the client from at least one list, this window opens to specify the reason of the cancellation. |
|
C: This button allows you to modify the reason of the unsubscription. |
D: After unregistering the client from all the desired lists, click on the " |
|
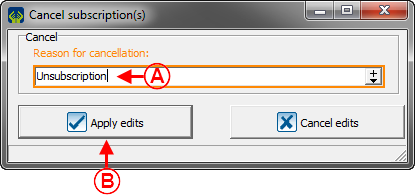
After unregistering the client from a list, from this window, the following window opens to specify the reason of the cancellation. | |
| |
|
A: Enter a new cancellation reason or choose an existing one in the drop-down list. |
B: After specifying a cancellation reason, click on the " |
Document name: ProDon:Preparing the Distribution List
Version : 4.6.7.19
